Now I am absolutely in love with these earrings, who knew that if you messed with the broomstick stitch you would get something so lovely? Now with just a glance people wont think that you crochet these, I know because I got told that. However besides folding down the broomstick part these are so easy to make!
Let me know what you guys think in the comments ^^
Lets get on with what you need!
Fine wire (tarnish resistant) – 28 or 30 gauge (the larger the gauge, the smaller the wire is, which makes it easier to work with your crochet hook however it is also easier to break if you pull it to hard) I used a 30 gauge.
Crochet hook – I used a 3/2 .10 mm hook, and a 10.00 mm for the broomstick part
Earring clasps – whichever designs that you like!
Beads – each ( 1 teardrop bead, 3 seed beads)
Wire pliers– these are not needed but make your life a lot more easy while using the end beads
Scissors – to cut the wire of course (it’s very fine so normal scissors will work)
Step 1
Put your 2 beads on seed bead first, slipknot, chain 7, slip stitch into the first chain (forming a circle).
Step 2
Turn your work, chain 1, 3 single crochet, 1 single crochet with teardrop bead, 3 single crochet again.
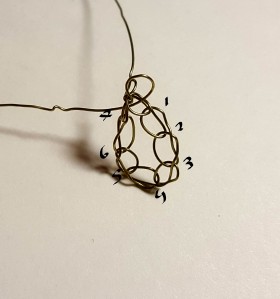
Step 3
Pull the loop that on your crochet hook and put it around the bottom of the larger hook. in the next stitch yarn over and put that loop on the larger hook. Continue so that you have 7 loops on the large crochet hook. * you want no kinks in this part on your wire*


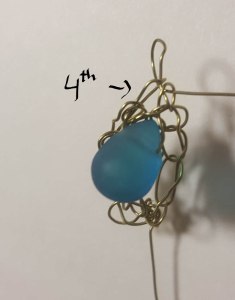
Step 4
remove the big hook, and place the smaller one where it was, chain 1 with a seed bead (you want to do this slightly tightly as that is what is keeping your broomstick together. Fasten off and weave end into bead.


Step 5
Now open up the stitch so it looks like the broomstick stitch and fold (should be towards the teardrop bead) you also want to pinch the top to make a cone shape. You are going to have to rearrange your your broomstick carefully pull on it till you get the desired shape.


Step 6
Put 2 seed beads on the starting tail and wrap around your Earring clasp, then back through the beads, around the project, cut it shorter if need and back into the beads. Note there are a lot of ways you could attach the earring this is just how I like to if you enjoy the look of something else then use it!

Repeat for the other earring
Now you should have a awesome pair of earrings!! Wonderful job!!
If you have any questions or concerns please leave a comment I will gladly answer them!
show your appreciation by liking or sharing this page!
