
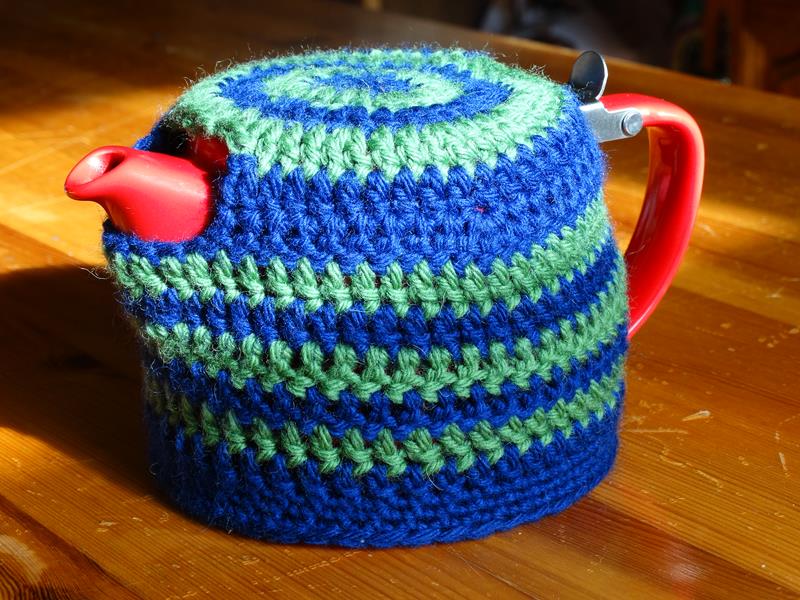
It’s been a while since I last posted on here, but today I wanted to share a free crochet pattern for a stump teapot. I searched on Ravelry and just couldn’t find one so I created a basic one and wanted to share it with you.
You’ll Need:
- ~40m of worsted weight yarn
- I used Cascade 220 in two colours (blue and green)
- 5mm hook
- Darning needle to sew the ends in
- The stump teapot you’re making the cosy for
Pattern
This pattern uses UK terminology and the chain 2’s at the start of each round don’t count as a stitch. Should fit a small teapot of size: 17cm from tip of the spout to the end of the handle, 8.5cm diameter across the top (not including spout and handle), 11cm diameter across the bottom.
Notes for colour changing: There are various options to change colour.
1) Easy way: Fasten off each round and join the new colour with a slipstitch.
2) Hard way: do a jog-less change by using the new colour to make the joining slipstitch (when working in the round) or by using the new colour to do the final part of a treble crochet – pulling a loop of the new colour through 2 remaining loops (of the previous colour) that are on the hook. Don’t fasten off and pull the yarn up to the next row that needs it. You’ll find this is easy when working in the round but when you’re not working in the round, you’ll have to go back to the start of the row to go over the top in the second colour. (I.e. two consecutive rows will start from the same end of the row). To not have random loops that will unravel, the final treble of the second row should go through the stitch as normal and also through the loop from the stitch that is waiting to start again.
I’ve done Rounds 1, 3, 5, 6, 8, 10, 12, 13, 14, 15 in blue and Rounds 2, 4, 7, 9, 11 in green.
Abbreviations (UK terminology)
Ch – chain
Dc – double crochet
Ss – slipstitch
Tr – treble crochet
Tr2tog – treble crochet two together
Round 1 – Make a magic ring, ch 2 and make 12 tr into the ring. Pull the ring tight and join with a ss. (12 tr)
Round 2 – Ch 2, make first 2 tr in the same place as join, continue round circle with 2tr in each st, join with a ss (24 tr).
Round 3 – Ch 2, make first tr in same place as join, 2 tr in next, [1 tr in next st, 2 tr in next st]. Repeat the part in [brackets] till end, join with a ss (36 tr)
Round 4 – Ch 2, make first tr in same place as join, 1 tr in next 2, 2 tr in next st, [1 tr in each of next 2 sts, 2 tr in next st]. Repeat the part in [brackets] till end, join with a ss. (48 tr)
You’ve finished the flat circle part for the top! Check it against your teapot. Add extra rounds in the same way if you’re using a bigger teapot (so the next row would be [1 tr in each of next 3 sts, 2 tr in next st] and would have 60 tr total, you’re increasing 12 sts every round to make a flat circle).
Now we need to make the holes for the spout and handle. We stop working in the round for a few rows now.
Round 5 – Ch 2, 1 tr in join, and 1 tr in each of next 18 sts. Ch 2, ss in each of next 7 sts (spout hole). Ch 2, 1 tr in each of next 18 sts. (38 tr, split over two sides – feel free to adjust the gaps to fit your teapot). Turn work.
Round 6 – Ch 2, 1 tr in each of next 9 sts (including same place as ch 2), 3 tr in next st (should be in the middle of the side), 1 tr in each of next 9 sts. Ch 7 to join up around the spout, continue along other side with 1 tr in each of next 9 sts, 3 tr in next st, 1 tr in each of next 9 sts to end. (42 tr, 7 ch). Turn work.
Round 7 – Ch 2, 1 tr in each st (including where the ch 2 is) up to chain sts. In chain sts: 1 tr, tr2tog, 1 tr, tr2tog, 1 tr. continue along other side with 1 tr in each st to end. (47 tr (including tr2tog)). Turn work.
Round 8 – Ch 2, 1 tr in each of next 21 sts (including where the ch 2 is). This should take you up to the 5 centre sts under spout hole. Tr2tog, 1 tr, tr2tog. 1 tr in each st along other of side. (45 tr) Turn work.
Rounds 9 – 11 – Ch 2, 1 tr in each st (including where the ch 2 is) (45 tr). Turn work.
Round 12 – Ch 2, 1 tr in each st (including where the ch 2 is). When reach end, make ch 4 and join into round with ss. Do not turn work.
Rounds 13 – 15 – Ch 1, 1 dc in each stitch round, join with ss.
Fasten off and weave in ends.
I hope you enjoy your teapot cosy, let me know if you find any problems by either commenting below or contacting me on Ravelry from the pattern page!
