***You can purchase an INEXPENSIVE AD-FREE PDF of this pattern on Etsy HERE! This beautifully formatted PDF includes the entire step-by-step stitch tutorial and all the construction pictures, and is a total of 10 pages including the cover page. You can also purchase a convenient kit HERE on the Lion Brand Yarn website that includes the pattern and all the luxurious Cotton Bamboo yarn needed to make this cardigan!
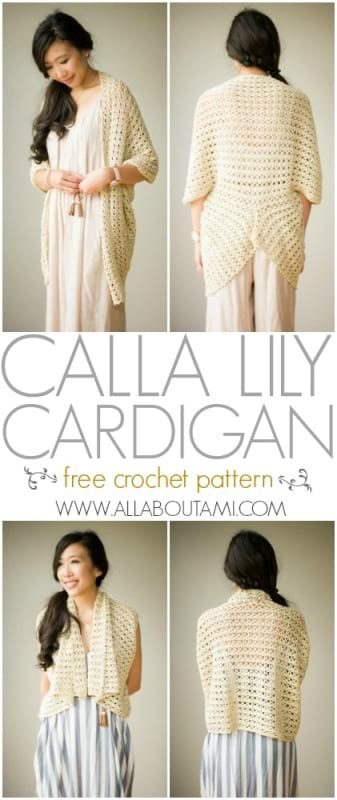
I have been wanting to design a lightweight and delicate crochet cardigan for a while now as I love wearing them over dresses and tank tops. I came across a very unique construction method while perusing a Japanese knit and crochet book, and I eagerly wanted to give it a try as it uses a basic rectangle! Any garment that starts off as a simple rectangle or square is always intriguing, and blanket sweaters continue to be very popular. This is what my beautiful cardigan looks like- continue reading to see how I made it, and keep scrolling down past all the process photos to see the full written-out crochet pattern!
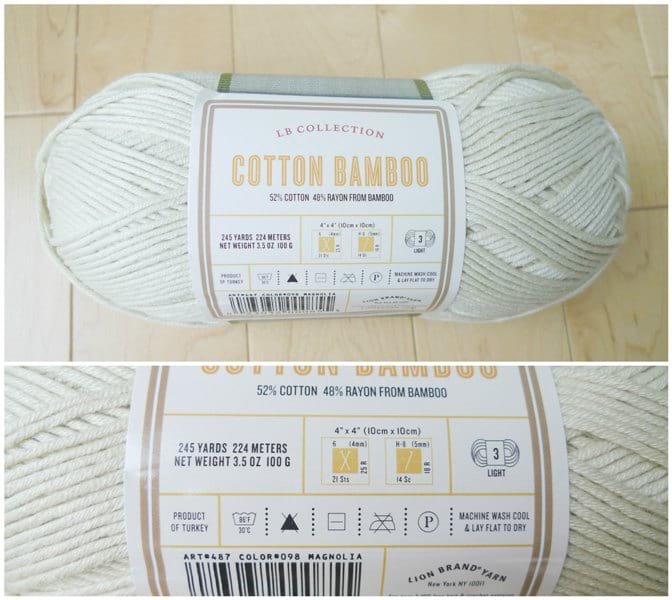
I decided to use one of my favourite lightweight, soft, and breathable yarns, Cotton Bamboo from the LB Collection– you may remember that I used this yarn in my Boho Crochet Wrap pattern from several years ago. It is classified as a light level 3 yarn and is made of 52% cotton and 48% rayon from bamboo. Each skein is 100 grams/245 yards.
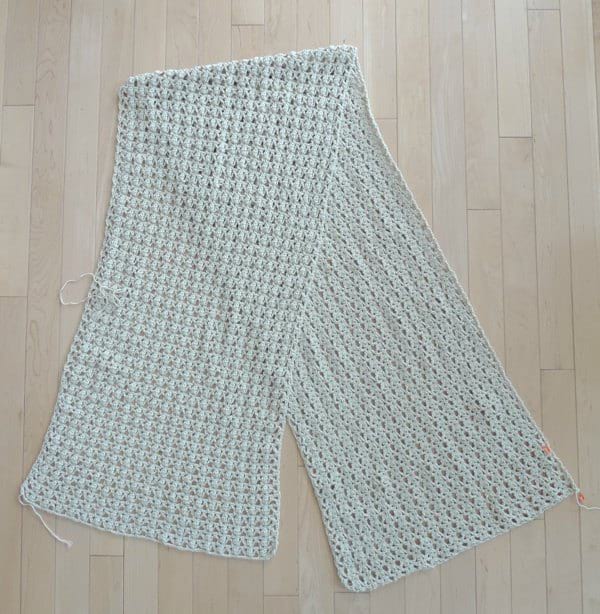
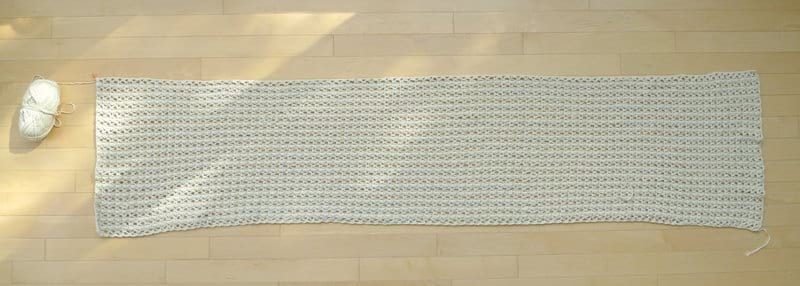
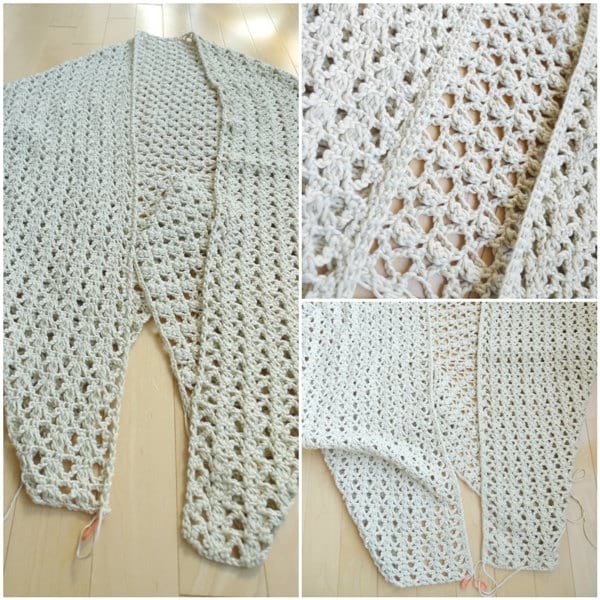
I used my 3.25 mm Clover Amour hook to crochet a long rectangle using a stitch I am calling “The Bobble Trellis Stitch“. I have written a detailed step-by-step blog post showing you exactly how to work this stitch HERE– please reference this for visual help as well as a video. After you have completed your long rectangle, you are ready to begin seaming it up into a beautiful cardigan and adding some finishing details. After completing 180 rows of the bobble trellis stitch, my rectangle measured 69″/175 cm long and 16.5″/42 cm wide.
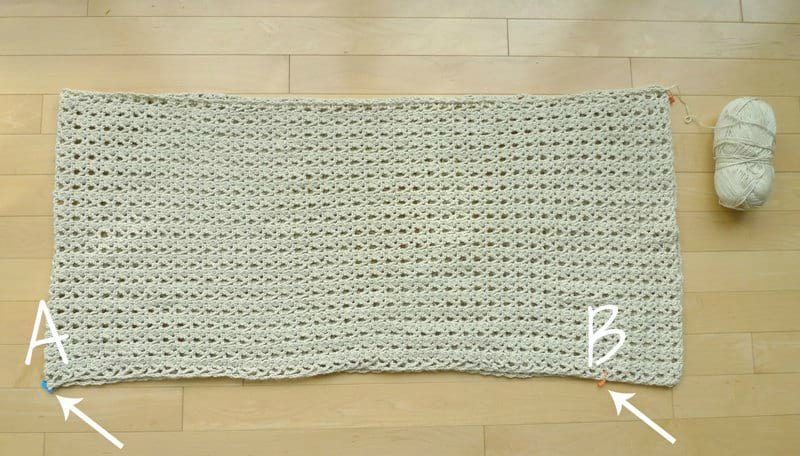
Place the rectangle in front of you so that the wrong side (more bumpy side) is facing you. This side will end up being the inside of the cardigan (it is your choice which side you prefer to be on the outside of the cardigan)!
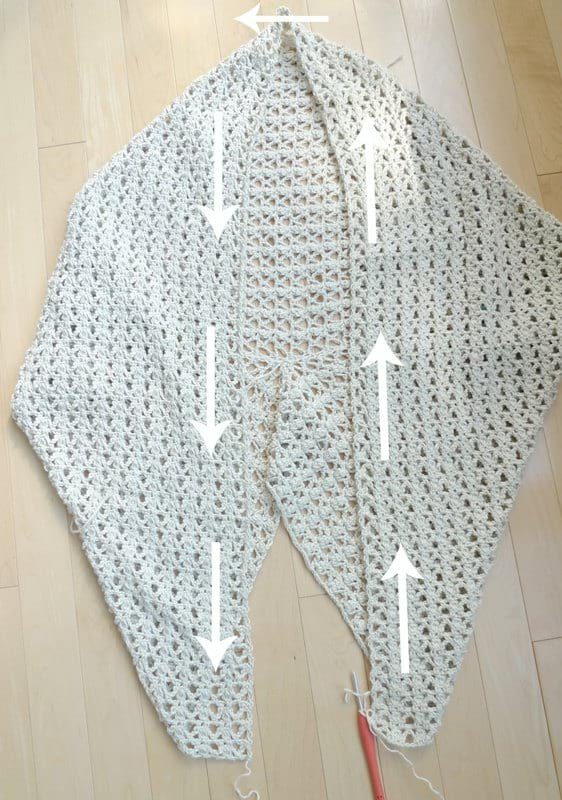
Fold the rectangle in half width wise so that the folded end is on the left side. Place a blue stitch marker (labeled A in picture below) at the bottom left corner of the rectangle on the folded side. Place an orange stitch marker (labeled B) 3.9″/10 cm away from the open side (please note the different measurements for larger sizes as stated in the pattern below). Notice that the “correct/right side” of the stitches is now facing you.
Gently unfold the rectangle by bringing A (the blue stitch marker or folded side) down towards B, the orange stitch marker.
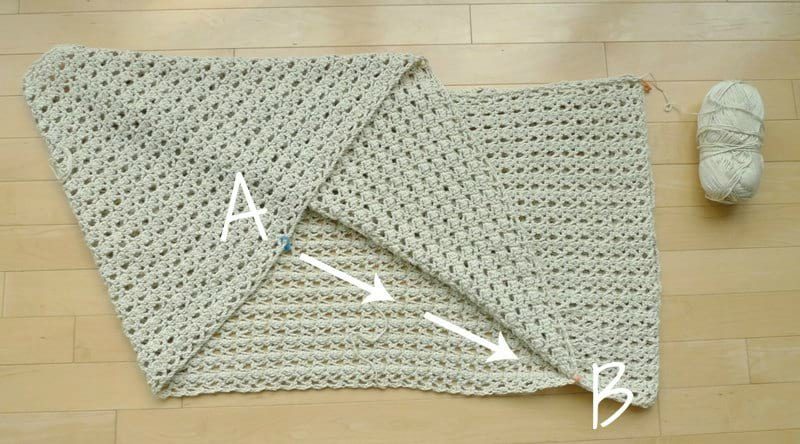
Splay the piece open as pictured below. The open sides of the rectangle are now on the bottom, and the folded side is now at the top. Keep moving A down towards B.
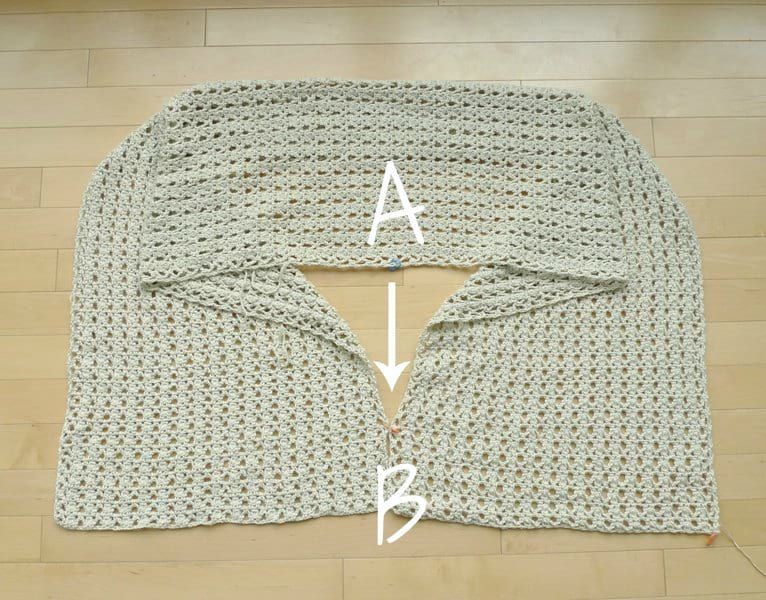
Your piece now looks like this when A and B (the blue and orange stitch markers) meet up together.
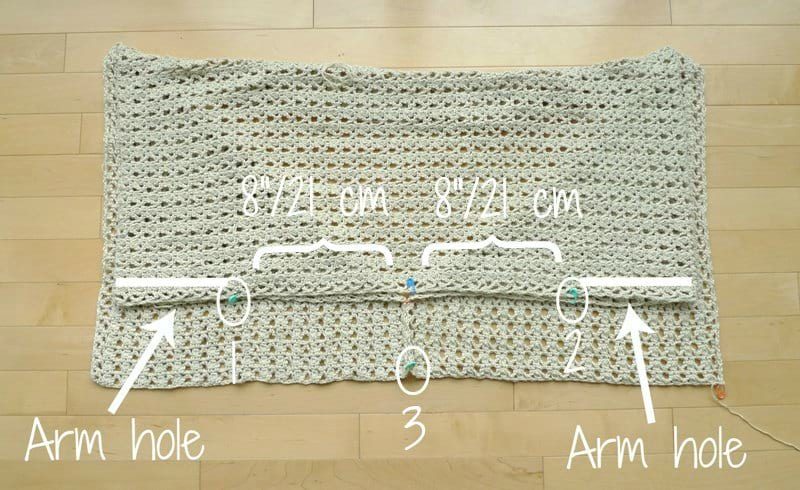
Place three green stitch markers as shown below (indicated as 1, 2, and 3): 8.3″/21 cm on either side of the blue stitch marker, and at the very bottom of the piece directly below the blue and orange stitch markers. The arm holes are the spaces shown with arrows below. Adjust as necessary if you would like larger or smaller arm holes. At this point, you can try slipping the cardigan on to see if you are liking the sizing or if you want to make any adjustments.
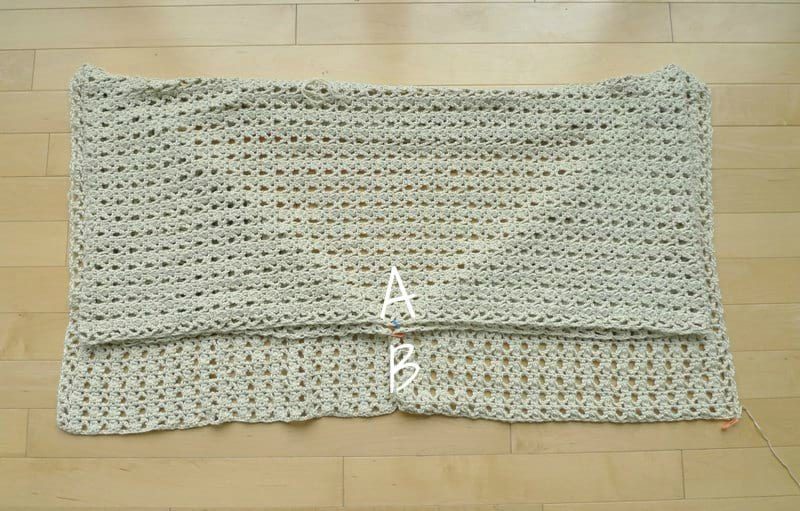
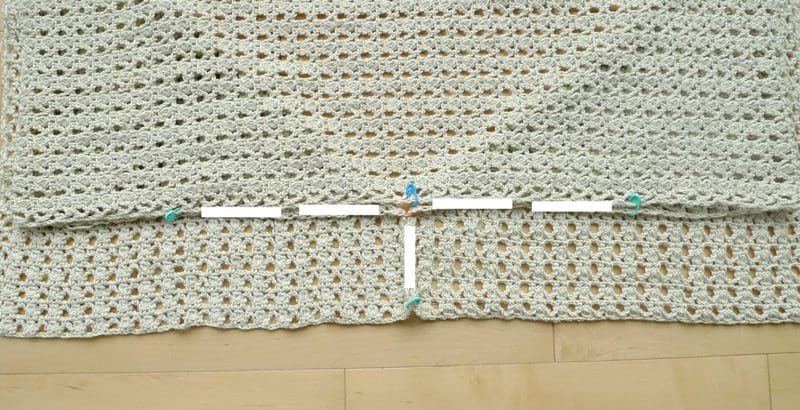
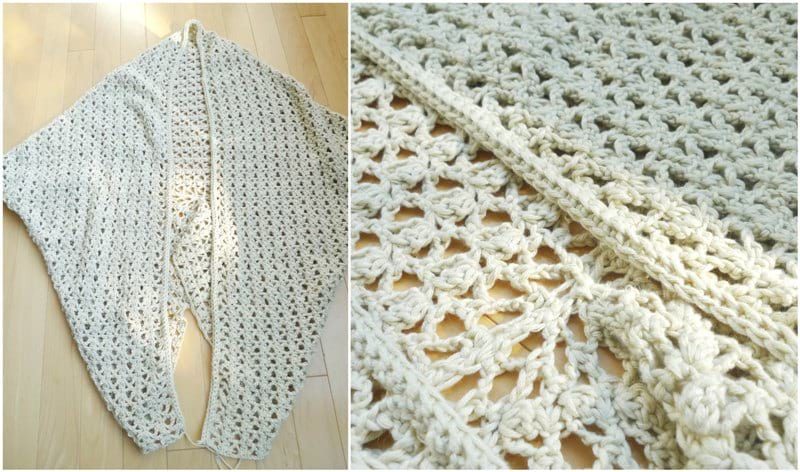
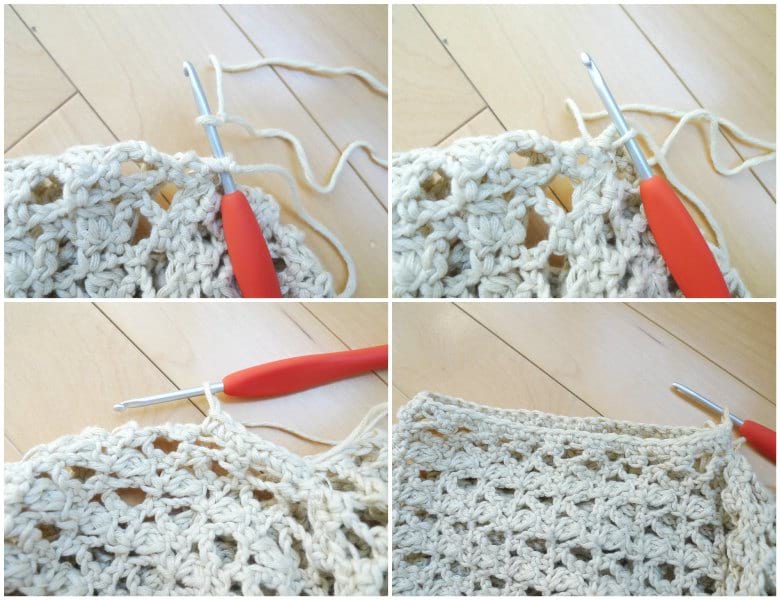
Whip stitch the T that is formed as shown below (edges between blue and green stitch markers).
Here are some process pictures showing the whip stitching with a tapestry needle. I love how there is very little seaming involved with this cardigan design!
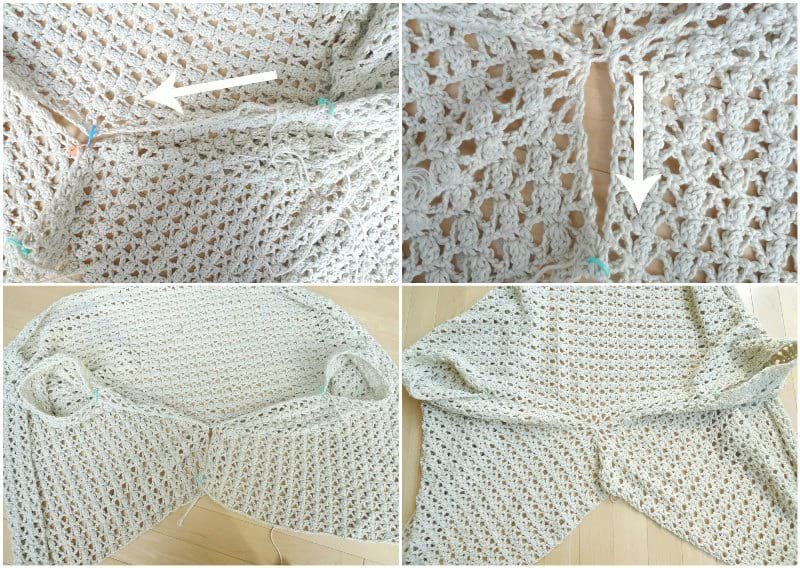
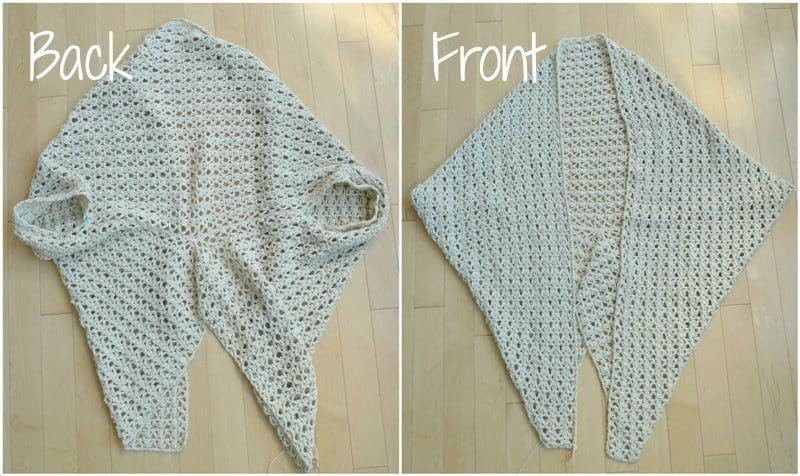
After seaming up the T, this is what the back and front views look like!
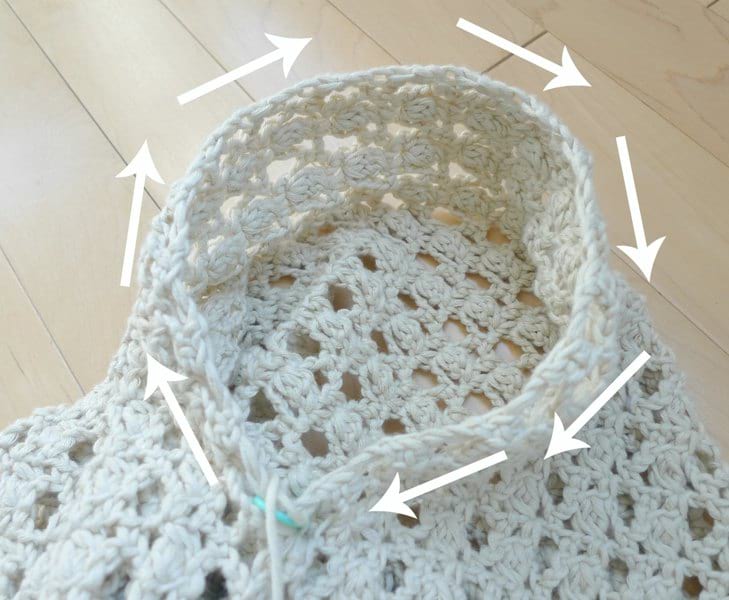
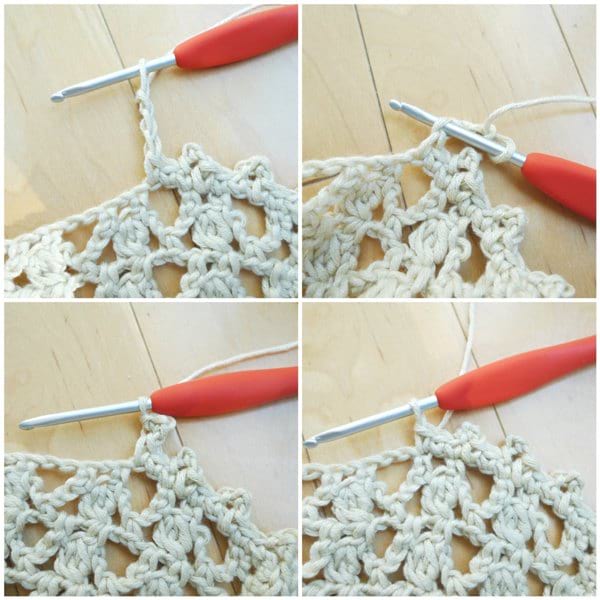
It is now time to add a more polished collar around the front opening of the cardigan. If you would like to work an odd number of rows, start at the bottom left of the cardigan (when you are looking at the cardigan). Single crochet around for the first row. Next, single crochet in the front loops only for Row 2.
I realized that I would rather work an even number of rows (two in total), so I ended up cutting the yarn and reattaching it at the bottom right corner. Single crochet around for the first row as indicated by the arrows, and then single crochet in the back loops only for Row 2.
Here is my collar after working two rows- I want the V’s of the last row to be facing outwards!
To add a more finished look to the arm hole, work one row of single crochets around as indicated below.
To pick up stitches, insert your hook in any space. Place a slip knot on your hook and pull through. Insert your hook in the next space and work a single crochet. Continue on in this manner and work one round of single crochets around the entire arm hole.
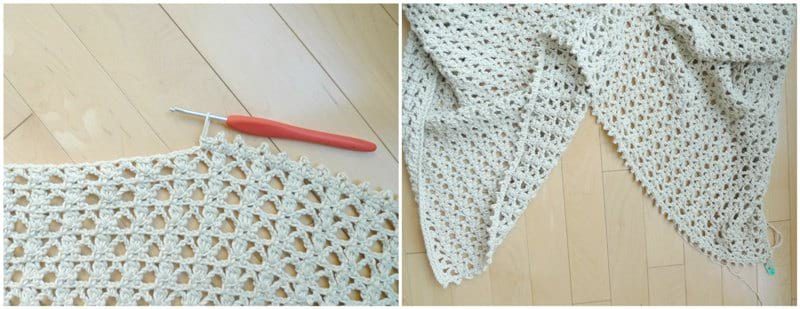
I decided to add a beautiful and delicate picot edging along the bottom of the cardigan as I did in my Boho Crochet Wrap design. Work the picot edging in the direction as indicated by the arrows below.

To work the picot edging, chain 3. Slip stitch in the first chain and then single crochet 3 in the next three stitches. Continue this pattern along the bottom of the cardigan.
I love the look of delicate picots along the bottom!
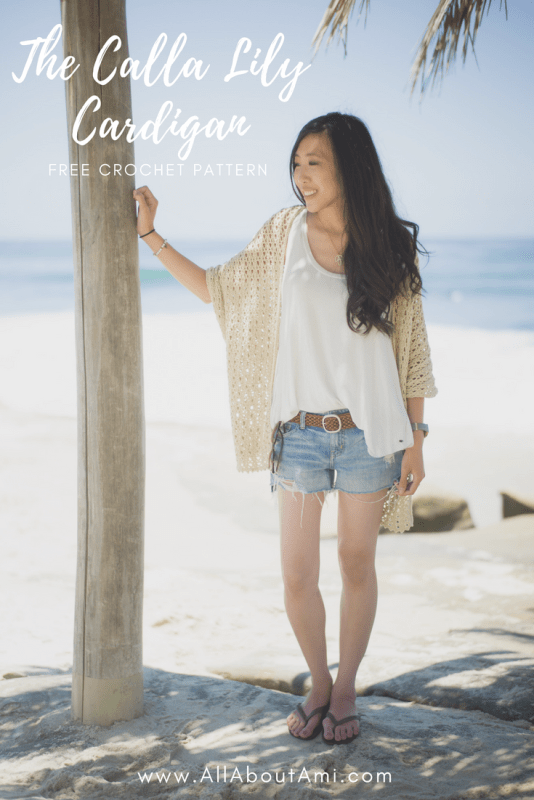
I was excited to try on my new cardigan and see how it draped! I was absolutely THRILLED when I slipped it on for the first time and saw how romantic and elegant it looked!
![]()
******************
Here is the written-up crochet pattern for the Calla Lily Cardigan:
Materials:
- LB Collection Cotton Bamboo level 3 DK lightweight yarn (see below for yardage); I used the colour “Magnolia” – 8 different colours available HERE; purchase the convenient kit available in 3 different sizes HERE!
- Clover Amour 3.25 mm crochet hook
- Yarn needle
- Lock ring stitch markers
Approximate Yardage/# of Skeins Required
- Small/Medium: 443 grams/1085 yards – 5 skeins
- Large/XL: 593 grams/1453 yards – 6 skeins
- 2X/3X: 770 grams/1888 yards – 8 skeins
Gauge: 6 arcs/bobble sets (5 sts) = 5″, 10 rows = 4″
Finished Dimensions:
- Small/Medium: 32″/81 cm wide, 34″/86 cm long
- Large/XL: 38″/96.5 cm wide, 40″/102 cm long
- 2X/3X: 44″/112 cm wide, 45″/114 cm long
Notes:
- A long rectangle is created using the bobble trellis stitch. The rectangle is then folded and seamed in a special way to create this cardigan.
- Single crochet edging is added along the collar and around the arm sleeves. A picot edging is added along the bottom.
- To calculate the bigger sizes, a ratio of the length and width of the rectangle is used.
- Initial chain length must be a multiple of 5 + 2 (e.g. 100 + 2 = 102 chains, 145 + 2 = 147 chains)
- Wear the cardigan in two different ways: with the picot edging along the bottom, or flip the garment upside down and have the picot edging along the top!
- Please reference this detailed Bobble Trellis Stitch blog post HERE to see step-by-step photos as well as a video!
Special stitches:
Bobble
1. Yarn Over (YO), insert hook in next stitch, YO, pull up a loop, YO, pull through two loops.
2. (YO, insert hook in same stitch, YO, pull up a loop, YO, pull through two loops) two times.
3. YO, and draw through all 4 loops on hook.
PATTERN:
*Rectangle:
Chain 97 (112, 127).
Row 1: Starting in 2nd chain from hook, Sc 2. *Ch 5, Skip 2, Sc 1. Ch 1, Skip 1, Sc 1.*, rep until 4 sts remain. Chain 5, Skip 2, Sc 2. (19, 22, 25 arcs)
Row 2: Chain 4, turn work. *Sc 1 in 3rd chain of Chain 5. Chain 2, Work bobble in Chain 1, Ch 2.* rep until you reach last Chain 5 space. Sc 1 in 3rd chain of last Chain 5 space. Ch 2, Skip 1 sc from row below, Dc in last st.
Row 3: Chain 1, turn. Sc 2 (from dc below and 1 chain stitch). *Ch 5, Skip 3. Sc 1 (st to the right of the bobble from row below), Chain 1, Skip 1 (the bobble from row below), Sc 1 (st to the left of the bobble from row below)*, rep until there are no more bobbles from row below. Chain 5. Sc 2 in 2nd and 3rd chain from Ch 4.
Row 4-180 (208, 238): Repeat Rows 2 and 3. (End off with the Row 2 pattern.)
Resultant rectangle is:
- Small/Medium: 16.5″/42 cm wide and 69″/175 cm long
- Large/XL: 19″/48.5 cm wide and 80″/203 cm long
- 2X-3X: 22″/55.4 cm wide and 91″/231 cm long
See the Bobble Trellis Stitch in action with my video below:
* Construction: Follow the step-by-step instructions above. Here is the text written out:
– Place the rectangle in front of you so that the wrong side (more bumpy side) is facing you. This side will end up being the inside of the cardigan (it is your choice which side you prefer to be on the outside of the cardigan)!
– Fold the rectangle in half width wise so that the folded end is on the left side. Place a blue stitch marker (labeled A) at the bottom left corner of the rectangle on the folded side. Place an orange stitch marker (labeled B) 3.9″/10 cm (4.6″/11.6 cm, 5″/13 cm) away from the open side. Notice that the “correct/right side” of the stitches is now facing you.
– Gently unfold the rectangle by bringing A (the blue stitch marker or folded side) down towards B (the orange stitch marker).
– Splay the piece open so that the open sides of the rectangle are now on the bottom, and the folded side is now at the top. Keep moving A down towards B.
– Place three green stitch markers along the edges as follows: 8.3″/21 cm (9.4″/24 cm, 10.9″/27.7 cm) on either side of the blue stitch marker, and at the very bottom of the piece directly below the blue and orange stitch markers or A/B. The arm holes are the spaces from the side green stitch markers to the outer edges. Adjust as necessary if you would like larger or smaller arm holes.
– Whip stitch the T that is formed (edges between blue and green stitch markers).
* Collar:
Note: If you want to do an odd number of rows, start on left side of collar (when you are looking at the cardigan).
R1: Pick up stitches and single crochet around collar.
R2: Chain 1, turn. Sc in front loops only.
If desired, continue adding rows, e.g. R3: Chain 1, turn. Sc in back loops only. Alternate rows in front and back loops only.
If you want to work an even number of rows (as I did), start on right side of collar.
R1: Pick up stitches and single crochet around collar.
R2: Chain 1, turn. Sc in back loops only.
* Sleeve Edging:
Pick up stitches around arm hole and work 1 round of single crochets. To pick up stitches, insert your hook in any space. Place a slip knot on your hook and pull through. Insert your hook in the next space and work a single crochet. Continue on in this manner and work one round of single crochets around the entire arm hole.
* Bottom Edging:
Add picot edging along bottom edge.
Position cardigan so that it is upside down and the back is facing you. Start at right side of cardigan and work towards the left side. *Ch 3, Sl st in 1st chain, Sc 3 in next 3 sts* rep long bottom edge. Fasten off and weave in end.
**********************************
The Calla Lily Cardigan is so romantic with its drape and beautiful picot detailing! I love how the stitches run up and down in the front of the design and how they run horizontal along the back. The way the back curves together gives such an interesting shape as well. When I was thinking of a suitable name for this design, I tried to play up the trellis or garden aspect of it since the stitch used is called the Bobble Trellis Stitch. I love alliteration, so I looked up names of flowers that start with the letter “C”, and “Calla Lily” immediately jumped out at me! I thought the name “Calla Lily Cardigan” had a lovely ring to it as it rolled off the tongue. We attended a wedding the next day and I wore my crochet cardigan over a floral dress to the ceremony- I knew the name was meant to be when I saw all the bouquets and boutonnieres were calla lilies!
![]()
Another amazing feature of the Calla Lily Cardigan is that you can actually wear it TWO DIFFERENT WAYS! When you flip the garment upside down so that the picot edging is now running along the top, the piece becomes an adorable shrug that drapes beautifully in the front!
![]()
As you can see, the shrug is short-sleeved (love how it peaks towards the top of the arm holes) and the back is shorter as well. This garment is so versatile since it can be worn in these different ways depending on what style you want!
![]()
We went on a family vacation to San Diego in late May/early June, and I finished the Calla Lily Cardigan just in time so that I could wear it on our trip! I always need to bring a cardigan for chilly nights, and I loved wearing my cardi along the breezy La Jolla shoreline. I love how you can either dress up this piece and wear it to a wedding, or wear it casually with jeans and a tank top as I did at the beach!
![]()
It’s amazing how this garment can be created from a simple rectangle when you fold and seam it in such a special way! Keep in mind that you won’t have full range of your arms due to the construction and seaming at the back, so I wouldn’t attempt to play tennis wearing this cardigan haha. I hope you are excited to make your own romantic cardigans and sport these all year-round, particularly those of you who live in very warm and tropical climates and are not in need of chunky sweaters, hats, and scarves (I’m thinking of you, my California friends!)!
![]()
Follow along with me on my crochet and knit journey by subscribing to my e-mail newsletter HERE! I love sharing my new designs with you all and showing you what I am working on. Don’t forget that you can purchase the ad-free PDF of the Calla Lily Cardigan in my Etsy shop HERE and on Craftsy HERE. The PDF is 10 pages and contains the whole step-by-step stitch tutorial and the whole construction process so you can choose what you want to print out! The Lion Brand Yarn kit can be purchased HERE! Thank you for following along with me as I try out new techniques- I greatly appreciate your support, everyone!
{This post is sponsored by Lion Brand Yarn! I’ve loved working with their yarn throughout the years and I’m thrilled that I get to collaborate with them every month!}
This pattern is an original pattern by Stephanie Lau of All About Ami. Please do not claim this pattern as your own. If you wish to share this pattern, you may link to this pattern but please do not reprint it on your site. You may keep a copy for your own personal use but please DO NOT sell the pattern or distribute it.
You may sell products made from this pattern but please clearly credit the design to me, Stephanie Lau of All About Ami, and provide a link to my blog www.AllAboutAmi.com. Permission is NOT granted for mass production or factory manufacturing of any kind. Thank you for being respectful and for your understanding!