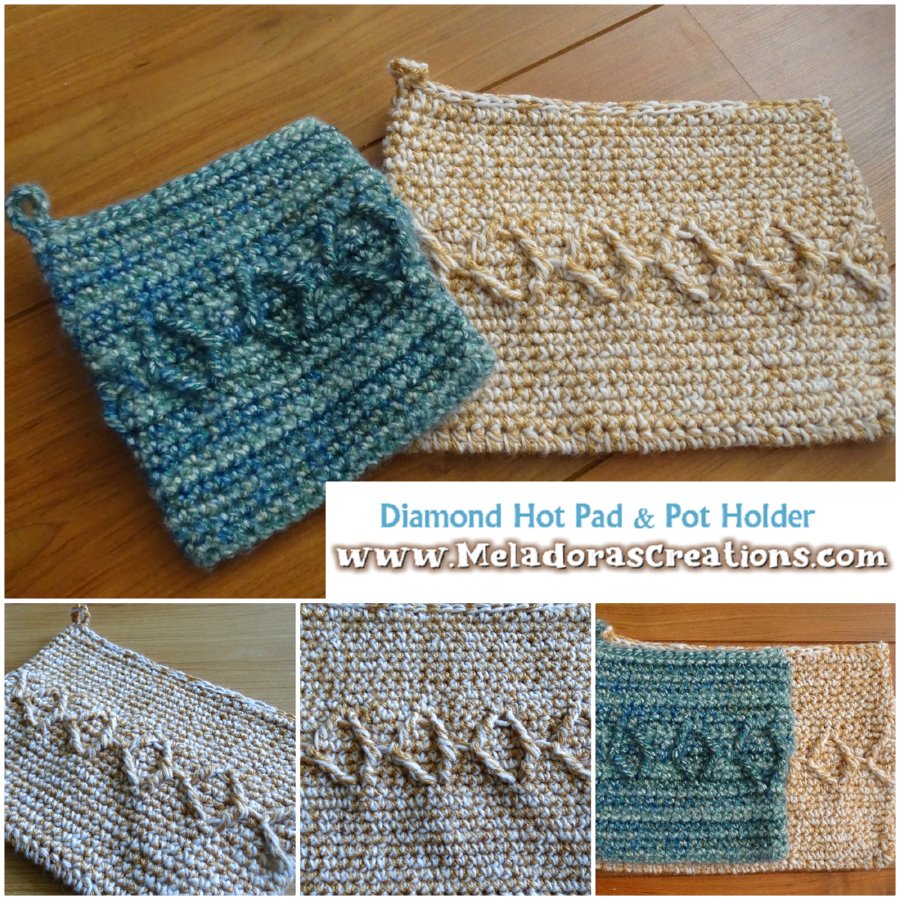
I love these Diamond Crocheted Pot Holders and crocheted Hot Pad because they are so easy to make and are great for a quick crochet project or gift. Plus it’s a great stash buster pattern
Find more crochet patterns here on the category Crochet for the Home
Be sure to sign up for my email so you can always be update date with the free patterns I release as they come out! https://www.meladorascreations.com/sign-up-for-newsletter/
Diamond Hot Pad & Pot Holder– Free Crochet pattern
This page contains affiliate links

For this project you will need:
HOOK: 5 mm hook or size H hook for the US
YARN: I used two skeins of Ice yarns’s Mirella Blue Shades which you can find here or use worsted weight yarn, 4 ply US, 10 ply AU or feel free use 3 Ply yarn which is 8 ply for AU this pattern is pretty flexible. Just be sure to use 2 skeins worked in tandem.
You’ll also need a stitch marker
ABBREVIATIONS
(click on link to find tutorials)
ch = Chain
sl st = Slip Stitch
st = Stitch
sk = Skip
beg = beginning
YO = Yarn Over
SC = Single Crochet
HDC = Half Double Crochet
TRC = Triple crochet
Repeat what’s in between * for rest of round.

If you haven’t yet, take a moment to subscribe to my videos on YouTube to have easy access to all my videos and playlist @meladora1 on YouTube
![]()
PDF Pattern with Pictures
You can find the PDF version of my pattern with pictures on Ravlery Or my shop on Etsy. Thank you very much for all you do to support my channel.
Remember to sign up for my email so you can always be update date with the free patterns I release as they come out! https://www.meladorascreations.com/sign-up-for-newsletter/
Be sure to come to my Facebook Page where I share free pattern links Daily!

THE TUTORIALS:
I don’t have a tutorial for this project but I do have a video tutorial teaching the Diamond Stitch Crochet here.
Also if you’re new to pocket crocheting like this, then I invite you to check out this Pocket Crochet Ideas – Great crochet Summer Projects here.
If you haven’t yet, take a moment to subscribe to my videos on YouTube to have easy access to all my videos and playlist @meladora1 on YouTube
This stitch is done in multiples of 4 + 1
To Start: Using 2 strands of yarn.
Ch 33 for Hot pad (HP) and Ch 22 for Pot Holder (PH)
Row 1
HDC in 2nd ch from the hook and in all 32 sts (HP) or 21 sts (PH). I did not do a row of HDC for my Potholder only for the Hot Pad. When you end the end of the row, we’ll continue our row but we’ll be using the bottom’s of our sts. So pivot your work and continue to HDC into all 32\21 bottom sts. Place marker at beginning st. You should have 64 sts (HP) \ 40 sts (PH) total. Ch 1
Working in one continues row now. From marker to marker.
Rows 2 – 12
sc in 1st st and in all 64 sts (HP) \ 40 sts (PH) total.
Row 13
Now keep in mind that your beginning stitch has moved diagonally, so find your marked beginning stitch and trace it up to the first st on your current row. Place marker here if you want, but our real target is to place a marker on the beginning st 3 rows down.
Once you have it marked let’s continue.
SC in first 2 sts as normal. *Now we are going to be grabbing post’s from the sc’s 3 rows down to make our diamond pattern, so find your 3rd row down that you marked YO twice and grab up the post of the 1st sc and TRC onto it. Then SC in the next 4 sts. Now we’ll be making our next TRC.
Working 3 rows down again, we’ll be using the following sc to the one we used last time, to make our next TRC. The two TRC attachments will always be side by side 3 rows down for our diamonds. Once you have your TRC done you need to immediately make your next TRC, so yarn over twice and counting from our last TRC connection 3 rows down, skip 4 sts and in the 5th crochet your TRC. Then skip 2 sts on your current row and sc 4 sts.* repeat for row.
Row 14
sc in all sts. When you come up to the TRC sections, I went through both the TRC st along with the SC behind it for those 2 sts. You don’t have to but I think it looks better. Just be sure that at the end of this row that you have the same amount of stitches that you started with. We started this with 64 sts (HP) \ 40 sts (PH) so we should have 64 sts (HP) \ 40 sts (PH) on this row, if you don’t then back up and do a few sc decreases until you do. Move your marker up to beginning of row.
Rows 15 and 16
sc in all 64 sts.
Row 17 – Second half of diamond
sc in next 2 stitches from beginning st. TRC using the sc stitch above your previous TRC 3 rows down, *then immediately start your next TRC and counting over 4 sts from your last connected TRC that you just did, attach your TRC on the 1st SC of your point. Remember we did our two TRC’s worked side by side before on row 14, we’ll be using the SC’s above those two TRC’s. So attach your new TRC onto the first SC then skipping 2 stitches on your current row and SC in the next 4 sts. TRC onto the next SC 3 rows down.*
Repeat for round until you reach your marker again.
Row 18
Take your time when doing this first row of SC’s. When you come to a peak area I went through the TRC stitch and the corresponding SC behind it. Continue to sc in all sts. We started this with 64 sts so we should have 64 sts on this row, if you don’t then back up and do a few sc decreases until you do. Move your marker up to beginning of row.
Rows 19 and 24
sc in all 64 sts (HP) \ 40 sts (PH)
Row 25
HDC in all sts.
For row 26 we’re going to be closing our Hot Pad \ Pot holder.
I used a simple slip stitch to close mine. Make sure you make your slip stitches loose enough so that it doesn’t pull the row tighter. Do your best to crochet loose and evenly down your row, going under all 4 loops. Once you get to the end of the row you can do a chain of 8 and slip stitch to the ending stitch to create a loop for hanging. Ch 1 and cut your yarn. Hide your tail.
Remember to sign up for my email so you can always be update date with the free patterns I release as they come out! https://www.meladorascreations.com/sign-up-for-newsletter/
This pattern is brought to you by www.meladorascreations.com
You can sell any item made from this pattern and link back to my page or videos, but you do not have permission to copy and paste my pattern anywhere online. ©Copyright 2021, All Rights Reserved
~~~~~~~~~PLEASE READ BELOW!~~~~~~~~~~
If you’d like to see my channel stay and grow, please consider becoming a patron.
Or you could make a one time donation through PayPal. Thank you so much for your support! God Bless!