Minecraft Bookshelf Kindle/Tablet Sleeve

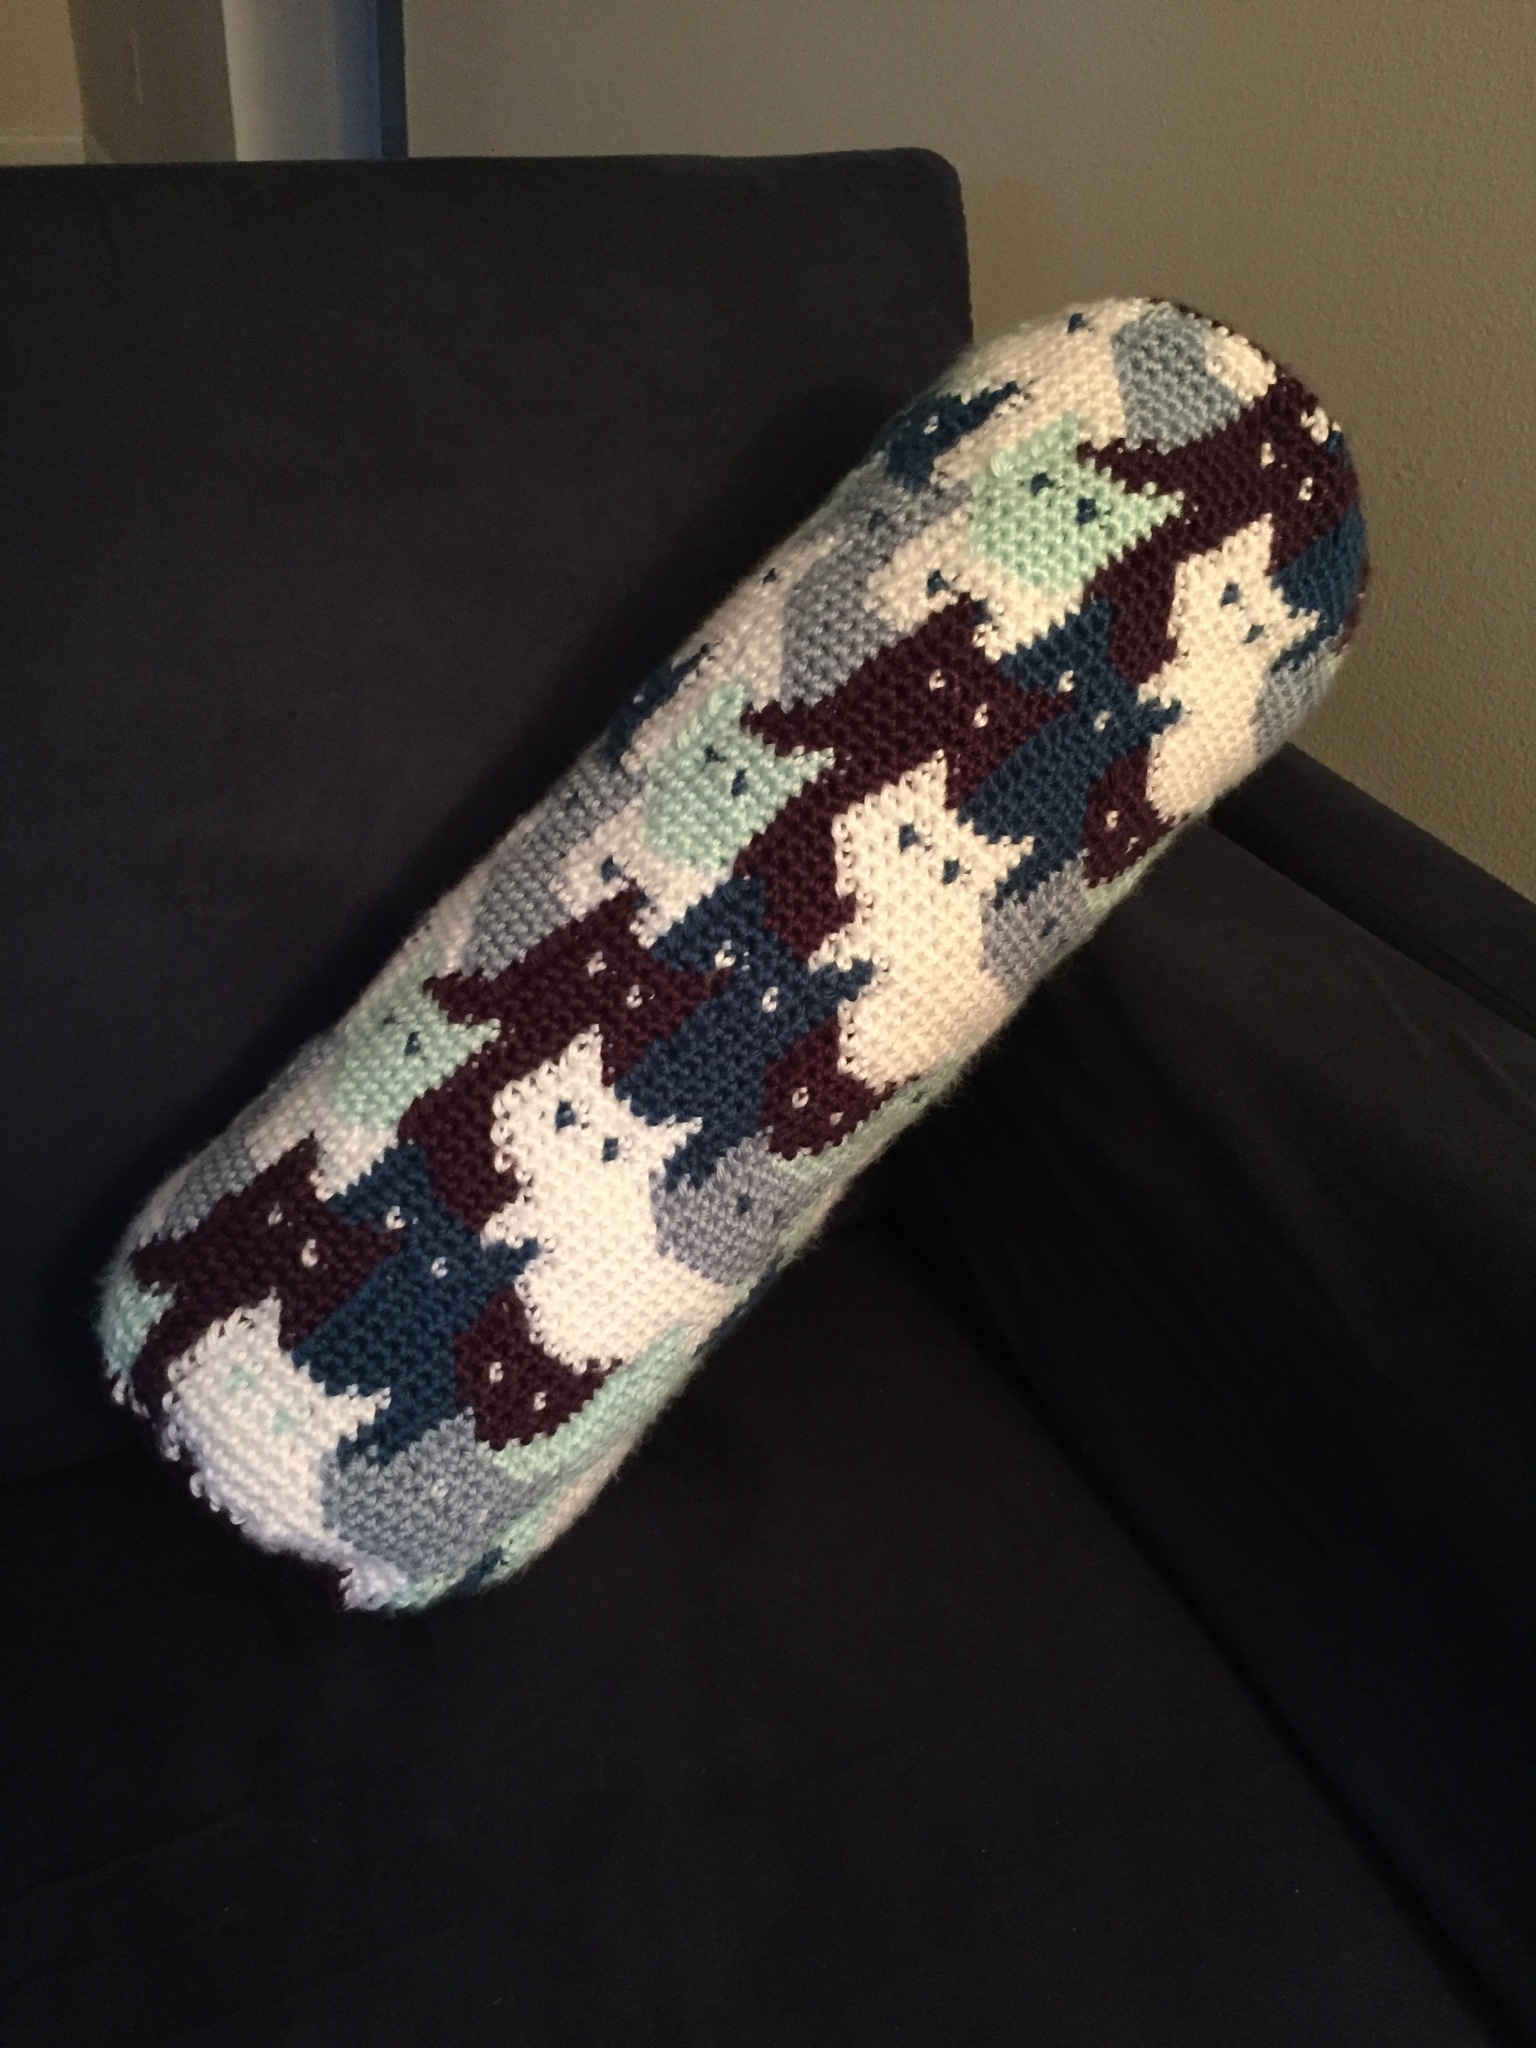
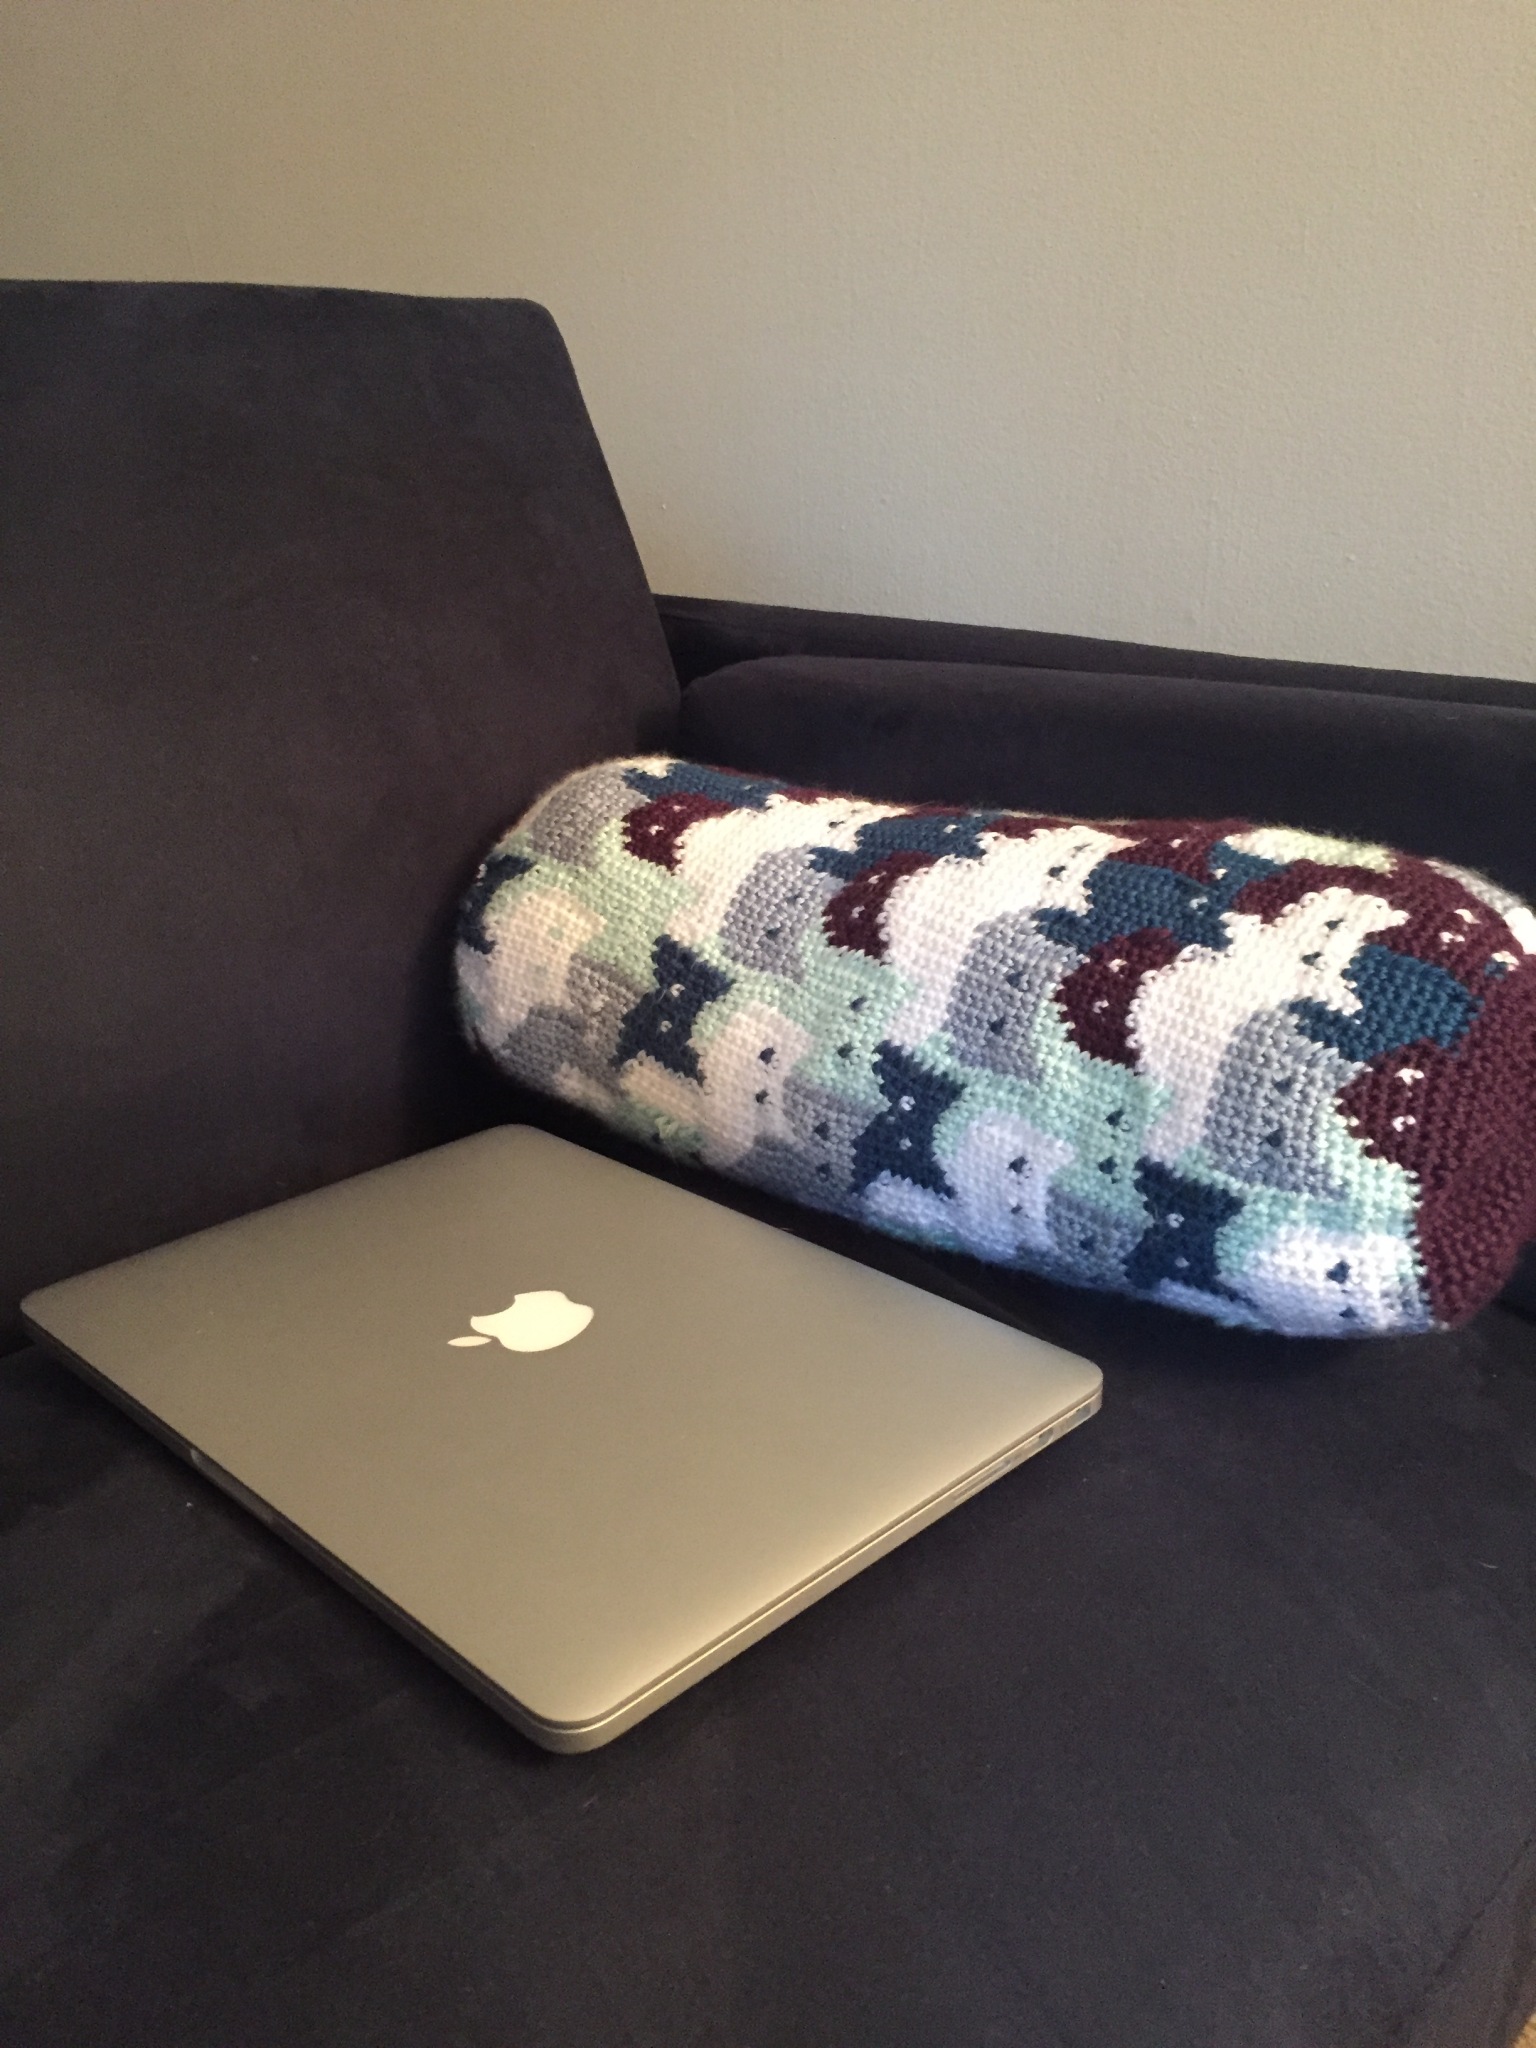
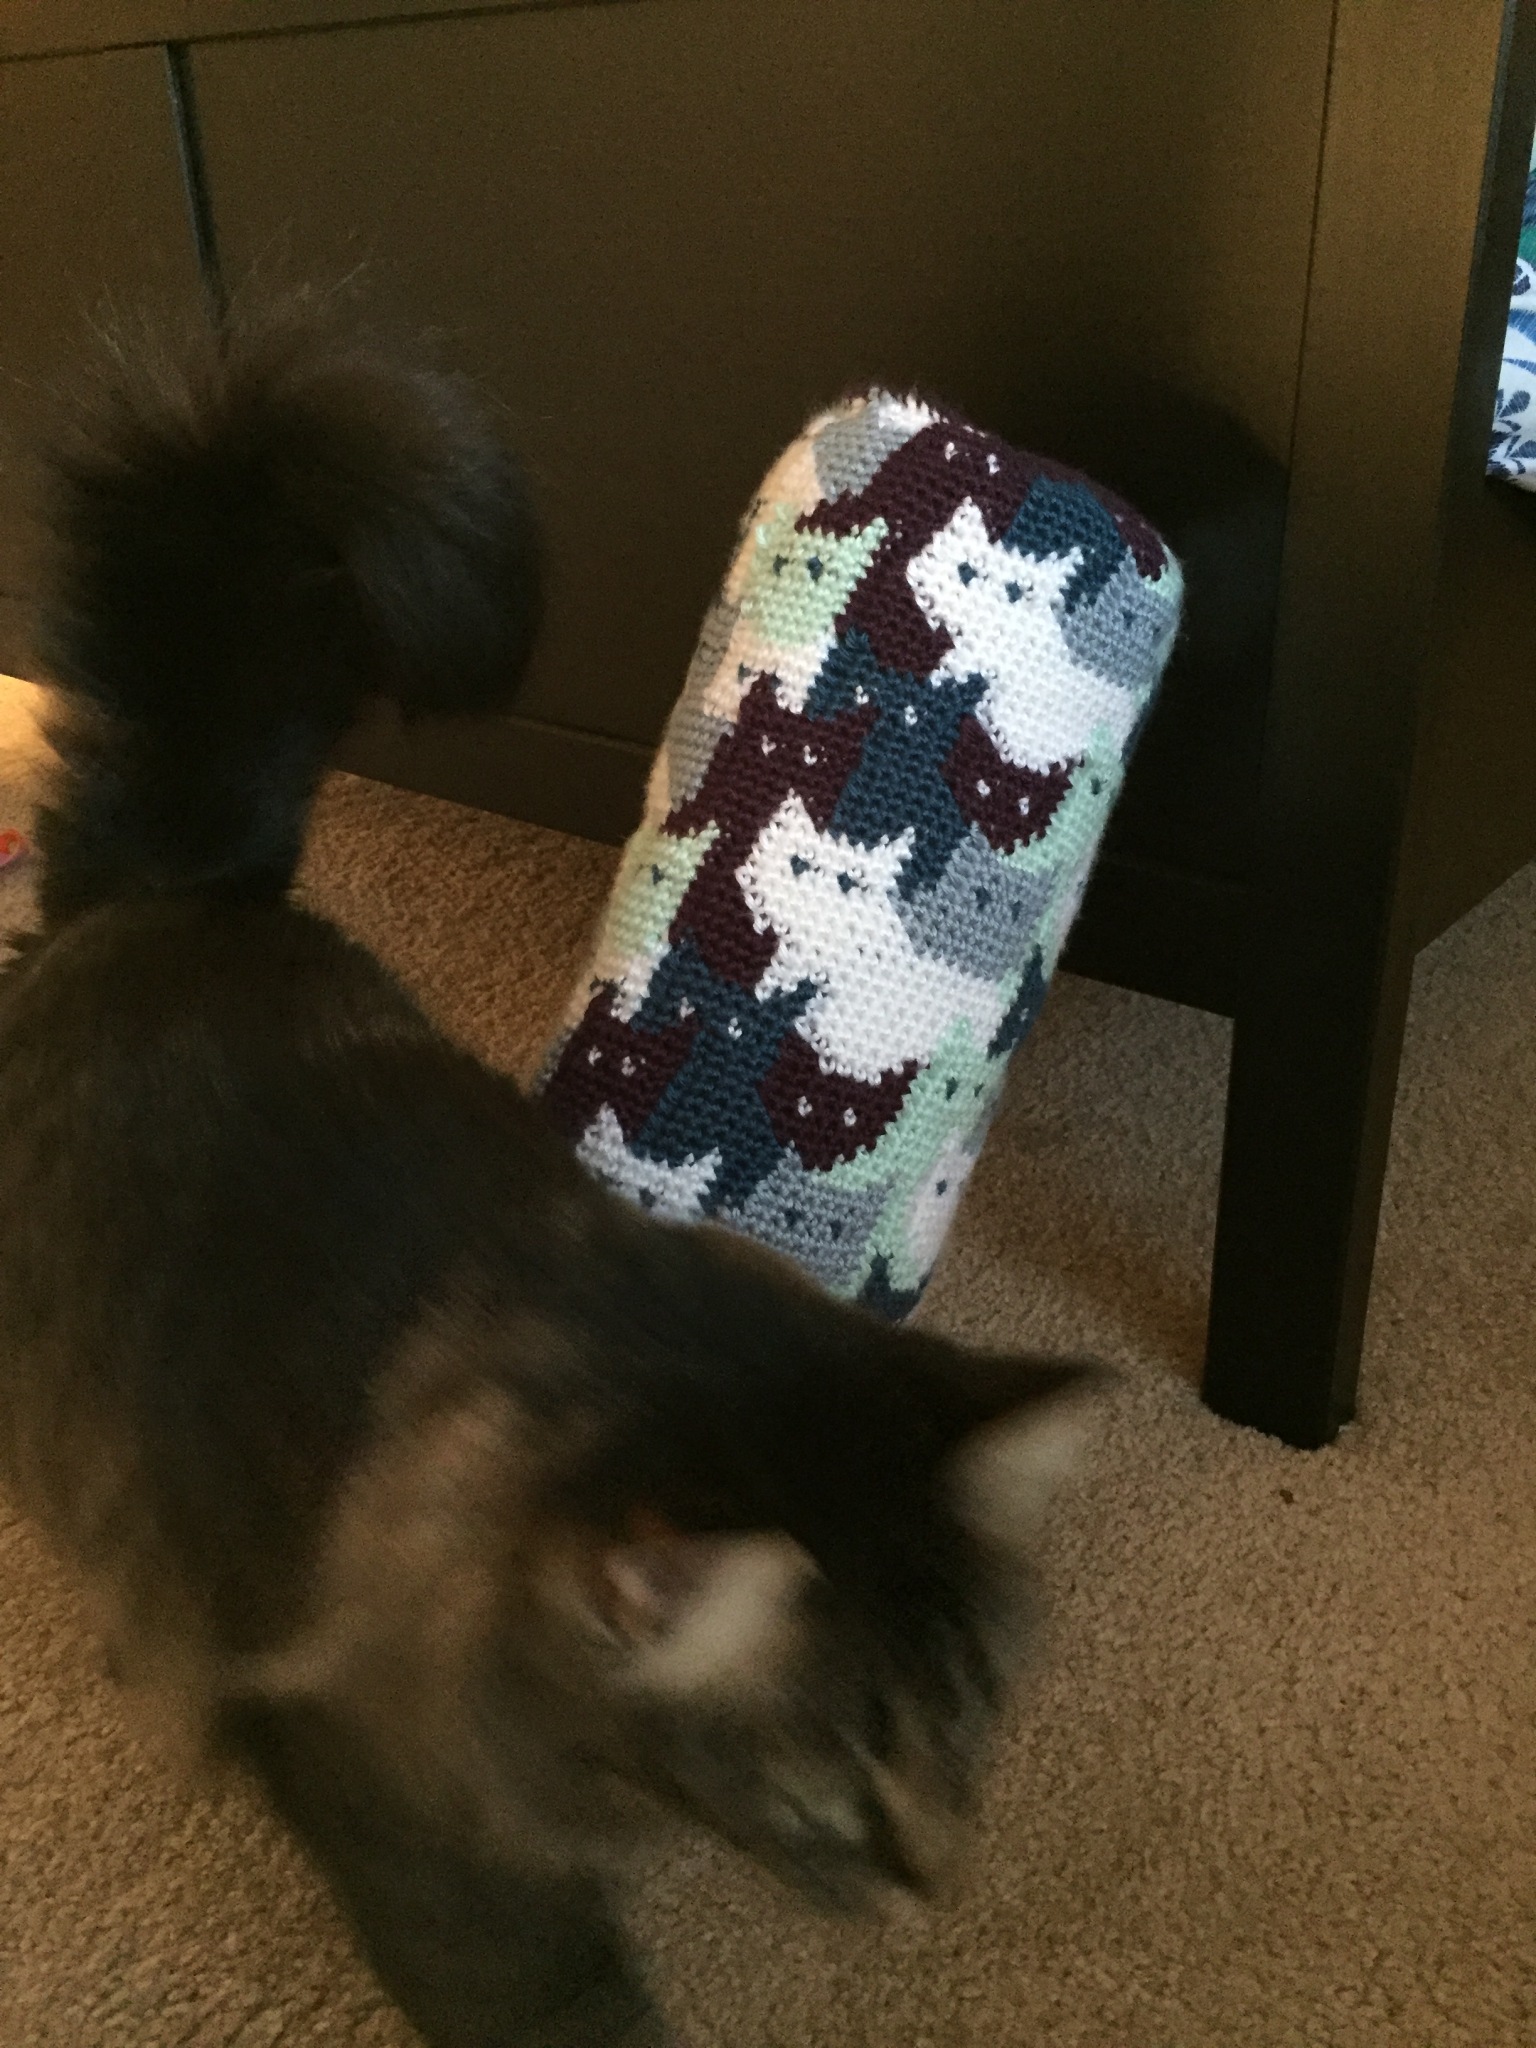
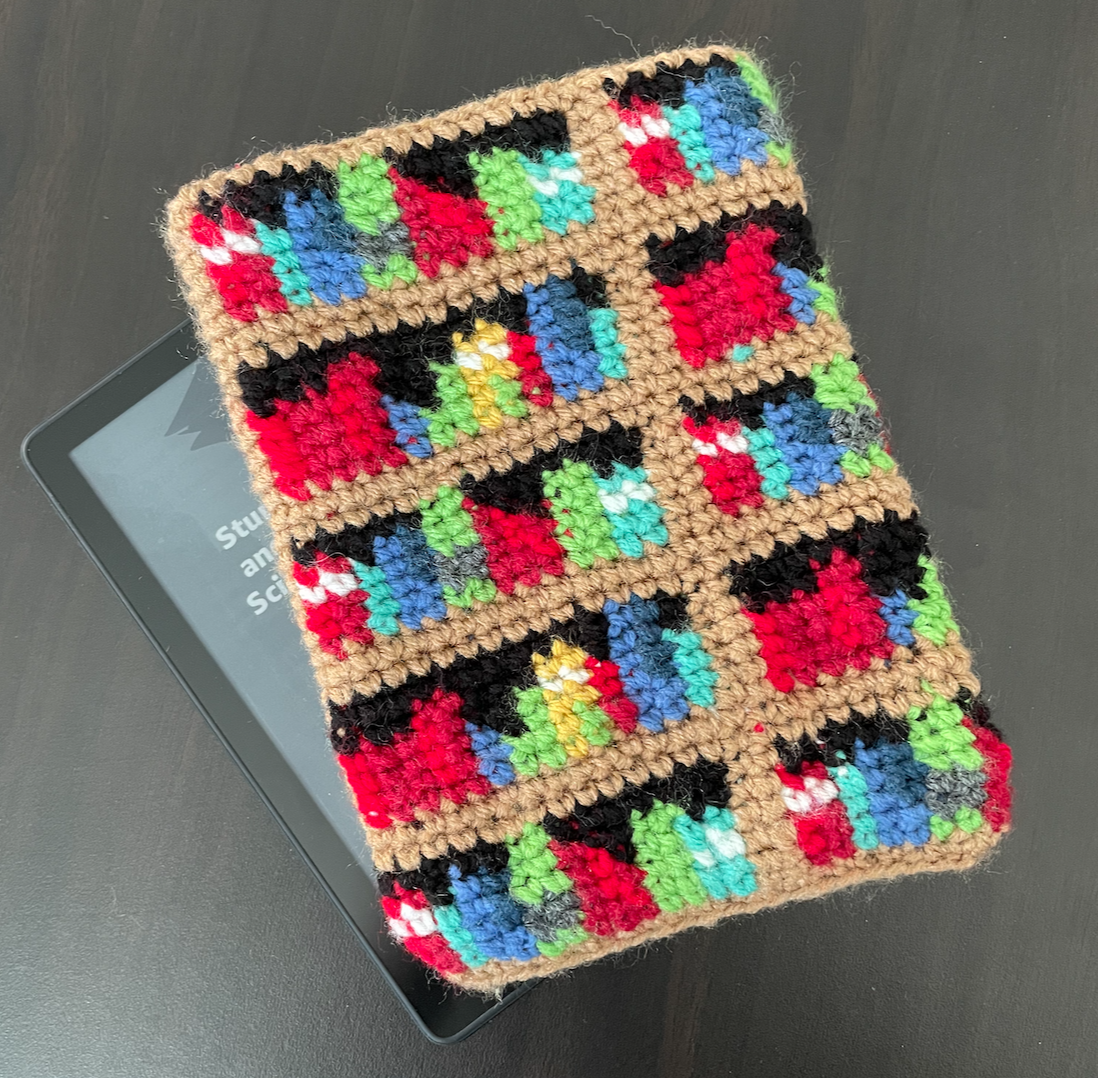
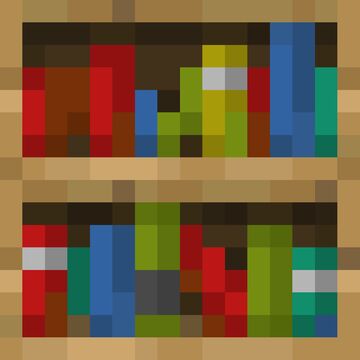
This is a crochet pattern for a sleeve or holder for a kindle, appropriately patterned to look like a Minecraft bookshelf. (Get it, because a kindle holds books?) It is also possible to adjust the size to fit other electronic devices such as tablets, laptops, or phones. The construction is very easy: you’ll make a tube by working in the round following a repeating pattern, then sew up the bottom edge. Optionally, you can add a fabric lining inside.

Materials Needed:

  • Worsted weight yarn in the following colors (or similar colors). I used leftover yarn from other projects, mostly in Red Heart Super Saver. If all your yarns are similar in weight, it should work. See the images on the next page to try to match the colors.
    • Light brown
    • Dark red
    • Bright red
    • Green
    • Yellow
    • Light blue
    • Dark blue
    • Turquoise
    • White
    • Black or dark brown
    • Gray
  • D hook or size needed to obtain correct width (see sizing section below)
  • Yarn needle
  • Optional: small amount of coordinating fabric (enough to cover your device on both sides plus a bit extra), thread, and sewing machine

Abbreviations: (US terminology)

  • Sc = single crochet
  • Ch = chain

Sizing:

You will want your device to be snug in the sleeve, so this part is important! Here you will determine how many bookshelves wide your sleeve will be. For a kindle, the answer is probably 3, but may be different depending on your yarn choice and tension. Since my kindle sleeve is 3 bookshelves wide, 1.5 bookshelves are visible on each side. (See photos at top.)

  1. With light brown yarn, ch 17 and turn.
  2. Sc in the second ch from hook and sc in each ch across, ch 1, turn.
  3. Sc across for at least 2 more rows.
  4. Measure the width of the swatch you have made, and measure the width of your Kindle or other device.
  5. Multiply the device width by 2 and divide this by the width of your swatch. Ideally this will be a whole number or very close to it. This is how many bookshelves wide your device sleeve will be. In my case, I got ~2.9, so I made it 3 bookshelves wide. If your answer is NOT close to a whole number, try changing your hook size and repeat. If that still is not close, you can include a half bookshelf in your pattern. Remember that it is better to be slightly too big than too small, or your kindle/device will not fit!
  6. The number of bookshelves wide is referred to by a bold N in the pattern below. (Example: for me, N = 3.)

Note about technique:

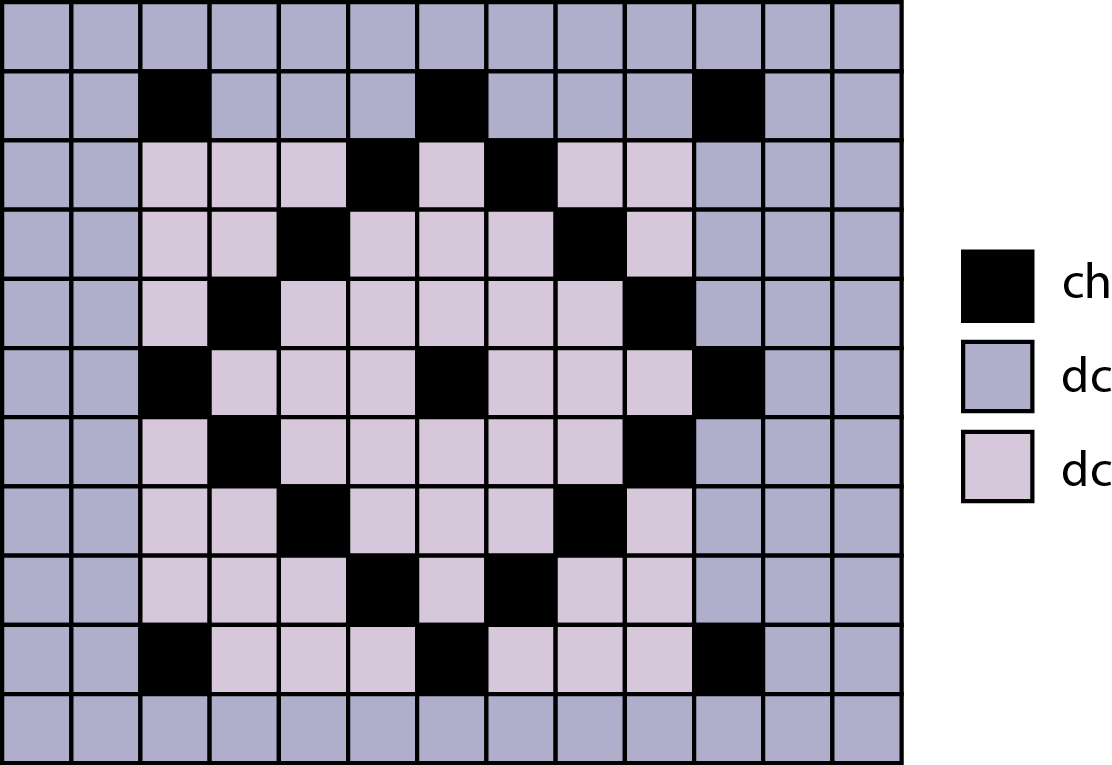
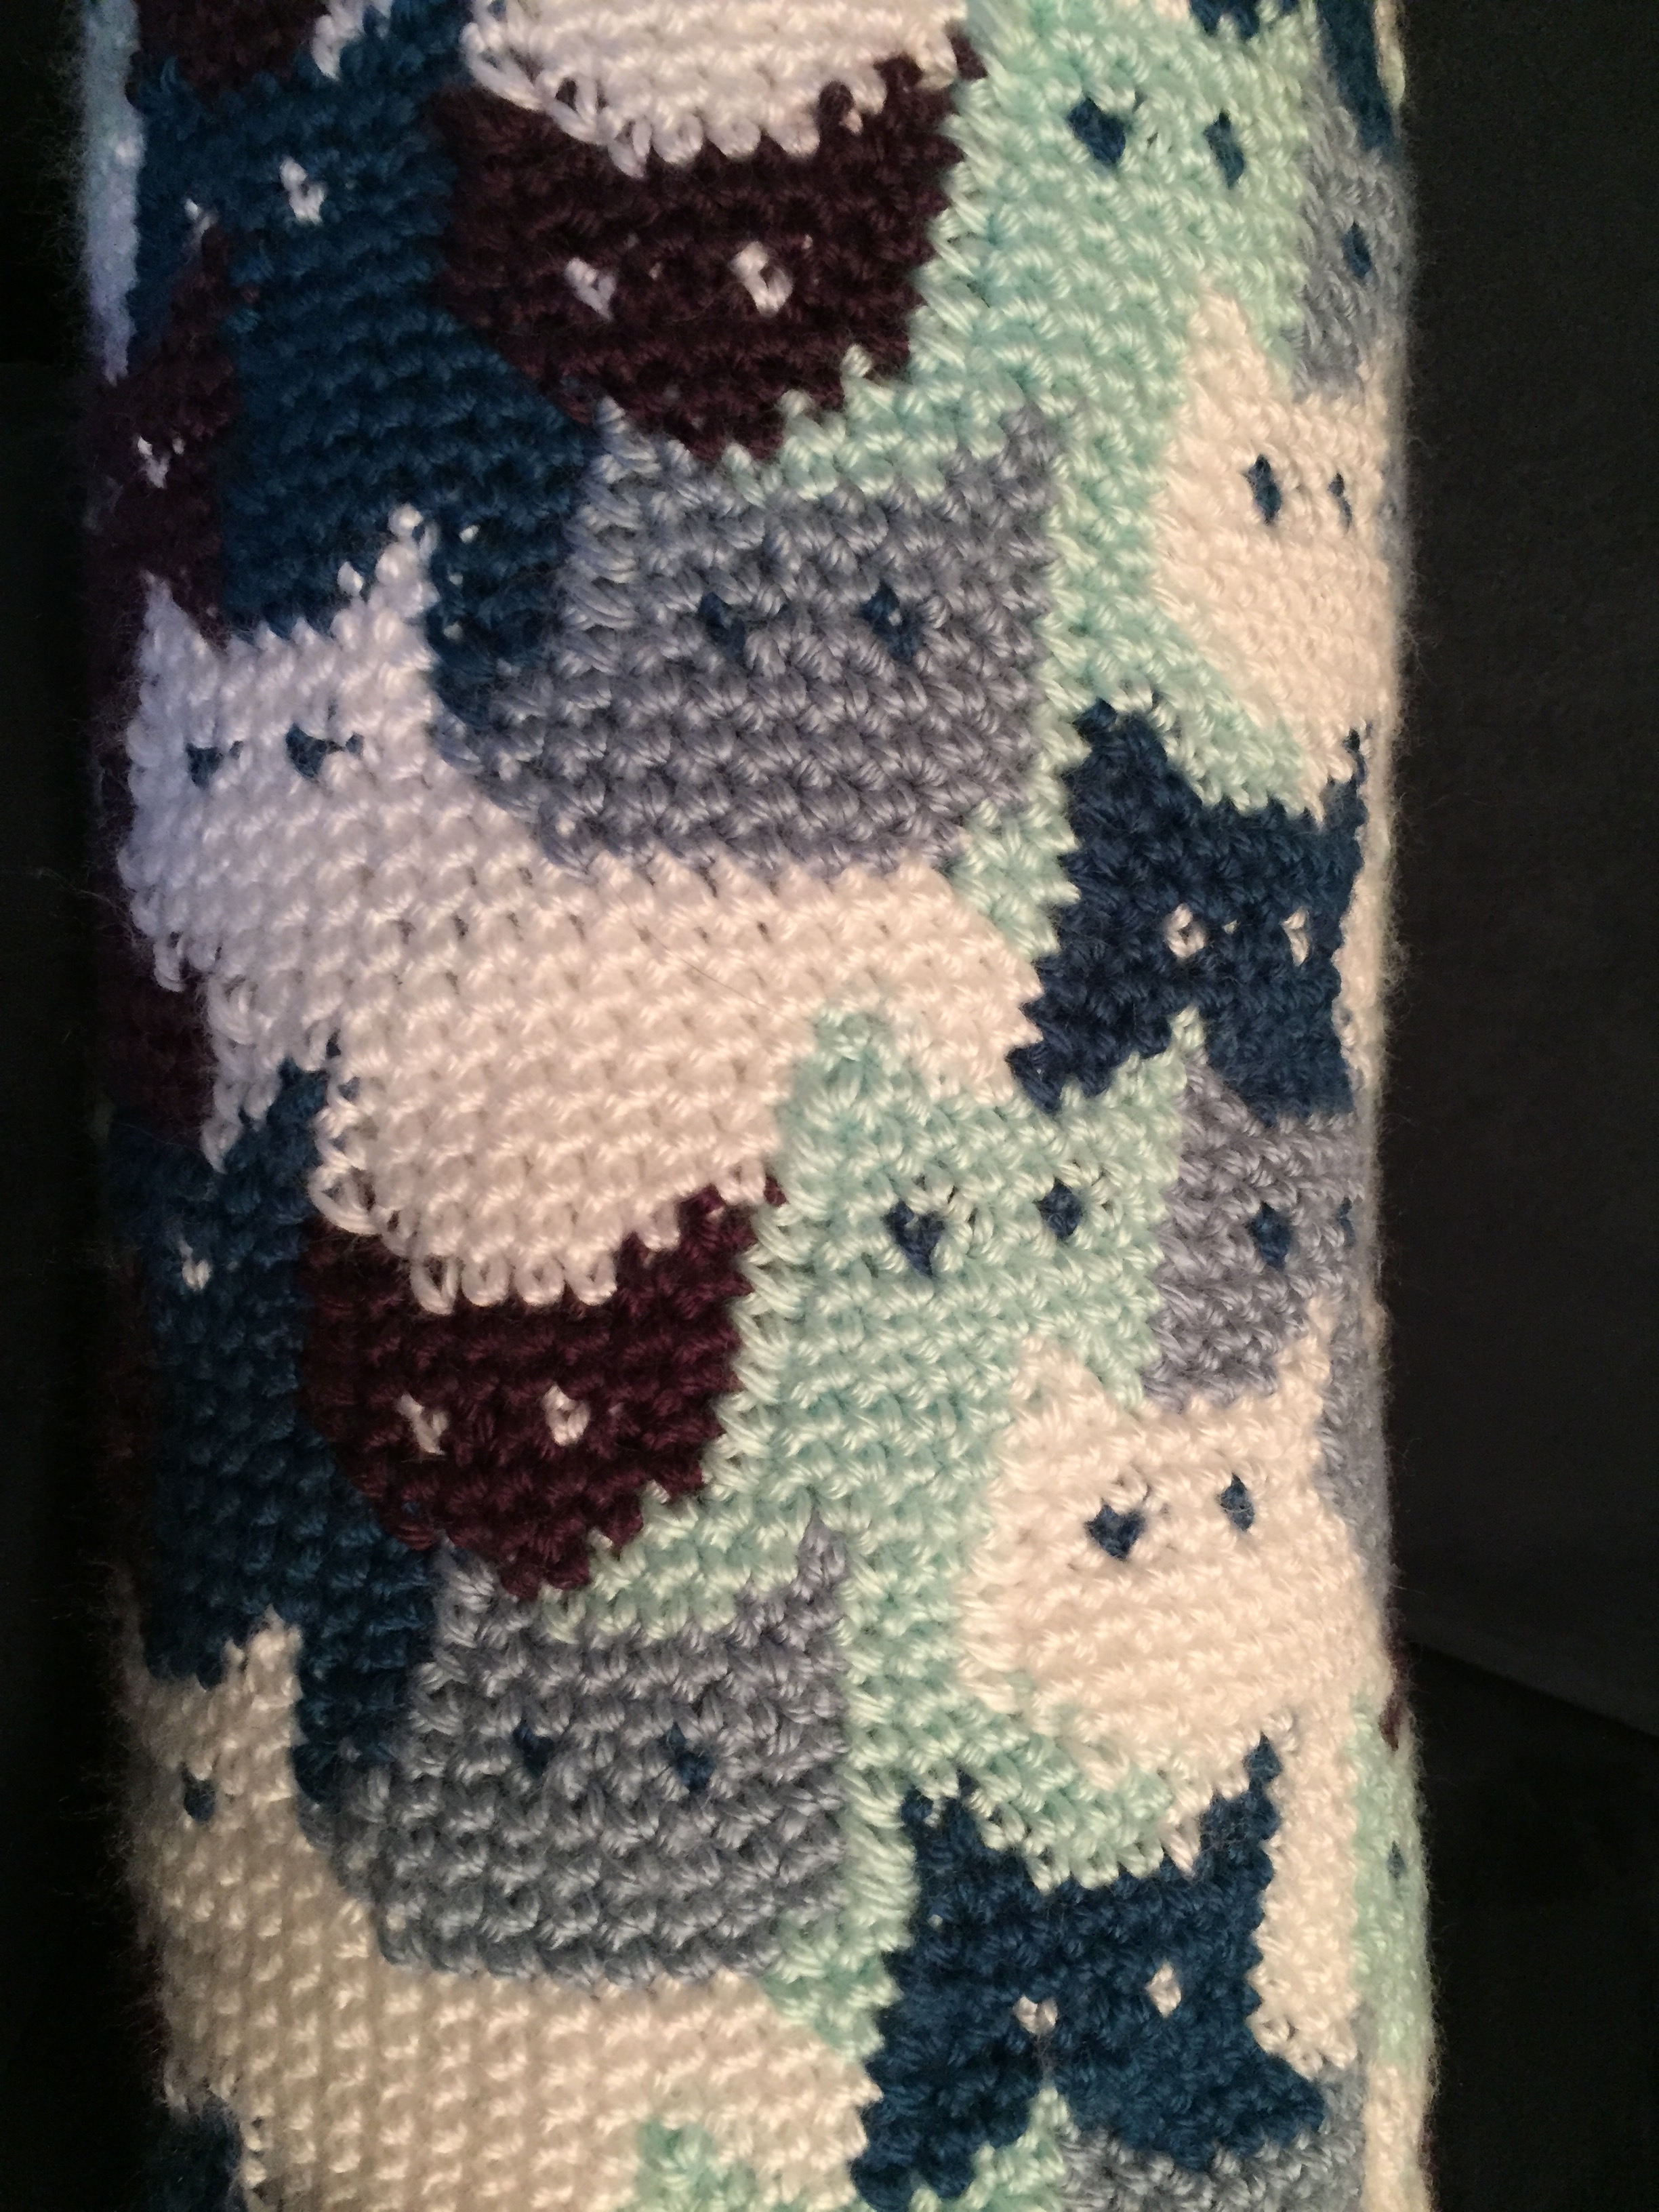
This pattern requires intarsia technique. Do NOT attempt to crochet fair isle style with strands carried in the back, or the backside will be too bulky for anything to fit inside. (That might work if you want to make a pillow instead!) Each book and each vertical brown section should be a separate piece of yarn, unless it is a very short distance to the next section of the same color. When switching colors, change to the new color for the final yarn-over of the previous stitch. (If you aren’t familiar with intarsia technique, I recommend finding a tutorial video about it.) I recommend snipping off excess yarn whenever you finish a section. I hope you like weaving in ends; you will weave these all in at the end!

Pattern:

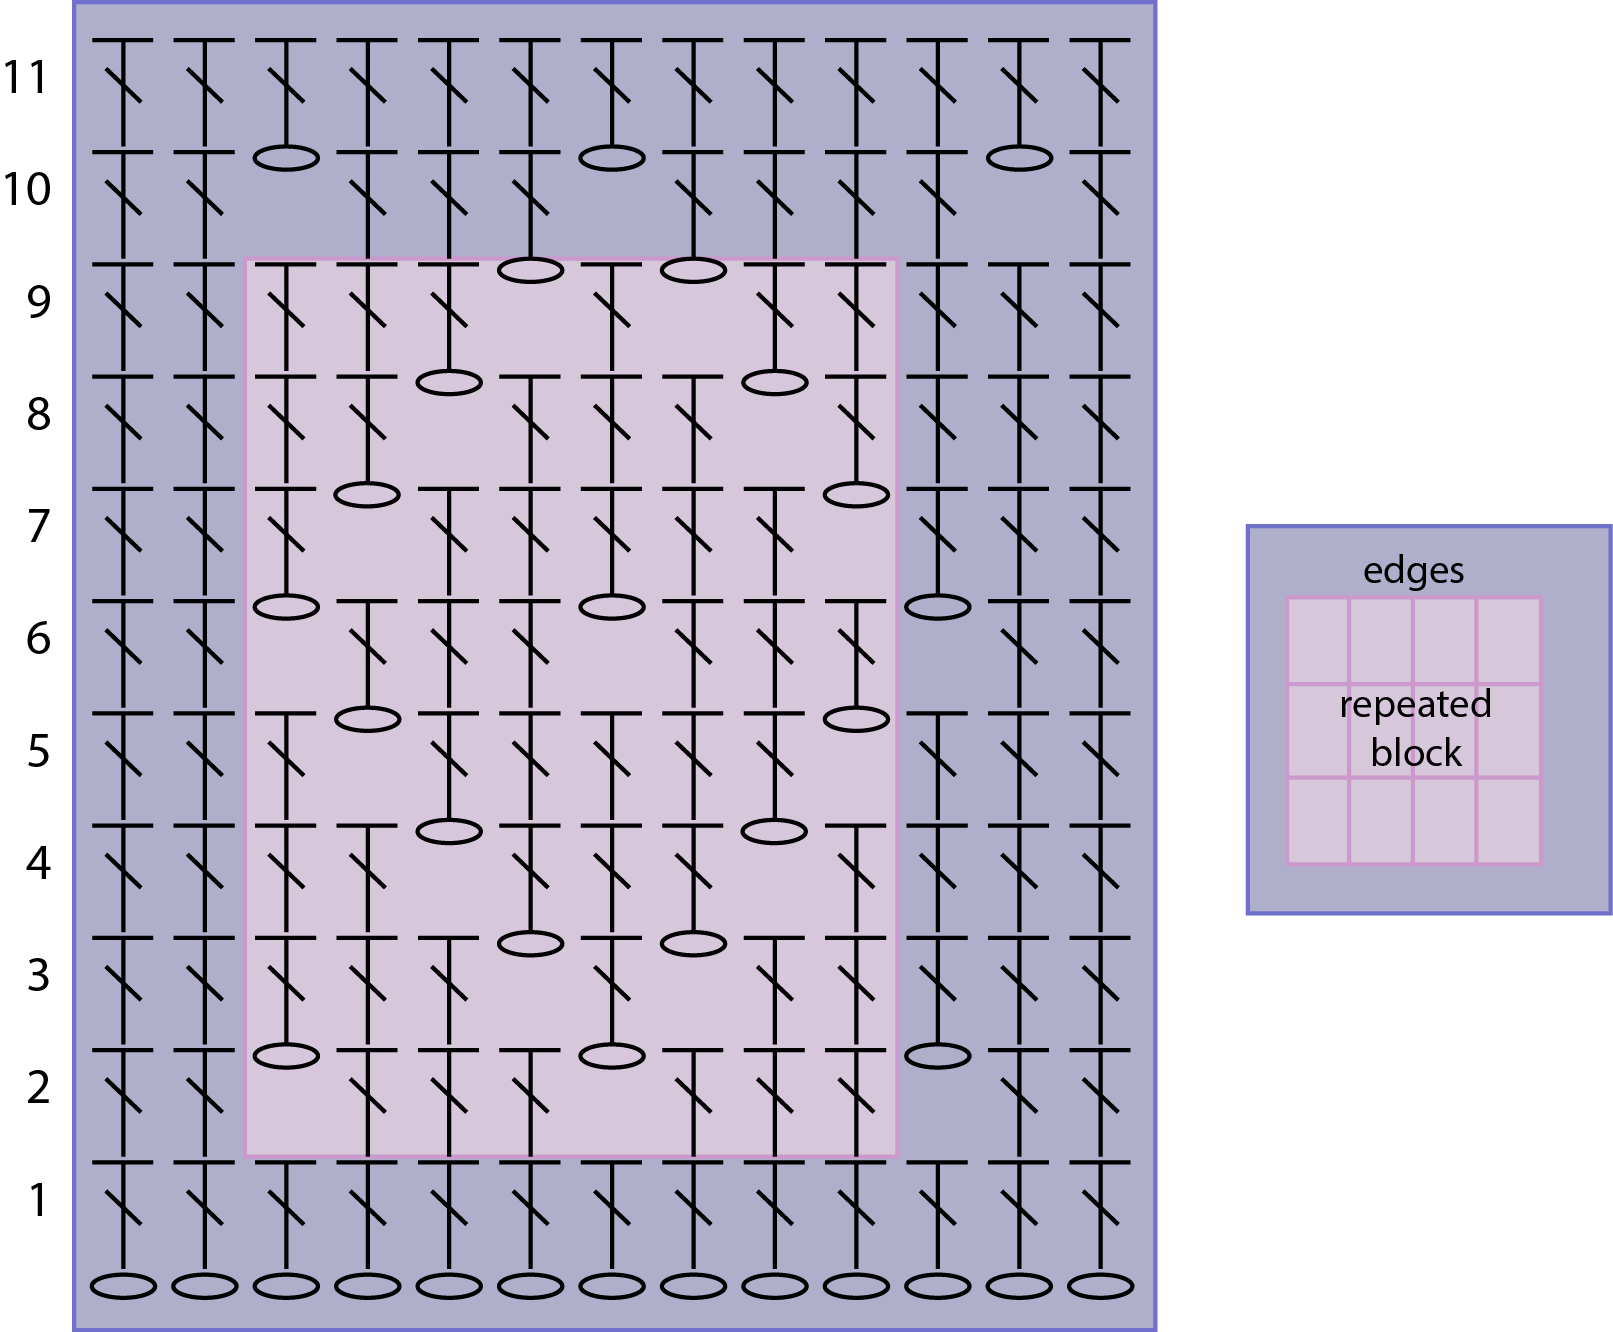
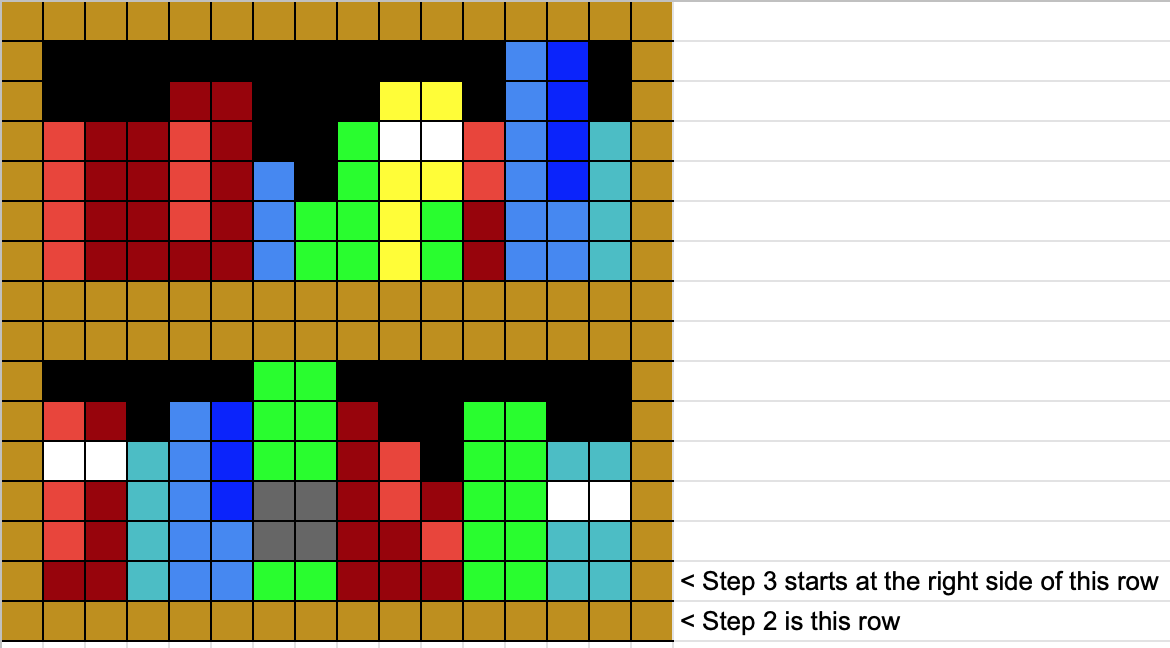
  1. Multiply the N you determined above by 16 and ch this many. (For example, if your N = 3, ch 48.)
  2. Join to the beginning of the chain and sc around. Join to first sc and ch 1. (All rounds will have Nx3 sc stitches.)
  3. Start the next round with an sc in the first sc of the previous round. For each round, follow the chart below, switching colors as needed using intarsia technique. Step 2 above was the bottom brown row. Continue with the second row from the bottom, starting at the right side. When you reach the end of the pattern row, repeat it for a total of N times per round.
  4. At the end of each round, join to the first sc, ch 1, and begin the next round in the same sc.
  5. Continue until your kindle/device fits inside completely and fasten off. Notice that my kindle sleeve is 2.5 bookshelves tall, ending nicely on a brown row.
  6. With light brown, sew the bottom edge shut.
  7. Trim all ends to about 1” long and weave in.
This is an actual bookshelf from Minecraft. Match your colors to this image.

PATTERN: This is a simplified version of the previous image. Follow this pattern starting at the bottom right, moving upward with each row.

Multiple bookshelves together should look like this. Note that all brown sections are two wide or tall.

Optional fabric lining:

The inside might look messy, so adding a lining can help.

  1. Cut two rectangles of fabric the size of your kindle/device with about half an inch on each side to spare.
  2. With right sides of the fabric together, sew the two pieces together along 3 edges, leaving one short edge open.
  3. Insert your kindle/device. Fold the top edges outward and down so that the length of it fits your kindle/device exactly. The right side should still be on the inside.
  4. Remove device and sew along the edge of this folded section, making sure the top is still left open.
  5. Insert this lining into the crocheted sleeve with your device inside.
  6. Sew along the top edge to secure the top of the lining to the top of the crocheted sleeve, making sure the top is still left open. (You may need to sew this part by hand if it is too difficult for the sewing machine.)
Posted in Crochet | Tagged , , , , , , | Leave a comment

Double-sided crochet and chiffon cat scarf

Here’s a great way to take a thin, chiffon scarf with a fun pattern and make it warm and even more stylish!

IMG_4182.jpg

IMG_4207.jpg

It also makes a nice shawl/wrap.

IMG_4197.jpg

Cats love it!

Materials:

 Abbreviations:

  • Dc = double crochet
  • Sc = single crochet
  • Ch = chain
  • Ch space = the hole below the ch in the previous row
  • *…* = repeat this until you have 3 stitches left in the row

IMG_4205.jpg

Instructions: (See chart instructions after written instructions.)

Make a long chain that is approximately the width of your chiffon scarf (without stretching). This should be a multiple of 8, plus 5. Mine is 101 ch long (12*8 + 5). Every row will have this number of stitches. Turn.

Row 1: Ch 3. (This counts as the first dc.) Dc in each ch across.

Row 2: Ch 3, dc in the next dc. *Ch 1, skip next dc, dc in the next 3 dc.* Ch 1, skip next dc, dc in next 2 dc, turn.

Row 3: Ch 3, dc in the next dc. *Dc in ch space, dc in the next 2 dc, ch 1, skip the next dc, dc in ch space, ch 1, skip the next dc, dc in the next 2 dc.* Dc in the next 3 dc, turn.

Row 4: Ch 3, dc in the next dc. *Dc in the next 2 dc, ch 1, skip next dc, dc in chain space, dc in next dc, dc in ch space, ch 1, skip next dc, dc in next dc.* Dc in next 3 dc, turn.

Row 5: Ch 3, dc in the next dc. *Dc in the next dc, ch 1, skip the next dc, dc in ch space, dc in next 3 dc, dc in ch space, ch 1, skip next dc.* Dc in next 3 dc.

Row 6: Same as Row 2. (Dc in ch space instead of dc where applicable.)

Row 7: Same as Row 5.

Row 8: Same as Row 4.

Row 9: Same as Row 3.

Repeat Rows 2 through 9 until your crocheted piece is about the same size as the chiffon scarf.

Row 10: Same as Row 2.

Row 11: Dc across in each dc or ch space.

Turn and crochet along the long edge of the scarf as follows: 2 sc in every ch 3 space and sc in each dc. (You can adjust this to have more sc per stitch or space if your tension is too tight.) Fasten off and repeat this with a new length of yarn along the opposite side. Fasten off.

Sew the chiffon scarf to the crocheted piece using needle and thread or a sewing machine.

Optional: Add fringe to both ends: Cut strips of desired length and fold each in half. Put hook through a stitch at the end of the scarf. Pull the folded strip of yarn through. Put the ends over the hook and pull through the loop. Repeat this for most stitches along both ends of the scarf until the desired fringe thickness is achieved.

Below are two chart versions of this pattern. I find these much easier to follow than the written pattern above.

catscarfdiagram_symbols

This chart uses standard crochet symbols.

catscarfdiagram_blocks

I find this chart easiest to follow for this pattern. The light colored section is repeated.

Posted in Crochet | Tagged , , , , , , , , , , , | Leave a comment

Bumblebee Kitten Costume

img_3672

My new baby kitten Maisie loves to fly around my apartment and bug her sister Lucy, so she is a bee this Halloween! Here is the pattern!

img_3591

This photo also features Lucy’s ladybug costume!

Maisie is a ~14 week old kitten weighing about 3 lbs. It is easy to adjust the size of this pattern for other kittens or small pets.

Materials:

  • Black, yellow, and white yarn (I used Red Heart Super Saver)
  • J hook
  • Yarn needle
  • Kitten

Abbreviations:

  • Dc = double crochet
  • Sc = single crochet
  • Ch = chain
  • Sl = slip stitch
  • The number is parentheses after each line indicates the number of stitches you should have in the row/round.

Instructions:

Main piece

  1. BLACK. Ch 16, sl to join with first ch, being careful not to twist. We are crocheting in rounds for now.
  2. YELLOW. Ch 3, dc around, sl to join with first dc. (16)
  3. BLACK. Ch 3, dc in first 10 dc. We are crocheting in back and forth rows now. (10)
  4. YELLOW. Turn. Ch 3, dc across. (10)
  5. BLACK. Turn. Ch 3, dc across. (10)
  6. YELLOW. Turn. Ch 3, dc across. Ch 15, join to other side. Turn. (25) We are crocheting in rounds again now. (Note: adjust the number of ch to fit different sized pets.)
  7. BLACK. Ch 3, dc around (in all dc and ch from previous step). Sl. (25)
  8. YELLOW. Ch 3, dc around, sl. (25)
  9. Repeat step 8 four more times, continuing to alternate between black and yellow each round.
  10. Fasten off.

Wings (make 2)

  1. Use WHITE. Sc 6 in magic ring. (6)
  2. 2 sc in each sc. (12)
  3. 2 sc in first sc, sc in next sc. Repeat this around. (18)
  4. Fasten off.
  5. Sew to main piece.

halloweenkitties

Be sure to check out Maisie’s sister Lucy’s costume too! Also shown here are a hat and a pumpkin.

Posted in Crochet | Tagged , , , , , , , , , , | 1 Comment

Ladybug Cat Costume

img_3675

I thought a ladybug costume would be purrfect for my lovely lady Lucy this Halloween. Here’s the pattern!

img_3633

Also featured in this photo are my Halloween Cat Witch Hat and a pumpkin.

Lucy is a ~10 lb adult fluffy cat, and this fit her very nicely. It is easy to add and subtract stitches to make it fit your kitty or doggy.

Materials:

  • Red and black yarn (I used Red Heart Super Saver)
  • J hook
  • Yarn needle
  • Cat

Abbreviations:

  • Dc = double crochet
  • Hdc = half double crochet
  • Sc = single crochet
  • Ch = chain
  • Sl = slip stitch
  • The number is parentheses after each line indicates the number of stitches you should have in the row/round.

Instructions:

Main piece

  1. Start with BLACK. We’re crocheting in rounds for now. Ch 30. Sl to join with the first ch, being careful not to twist.
  2. Ch 3. (This doesn’t count as a dc.) Dc in each ch around. Sl in first dc of this step. (30)
  3. Ch 3. Dc in each dc around. Sl in first dc. (30)
  4. We’re crocheting in back and forth rows now. Ch 3. Dc in the next 20 dc. Ch 3 and turn. (20)
  5. Dc in each of the 20 dc from previous row. Ch 3, turn. (20)
  6. 2 dc in first dc. Dc in next 18 dc. 2 dc in last dc. Switch to RED. Ch 3, turn.(22)
  7. Dc in each dc. (22)
  8. 2 dc in first dc. Dc in next 20 dc. 2 dc in last dc. Ch 3, turn.(24)
  9. 2 dc in first dc. Dc in next 22 dc. 2 dc in last dc. Ch 3, turn.(26)
  10. Ch 24, join with sl to other side. We are crocheting in rounds now again. (Note: you can adjust the number of ch here to fit your cat.)
  11. Ch 3. Dc in each dc and then dc in each ch that you made in the previous step. You should have a complete round of dc stitches now. (50)
  12. Sl to in first dc of pervious round. Ch 3. Dc in each dc around. (50)
  13. Repeat step 12 four more times. (50)
  14. Sl, ch 3. 2 dc in first dc. Dc in next 24 sc. 2 dc in next dc. Dc in remaining dc. Sl, ch 3. (52)
  15. Dc around. Sl. (52)
  16. We’re crocheting back and forth in rows again now. Ch 1. Sc in first dc. Hdc in next dc. Dc in next 24 dc. Hdc in next dc. Sc in last dc. turn. (52)
  17. Repeat step 16 twice.
  18. Fasten off.

Center line

  1. Ch 21, turn
  2. Skip the first ch. Sc in next 20 ch.
  3. Fasten off and sew this piece down the center of the main piece.

Spots (make 6)

  1. Sc 6 in magic ring. (6)
  2. 2 sc in each sc. (12)
  3. Fasten off.
  4. Sew to main piece.

halloweenkitties

Lucy’s sister Maisie dressed up as a bumblebee! Check out the pattern!

Posted in Crochet | Tagged , , , , , , , , , | 2 Comments

Catnip Long Cat

Here’s a crochet pattern for a long, catnip-filled friend for your kitty. As you can see, Lucy loves cuddling and wrestling with hers! This can also be made without catnip as a toy for humans.

IMG_3618

Materials:

  • 1 pack of Bonbons Yarn, “Nature” colors. This is a pack of 8 tiny skeins of cotton sport weight yarn available on Amazon. Note that not all of the colors available are the same weight/fiber.
  • Size 00 steel crochet hook (Probably 3 mm. This is a very old hook I inherited!)
  • Polyester fiberfill
  • Yarn needle
  • Catnip (optional)

Abbreviations:

  • Sc = single crochet
  • Dec = decrease
  • Ch = chain

Notes:

  • Number after each line indicates the number of stitches in the round/row.
  • Each bullet point corresponds to one round, unless otherwise noted.
  • Crochet tightly so the stuffing and catnip isn’t visible.

IMG_3603

Instructions:

Body

  • You are starting at the butt end. Pick a color.  Sc 6 in magic ring (6)
  • 2 sc in first sc, sc in next sc. Repeat around. (12)
  • 2 sc in first sc, sc in next 2 sc. Repeat around. (18)
  • 2 sc in first sc, sc in next 3 sc. Repeat around. (24)
  • 2 sc in first sc, sc in next 4 sc. Repeat around. (30)
  • 2 sc in first sc, sc in next 5 sc. Repeat around. (36)
  • Sc around. Continue sc-ing around and around for many rounds until you finish a skein. Switch to another color skein. Continue until you have used 6 of the 8 skeins in the pack.
  • Now is a good time to start stuffing. First, sprinkle a few pinches of catnip inside and rub to spread it evenly around. Remove any large stem pieces that poke out. Then stuff lightly with fiberfill, and squish until it is uniformly stuffed. Catnip can also be added in between chunks of stuffing.
  • Switch the the 7th skein. 2 sc in first sc, sc in next 6 sc. Repeat around. (42)
  • 2 sc in first sc, sc in next 7 sc. Repeat around. (48)
  • Sc around for the next 6 rounds. (48)
  • Dec over first 2 sc. Sc in next 15 sc. Repeat around. (45)
  • Dec over first 2 sc. Sc in next 14 sc. Repeat around. (42)
  • Dec over first 2 sc. Sc in next 13 sc. Repeat around. (42)
  • Dec over first 2 sc. Sc in next 12 sc. Repeat around. (39)
  • Dec over first 2 sc. Sc in next 11 sc. Repeat around. (36)
  • Dec over first 2 sc. Sc in next 10 sc. Repeat around. (33)
  • Dec over first 2 sc. Sc in next 9 sc. Repeat around. (30)
  • Dec over first 2 sc. Sc in next 8 sc. Repeat around. (27)
  • Dec over first 2 sc. Sc in next 7 sc. Repeat around. (24)
  • Dec over first 2 sc. Sc in next 3 sc. Repeat around. (18)
  • Finish stuffing head.
  • Dec over first 2 sc. Sc in next 2 sc. Repeat around. (12)
  • Dec over first 2 sc. Sc in next sc. Repeat around. (6)
  • Sew hole. Fasten off. You should have just about finished the 7th skein.

Legs (make 4 using 8th skein)

  • Sc 6 in magic ring. (6)
  • 2 sc in each sc. (12)
  • Sc around for several rounds until the leg is about 2″ long. Make all legs the same length. Fasten off.
  • Stuff lightly. Sew onto body.

Tail (using 8th skein)

  • Sc 6 in magic ring. (6)
  • Sc around for several rounds until tail is 3-4″ long. Fasten off. Sew onto butt.

Ears (make 2 using 8th skein)

  • Ch 6, turn.
  • Skip first ch. Sc in next 3 ch. Dec over last 2 ch. (4) Ch, turn.
  • Sc in first 2 sc. Dec over last 2 sc. Ch, turn. (3)
  • Sc in first sc. Dec over last 2 sc. Ch, turn. (2)
  • Dec over 2 sc. (1)
  • Fasten off. Sew onto head.

Face

  • Embroider eyes and nose using any remaining yarn from skein 8 or other scraps of yarn in a contrasting color.
  • Make whiskers by tying a few short pieces of yarn on face together.

Give to your furry friend to enjoy!


Posted in Crochet | Tagged , , , , , , , , , | Leave a comment

Cat neck roll pillow

IMG_3389

I love cats, so I wanted to make a scarf covered in cats, inspired by this blanket pattern (which was designed by Sandra Miller Maxfield and is sometimes available for free on various websites). I was almost at 2 feet long, when I realized this scarf was way too heavy and thick to be a scarf! A very clever friend of mine suggested that I make it into a pillow cover instead, and luckily I found the perfect pillow form for this purpose.

IMG_3406

13″ laptop for scale.

Want to make your own cat pillow? Here’s how:

Materials:

  • 5 skeins of worsted weight yarn in all different colors. I used Caron Simply Soft.
  • H hook
  • Yarn needle
  • A ton of yarn bobbins! (~15 should be enough)
  • Neck roll pillow form. I used this one.

Abbreviations:

  • Ch = chain
  • Sl = slip
  • Sc = single crochet

Color changing tips:

  • Use the next color for the final yarn over in the last sc of one color section.
  • Carry the yarn behind the work, and pick it back up loosely in the next round.
  • Use a separate bobbin of yarn for each cat.
  • The eyes don’t require a bobbin. Just cut a piece of yarn about 6″ long.
  • Use contrasting colors for the eyes.

Instructions:

Tube:

  1. Download the free chart from this blanket pattern.
  2. Assign one color for each of the 5 colors in the chart.
  3. Pick one color. Ch 80 in that color and join to make a big circle.
  4. Now you will start the pattern. Sc 1 for each square on the pattern, starting at the bottom of the chart and changing colors when necessary. (I started at the left because I prefer reading that way, but starting at the right is fine too.) You will repeat the pattern twice per round. At the end of the round, sl in first sc made.
  5. For the next round, use the next row up on the chart. Ch 1 and make the first new sc in the same sc as the ch you just made. Sc around, keeping with the color pattern. Sl in first sc made in this round.
  6. Repeat step 5 until the tube is the length of your pillow form.
  7. Fasten off.
  8. Turn the tube inside-out. Tie double knots between ends that are in close proximity together, until all ends have been fastened to another end. This is to prevent ends from becoming loose in your final product. Don’t pull too tight or the fabric won’t stretch enough. Turn the tube back the right way.

Circular ends (make 2 in any color):

  1. Sc 6 in magic ring (6)
  2. 2 sc in first sc, sc in next sc. Repeat around. (12)
  3. 2 sc in first sc, sc in next 2 sc. Repeat around. (18)
  4. 2 sc in first sc, sc in next 3 sc. Repeat around. (24)
  5. 2 sc in first sc, sc in next 4 sc. Repeat around. (30)
  6. 2 sc in first sc, sc in next 5 sc. Repeat around. (36)
  7. 2 sc in first sc, sc in next 6 sc. Repeat around. (42)
  8. 2 sc in first sc, sc in next 7 sc. Repeat around. (48)
  9. 2 sc in first sc, sc in next 8 sc. Repeat around. (54)
  10. 2 sc in first sc, sc in next 9 sc. Repeat around. (60)
  11. Sl 1 and fasten off.

Assembly:

  1. Insert the pillow form into the tube and tuck in any loose ends sticking out from the inside.
  2. Sew the circular ends on.
  3. Ta-da! Your cat pillow is done.

IMG_3391

A closeup of the cats.

IMG_3384

Cat for scale?

Posted in Crochet | Tagged , , , , | 4 Comments

Halloween Cat Witch Hat

I adopted a beautiful little kitty named Lucy a few weeks ago, and I’ve already been having fun making her some festive accessories. Here she is, dressed up in a witch hat and a candy corn sweater, with a pumpkin prop.

IMG_2853

The pumpkin and sweater patterns are from designers on Ravelry (see links above), but I designed the hat myself. Here’s the pattern!

Materials:

  • J hook
  • Yarn needle
  • Worsted weight yarn in black, orange, and yellow
  • Cat

Abbreviations:

  • sl = slip stitch
  • ch = chain
  • sc = single crochet
  • *…* = repeat for the whole round
  • FLO = front loop only

Instructions:

Each number is a new round. The number in parentheses is the number of stitches you should have in the round when you finish it.

  1. (Black) 6 sc in magic ring (6)
  2. Sc around (6)
  3. Sc around (6)
  4. *2sc in next sc, sc in next sc* (9)
  5. Sc around (9)
  6. Sc around (9)
  7. *2sc in next sc, sc in next 2 sc* (12)
  8. Sc around (12)
  9. *2sc in next sc, sc in next 3 sc* (15)
  10. Sc around (15)
  11. *2sc in next sc, sc in next 4 sc* (18)
  12. Sc around (18)
  13. *2sc in next sc, sc in next 5 sc* (21)
  14. Sc around (21)
  15. (Orange) sc around (21)
  16. *2sc in next sc, sc in next 6 sc* (24)
  17. Sc around (24)
  18. (Black) sc around (24)
  19. FLO: *2sc in next sc, sc in next 3 sc* (30)
  20. *2sc in next sc, sc in next 4 sc* (36)
  21. *2sc in next sc, sc in next 5 sc* (42)
  22. *2sc in next sc, sc in next 6 sc* (48)
  23. *2sc in next sc, sc in next 7 sc* (54)
  24. Sc around loosely (54), fasten off

With yellow: Ch 16, sew onto orange band in a square buckle shape.

You’re done! Good luck getting your cat to wear it for more than half a second. My best strategy is to repeatedly place it on her head and snap photos as fast as possible until I get something cute. This works best when she’s sleepy from a nap. Have fun torturing dressing up your cat!

IMG_2817

Posted in Crochet | Tagged , , , , , , , , , | 5 Comments

Instagram Pillows

My sisters, Rebecca and Chloe, are more than a little obsessed with Instagram, so I made them Instagram pillows!

Rebecca's pillow

Chloe's pillow

Each pillow has the Instagram app logo on one side, and some colorful stripes on the other side. The pillows are 16″x16″. Here is the pattern:

Materials

  • 16″x16″ pillow form
  • Worsted weight yarn in the following colors (I used Red Heart Super Saver)
    • Aran/off-white
    • Light brown
    • Black
    • Red
    • Yellow
    • Green
    • Blue
    • Additional colors of your choice for the back side
  • Yarn needle
  • J hook

Abbreviations

  • sc = single crochet
  • sl = slip stitch
  • ch = chain
  • BLO = back loop only
  • FO = fasten off
  • *…*x# = do # times

Notes:

  • When switching colors, use the new color for the last yarn-over of the previous stitch. The loop on the hook should be your new color when you’re about to start the new color stitch.
  • The number after each line indicates the number of stitches you should have in the row/round.

Front side (Instagram icon)

You are going to make a 37×49 stitch square. 34 rows will be off-white, and 15 rows will be light brown. Here are the step-by-by step instructions:

  • (Off-white) Ch 38, turn
  • Sc in second ch from hook, sc across (37)
  • Ch 1, turn. Sc across. (37)
  • Repeat the previous step 33 times. You should now have 34 rows of white.
  • Switch to light brown. Ch 1, turn. Sc across. (37)
  • Ch 1, turn. Sc across. (37)
  • Repeat the previous step 14 times. FO. You should now have 15 rows of brown on top of 34 rows of white.

Back side

You will now make another 37×49 square. This can be whatever striping pattern you want. Here’s what I did:

Rebecca’s pillow:

  • (Orange) Ch 38
  • Sc in second ch from hook. Sc across (37).
  • Ch 1, turn. Sc across (37)
  • Continue making sc rows until you have the following pattern (should add up to 49 rows total)
    • 7 rows orange
    • Repeat this section 3 times:
      • 1 row dark pink
      • 1 row blue
      • 1 row light pink
      • 9 rows orange
    • 1 row dark pink
    • 1 row blue
    • 1 row light pink
    • 3 rows orange
    • 9 rows orange
  • FO

Chloe’s pillow:

The shape is the same as above, a 37×49 sc square. The stripes decrease in thickness as follows: 5 rows, 4 rows, 3 rows, 2 rows, 1 row, repeat. The colors alternate as follows: green, light pink, dark pink, black, repeat. There are more stripe widths than colors, so the same color won’t always be the same width. See the photos for help. Make sure you stop after 49 rows!

Details

Center circle:

  1. (Black) 6 sc in magic ring (6)
  2. 2 sc in each sc (12)
  3. *2 sc in first sc, sc in next sc*x6 (18)
  4. *2 sc in first sc, sc in next 2 sc*x6 (24)
  5. *2 sc in first sc, sc in next 3 sc*x6 (30)
  6. *2 sc in first sc, sc in next 4 sc*x6 (36)
  7. *2 sc in first sc, sc in next 5 sc*x6 (42)
  8. *2 sc in first sc, sc in next 6 sc*x6 (48)
  9. Sl 1, switch to off-white, ch 1. *Sc in first 3 sc, 2 sc in next sc, sc in next 4 sc*x6 (54)
  10. BLO sc around (54)
  11. Sl 1, FO

Black rectangle in upper right:

  1. (Black) Ch 9, turn, sc in second ch from hook, sc across (8)
  2. Ch 1, turn, sc across (8)
  3. Repeat row 2 for 7 more rows. You should have 9 rows of black
  4. FO

Rainbow stripes:

  1. (Red) Ch 11, turn, sc in second ch from hook, sc across (10)
  2. Ch 1, turn, sc across (10)
  3. (Switch to yellow) repeat row 2
  4. Repeat row 2
  5. (Switch to green) repeat row 2
  6. Repeat row 2
  7. (Switch to blue) repeat row 2
  8. Repeat row 2
  9. FO

Brown strip under stripes:

  • Ch 9, turn, sc in second ch from hook, sc in next 6 ch, 2 sc in last ch (9)
  • Now you’ll continue going counter-clockwise around the other side of the chain: 2 sc in first ch, sc in remaining ch until you reach the end
  • Sl 1, FO

Assembly/Finishing

  • Sew the circle, black rectangle, stripes, and brown strip onto the brown/white side of the pillow cover as pictured.
  • Align the two sides of the pillow cover. Using one of the colors you used for the stripes, pull up a loop at one corner and sc around 3 sides of the pillow cover, through both pieces. Don’t worry about exactly where to insert the hook around the side edges; just make sure the stitches are uniformly spaced and about as close together as in the rest of your sc rows, not leaving any holes. (You can also whipstitch the two sides together instead, if you want.)
  • Insert the pillow form (after cutting off tags) and continue to sc around the fourth side. FO.
  • Your pillow may take some squishing and fluffing to get it to look the right shape, especially if your cover is tight like mine.
  • Post a picture of your new pillow on Instagram!

Feel free to use this pattern as much as you like! If you post your creations, please link to this page or the corresponding Ravelry page. Thanks!

Posted in Crochet | Tagged , , , , , , | Leave a comment

Rebecca’s Scarf

Here’s the pattern for the infinity scarf I made for my sister, Rebecca, for Christmas! It’s a simple, chunky version of my previous infinity scarf pattern.

Rebecca_with_scarf

Rebecca

Materials used:

  • 1x Lion Hometown USA in ‘San Diego Navy’ (color 1)
  • 2x Lion Hometown USA in ‘Chicago Charcoal’ (color 2)
  • N hook

Abbreviations:

  • Ch: chain
  • Sl: slip
  • Dc: double crochet

Instructions:

  1. Starting with color 1, make a giant loop of relatively loose chain stitches and slip to join. It should be the size you want your scarf to be.
  2. Ch 3, dc around. Join to starting chain with slip.
  3. Repeat step two for the desired number of rounds. I did two rounds of navy, one round of gray, one round of navy, then three rounds of gray.
  4. Fasten off and weave in ends.

Click here to see the scarf I made for Chloe!

IMG_0049

Posted in Crochet | Tagged , , , | 1 Comment

Chloe’s Scarf

Here’s the crochet pattern for the infinity scarf I made for my sister, Chloe, for Christmas!

Chloe_with_scarf

Chloe

Materials used:

  • Red Heart Super Saver yarn in ‘Pretty N Pink’
  • J hook

Abbreviations/terms:

  • Hdc: half double crochet
  • Dc: double crochet
  • Ch: chain
  • Sl : slip
  • YO: yarn over
  • Cluster:
    • YO, draw up a loop, YO, pull through 2 loops
    • Repeat two more times in the same stitch
    • YO, pull through all 4 loops on hook

Instructions:

  1. Make a giant loop of relatively loose chain stitches and slip to join. It should be the size you want your scarf to be. Mine had about 150 stitches, but this will depend on your yarn, hook, and tension.
  2. Dc round: After joining, ch 3. Dc around. Join to top of starting chain.
  3. Hdc round: Ch 2. Hdc around. Join to top of starting chain.
  4. Dc row. (See step 2)
  5. Cluster row: Ch 4. In next st, make a cluster st as described above. Ch 1. Skip the next stitch. Repeat around. Join with starting chain.
  6. Repeat steps 2-5 twice. (You should have a total of three cluster rows.)
  7. Dc row.
  8. Hdc row.
  9. Dc row.
  10. Fasten off and weave in ends.

Click here to see the scarf I made for Rebecca!

cropped-img_0017.jpg

Posted in Crochet | Tagged , , , | 1 Comment