TRANSLATE

Monday, June 5, 2017

Owl Keychain

So I spent last week working on this adorable little guy!


And I'm so excited to tell you that the pattern is now available on Ravelry! The pattern posed no issues and worked up relatively quickly, even after testing it 3 different times.

You'll need a small amount of yarn in white plus 3 additional colors. Also, a size F/3.75MM crochet hook, scissors and an embroidery needle. I used 9MM and 12MM safety eyes on this project. The purple owl has the smaller 9MM eyes while the pink owl has the larger 12MM eyes. If your making this as a keychain, you'll need a keyfob of some sort, I used a regular keyring 1.25" wide and for the other one I used a lobster clasp fob. I also used solid rings for attaching to the project. I do not recommend split jump rings as the weight of the keys will pull it apart.

I can't give an exact timeframe on how long it takes to make one since I was interrupted by dogs needing to potty and laundry that needed washing and folding. We all get interrupted in our crafting time by one thing or another, don't we?

Follow this LINK
to get your PDF version
of my crochet owl keychain!

Peace and blessing to you all,
~~Karen~~


Here's a couple more pics to
whet your whistle for this pattern!


Monday, May 22, 2017

Baby Booties (Fireman/Galoshes)

So I made a fireman set (for a girl) for a friend that's about to be a grandma. The baby's daddy is a fireman and she wanted to gift the set to her daughter as a photo prop. I ordered a pattern from Ravelry and got busy making the set. I ran into a problem when I got to the booties because the pattern I purchased had stitch counts that were not adding up. I tried 15 times (no joke) to get those booties to work out following her directions and failed every time. Maybe it was just me, I don't know, but I think 15 times is a bit extreme even for me. Finally I gave up and made up my own pattern for the little suckers and that's what I'm posting today!


This pattern is a .pdf file from Ravelry, available HERE.


Aren't these just the cutest things! I love them!

And here's the set I finished for my friend. She absolutely loved it! I have to admit, it did turn out completely adorable! I can't wait to see pictures of the precious baby wearing them!


Enjoy that bootie pattern and feel free to sell the items made with this pattern; just don't claim the pattern as your own cause, ya know, that'd be stealing.

Peace and blessings to you all,
~~Karen~~


Thursday, April 27, 2017

Granny Square Bookmark

I like books. Actual paper or cardboard books that I can hold in my hands. There's just something about holding a paper book that makes me happy. I do have several dozen books on Kindle that I read but I always prefer to hold a real book.

And I've used several things as bookmarks as well. From dollar bills to scraps of my store list to receipts to dog-earring the corners of the page. My preference? Crochet of course!

I have a couple of bookmarks available on the blog (here and here and here) and also available on Ravelry (here). But I'm making a new one and sharing it with you!


This pattern is available as a PDF download from Ravelry.
Click here to be taken to the pattern.


Granny Square Bookmark

Materials:


  • #10 crochet thread
  • size B/1-2.25MM crochet hook
  • scissors
  • embroidery needle for weaving in the ends
Stitches Used:

  • Double Crochet - DC
  • Chain - Ch
  • Slip Stitch - Sl St
Notes:
Chain 3 counts as first DC throughout pattern.
Weave in ends and cut tails at the end of each square.

Begin:
1st Granny SquareRow 1 - Ch 5 and join to form a circle, ch 3, 2 dc in circle, ch 2. *3 dc in circle, ch 2. Repeat from * two more times. Join to first dc with sl st, ch 3 and turn. (You should have 4 sets of 3dc and 4 sets of ch 2 spaces that make the corners of the square.)

Row 2 - 2 dc, ch 2, 3 dc in ch 2 space. Ch 1. *3dc, ch 2, 3dc, in ch 2 space, ch 1. Repeat from * around. Join to first dc with sl st, ch 3, turn.

Row 3 - 2 dc in ch 1 space, ch 1. *3dc, ch 2, 3dc in ch 2 space, ch 1. 3dc in ch 1 space, ch 1. Repeat from * around. Join to first dc with sl st. Secure and tie off, cut yarn.

Finished Square 1

Squares 2 - 5

Row 1 - Ch 5 and join to form a circle, ch 3, 2 dc in circle, ch 2. *3 dc in circle, ch 2. Repeat from * two more times. Join to first dc with sl st, ch 3 and turn.

Row 2 - 2 dc, ch 2, 3 dc in ch 2 space. Ch 1. *3dc, ch 2, 3dc in ch 2 space, ch 1. Repeat from * around. Join to first dc with sl st, ch 3, turn.

Row 3 - 2 dc in ch 1 space, ch 1. 3dc in ch 2 space.
             [Begin join as you go method]
             ch 1, sl st to any ch 2 space of first square
             (Put wrong sides together to make sure they look the same
             throughout the pattern)
             3dc in ch 2 space of the working square
             ch 1, sl st to ch 1 space of first square
             3dc in ch 1 space of working square
             ch 1, sl st to ch 1 space of first square
             3dc in ch 2 space of working square
             sl st to ch 2 space of first square
             ch 1, 3dc in ch 2 space of working square
             Finish square as noted for square one.

Connecting the corner to the first square
This is the slip stitch joining

Completed first corner and it's
connection to the first square

Connect 5 squares together and block using your preferred method. I use warm water to soak the piece and press the water out using paper towels (do not wring the crochet work, it pulls your stitches out of true shape).


Be sure to use stainless steel pins so you don't get any rust on your crochet work. You can use a foam mat like shown here (I think that's the letter N - lol) or you can use a folded towel as long as it will hold the shape you're trying to achieve. I've also used cardboard boxes but I place a paper towel under my work before pinning.

Let dry for 4 to 24 hours - the longer you let it dry the better shape you'll achieve. Once dry you've got a beautiful bookmark!

Here's hoping your piece comes out looking great!

Peace and blessings,
~~Karen~~


Monday, April 17, 2017

Easy Peasy Face Cloth

I thought I'd start with a simple pattern that's perfect for beginners and even the advanced crocheter that needs to make some stock for Craft Fairs. A soft but exfoliating cloth perfect for the daily facial routine. Made with 100% cotton (yarn weight 4) it's easy to use and easy to take care of! I wash mine with towels and washcloths, that's how easy they are to care for. This pattern is a quick one that works up without any fuss.

Enjoy a Free PDF download from
Ravelry available HERE 


Easy Peasy Facecloth
Completed project measures 3” in diameter.

Materials:
            100% cotton yarn weight size 4 (brand and color of your choice)
            size J/10 – 6.00MM crochet hook
            scissors
            darning needle (for weaving in the ends)

Abbreviations and Stitches used:
            Magic Circle (you can use whichever circle starting method you prefer)
            Ch – Chain
            SC – Single Crochet
            SS – Slip Stitch

Notes:
            Do not turn your work. 
            Piece is made in rounds with a joining at the end of each round.
            Join to the top of the first SC with a SS, not into the Ch 1 stitch.
            Ch 1 stitch is NOT a working stitch.
            Tails are woven in at the end of the project or can be worked
            over as you stitch along.
            Numbers in ( ) indicate the number of stitches in that round.
           
Pattern:
Round 1: Begin with a Magic Ring. 10 SC in ring. Join. Ch 1. (Tighten center of Magic Ring by pulling on the tail of the yarn.) (10)

Round  2: 1 SC in first stitch, 2 SC in next stitch. Repeat around. Join. Ch 1. (15)

Round  3: 1 SC in next 2 stitches, 2 SC in next stitch. Repeat around. Join. Ch 1. (20)

Round 4: 1 SC in next 3 stitches, 2 SC in next stitch. Repeat around. Join. Ch 1. (25)

Round 5: 1 SC in next 4 stitches, 2 SC in next stitch, Repeat around, Join. Ch 1. (30)

Weave in your ends if you haven’t worked over them as the piece progressed. Trim any tails.


Permission is given to sell any items made from this pattern, after all, this makes a great craft fair item! (Might I suggest 3 for $5 or $2 each?)
Please give credit where credit is due when sharing photos of your completed work.
DO NOT copy or claim this pattern as your own.

I hope you enjoy making many of these little cloths!

Peace and blessings,
~~Karen~~

Tuesday, April 11, 2017

My Crochet Mojo ... Is It Back?

So, I haven't posted on the blog in over a year. One thing that led to the downfall of my crochet mojo is the death of 3 family members in the span of (less than) 18 months. I lost all desire to do anything other than what I absolutely HAD to get finished. I know some of you understand that, and while crochet is a release of emotional stress for me, I simply had lost the desire to do anything other than stare at what others were creating. Nothing inspired me. I can't really say that I'm "inspired" right now but I do have an itch starting that I think I recognize as that "want-to" when it comes to crafting.

I "want-to" do something with my hands. I "want-to" get my mind out of the dark place it's been resting. I "want-to" get back to it, and I thought making a blog post might inspire me to do something about that.

I'd be interested to see what you're up to and what you've done in the past if you've ever lost your crochet mojo. Leave a comment and tell me what urged you to get back into the swing of things.


Peace and blessings,
~~Karen~~


Thursday, November 12, 2015

Christmas Elf, Elf, Elf, Elf ...

I thought today I'd share some of the cute little crochet Christmas Elf patterns that I've come across in recent weeks! Here goes:

1. This pattern from Heart & Sew is done so well that he should last for years to come and maybe even be able to be handed down to the next shelf lounging Elf lovers out there!

Photo by Heart & Sew

2. These gorgeous little guys from AmigurumiBB look like something from a childhood Christmas movie! Who wouldn't want one of these to play with?

Photo by AmigurumiBB

3. This cute little elf (or gnome or ...) from Owlishly is perfect for practicing the art of amigurumi. And you can place them as ornaments on the tree!

Photo by Owlishly


4. Although this pattern by Anastasia Eisenberg is available for purchase via Ravelry, I thought I'd include it because he's just too stinking cute! Those huge ears did it for me and I can't help but grin when I look at him.

Photo by Anastasia Eisenberg

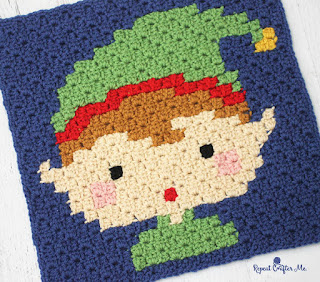
5. And finally, an Elf to help keep you warm this cold holiday season. RepeatCrafterMe has designed this square, along with 8 others, for a Christmas themed blanket that, when finished, is simply fantastic!

Photo by RepeatCrafterMe


I hope you've enjoyed these 5 little guys/gals. It definitely gives us something different to make for this busy holiday season. Craft fairs and Christmas bazaars are getting into full swing right about now, so one of these guys may make an appearance!


Peace and blessing,
~~Karen~~

Thursday, October 29, 2015

One Gift Down ...

As you can tell by the title of the post I have one gift completed and ready for Christmas! Of course, if I keep looking at it I'm going to want to put beads or buttons or something else on it. But what crafter doesn't do that?


This is the Granny Cocoon Shrug that recently went viral in several Facebook groups. I decided I wanted to make one - I also decided that instead of making it for me I was going to gift it!


I kinda sorta followed >>THIS<< video but I changed a couple of things - the arms for one. However, I LOVE the way it turned out and I think the recipient will love it too! 

Stay safe this Halloween and remember it's all about FUN! Peace and blessings.

~~Karen~~