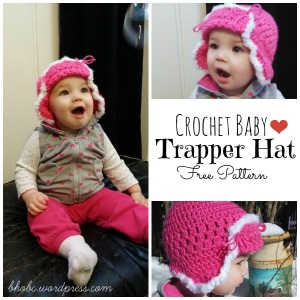
Crochet Baby Trapper Hat

Trapper Hat Collage

This warm and cozy cute crochet baby trapper hat is sized for 1-3 year olds. Use a smaller or bigger hook to obtain a different size or adjust the number of rows in the main body of the hat. I used a basic hat pattern crocheted in double crochets in the round from the fantastic blog Repeat Crafter Me and textured in some rows with dc3togs. The hat features ear flaps, a trapper flap and a fuzzy fringe in a coordinating color to really highlight those cute and chubby baby cheeks. My baby loves her crochet baby trapper hat and it only took me 30 minutes to make!

Materials:

-Size H Hook

-Simply Soft Yarn in Bright Pink

-A fuzzy white yarn of your choice for the trim

Abbreviations:

-Magic Circle (Tutorial: here)

-Ch = Chain

-YO = Yarn Over

-Sc = Single Crochet

-Dc = Double Crochet

-Dc2tog =  YO, pull up one stitch, pull through 2 stitches on hook, YO, pull up one stitch in same stitch, pull through 2 stitches on hook, pull through 3 remaining stitches on hook.

-Dc3tog = YO, pull up one stitch, pull through 2 stitches on hook, YO, pull up one stitch in same stitch, pull through 2 stitches on hook, YO, pull up one stitch in same stitch, pull through 2 stitches on hook, pull through 4 remaining stitches on hook.

-Sl St = Slip Stitch

The Main Hat:

(Done all in Pink)

Round 1: Magic ring, ch 2, 11 Dc in ring, join with sl st to first dc, ch 2. (Do not turn, the pattern is worked in the round)

Round 2: (Chain does not count as first stitch throughout the pattern) 2 Dc in each stitch around. Sl st to first dc, ch 2. (22)

Round 3: *2 Dc in first stitch, 1 Dc in next stitch, repeat from * around. Sl st to first dc, ch 2. (33)

Round 4: *2 Dc in first stitch, 1 Dc in each of next 2 stitches, repeat from * around. Sl st to first dc, ch 2. (44)

Round 5: *2 Dc in first stitch, 1 Dc in each of next 10 stitches, repeat from * around. Sl st to first dc, ch 2. (48)

Round 6: *2 Dc in first stitch, 1 Dc in each of next 11 stitches, repeat from * around. Sl st to first dc, ch 2. (52)

Round 7: *2 Dc in first stitch, 1 Dc in each of next 12 stitches, repeat from * around. Sl st to first dc, ch 2. (56)

Round 8: *2 Dc in first stitch, 1 Dc in each of next 13 stitches, repeat from * around. Sl st to first dc, ch 2. (60)

Round 9: Ch 3, Dc2tog, ch 1, *Dc3tog, ch 1, repeat from * around. Sl st to first dc2tog.

Round 10: Sl st to first ch space. Ch 3, Dc2tog, ch 1, *Dc3tog, ch 1, repeat from *a around. Sl st to first dc2tog.

Round 11: Repeat row 9. Ch 2.

Rounds 12-13: 1 Dc in each stitch around, sl st to top of first dc, ch 2.

Round 14: 1 Dc in each stitch around, sl st to top of first dc, fasten off and weave in end.

Ear Flaps:

(Worked all in pink)

Row 1: Mark positions for ear flaps by folding the hat at the seam and centering on each side. Working on the last round of stitches on the main hat: Ch 2, dc2tog, ch 1, *dc3tog, ch1, repeat from * 3 more times, turn.

Row 2: Sl st to first ch space, ch 2, dc2tog, ch 1, *dc3tog, ch 1, repeat from * 2 more times,  turn.

Row 3: Sl st to first ch space, ch 2, dc2tog, ch 1, *dc3tog, ch 1, repeat from * 1 more time, fasten off.

Row 4: Starting in the stitch just in front of the first stich of round 1 of your ear flaps, dc along the side, the top and the other side of the flap and ending in the stitch right after the last stitch of round 1. Sl st in same st, fasten off.

Line up beginning of ear flap number 2 on the other side of the hat with the beginning of ear flap number 1 and just follow the same pattern.

Trapper Flap:

(Worked all in pink)

Row 1: Position beginning of trapper flap 4 stitches away from one ear flap and stop when you get to the 4th st away from the other ear flap. Make sure you are working on the front of the hat (The seam should be in the back). Ch 3, dc2tog, ch 1, *dc3tog, ch 1, repeat from * until you are 4 stitches away from the opposite ear flap, turn.

Row 2: Sl st to first ch space, ch 3, dc2tog, ch 1, *dc3tog, ch 1, repeat from * to the last ch space of the row, turn.

Row 3: Repeat row 2, fasten off.

Row 4: Starting in the stitch just in front of the first stich of round 1 of your trapper flap, dc along the side, the top and the other side of the flap and ending in the stitch right after the last stitch of round 1. Sl st in same st, fasten off.

Coordinating Trim:

Grab your fluffy white yarn, start at the seam at the back of the hat and work sc along the last row of the main hat, then around the first ear flap, a few stitches on the main hat, then around the trapper flap, a few stitches on the main hat, then around the second ear flap, then along the last little bit of the main hat back to the seam, sl st to first sc, fasten off.

Finishing touches: 

Fold the trapper flap up and attach to the main hat using a simple bow knot in pink yarn in each corner of the trapper flap. Make sure all ends are woven in to the hat, revel in your accomplishment and find the nearest cute baby to model it for you. When you’re all done, send me a picture of your masterpiece or post it to the blog’s Facebook wall and enjoy!

Thanks for stopping by!
Striped Baby Leg Warmers

Pinnable Baby Leg Warmers

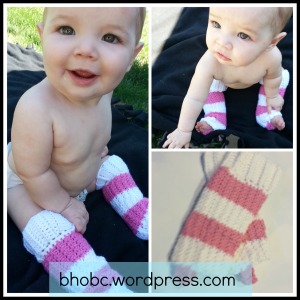
These super cute leg warmers are size 6-9 months. Use a smaller or bigger hook to obtain a different size or adjust the number of rows in the cuff. The cuff is textured and extra stretchy using back loops only and the body is textured using the super simple star stitch (sc, dc). There is also a foot strap at the bottom to help keep the leg warmers on your wiggle worms. My baby loves her new striped leg warmers and it only took me 30 minutes to make them!

Materials:

-Size H Hook

-Cascade 220 100% Wool yarn in Pink and White

Abbreviations:

-Ch = Chain

-Sc = Single Crochet

-Dc = Double Crochet

-BLO = Back Loops Only

-Sk = Skip

-Sl St = Slip Stitch

Cuff:

(Done all in White)

Round 1: Ch 12.

Round 2: Dc in 3rd Ch from hook and in each St across.

Round 3: Ch 2 (Counts as first Dc). BLO Dc in the second stitch and each St across.

Rounds 4-18: Repeat Round 3.

Round 19: Sl st the ends together to form a ring, do not twist.

Round 20: Ch 1, Sc in same space, Sc around the ring. Sl st to first Sc. You should get 30 st.

Leg Warmer Stripes:

Round 21 (In Pink): Ch 1, Sc in same space, Dc in next st, *Sc in next, Dc in next. Repeat from * til end, Sl st to first Sc.

Rounds 22-26 (In Pink): Repeat Round 21.

Rounds 27-31 (In White): Repeat Round 21.

Rounds 32-36 (In Pink): Repeat Round 21.

Rounds 37-41 (In White): Repeat Round 21.

Foot Strap:

Row 1(In Pink): Ch 1, BLO Sc in same St, Dc in next, Sc in next, Dc in next, Ch 1, turn.

Rows 2-6: Repeat Row 1.

Thanks for stopping by!

6 Out-of-the-Box Ways to Get Your Baby to Fall Asleep

Baby Echo Sleeping Pinnable

It’s 11 pm but the baby is still awake! She is tired and cranky but way too wiggly to fall asleep. She isn’t hungry, her diaper just got changed. What do you do?

1. Take a Walk!

Put the baby in warm pjs and put her in the front pack. Take a walk around the block or around the neighborhood. The cool night air will excite baby and she might coo at a bright streetlamp or a passing car. This excitement is so much fun to witness. Remember that she has never stared up at the stars. Never been in awe at the stillness and beauty of a deer. Enjoy these special moments with baby and forget about the dishes or that TV show you need to catch up on. Soon enough, the gentle rhythm of plodding footsteps and the warmth of her pjs will lull her to sleep. Babies crave this rhythm because they are used to being in a constantly moving environment in the womb.

2. Take a Drive!

Bundle baby up and put her in the car. Take a short ride and try to go somewhere pretty so that you can enjoy the car ride as much as she is going to. The gentle vibrations of the car and the moving lights she sees through the car window will soon have her mesmerized. Sometimes I find myself taking the long way home at night after I pick my baby up from the sitter, after work. Especially when I know that she is almost asleep, I can’t resist another loop around the block to send her to dreamland.

3. Make a fort! 

Who doesn’t love a blanket fort?! I like to lay my baby in her crib and drape a blanket over the top half of the crib. She loves to bat at it and talk to it, which quickly tires her out, and that combined with the lower light level due to the blanket is a recipe for insta-sleep! Just make sure you remove the blanket after she falls asleep to avoid the risk of suffocation. Yikes! :S

4. Dance it Out!

Sometimes trying to put baby to sleep makes me just as cranky and tired as she is. Babies are crazy good at sensing this crankiness and may act out because of it. It is super important to stay chill and upbeat when putting a baby to bed so baby knows that bedtime isn’t a bad thing. To set a different mood, put on your favorite tunes, pick up your baby and dance your heart out. You’ll start to feel better as you sing along with the music and baby will too. Dance until you are pooped and I bet she will be too from all the excitement!

5. Take a Bath!

Bathtime is Echo’s favorite. She loves to splash in the water and slide around on her back in the bath tub. It is fun to run her hand under a running faucet or light up when her splash makes a loud noise. All that splashing soon tires her out and PJs feel extra warm and cozy on her damp skin. Swimming makes me tired too!

6. Snuggle Up!

You know how sometimes you just want to cuddle? Why is it so crazy to think that babies feel extra needy sometimes too? It is NEVER spoiling your child to give them extra attention. Attention is one of the basic human needs. Snuggle up close to baby and tickle her tummy, kiss her forehead and walk fingertips up her arms. She might make little cooing sounds. Have a conversation with your baby, taking turns listening and talking. You are her whole world and sometimes you’re the only cure for all her woes.

Super Simple Chevron Washcloths

Chevron Washcloth Pinnable

These super strong washcloths work up fast and would make a super cute addition to any baby shower present! Trust me, anyone with a baby knows that there is NEVER such a thing as too many washcloths! It is all single crochets so it is a good first project for beginning crocheters.

Materials:

-Size H Hook

-Cascade 220 100% Wool yarn in Pink and White

Abbreviations:

-Ch = Chain

-Sc = Single Crochet

-Sk = Skip

-Sl St = Slip Stitch

Super Simple Chevron Washcloth:

Round 1: Ch 21 (Pink)

Round 2: Sc 4, 3 Sc in next st, Sc 4, Sk 2, Sc 4, 3 Sc in next st, sc 4,  ch 1, turn.

Rounds 3-4: Sc 3, Sk 1, 3 Sc in next st, Sc 4, Sk 2, Sc 4, 3 Sc in next st, Sc 2, Sk 1, Sc 1, ch 1, turn.

Round 5-7: (white) Repeat Round 3.

Round 8-10: (pink) Repeat Round 3, Sl st, fasten off.

Filling in the Triangles:

Sc down one side of a triangle and sl st to connect it to the side of the next triangle, Turn and Sc back across, skipping the 2nd to last stitch, Sc 1, ch 1 and turn, Sk the 1st St and Sc back down and sl st again. Continue in this manner until the gap is filled.

Filling in the Corners:

Sc across edge, ch 1, turn, sk 1, sc across, sk 2nd to last one, sc in last one, ch 1, turn, Sk first one, Sc across, Sk 2nd to last, Sc in last, ch 1, turn, continue in this manner until it comes to a point.

Finishing Touches:

3 Sc in one corner, Sc to next corner, repeat around. Do this twice.

Thanks for stopping by!

Crochet Cuddly Jellyfish Amigurumi

Jellyfish Pinnable

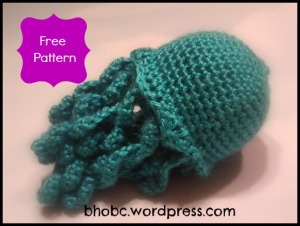
My 6 Month old baby girl absolutely adores her new jellyfish toy! It has no eyes for her to chew on and the tentacles are all made in a round and then attached as one piece to the jellyfish hood so she can’t break them off and choke on them. She likes it when I tickle her nose with the tentacles and loves it when I press him against her chest and make a buzzing sound like she is being stung. It is always a surefire way to get her to belly laugh. 🙂

Materials:

-Size H Hook

-Simply Soft Yarn in Pagoda

Abbreviations:

-Magic Ring: Tutorial

-Ch = Chain

-Sc = Single Crochet

-Inc = Increase = 2 single crochets in the same stitch

-Bpsc = Back Post Single Crochet

-Dc = Double Crochet

-Sl St = Slip Stitch

-Tc = Triple Crochet

-Jellyfish Tentacle = Bpsc,  ch 25, sc in 2nd ch from hook and in each ch across

Jellyfish Bottom and Tentacles:

Round 1: Magic Circle 5 Sc

Round 2: Inc in each stitch (10).

Round 3: Sc 1, Inc, repeat around, adding tentacles after the 3rd, 9th and 15th sts (15).

Round 4: Sc in first 2, Inc, repeat around (20).

Round 5: Sc in first 3, Inc, repeat around, adding tentacles after the 5th, 10th, 15th, 20th and 25th sts (25).

Round 6: Sc in first 4, Inc, repeat around (30).

Round 7: Sc in first 5, Inc, repeat around, adding tentacles after the 7th, 14th, 21st, 28th and 35th sts (35).

Round 8: Sc in first 6, Inc, repeat around (40). Sl St and fasten off.

Jellyfish Hood:

Round 1 (In Pagoda): Magic Circle 5 Sc

Round 2: Inc around (10). Mark beginning of next round.

Round 3: 1 Sc, Inc, repeat around (15).

Round 4: 1 Sc, 1 Sc,Inc, repeat around (20).

Round 5: Sc 1 in first 3, Inc, repeat around (25).

Round 5: Sc 1 in first 4, Inc, repeat around (30)

Round 6: Sc 1 in first 5, Inc, repeat around (35)

Round 7 : Sc 1 in first 6, Inc, repeat around (40)

Round 8: Sc evenly around, and join with a Sc to the outer edge of the tentacle circle.

Scalloped Jellyfish Edge:

Crocheting through both the stitches of the hood and the stitches of the tentacle circle at the same time,

sc, dc, tc, dc, sc, repeat around.

Thanks for stopping by!

Crochet Mario Star Granny Square Free Pattern

Mario Star Pinnable

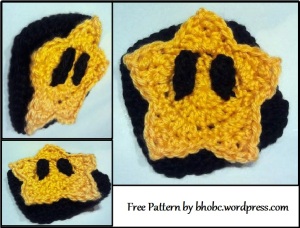
This is the second installment of my Mario Granny Square collection. You can find a pattern for the Mario Bomb square HERE. Mario is a timeless video game that always makes me feel nostalgic. I am designing a collection of Mario themed granny squares so I can make my baby a Mario blanket and share that good feeling with her. Video games have come a long way since then and not necessarily in a good way, but it’s nice to know that the classics will always be the classics. Feel free to use this free pattern in whatever way you see fit just link back to me in any sales you make of your finished product or if you post any pictures of what you made! I hope to see lots of blankets and maybe someone could even tackle a messenger bag! Wouldn’t that be cute? 🙂

Materials:
-Size H Hook

-Simply Soft Yarn in Black, Sunshine, and White

-Large plastic embroidery needle for attaching eyes

Abbreviations:

-Magic Ring: Tutorial
-Ch = Chain

-Sc = Single Crochet

-Hdc = Half Double Crochet

-Dc = Double Crochet

-Sl St = Slip Stitch

-Sk = Skip

-FLO = Front Loops Only

-Adj Dc = Adjacent Double Crochet Stitch – Tutorial HERE

Crochet Mario Star Granny Square:

Round 1 (In Sunshine): Magic Circle 10 Dc

Round 2: Ch 3 (Counts as first Dc), Dc in same stitch, Dc 2 in each st around, sl st to top of ch 3 (20)

Round 3: FLO Ch 1, *Dc 2 sts in each of next 2 sts, 1 Sc in each of next two sts. Repeat from * til end (ch 1 counts as second Sc for last repeat), sl st to top of ch 3.

Round 4: Ch 1, *Sk 1, 2 dc in next st, 1 adj Dc on last Dc, 2 Dc in next st, 1 sc in next st, 1 sl st in next st, 1 sc in next st. Repeat from * til end. Sl st to ch 1, fasten off and weave in ends.

Round 5 (attach black to spare loop of round 3): Ch 3,  Dc 4 in same st, Dc 1 in next 4 sts, *Dc 5 in the next stitch, then Dc 1 in the next 4 sts. Repeat from * twice, sl st to top of ch 3.

Round 5: Sl st 2, ch 3, 4 Dc in same stitch, *Dc 8, 5 Dc in corner st. Repeat from * til end, sl st to top of ch 3, fasten off and weave in ends.

Black Mario Star Eyes:

(Make Two) Ch 5, Hdc in 3rd ch from hook, Hdc in next two, sl st to beginning ch, fasten off and weave in ends. Attach to star using embroidery needle. Stitch on white for eye highlights.

Thanks for stopping by!

Crochet Two Finger Squid Puppet Pattern

Squid Puppet Pinnable

Materials:

-Size G Hook for little fingers, or size H Hook for bigger fingers

-Simply Soft Yarn in “Pagoda”

-Large Plastic Embroidery Needle

-Buttons or plastic safety eyes

Abbreviations:

-Magic Circle = Tutorial

-Ch = Chain

-Sc = Single Crochet

-Dc = Double Crochet

-Sl St = Slip Stitch

-St = Stitch

-Dec = Decrease

Crochet Squid Head and Tentacles:

(to be worked in one continuous round: do not sl st each row, just work in a spiral)

Round 1: Magic Circle, Dc 4 (4)

Round 2: 2 dc in each st (8)

Round 3: *1 Dc in first st, 2 Dc in next st. Repeat from * around (12)

Round 4: *1 Dc in first 2 sts, 2 Dc in next st. Repeat from * around (16)

Round 5: *1 Dc in first 3 sts, 2 Dc in next st. Repeat from * around (20)

Round 6: *1 Dc in first 4 sts, 2 Dc in next st. Repeat from * around (24)

Round 7-9: 1 Dc in each st. (24)

Round 10: *Dec over the next 2 sts. Repeat from * twice. 1 Dc in the next 6 sts. Repeat from * three times. 1 Dc in next 6 sts. (18)

Round 11: 1 Dc in first st, *Dec over next two sts. Repeat from * once. 1 Dc in next 5 sts. Repeat from * twice. 1 Dc in next 4 sts. (14)

Round 12: *Ch 12, 3 Dc in 3rd st from hook, sc in next st and in each st back to the body. Sl st in next 3, repeat from * once. Sl st in next 2, repeat from * once. Sl st in next 3, repeat from * once.  Sl st in next st, fasten off and weave in ends.

The Two Finger Puppet Base Leg:

(make two, work in a continuous round)

Round 1: Magic Circle, Dc 4.

Round 2: 2 Dc in each st.

Rounds 3-8: 1 Dc in each st.

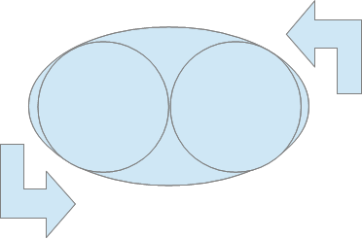
(set the legs next to each other and work 1 row all the way around the outside of the 2 legs as illustrated)

Image

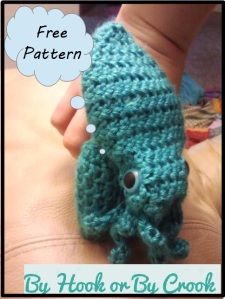
Attach one side of the larger oval to the 9th row of the squid head using the embroidery needle, and enjoy your new two finger puppet. 🙂 Please like and share and make sure to follow my blog to receive updates about new posts.

Thanks for stopping by!

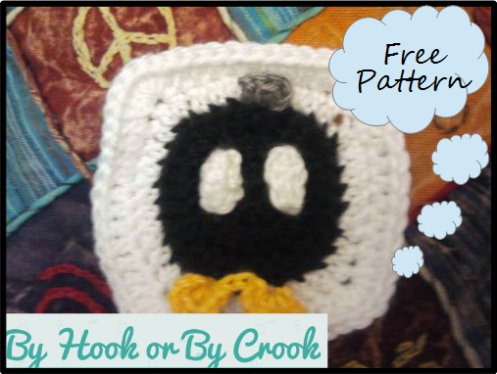
Crochet Ba Bomb Square Pattern

Image

Mario is a timeless video game that always makes me feel nostalgic. I am designing a collection of Mario themed granny squares so I can make my baby a Mario blanket and share that good feeling with her. Video games have come a long way since then and not necessarily in a good way, but it’s nice to know that the classics will always be the classics. Feel free to use this free pattern in whatever way you see fit just link back to me in any sales you make of your finished product or if you post any pictures of what you made! I hope to see lots of blankets and maybe someone could even tackle a messenger bag! Wouldn’t that be cute? 🙂

Materials:
-Size H Hook
-Simply Soft Yarn in White, Black, Sunshine, and Gray

Abbreviations:

-Magic Ring: Tutorial
-Ch = Chain
-Sc = Single Crochet
-Hdc = Half Double Crochet
-Dc = Double Crochet
-Sl St = Slip Stitch
-FLO = Front Loops Only

Crochet Mario Bomb Granny Square:

Round 1 (In black): Magic Circle 10 Dc
Round 2: Ch 3 (Counts as first Dc), Dc in same stitch, Dc 2 in each st around, sl st to top of ch 3 (20)
Round 3: FLO Ch 3, Dc 2 in next st, *Dc in next st, Dc 2 in next st. Repeat from * til end, sl st to top of ch 3
Round 4 (attach white to spare loop of round 3): Ch 3,  Dc 4 in same st, Dc 1 in next 4 sts, *Dc 5 in the next stitch, then Dc 1 in the next 4 sts. Repeat from * twice, sl st to top of ch 3.
Round 5: Sl st 2, ch 3, 4 Dc in same stitch, *Dc 8, 5 Dc in corner st. Repeat from * til end, sl st to top of ch 3, fasten off and weave in ends.

Gray Mario Bomb Fuse:

Join gray yarn to black circle in the 4th st from corner. Ch 3, 2 dc in same st, ch 3, sl st to next st, fasten off and weave in ends.

Yellow Mario Bomb Feet: 

Starting at opposite corner, skip 3 sts and join yarn in 4th st from corner. Ch 3, 2 Dc in same st, ch 3, sl st in same st, sl st next 2 sts, Ch 3, 2 Dc in same st, Ch 3, sl st to same st, fasten off and weave in ends.

White Mario Bomb Eyes:

(Make Two) Ch 5, Hdc in 3rd ch from hook, Hdc in next two, sl st to beginning ch, fasten off and weave in ends.

Thanks for stopping by!