PRIVATE CROCHET LESSON- FLOWER MOTIF CHAIR MAT VOL. 2

After about a week, I had a second lesson on a flower mat making with one of my students 🙂

She’s studying at a college for her master’s degree in the early morning as well as in the evening, so I was wondering if she could finish making the rest of the flowers in time… but here you go. She’s great!!! She managed making everything! 😀

flower-motifs-by-dipal

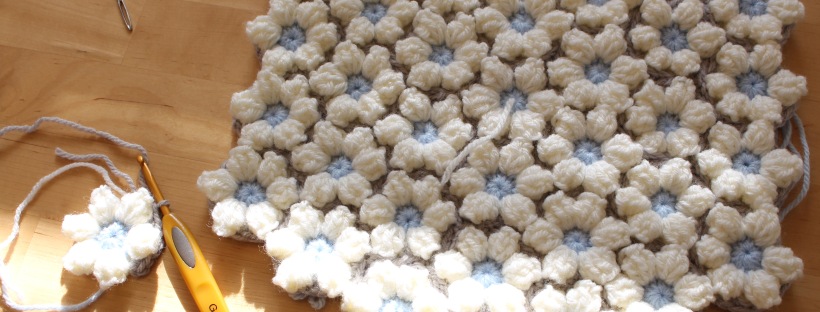
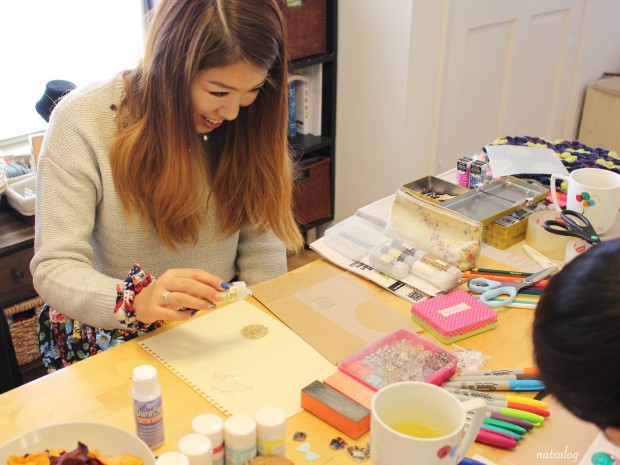
So today, it was all about joining those motifs… This part is not much fun for me and I guess for a lot others neither.

private-lesson2-with-dipal

She looked a little struggled, but… voila. She’s done up to the 2nd row in today’s lesson 🙂 Very well done!!!!!

private-crochet-lesson-2-dipal-flower

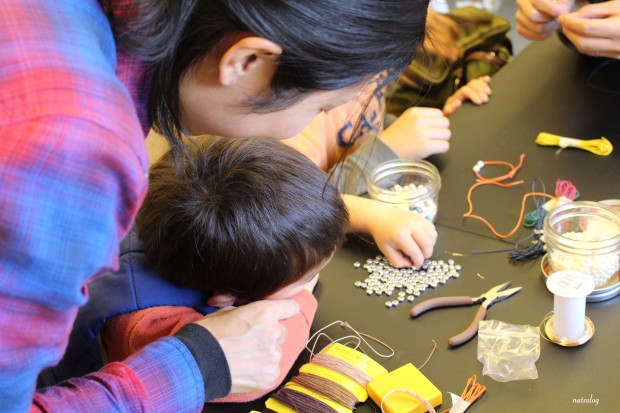
The rest of joining works and edging will be her homework, but I can’t wait to see her finished work ♡ Hope she’ll send me a photo when she’s done with it! In the very end of our lesson, she gave me a lovely handmade card, decorated with quilling. You can see some of her works on her blog here 🙂 Thank you for your lovely message again!!

*****

A sneak peak of my recent work… I’m making a bigger mat for my coming baby boy ♡ I’m so excited about my big life-changing event 🙂

flower-mat-for-my-baby

Private crochet lesson- Flower motif chair mat vol. 1

One of my students at Michaels contacted me and we had a private crochet lesson today 🙂

Since we shared the basic information via email, she got all the materials we needed for the class. In her email, she said she had purchased “pink, orange and white yarn” but when she showed up today, she was carrying a huge travel bag!!!

private-crochet-class-yarn-bag

In the bag, there were lots and lots of yarn balls!! She said she couldn’t pick up “the one”… so … voila. These are the all she had brought to the class today!! 😀 So funny but sweet ♡♡♡

private-crochet-class-dipal

After hearing her most favorite color choice and examining the yarns, we decided the color combinations for her first flower mat project.

private-crochet-class-dipal-working

We worked hard, but at the same time, we talked a lot and shared cultural backgrounds… It’s a lot different from her country, India, to my country, Japan, and where we are now, the US. It was so much fun to work with her today!!!

private-crochet-lesson-flower-motif

I’m looking forward to seeing lots of beautiful flower motifs in our next lesson! 🙂

Till then, I hope she’ll do well at her graduate school as well!! Hearing the story of her attending classes at 7-9am and 7-9pm was quite inspiring and motivating for me! I now feel I should use my time more effectively to use my brain as well!! ♡

CROCHET CLASS – FLOWER MOTIFS CHAIR MAT 2 –

3 weeks after our 1st crochet class of the chair mat lessons, we got together and had a 2nd class. I was excited to see that everyone had beautifully made the flower motifs by then!!

%e3%81%8a%e8%8a%b1%e5%a4%a7%e9%9b%86%e5%90%88


Each looks really different just by how they put colors together 🙂


The blue, black and gray version is made after her (Lady A) son’s soccer club team colors. We thought it would look more boy-like, but actually, they came out really cute. They even reminded us of “marimekko”. I hope she’ll make another one with red as well 😀 I’d love to see it ♡

The dark green, light green and white version is made to match her (Lady B) couch colors. To my surprise, she almost finished making 3 color variations in these 3 weeks! I can’t wait to see her finished work 🙂

The light blue, white and purple version is made for herself (Lady C). She loves light blue and I think the colors remind me of “FROZEN”!!! I’m sure girls will love it ♡


crochet-class

As always, it was super fun to crochet at a bright space with a cup of tea and some sweets when the sun is there 🙂

%e3%81%8a%e8%8a%b1%e3%81%ae%e3%81%8a%e3%81%95%e3%82%99%e3%81%b5%e3%82%99%e3%81%95%e3%82%93%ef%bc%88blue-with-green%ef%bc%89

In the lesson, our goal was to joint 7 flower petals together. And now, to joint all the petals and hopefully finish up the edge is their homework by the end of March!!

I’m very much looking forward to receiving their finished items’ photos ♡

Thank you for joining the class 😀 Happy crocheting ♡

Mommy crocheting with her baby – flower garland with kid’s names :D

I had one of my friends coming over to my place for a private crochet lesson 🙂

She made a flower garland with her son’s name on it about 2 years ago, and this time, she wanted to make one with her second child’s name on. She said she didn’t crochet for a long time, but after a few trials, her speed got much faster. Yay!!

She always crochet in her unique style. What I like about her style is that she holds the yarn ball so that her baby can’t play around and make a mess with it. I think when I have my own baby, I’ll do the same style with her 🙂
mommy-crocheting-with-a-baby

After working for several hours, she’s completed making new pink garland!! Together with her son’s, they look really cute!! I think I’m going to make one for mine when I know his name 🙂

name-flower-garland

After we said goodbye, she sent me a photo how she decided to decorate them at home ♡♡♡

I can’t say anything but “they look soooooo cute!!!!” ♡crochet-name-garland

Feeling very happy to share a peaceful handmade time with a good friend ♡

Crochet class – Flower motifs chair mat 1 –

After maybe 6 months of absence, I had some mamas coming over and held a crochet class at home. The theme was “flower chair mat”. I love this pattern and many of those who saw the actual mat, they gave me some compliments 🙂

crochet-class-1-23-2017

I usually prepare yarns that we use in a lesson, but this time, I’ve asked them to bring their favorite colors. Just as color references, I picked up photos online and showed these samplings to them. It’s interesting how the atmosphere completely changes just by colors!!

flower-chair-mat-colors

What they brought were completely different than those reference picture above, but I can’t wait to see how they will look like in the end 😀 The next lesson will be in 3 weeks and I hope everyone will finish making the flower motifs in time ♡

crochet-class-1-23-2017-lesson-atmosphere

Archangel Holiday Boutique 2016

We held a fundraising event, Archangel Holiday Boutique 2016, on October 7th and 8th 2016. I’d been preparing for this boutique for one year as one of the organizers, starting from December 2015. Finally, we finished two event days in a success 🙂

There were 3 organizers, and we had meetings once or twice per month. There were several difficulties in proceeding the event preparation, but over all, I’ve enjoyed doing them. We picked up over 20 high quality local artists, scattered flyers and post cards in down towns across the Bay Area, and made new website and kept posting on SNS pages.

The event venue preparation was also a lot of work, but the main organizer did really a great job about it. I personally enjoyed decorating the venue 2-3 days before the event dates.

archangelboutique-event-preparation

Making lots of decorations

archangelboutique-banner

We’ve made banner. I like it 🙂

On the event days, I was working as a cashier, and greeted guests. Thanks to the gorgeous weather, I had suntanned… oops…

archangelboutique-at-cashier

I also worked as one of the artists. I even had my booth there 🙂

archangelboutique-natsudesign

NatsuDesign booth at the boutique 🙂

archangelboutique-natsudesign-pearls

My most popular item was this “made of cotton” pearl jewelry 🙂

I loved talking to customers face to face, and giving some advices!!

接客の様子.jpg

Hope she loves her pearl necklaces now 🙂

The venue looked really beautiful.

archangelboutique-venue-morning

I’ve made some new artist friends 🙂 With my favorite artists -an owner of Aplat, a culinary tote store, and that of Flowie, an original textile bags and accessory products.

archangelboutique-withotherartists

I’m so happy to have spent my whole year to this fundraising event!! Our goal, to raise funds in support of local foster children and to spread awareness of the current need for more volunteer mentors, seems to be ended up in a good results 🙂

archangelboutique-with-artists

With volunteer stuffs and great local artists 😀

I won’t be joining in the organizer team for 2017 since I’ll be very busy with my own life, but hope this event will continue for good cause!!

What I love in teaching Crochet…

I’ve been teaching crochet at home and at a craft store for quite a while now.

What I love in teaching crochet is that my students can be anyone and I get to know so many different people! My youngest students are 7 years-old, and the oldest is 84 years-old!! I have both male and female students, and they came from varieties places on the earth!! It’s so fun to get to know new people 🙂

eldest student.jpg

She’s started trying a new hobby in her mid-80’s. So energetic!

Many of them, who come to my place are those who never crocheted before but always wanted to give it a try. So, I teach from the very basic, starting from how to hold tools, make basic stitches, read patterns and symbols (sometimes both in English and Japanese)…


The very first stitch we’ll have to master is “chain stitch” and kids really have fun making a long chain!!

kids crochet.jpg

Girls in 3rd-4th grades can make their own hair accessories with this crafting. We’ve made scrunchy and hair bows. I love it 🙂


One new grand-mom has recently finished making her first crochet work for her new-born grand-son!! I was so happy to spend pleasant time with her 🙂


The most popular projects so far is this flower mat.

flower mat.jpg


Now, 3 of my students are working one the same flower mat project, (and there are so many who want to try later) and I can’t wait to see the finished work! 😀


Maybe it’s your turn to try crocheting? If you want to join us, please let me know 🙂

Summer is almost over and the yarn season is coming…!! 😀

Collaborating with art gallery

I met an art gallery owner and he suggested me to collaborate and hold a craft & art meet-up there. As our first attempt, I held a wrap bracelet making workshop there.

gallery photo.jpg

This is how it looks like in the studio and our work space 🙂

gallery photo 2.jpg

This is how we worked 🙂

meetup wrap bracelet.jpg

Then, This is what we get in the end 🙂

Beige brown cord x blue beads. She had blue necklace and it matched well 🙂


Brack cord x pink and white beads. Her theme was “elegant” 🙂


Dark brown cord x wood and pearl beads. The choice of the button was also good 🙂


We had fun, getting together and sharing the passion for the craft 🙂

Thank you for those who participated the event! I’ll be looking forward to having another crafting event with you ♡

TIPS 4 health & beauty evnet

With my other skilled friends who shares the same interest in health & beauty, we opened a 1 day only petit boutique at a rental event space. We named the event as “TIPS 4 – health & Beauty”.

I sold handmade jewelry, another sold handmade cream and the other sold vegan sweets. For the event, I prepared some new designs 🙂 The theme is “Spring”! They will be also coming to my web shop soon 🙂

Spring designs (NatsuDesign)

Here is the photo of vegan sweets.

vegan sweets.jpg

Here are the handmade creams without anything chemical, but only with natural ingredients.

handmade cream.jpg

Here is my jewelry section. I need to learn how to display the items nicely…

natsudesign desplay.jpg

I also used a model photo streaming. I hope this helped people to get an idea how it will look on them 🙂

natsudesign display with ipad photos.jpg

We also had some free sessions that everyone can enjoy! Yoga.

yoga @tips 4.jpg

Craft workshop, a bracelet making.

workshop @ tips4.jpg

It was our first attempt, but we had so much fun and I hope the visitors also had lots of fun 🙂 I’m already looking forward to our next boutique day. Thank you so much for those who supported the event and those who visited us 🙂

Another tulle skirt making adventure

After I made my very first tulle skirt, I was reading a Japanese blog written by a fabric store owner. It’s so fun to see how a very beginner master the sewing techniques!! He said something like “repetition is the closest way to the success”, so I decided to continue this skirt making adventure a little bit more. This time, I wanted to make the length a little shorter and had to get fabrics by myself.

So, I went to a fabric store to get several fabrics. There were plenty types of fabrics. Even just for tulles, there were probably a hundred to chose from.

fabric store

It was quite difficult to get the right fabric. Some are too thin, some are too rough, some are too thick… Also, the colors… aww.fabric store -cotton

I was trying my best to chose the right one.

fabric store 3

Then, finally I got them. For the tulle skirt, I decided to go with light gray. Also, I bought a knit fabric for later to make a long skirt. Overall they costed about $25. ($9.99/yard for the cotton fabric, $5.59/yard for the tulle, $9.99/yard for the knit)

fabric

First, I had to soak the fabric and do the ironing, but I was lazy to do the soaking part. So I skipped that part, and instead, I sprayed a water on it and did the ironing.

gray fabric with oji-san

skirt- ironing

I learned how important the cutting part is, and I used some new methods with that, so I think my cutting skill has improved! 🙂

skirt- cutting fabrics with scissors

The point is “not to move the fabrics, but let myself move”.

skirt- cutting

Then, finally, the sewing part! Yay! 🙂 Using clips was really convenient and it helped me to save time compared to using pins.

skirt - using clips

When I finished sewing the most difficult part, I realized that one of the parts were sewn with the wrong-side up…

skirt - wrong way...

So, I had to undo!! It took me almost an hour to get back here… 😦 I wanted to cry…

skirt - bring it back

Anyway, I finished making it. It looks like this 🙂 Seems like the little man is also happy!!

skirt - done

I now have two new skirts 🙂 ♡

skirt -2 types


=====
* total time : 6 hours
* cost : $17 for fabrics
=====

I made a lovely tulle skirt :)

I like skirts though I don’t really wear them… Here in California, I rarely find the type of skirt that I like. So, I decided to make one that I like!!

I wish I could make whatever clothes that I like, but I’m just a beginner with sewing, so things don’t work that way. I bought a kit for the tulle skirt in Japan (almost a year ago…!!), which came with a tulle fabric and one other fabric with a simple instruction paper. This costed about $30, so you may actually find a skirt with the same price…

tulle skirt kit

The sewing part was rather easy. Most of the parts, I just had to sew straight.

skirt making-1

The steps that I found quite difficult was to cut the materials straight. I had to do the ironing quite often…

skirt making-2

The tulle fabrics… oh it was terrible since I couldn’t do the ironings on that fabrics, so I had to cut, and keep trimming… so finally, when it got the straight edge, the length was shorter than what the instruction said :p

So, when I saw everything together, the tulle part was shorter than the other (as shown in the picture below)… Anyway, I didn’t like the length of the skirt since it was a little too long for me, so I adjusted the length.

skirt making 3

Now, I have this skirt!! I’d probably wear like this ? 🙂

skirt with others

I’m so happy to get the skirt that I like 🙂 I’d probably try to make more with other kind of fabrics and colors!!

1st Birthday!!! Love gifts.

My best friend’s baby boy turned 1 recently, and my friend held a big birthday party for him.

I wanted to give something special, and so I prepared several handmade gifts to him.

1st item is a photo panel. I love this photo!! A while ago, he was so little, even smaller than my dolls. He’s much bigger than them now… so, looking at this photo reminds me how fast he has been growing up!!

koa's gift (photo panel)

2nd item is a name pin. Oops, I don’t have a good picture of the item…

3rd item is a bow tie. I made one for him and another bigger one with pins at the back for his mom.

koa's bow tie

His outfit was matching well with the bow tie! I was so happy to see that 🙂

koa with bow tie

bow tie 2

Seeing him growing so fast just next to my friend, it’s a joy for me! Thanks always for making me smile 🙂

bow tie set with koa and rina

Then, it’s my friend’s birthday!! Wish you will have a wonderful year ahead and explore a lot of new things and new world with me 🙂 ♡

Rina's birthday


Shrink plate workshop

I held a new workshop today!! It’s about shrink plates.
Do you know what shrink plate are like? A shrink plate is just a thin plastic plate and you draw or paint on it and heat it in an oven for about a minute. Then, it will shrink down to almost 1/3 or 1/4 of the original size.

When I was little, it was very popular among kids. Today, shrink plates are so big in the Japanese handmade world. If you browse Japanese online handmade markets, I’m sure you will easily find some.

I have been so into this craft for a few month, and of course, I made this character 🙂 I always carry them on my bag.
shrink plate (oji-san)

Here are some photos from the workshop.
plastic plate workshop 2

I’ve asked them to bring their kids’ favorite characters or kids’ drawings.
So, she was drawing lots of trains for her son.
plastic-plate workshop 1

She brought her son’s very first drawing! It’s a fish! How exciting!!
shrink plate workshop 3

I forgot to take all of the works, but here are the trains! They are so tiny and cute 🙂 I can’t tell which one is which, but I’m sure the great little boy can! 😀
plastic plate workshop 4

Here are another boy’s very first drawing, a fish, in a fish bowl as a key holder and a pair of earrings!! She’s going to give the key holder as a gift to her husband and send the jewelry to her friend. How sweet ♡
plastic plate workshop 5

She made name pins with her name and her kid’s name 🙂Akina-chan bag

When I become someone’s mom, I’d love to do the same as what my friends did today!!

plastic plate wokshop 6Hmmm, crafting helps to make our life a little bit happier ♡

Repairing my hair accessory

When I was working back in Japan, I bought a hair clip. I really liked it because it was shiny and cute, simple but stunning 🙂 I always carried it in my purse, and whenever I wanted to tie up my hair, I used it. I like keeping my hair up when I want to get concentrated and work on something.

This is the thing after several years. I don’t think this looks appealing to any of you though…

hair clip before

The embellishment chains and the pink glitter were  falling off. I knew it didn’t look good, so I wasn’t using it for a long time, but I just couldn’t throw it away.

I probably didn’t know what to do if it was two year’s ago… but now, I know exactly what to do.

First, I glued the chains. I should have done it long time ago but I was also lazy…

hair clip (in the middle of repairment).jpg

It’s already looking much better than before… isn’t it?

Then, I used my favorite items… resin and glitter!! For the glitter, I thought of changing color from pink, and chose gold 🙂

hair clip (with repairment tools).jpg

Let me show you how it looks after I repaired 🙂

hair clip (after the repairment).jpg

It looks much better now!! I will probably be able to use it for another several years now 🙂

hair clip (Before-After)

I think “fast fashion” involves with lots of “waste”, which is really bad when we think of the world’s environment. Through repairing experience, I thought I’d like to make things that would be cherished by customers for a longer time with love.

You can check my handmade jewelry and hair accessories on my Etsy store. I hope they will be your favorite for a longer time 🙂

cropped-natsudesignshop-small.jpg

NatsuDesignShop on Etsy

Please let me know if there are something that I can help you with repairing your favorite jewelry or accessories 🙂


Holiday Boutique 2015 in Los Altos

I helped to run “Holiday Boutique 2015” as one of the organizers this year. We did that to raise awareness of what CASA, Child Advocates of Silicon Valley, was doing and also for fund-raising. I’ve heard that there are more than 1,600 foster children in Santa Clara county only and they definitely need more volunteers to help those children.

We started planning the event from June and had several meetings for 5 months. It was a lot more work than I’ve expected but now when it’s finished, I’m so relieved and I feel so happy that I’ve done this. I’m happy that I have spent quite a bit of my time for a good cause!!

Also, I’ve found out that there are so many kind and generous people out there!! Some people have helped to advertise our events, some people spent extra money on donation and so on.

With nearly 15 other local artists, I’ve also displayed many types of jewelry there. It was so interesting to see what types of things were popular.

holidayboutique-mywork

Now, I have to rearrange my Etsy shop according to my survey!! I need to add things that were popular on the event day!

What really interesting to me was to connect with other local artists!! It’s always nice to be connected to nice people 😀

I haven’t hold any workshops for several months now, but one big event is over. So, I’m happy to do something for my craft passionate friends 🙂

holidayboutique

I’m now very motivated for our next year’s event. I hope we will make this boutique more exciting places!!

If any of you are interested to run the event with us as a volunteer, please contact me 🙂

Welcome bear at the wedding reception in Japan

I was back in Japan from middle of September for a little less than a month till early October.

The main purpose of this trip was to attend my friends’ wedding party. Of course, I’ve enjoyed the stay there and I went to visit lots of beautiful places and fancy craft shops, as well as great restaurants. So, I hope I will get other chances to show you how it was like 🙂

Anyway, my friend, the bride, had asked me to make a welcome bear for her wedding reception. (In Japan, it’s common to put stuffed animals or dolls at the entrance of the wedding reception to welcome guests in stead of the bride and gloom.)

I was so happy to have received this request from her!!

I asked her what kind of dolls she would like and she sent me some images that she took somewhere online. This is one of the images she sent me.

IMG_3269

I rushed into a fabric shop, and bought a white fabric. And then, I played with the fabric… voila!!

welcomebear1

It looks ugly before putting the stuffing… right? hihihi 😀 Here are steps to show you how I’ve made it.

bear

Then, I cut off the area that I didn’t need.

welcomebear8

Then, I flipped it inside out and put in the stuffing. Voila!!

welcomebear9

Actually, I wasn’t satisfied with the quality of my outcomes, so I’ve made quite some of them.

bear10

By the way, I still have some of them at home… 🙂
Anyway, from them, I’ve picked up two of my favorite cuties. And I’ve made them dressed up 😀

welcomebear11

Since the first gift my friend has got from her husband was a necklace from Van Cleef & Arpels, I’ve made the same necklace for the doll 🙂 I hope they’ve noticed it!! (By the way, I was really surprised to see how expensive the real one was!!)

I was happy to have seen them at the their entrance hall of their wedding reception ♡

wedding entrance

I do hope their love will last forever!!
Happy wedding again, for my dear friend ♡

Ready for “Trick or Treat”? Here is the last minute easy Halloween project!

Are you ready for this year’s Halloween??

If you have kids and haven’t gotten the idea yet, you must be thinking what to do for them. Even if you don’t have kids, you might be thinking what to prepare at your house for the kids!!

It’s going to be my first Halloween to stay at home in California. Last year, I was back in Japan at that time of the year.
So, I’m excited to see how kids are dressed when they come to my house 🙂 I should get ready for the day, getting hundreds of candies!!


Today, I want to share my “within 1 hour Halloween project”. They are little cute pumpkin earrings.

pumpkin earrings

If you wear them on Halloween, people will look at you and definitely notice that you’re in the mood and ready for the event!!
If you make them for your kids, your pumpkins will look brilliant with the pumpkins!!

You can also use this pumpkin as an applique. It’s only an idea but decorating a simple T-shirt with lots of these pumpkins will be really cute!! Using this pumpkin as a zipper charm is also a good idea 🙂

As usual, I’ve put many step-by-step photos in the pattern, so I hope lots of you will enjoy making them 🙂

button_craftsy button_etsy

Happy crocheting ♡

Something blue. Blue brings happiness!

On the wedding day, people say it’s good to have something blue. So, how do you think about asking ring bearers to have this blue backpack?

elephantbackpack-cover-withoutletters (with natsulog)

It’s my fourth animal backpack series, an elephant!

This is originally made upon a request of my friend. I hope she will like it!!

It’s a perfect size to carry 4 diapers and baby wipes, so I think it’ll be a perfect DIY/handmade baby shower gift 🙂
It can also carry toys or snacks, so it’ll also be a great DIY/handmade birthday gift 🙂

Size-elephantbackpack

If you feel like making one for your cuties, please visit my shops below 🙂

button_craftsy button_etsy

Happy crocheting ♥♥♥

New trial :)

I’ve been making something new 😀

A

I’ve came up with an idea of making rosette with a cute alphabet embroidery on a linen. This first one was for my friend’s baby shower gift.

Awith-gift

I’ve made another one for my friend.

M

Then, her daughter requested me to make one with her favorite colors, so I’ve tried. They were something that I usually wouldn’t chose, but here it came.

M2

Don’t you think it’s nice? I actually really like it!!

M2onapoach

Then, here is another one for my other friend’s baby shower gift.

Y

It’s a lot of work to make one… but I really like them all 🙂

I’ll probably try to make some more with other colors! Hope I’ll have a chance to share them here on my blog!!

Eco-friendly bag for summer??

I was on holiday in Hawaii in early June and after that, I’ve been lazy…!! And now, June is almost over… !!!

I made a new pattern a while ago but forgot to introduce it here, so I’m uploading some photos of my new pattern!! It’s a bag pattern, simple but cute, made with jute strings.

NaturalJuteBAG-pattern

You can carry your wallet, books, phone, towels and some other things in this bag. The handles are long enough to carry comfortably on your shoulder.

SONY DSC

When I went out to Jo-Ann with this bag, the person from the shop was really interested in my bag and was asking about the pattern! I was so flattered!!

SONY DSC

If you feel like making one for yourself, please visit my shops below 🙂

button_craftsy button_etsy

We haven’t had rain in California for quite a while now. I wonder how it is like in the other areas in the US. I’ve heard that we will have a lot of rain in winter though. I prefer sunny days, but if we have too much rain this winter, I guess I need to stay at home and think about more and more new patterns!!

Happy crocheting ♡