Friday, May 24, 2024

FRIDAY FUN FUN DAY! - How To Make A Pillow Cover With Crochet Trim By Sara Sach

FRIDAY FUN FUN DAY!
How To Make A Pillow Cover
 With Crochet Trim
By Sara Sach Of Posh Pooch Designs


I saw the fabric on line and just had to have some.
 I went to my local Hobby Lobby
 but they did not have it in stock.
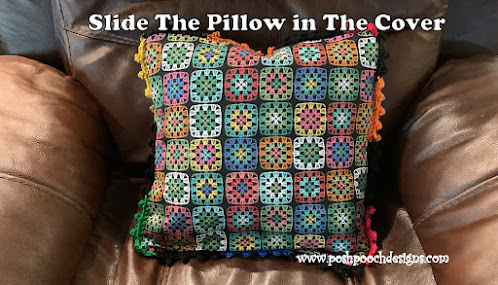
I ordered the Granny Square fabric from the 
Hobby Lobby website. It is a cotton Duck cloth
 which is a nice heavy duty fabric.

I originally wanted the fabric to make some liners 
for bags. Once it arrived I decided to make a pillow cover
 for a pillow I already had. I Love it. The cover can
 be removed and washed if it gets dirty.
Remember you do not need a sewing machine to make
 this pillow cover. You can stitch this up by hand 
with thread and needle. The Sewing machine just
 makes it faster and easier.


I also decided I wanted to make a Crochet trim for the
 pillow cover. I thought this Red Heart yarn was a perfect
 match with the bring colors and pops of black.
It's Red heart Stripes in the Primary Stripes Colorway.


See The Video On My Crochet Youtube 
Channel At This  LINK


Crochet Pillow Trim Crochet Pattern

Skill: Easy

Material:
Crochet Hook - I / 5.5 mm
Yarn - Med. (4) Acrylic - Red Heart Super Saver/
            Primary Stripes 2 oz.
Yarn Needle
Tape Measure

Stitches:
Pico Stitch (pcst) ch4, slst in the top of the previous st
Foundation Double Crochet (FDC)

Size: 1.5 inches tall, length the size of the pillow

Notes:
Measure your pillow/ pillow form for the length needed.
My Pillow is 14 inches

Pattern:
*FDC, pcst in the 3rd FDC*


Repeat From * to * until the length needed for the pillow.

When I reached my length needed, I kept the 
yarn attached until adding it to the pillow over.
Remember this is a stretchy stitch pattern, and
 may stretch when added to the pillow cover.


Let's Make The Pillow Cover

Materials:
14 inch Pillow/Pillow Form 
Fabric - 3 15 inch pieces of Fabric
Needle And Thread to match
Scissors 
straight pins
Iron and Ironing board

Sewing Machine Optional

1. Step 1 - Measure Your pillow / pillow form


2. Cut 3 Squares The Size of your pillow + 1 inch
My pillow is 14 inches, I cut 15 inch squares


3. Fold 2 of the Squares a 1/3 the way down


Then fold under, and Iron them.


Pin and sew them.


4. Line them up, Wrong sides out with the front square.


5. Lay the trim between the front and back, making sure the picots are 
facing inward. And pin in place.


6. Now sew them all together. Remember the trim may stretch.
Make sure the ends meet up. Tie off the trim ends.


7. Now flip the pillow cover to the right side.
 You may need to ease the trim out some.


Now Slip the pillow / pillow form inside the opening in the back.


Now Wasn't That Fun And Easy???


I Love This New Pillow So much!


Tuesday, May 21, 2024

COFFEE AND CROCHET LIVE PODCAST May Winner And More Yarnie Fun With Sara Sach

 COFFEE AND CROCHET LIVE PODCAST
May Winner And More Yarnie Fun 
With Sara Sach Of Posh Pooch Designs


😍😍😍😍😍😍😍😍😍😍😍😍😍😍😍😍😍😍

SHOUT OUT OF THE WEEK
Amber of 
Jaibees Crochet Channel 
Click Her LINK
And Lets send her some crochet  joy please Like, Share And Subscribe

🌞🌞🌞🌞🌞🌞🌞🌞🌞🌞🌞🌞🌞🌞🌞🌞🌞🌞


The May Give Away is
3 Skeins Of 
Premier Anti Piling Yarn
And
Coffee and Crochet with Sara
A Canvas Zipper Pouch


See The Video On My Crochet Youtube
 Channel At This LINK


😀😀😀😀😀😀😀😀😀😀😀😀😀😀😀😀
WHATS NEW THIS WEEK AT

THIS OR THAT?
5 Most Needed Crochet Tools
Video LINK


FRIDAY FUN DAY!
Flower Bunting 
Crochet Pattern And Video  LINK


Summer Billed Hat
Crochet Pattern And Video -LINK


Monday, May 20, 2024

Summer Billed Hat Crochet Pattern By Sara Sach

 Summer Billed Hat 
Crochet Pattern 
By Sara Sach of  Posh Pooch Designs


The Summer Billed Hat is a great addition to your
 Summer outfits. The hat is open and airy to keep you
 comfy cool, and has a small bill to keep the sun off 
your face and out of your eyes.


Even though This was a request,
I'll admit I designed this style for me. I have been 
thinking about it for a while and when I saw how 
pretty the yarn was, I knw it would be perfect
 for this hat.

I designed it using Premier Sweet Roll acrylic yarn
 Medium (4) weight yarn, The Colorway I chose is guava.
 There are 8 colorways to choose from and any of them
 will work great for this hat design.
Use My Premier LINK 
To see them for yourself.
You will not be disappointed.


The Hat design is an easy design, no fancy stitches,
and it works up quickly. It makes a nice last minute gift
 or needed for a last minute outing.

See The Video On My Crochet Youtube
 Channel At This LINK


Summer Billed Hat Crochet Pattern

Please Add This Crochet Pattern To Your Raverly Favorites
 
Skill: Easy
 
Materials:
Crochet Hook – I / 5.5 mm
Yarn – Med (4) Acrylic – Premier Sweet Roll Fruit Cake
              Guava, 3.5 oz. / 174 yds.
Yarn Needle
1 or 2 Matching buttons for decoration
 
Stitches:
Chain (ch)
Slip Stitch (slst)
Single Crochet (sc)
Double Crochet (dc)
Space (sp)
Skip (sk)
2 Single Crochet together (2sctog)
V Stitch (V st) Dc, CH1, dc in the same st / sp
 
Size: Fits 22 -24 inch head
 
Notes:
Ch1 does not count as a St
Ch3 Counts as a dc
 
Pattern:
 
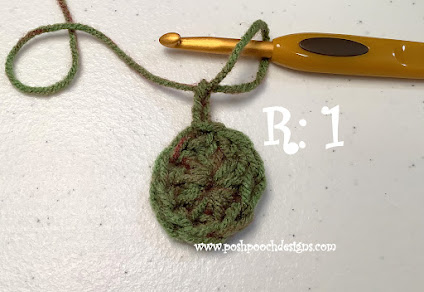
R: 1- Ch 5, join in a circle, ch3, 9 dc in the circle,
Join to the ch3 with a slst, ch3 (10 dc)


R: 2 – Dc in the same st as the ch3, 2 dc in each c around,
Join to the ch3 with a slst, ch3 (20 dc)


R: 3 – *2 Dc in the next dc, 1 dc in the next dc*
Repeat from * to * around,
Join to the ch3 with a slst, ch3 (30 dc)


R: 4 - 1 dc in the next dc,
*2 Dc in the next dc, 1 dc in the next 2 dc*
Repeat from * to * around,
Join to the ch3 with a slst, ch3 (40 dc)


R: 5 - 1 dc in the next 2 dc,
*2 Dc in the next dc, 1 dc in the next 3 dc*
Repeat from * to * around,
Join to the ch3 with a slst, ch3 (50 dc)


R: 6 - 1 dc in the next 3 dc,
*2 Dc in the next dc, 1 dc in the next 4 dc*
Repeat from * to * around,
Join to the ch3 with a slst, ch3 (60 dc)


R: 7 – 1 Dc in the next dc, ch1, sk the next dc, Vst in the next dc,
*ch1, sk 1 dc, 1 dc in the next 2 dc, ch1, sk 1 dc, Vst in the next dc*
Repeat from * to * around,
Join to the ch3 with a slst, ch3 (12 Vts, 24 Dc)


R: 8 - 1 Dc in the next dc, ch1, Vst in the ch1 sp of the next Vst,
*ch1, 1 dc in the next 2 dc, ch1, Vst in the ch1 sp of the next Vst*
Repeat from * to * around,
Join to the ch3 with a slst, ch3 (12 Vts, 24 Dc)


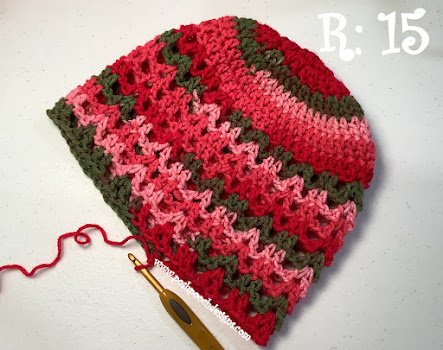
R: 9 – R: 15 – Repeat R: 8
Ch1 after R: 15


Add more rows if a longer or Slouchy style hat is desired.
 
R: 16 – 1 sc in each dc, and ch 1 sp around,
 do not sc in the ch1 sps of the Vsts.
Join to the 1st sc, ch1


Tie off here if you prefer not to add the hat bill

 
Hat Bill:
R: 17 – Sc in the next 28 sc, TURN, ch1 (28 sc)


R: 18 – 1 sc in each sc across, Turn, ch 1 (28 sc)
 
R: 19 – 2Sctog the 1st 2 sc, 1 sc in the next 24 sc,
2sctog the last 2 sc, turn, ch1 (26 sc)


R: 20 - 1 sc in each sc across, Turn, ch 1 (26 sc)
 
R: 21 - 2Sctog the 1st 2 sc, 1 sc in the next 22 sc,
2sctog the last 2 sc, turn, ch1 (24 sc)


R: 22 - 1 sc in each sc across, turn, ch 1 (24 sc)
 
R: 23 – Sc Across the of the hat bill, sc the edge of the bill,
Sc around the hat, sc up the other edge of the hat bill,
Join to the 1st sc, tie off weave in the ends.


Sew Buttons in place.


An Ad Free PDF File is Available
 In My Ravelry Shop At This LINK
For $ 4.50


Friday, May 17, 2024

FRIDAY FUN DAY - Flower Bunting Crochet Pattern By Sara Sach

FRIDAY FUN DAY!
 Flower Bunting Crochet Pattern 
By Sara Sach Of Posh Pooch Designs


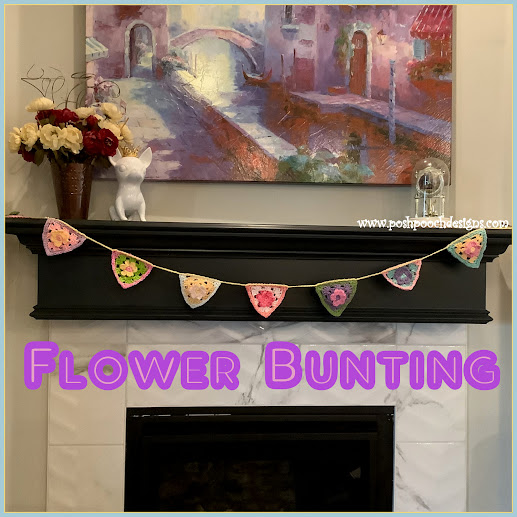
The Flower Bunting is a fun way to add spring and
 summer to your garden, deck, patio, 
porch or even indoors.
The Flower Bunting / Banner  is perfect for decorating for
parties, get togethers and celebrations. So many color
 and theme possibilities.


I designed it using left over medium (4) weight
 cotton yarns and really love the combination
 of spring colors. You can choose any colors of yarn
 or colors you have on hand.
Acrylic yarn also works great for this project, as well.


 They stitch up quickly, too. They Measure about 5 Inches
 each pennant, so you can stitch up a bunch in just a 
short time. And be ready to decorate.

See The Video On My Crochet Youtube
 Channel At This LINK


Flower Bunting Crochet Pattern

Please Add This Crochet Pattern To Your Raverly Favorites
 
Skill: Easy
 
Materials:
Crochet hook – H / 5 mm.
Yarn - med (4) Cotton 1 oz. per Bunting/ assort colors
Yarn needle
 
Stitches:
Chain (ch)
Single Crochet (sc)
Double Crochet (dc)
Space (sp)
 
Size: 5 X 5 Inches
 
Notes:
Ch1 Does Not Count as a st
Ch3 Counts as a dc
Color changes are not indicated in the Pattern
When changing colors ch3 after the color change
 
Pattern:
 
R: 1 – Ch5, join in a circle, ch1
6 sc in the circle, join to the 1st sc with a slst
(6 sc)

R; 2 – Ch2, 2 dc, ch2 in the 1st sc,
*Slst in the next sc, Ch2, 2 dc, ch2 in the sc*
Repeat From * to * 4 more times,
Join to the ch2 with a slst (6 petals)


R: 3 –Slst in the back of the 1st slst, ch 3,
Sk the next slst, Slst in the back of the 3rd slst, ch 3,
Sk the next slst, Slst in the back of the 5th slst, ch 3,
Join to the 1st slst with a slst, slst in the ch3 sp.
(3 chs)


R: 4 – Ch3, 2dc, ch2, 3dc, ch2 in the 1st ch3 sp,
3dc, ch2, 3dc, ch2 in the 2nd ch3 sp,
3dc, ch2, 3dc, ch2 in the 3rd ch3 sp,
Join to the ch3 with a slst, slst in the next 2 dc,
Slst in the ch2 sp and ch3
(3 corners made)


R: 5 - Ch3, 2dc, ch2, 3dc, ch2 in the 1st ch2 sp,
3 dc in the next ch2 sp,
3dc, ch2, 3dc, ch2 in the next ch2 sp,
3 dc in the next ch2 sp,
3dc, ch2, 3dc, ch2 in the next ch2 sp,
3 dc in the next ch2 sp,
Join to the ch3 with a slst, slst in the next 2 dc,
Slst in the ch2 sp and ch1
(3 corners and 3 dc clusters)


R: 6 – *Sc, ch2 sc in the 1st corner, ch 3,
Sk the 3 dc, sc in the next ch2 sp,
Ch3, Sk the 3 dc, sc in the next ch2 sp,
Ch3, Sk the next 3 dc*
Repeat From * to * 2 more times,
Join to the sc with a slst, slst in the ch2 sp
(3 corners, 3 ch3, 2 sc on each side)


R: 7 – *Sc, Ch1, SC in the corner, sc in the next sc,
3 sc in the next ch3 sp, sc in the sc,
3 sc in the next ch3 sp, sc in the sc*
Repeat from * to * 2 more times,
Join to the sc, slst in the ch1 sp,
Tie off weave in the ends.  

Blocking in necessary,
but it makes for nice crisp triangles.

Make as many as needed for the size
 Bunting you are making.


Ch 20, slst across the top of the 1st triangle, 
*ch1, sk 1 st, slst in the next*
Repeat from * to *across the top of the bunting
* Ch 10, Repeat from * to *across the top of the bunting
Continue to repeat * to * for the length needed,
Ch 20, tie off, knot both ends of the ch and you are
Ready to hang your flower bunting.


An Add Free PDF file is Available
 In My Ravelry Shop At This  LINK
 For $2.50