
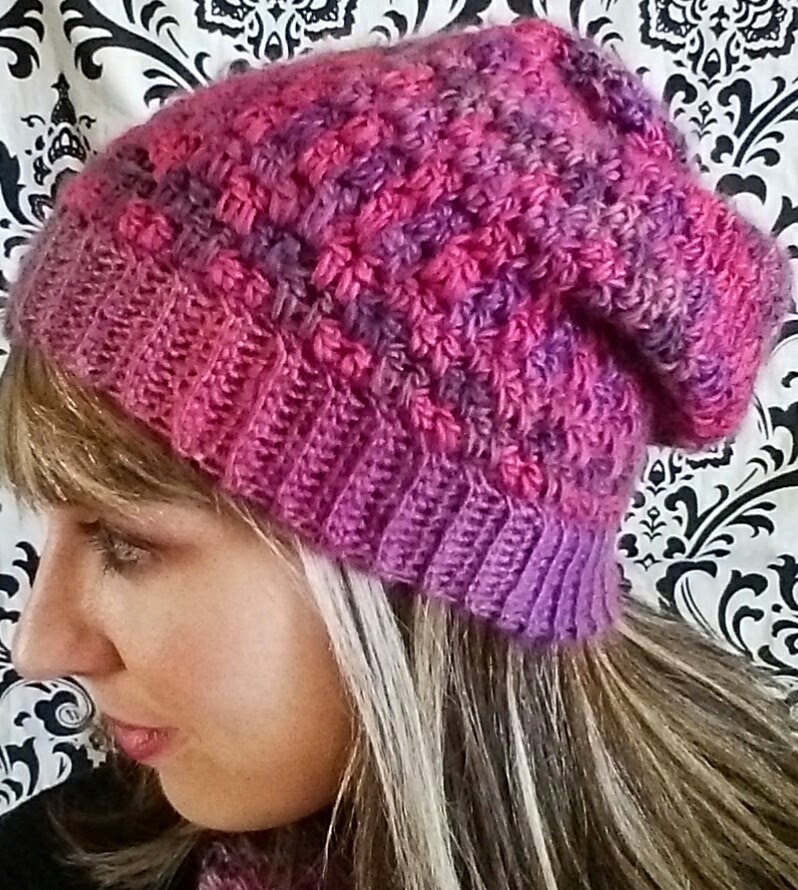
 I finally got around to writing up my Double Drop Slouchy hat pattern that matches the cowl pattern I posted earlier! This slouchy hat uses a drop stitch pattern (where you work stitches into a previous row) to make a warm but still light and stretchy fabric that works perfectly with the self-striping property of Red Heart Boutique Unforgettable yarn. If you’d like you can substitute any worsted weight yarn, and it would also look great in alternating solid colors for a bolder stripe effect! I’m working on uploading the pdf to Ravelry with more photos but for now here’s the basic pattern.
Materials:
One skein of worsted weight (category 4) yarn (I used Red Heart Unforgettable in Winery, 270 yds)
Size I hook
Yarn needle for finishing
Finished Measurements: Circumference–21 inches; Height–11 inches
Gauge: 20 st and 14 rows = 4 inches. Your double crochets should be about ½ in tall; 2 dc should measure about ½ inch across.
*Note: Red Heart Unforgettable yarn varies a little bit in thickness throughout the skein even though it is categorized as worsted weight. If you want to use a different worsted weight yarn for this pattern, just be sure to check your gauge. If you’re having trouble obtaining the proper gauge, try changing your hook size.
Instructions
Ribbing
Row 1: Ch 11, sc in 2nd ch from hook and each ch across (10 sc). Ch 1, turn.
Row 2: Sc in back loops only in each sc across. Ch 1, turn.
Repeat row 2 until band measures 21 inches long. It should be about 2 inches wide. Line up edges and slip stitch together to form a circle. Do not fasten off.
Hat
R1: Ch 1, sc 76 evenly around top edge of ribbing. Sl st in ch to join.
R2: Ch 3 (counts as dc), dc in next sc. *Ch 2, sk 2 sc, dc in next 2 sc. Repeat from * around, sl st to top of ch 3 to join.
R3: Ch 4 (counts as hdc, ch 2), *skip next 2 dc, dc in next 2 sc from round 1 (2 rows below, working over the ch 2 space), ch 2. Repeat from * around, sl st in 2nd ch of starting ch to join.
(In other words, after you ch 4, skip the first 2 dc in your current row. You’re now at the ch 2 space you made on the previous round. Directly below this space are 2 sc from the previous round. Working over the ch 2 space, dc into these 2 sc to make your first drop stitches.)
R4: Ch 2 (counts as hdc), *dc in next 2 dc from round 2 (2 rows below, working over ch 2 space), ch 2, skip next 2 dc. Repeat from * across, sl st in top of starting ch to join.
R5: Ch 4 (counts as hdc, ch 2), *sk next 2 dc, dc in next 2 dc from round 3 (2 rows below, working over ch 2 space), ch 2. Repeat from * around, sl st in 2nd ch of starting ch to join.
Repeat rows 4-5 until hat measures 11 inches from top to bottom of band.
Ch 1. Now you’re going to sc around the top, dropping stitches in the same established pattern (sc in each dc of current row and working over each ch 2 space to sc in each dc from 2 rows below). Do not fasten off.
Now you’re going to close up the top. Your hook should be at the top, back, center of the hat. Insert hook into the stitch directly across from the current stitch (top, front, center of the hat) and do a single crochet through both stitches. Pinch the opposite sides to the center point you just made and join with a sc in the same way. Continue pinching opposite sides together and sc them together until hole is completely closed. Fasten off and weave in end.


It can be a little awkward to sc through both sides, but it will ensure that your hat is closed up nice and secure ^_^


You’re done! Don’t forget to let me know how it turns out, and if you have any problems please let me know and I’ll be happy to help! The cowl pattern is also available for free here or you can download the free pdf on Ravelry here. For those of you getting an early start on your holiday gifts, the set would make a really cute Christmas present!
Terms of Use: Pattern is for personal use only, please do not sell, copy or redistribute either in print or online. You are free to sell finished items made from this pattern, I just ask that you please give credit to me (Ashley Soto/The Yarn Owl Boutique) as the designer and link back to the original pattern listing. Thank you!!

I am in college, and I just made this hat this afternoon. So cute! Thanks so much for the comprehensive pattern!
Thanks so much! I’m glad you liked the pattern and that it turned out good for you:)
This is a beautiful pattern! I’m having a little trouble though. In round 1 of the hat, there are 74 stitches but the next round is a multiple of 4. It doesn’t come out even for me. Am I doing/reading something wrong? Thanks!
Oops, I think you’re right! I just counted on mine and I actually have 76 sc! Thanks for catching that, I’m revising it now:)
perfect – I was hoping that would be the answer but didn’t want to try it on my own because I didn’t know how that would affect the rest of the rows. I’m excited to continue working on it tonight. thanks for the quick response!!
Your welcome! Let me know how it turns out!
Pingback: Double Drop Slouchy Hat–Free Pattern | eleisawifelife
Thank you for taking the time to write up the pattern and for your generosity to share it freely. This is a gorgeous looking hat and I can’t wait to try!
Reblogged this on Crafter Crums.
I want to make this hat for my grandson in college. How do I enlarge it? I’m new to crochet.
Sorry for the late reply! If a small adjustment is all that’s needed you could try using a larger hook size, like a J or K. Otherwise you could make the ribbing longer, then add on stitches when you do the single crochet along the top edge. For the main part of the hat pattern you need a multiple of 4 plus 2. Just add rows to the ribbing until it reaches the measurement you need, then from there you can figure out how many single crochets to place around the top edge. Hope this helps!