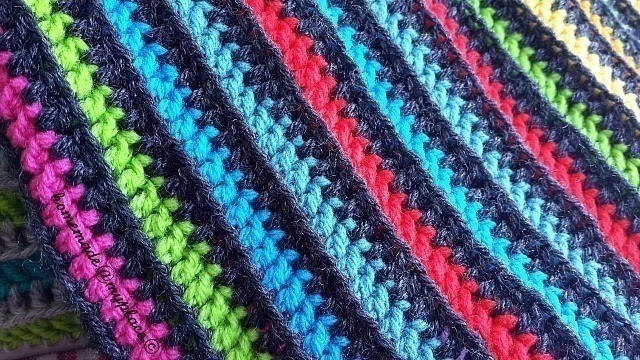
About
.... after your hands, even your head needs some warm cosiness!!!!!
Yes!!! This beanie is a good match for your wrist warmers and the pattern to follow is just the same !!!! Easy peasy !!!
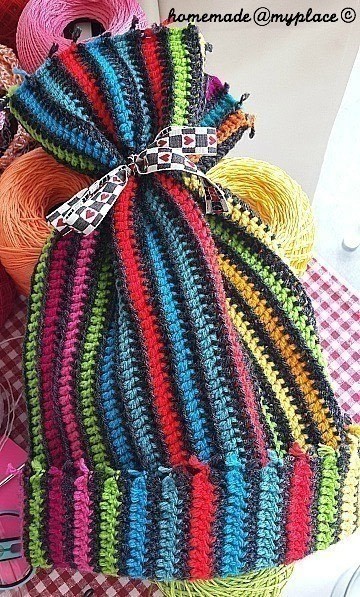
Obviously, if you finish it with a lovely ribbon, the beanie is more suitable for girls ... but , you know what? Use a simple cord, even crocheted in a matching colour, and you could make a boy (or more!) really happy!!!
Please note that I follow US crochet terminology
-
 Annelie S. favorited Stripy Beanie
04 Feb 16:43
Annelie S. favorited Stripy Beanie
04 Feb 16:43
-
 Alessandra P. published her project Stripy Beanie
28 Nov 16:01
Alessandra P. published her project Stripy Beanie
28 Nov 16:01
-
 Step 1
This first step is identical to the first step of my STRIPY WRIST WARMERS published yesterday!
There are few differences :
1- this time the base colour is black, not grey
2- the foundation chain that you need to crochet (loosely!) is made of 75 chains, not 45 !!! So, you will have to work 72 stitches for each row of your beanie-to-be!
3- you need to repeat the ROWS 2 and 3 until you complete ROW 53 ! -
 Step 2
ROW 54 : is like ROW 24 in STEP 7 of my previous STRIPY WRIST WARMERS photo tutorial.
This time you don't need any space to be left, but the row has to be crocheted all, all the 72 stitches!
You'll have a big cilinder, with tails both at the top and at the bottom. -
 Step 3
To make my life simple, I decided to keep the tails! ;oD
Just knot them in pairs (3 little knots) and cut the excess of yarn.
I cut my tails 0,5cm long, just after the knots.
Note that tails are in odd numbers (both bottom and top), so the "left alone" tail simply needs a couple of knots, then cut the excess as for the "couples" ! -
 Step 4
TOP OF THE BEANIE
Choose a nice ribbon. Count from the top (to bottom) of the beanie 18 DCs : from this DC, orizontally, pass the ribbon in and out the stitches, until you reach the starting point ! Pull the ribbon from both sides and make a knot, then a nice bow!
Cut the excess of ribbon and use a "stop frying" glue if you need. -
 Step 5
Just a detail of the bow! Nice, eh?
-
 Step 6
BOTTOM OF THE BEANIE
Just fold the bottom of the fabric to the top, the size you wish!
If you desire to fix it properly, I suggest you to sew few stitches on!
DONE and ready to wear it!!! ;oD