
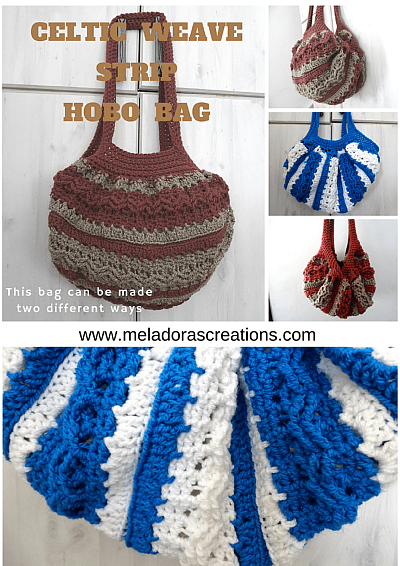
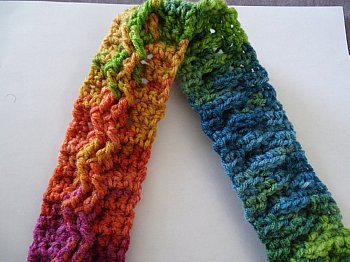
This crochet pattern and tutorial for the Celtic Weave Strip Hobo Tote Bag will teach you how to make the celtic weave strips which can be made at any length as well as how to connect the strips and create the strap.
This Celtic Weave Strip Hobo Tote Bag for 3 different sizes. Great purse if you like Hobo style bags that are unique.
You can find more things like this under the category Bags and Purses
Be sure to sign up for my newsletter so you can always be update date with the free patterns I release as they come out! https://www.meladorascreations.com/sign-up-for-newsletter/
Other patterns that use this stitch are:
Mile a Minute Celtic Weave Afghan
Interweave Celtic Weave stitch / Afghan
Interweave Celtic Weave Slouch Hat
Celtic Weave Strip Hobo Tote Bag – Free Crochet Pattern
This page contains affiliate links
For this project you’ll need:
HOOK: 5 mm hook or size H hook for the US
YARN: Worsted weight yarn, 4 ply US, 10 ply AU Best to use 2 different colors for best effect. I used 1 and a half skeins in each color.
NOTE: This purse is worked in strips and pattern begins with the center of the strip. The center stripe is worked back and forth in rows. The outside of the strip is worked in rounds.
Another yarn brand with color options
ABBREVIATIONS
(click on link to find tutorials)
ch = Chain
SC = Single Crochet
DC = Double Crochet
HDC = Half Double Crochet
TRC = Triple Crochet
st = Stitch
beg = beginning
* = Repeat what’s in between * for rest of round.
THE TUTORIALS:
RIGHT HANDED VERSION
LEFT HANDED VERSION
If you haven’t yet, take a moment to subscribe to my videos on YouTube to have easy access to all my videos and playlist @meladora1 on YouTube
Come visit me over on my Facebook Page where I share free pattern links Daily!
PDF Pattern with Pictures
You can find the PDF version of my pattern with pictures on Ravlery Thank you very much for all you do to support my channel.
Come visit me over on my Facebook Page where I share free pattern links Daily!
Remember to sign up for my newsletter so you can stay up to date with my free pattern releases as they come out! https://www.meladorascreations.com/sign-up-for-newsletter/
MAKING THE CENTER STRIP
To Start
Ch 10
Row 1
Dc in 3rd ch from hook. Dc in rest of sts. Ch 1 and turn ( 8 sts )
Row 2
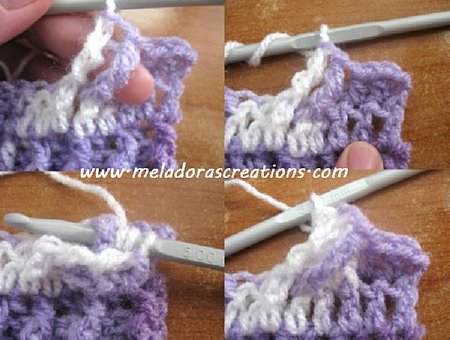
HDC in first two stitches, then skip two stitches and TRC on the post of the 5th and 6th Dc. Then going in from behind the TRC’s that you just did, back up and do TRC in the two dc’s that you skipped which were the 3rd and 4th Dc. Do this by pulling the stitch upward before working your stitch on it. Use pictures below to help you understand.
Repeat for the row, HDC in last two stitches.
Row 3
Sc in all stitches, ch 1 and turn
Row 4
HDC on the first 2 stitches. Then TRC on the post of the next two TRC’s, then back up and TRC on the two TRC’s. Do this by pulling the Stitches forward.
Continue this for the row and ch 1 and turn.
Round 5
Sc in all stitches, ch 1 and turn
Repeat rows 2 – 5
Sizing
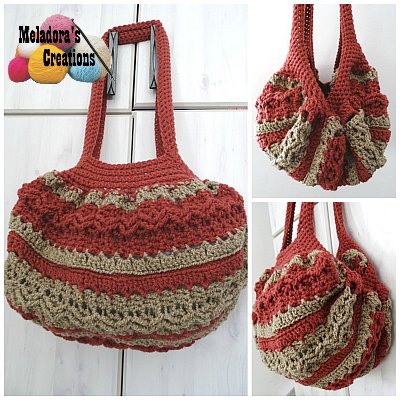
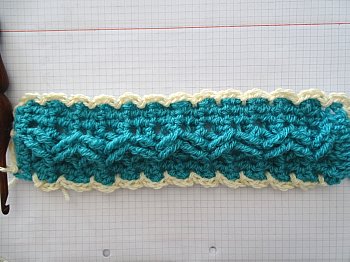
For the LARGE bag with horizontal strips as shown in the picture above, I made the strip 26 rows of the Cable. And Of course the 26 sc rows after each cable row. Count up the cable until you have 26 rows of it, making sure you end the strip after a sc row. Make 5 strips total.
For the smaller size purse, you want to do only 20 rows of cable and only make 4 strips.
Now grab up the color you want to use for the outside of the strip.
MAKING THE OUTSIDE OF STRIP
Attach your new color in the top left corner under the first DC.
We will be working down the side of the strip first.
Round 1
* ch 3 skip 2 sts and sl st in next st * Repeat for the whole side until you reach the top / bottom of the strip.
When you reach the top / bottom of the strip, you want to chain 5, skip 2, ch 5 skip 3 slip stitching in the very last stitch.
Then for the corner make sure you sl st in the bottom of the DC to create a loop for each corner. Do this for all corners of the strip.
When you reach the beginning again, make sure to create this same corner loop for the beginning as well. Slip st where I’m showing you here in this picture below.
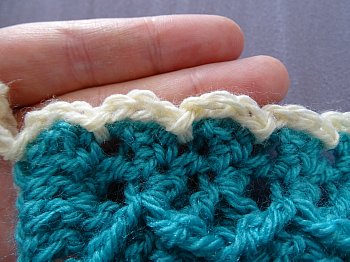
Round 2
sl st into first ch 3 space then ch 3 and DC 2 in this space. DC 3 in the following ch 3 space and in all ch 3 spaces down the sides.
NOTE: If it’s ruffling some it’s okay, you can fix this on round 4 round.
When you reach the top / bottom of the strip you want to DC 5 in the 2 ch 5 spaces at the top.
Sl st in the top of the beg ch 3 to end round.
Make 5 total strips

You can have the strips facing either way you wish! I used slip stitch through the back loops only to sew my pieces together.
THE HANDLES
Row 1
To start to make the handles, start at the top right corner and start gathering your stitches 3 stitches at a time, 4 loops on the hook, pull thorough all 4 loops and repeat for row. You can have your strips facing horizontal or vertically.
Now is the time to choose. We are making the part where the bag closes and will be the front / back of the bag, so if you want it horizontal make sure your strips are facing that way now like show in the pictures below. And vise versa for vertical facing bag.
When you reach the other corner, ch 1 and turn your work. You are working in rows back and forth for now.
Row 2
sc in all sts. Ch 1 and turn
Rows 3 – 6 ( Four Rows total )
This is where we start to decrease. All size purses will have a different number you are trying to reach before you are done decreasing. I am listing them below for future knowledge. You will be decreasing the first and last stitches of the row only. Continue until you reach the number you need.
For the large bag I started with 26 sts and decreased for 4 rows.
Row 1 of decreasing in first and last stitch of row gave me 24 sts
Row 2 of decreasing 22 sts
Row 3 of decreasing 20 sts
Row 4 of decreasing 18 sts
Do this with each size bag, just stop after desired number is reached.
For a larger purse opening decrease until you have 18 sts
For a smaller purse opening decrease until you have 16 sts.
Make sure to have 6 rows total though. So if it takes you 3 rows to reach desired decrease number, then just do single crochets for the 4th row. Which would be your 6th row total. See below. The reason this is important is because we have to make our handle size to match. I am making 6 rows for the handle, so this front part must be 6 rows too. If you want a thicker handle for the bag, you should make adjustments here to make sure the look of the bag stays consistent.
Now to continue, we must work down the side of this row to reach the side stitches to begin our decreasing and gathering again.
CH 1 and sc down the side stitches, to me 6 sts to reach the first stitch on the side.
This picture is wrong in one way, the GOOD side of the bag should be facing you. Make sure it is. If so you are good!
Now continue to gather the stitches as you did before, 3 stitches at a time and pulling through all 4 loops.
When you reach the corner on this side, make sure to PLACE A MARKER to mark this first stitch of the corner.
The marker should be marking the 1st stitch of the top part of the bag, because we will be making our rows back and forth again to decrease for this side, as we just did a moment ago. So you will be working from this stitch marker to the other corner.
Repeat the process as before to finish this other side. Then once again work along the side stitches and make it to your original front side of bag.
Your bag should be looking more like a bag now!
Now work up the side stitches again to reach the top on this corner.
Now we will be doing our Single Crochet Foundation Stitches to make our handles.
If you don’t know how to do single crochet foundation stitches, you can check out my video tutorial on it here.
Single Crochet Foundation Stitch
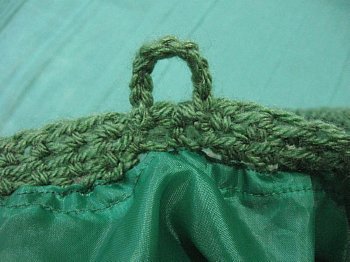
Make 70 single crochet foundation stitches for a off the shoulder bag, as shown below.

If you want it to hang off your shoulder but not this low, then do 60 single crochet foundation stitches and if you and a handbag style handle, then do 40 to 50 single crochet foundation stitches, depending how much of a short handle you want.
Slip stitch to connect your handle to other side of front / back piece. Then continue to work around the side of bag.
Repeat for the other side’s front / back piece.
Once you reach your first set of Single crochet Foundation Stitches you can place a marker here to remind you this is the beginning of the row. Then continue to sc up the stitches.
Continue your sc’s around the whole bag till you reach your marker. Now to match your 6 sc rows you did for your front / back pieces, you must do 5 more rows of sc’s all around the sts at the top of your bag. Going up the handles and side of the bag. The Single crochet Foundation Stitch counted as one row and you are just starting your second row.
NOTE: This bag will need a lining!
I do have a explanation tutorial on my crochet flower purse hobo bag that you can watch to help you, and there are many tutorials on youtube you can use to help you as well.
Crochet Flower Purse Tutorial 3 – Lining of the purses
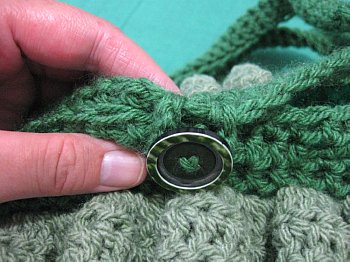
Tips for adding a fastner.
If you wish to add a button to fasten the bag, I suggest you use double yarn when making the loop, to give you extra strength. I usually get a long piece of yarn, fold it in half. Leaving a tail to sew in later, I make my slip knot, Find the center of the bag and sl st on the left side of stitch, skip one stitch and ch 8, sl st to bag, cut and leave a long tail to be worked in on this side as well. I usually do this after I have the lining in the bag.
This pattern is brought to you by www.meladorascreations.com
You can sell any item made from this pattern and link back to my page or videos, but you do not have permission to copy and paste my pattern anywhere online. ©Copyright 2015, All Rights Reserved
PLEASE READ BELOW!
If you’d like to see my channel stay and grow, please consider becoming a patron.
Or you could make a one time donation through PayPal. Thank you so much for your support! God Bless!