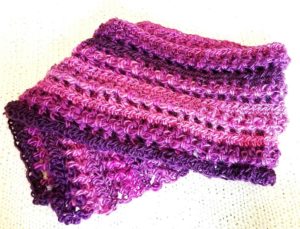
The Venetian Scarf & Cowl
 Pattern Design by Colleen Hays with YarnWars.com
Supplies you will need:
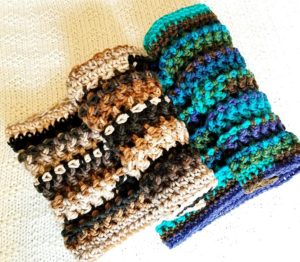
- Yarn (Pink scarf in picture made with RedHeart Unforgettable, 3 scarves on right created with Bernat Super Value)
- G hook used for pink scarf, J hook used for scarves in right column
- Scissors
- Blunt Needle
Techniques used in this pattern:
- Hdc – half double crochet (Yarn over, insert hook into stitch, draw yarn through, yarn over, draw through all 3 loops on hook.)
- Dc – double crochet (Yarn over, insert hook in the center of next chain, yarn over, draw yarn through stitch, yarn over, draw yarn through 2 loops on hook, yarn over, draw yarn through 2 loops on hook.)
- Bpdc – back post double crochet (Yo and insert hook from the back to the front around the post of the dc on a previous row.)
- Fpdc – front post double crochet (Yo and insert hook from the front to the back around the post of the dc on a previous row.)
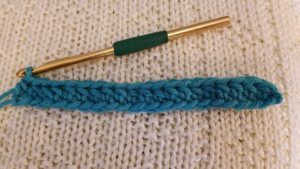
Pattern: (Vertical version) (20 stitches at end of each round.)
- Chain 21
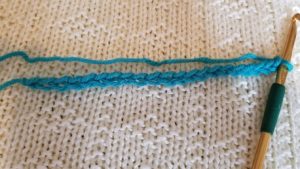
- 1 hdc starting in 2nd chain from hook & into each chain following. Turn (20)
- Ch 4, dc in 2nd st, *ch 1, skip nxt stitch, dc in next st* Repeat ** to end. Turn
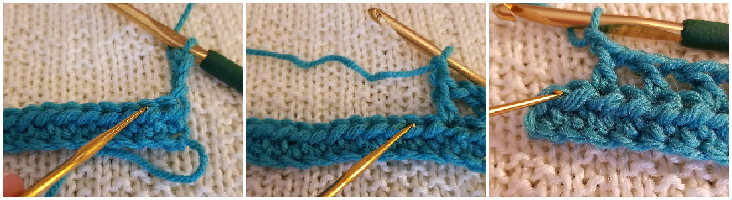
Row 3 photo tutorial: 1st image shows where you will make your 1st dc + ch1 after you chain up in beginning. Second image shows you skip next stitch then work your dc + chain 1 into. Then repeat to end of row.
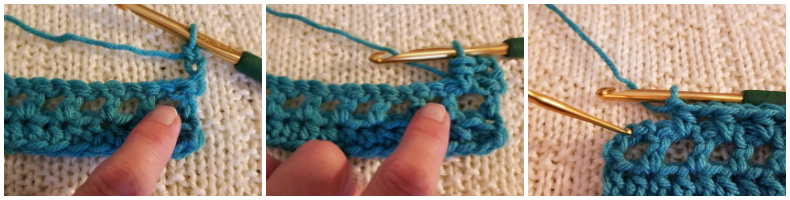
- Ch 2, hdc in 1st ch sp, *ch 1, hdc in nxt ch sp* repeat to end. Work last hdc into 3rd chain of beginning chain up from previous row. Turn
Row 4 Photo Tutorial: VIDEO FOR THIS SECTION
First image shows the 1st chain space you will work your 1st hdc + chain 1 into after your beginning chain up. 2nd image shows where the 2nd hdc will go, etc. 3rd image points to where you will work your final hdc into the 3 chain up from previous round. Repeat to end of row.
- Ch 1, bpdc around beginning ch of 4 just below from row previous to last, bpdc around the following dc from 2 rows back, *fpdc around nxt hdc, bpdc around next dc* Repeat ** to end. Your last stitch will be dc into 2nd of beginning chain from previous row. Turn
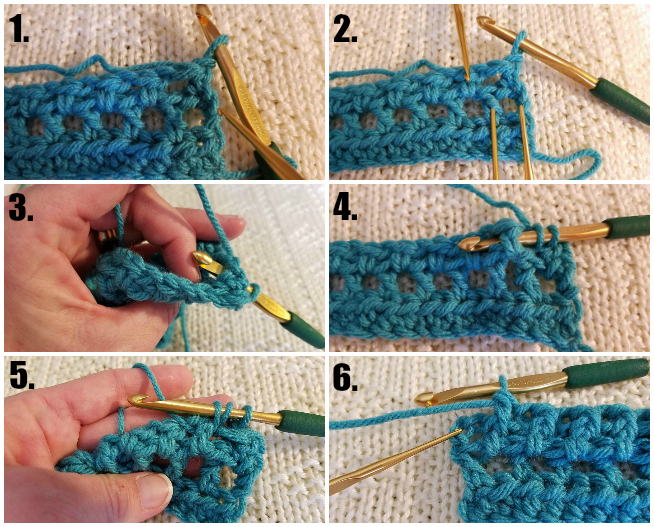
Row 5 Photo Tutorial: VIDEO FOR THIS SECTION
#1- I point to the 1st dc post you will work a bpdc around. In image #2- I show the sequence with gold needles that you will start working the row from right to left (1st 2 bpdc’s in the 2 dc from 2 rows back, then fpdc around the hdc from 1 row back, then alternate working next stitch bpdc, then fpdc, etc.) #3- I’m working the 1st bpdc, #4 & #5- I’ve already created the 1st 2 bpdc then working into the 1st fpdc, #6- I show where to work your final dc into the 2nd of the beginning chain from previous row.
- Ch 1, hdc in 1st st then ea st following to the end. Last hdc worked into outer 2 loops at end. See diagram above or video if unclear where to work last hdc. (20)
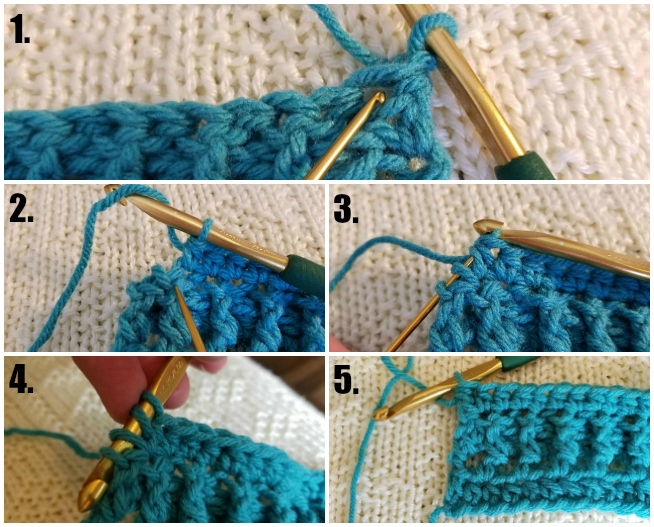
Row 6 Photo Tutorial: VIDEO FOR THIS SECTION
#1- I point to the 1st stitch where you will begin the row working hdc into, then you will continue to work hdc into ea stitch following in this row. #2- I point to 2nd to last stitch which will be slightly hidden. #3- There are 2 loops at the end of this row that I have a gold needle going into just to define, #4- Yarn over, go down into these 2 loops shown in image #3, yarn over, pull through and work your final hdc as shown in image #5. This will offer that perfect straight edge.
Repeat rows 3 through 6 Until you have reached the desired length for your scarf.
Adjust number of beginning chain as you like for larger width scarf, make sure to start with an odd number of foundation chains for this pattern.
You will find the video link, that is specific to a couple of the sections, at the bottom of that photo diagram. if you are only looking for help in that particular area of the pattern, otherwise
Scarf Working Horizontally
You will work the horizontal scarf exactly as you did the pattern above for the vertical scarf. The only difference is in your beginning chain count.
For the pink scarf above, I used a G hook and worked 119 chains to begin. My scarf after working 4 rounds of the pattern came to approximately 34” long, so it’s a smaller scarf, as you see in the picture with the scarf on me above, and you can certainly add more chains, you will just want to make sure you have another skein on hand!
(When I say 4 rounds, I am talking about working rows 3 through 6, 4 times including your beginning 2 rows)
Cowl
For the cowl, with the J hook, I chained 83 then joined my chain on my hook with the 1st chain made to complete a circle. (Try not to twist your chain.) At the end of each row, you will join to the top of the chain from previous row. Make sure to have a stitch marker handy! You can also work a hdc foundation of 82 stitches then join the 2 ends together. Your chain in the beginning of the foundation will create that beginning chain for joining at the end of each row. With this beginning number of chains, my cowl worked up to approximately 26” in size around. Working this project in a continuous circle has a bit of a bonus to it, you won’t be turning at the end of each round. The number of rounds in each sequence allows you to create the Venetian look by simply working each row around without turning once!
If you wish to create a cowl that fits tighter around the neck, I would suggest beginning with a lesser number of chains in the beginning, possibly 69 or even less if you stitch very loosely.
From here, you will again work the pattern exactly above as vertical scarf, except, as mentioned, you will not turn at the end of each round.
Thank you so much for your interest in my pattern! I would love to see your work up of this! Please do let me know if you find an area that needs correction. I have worked this pattern now several times so it should all be in place, but there is always that possibility of a mistake. I also realize there is a section that is a little more complicated which is why I’ve done my best to provide enough visuals along with video for your convenience. =)
Visit us in our Facebook group today! Tons of great free pattern downloads, awesome support and an all around amazing group of talented yarn crafters from around the world!
Like us on our Facebook Page!
Twitter
Instagram
Pinterest
YouTube Video Crochet Tutorial Channel
If you have any questions with any of my patterns, feel free to email me at yarnwars@gmail.com, or you can message me on the YarnWars Facebook page.
Pattern Terms
This pattern is being offered free to the public for creation purposes. Selling the written pattern itself is strictly prohibited, altering or modifying this pattern for distribution purposes is strictly prohibited. This does not mean you cannot change the pattern for your own personal use! You may not change the pattern to distribute or share it as your own in your community or any other venue. Whatever you choose to do with your end product is your choice. There was a lot of time and effort that went into creating this pattern to make available free to the public. If you plan on sharing this pattern with your group, members or friends, please refer to the original designer of this pattern Colleen Hays with YarnWars.com. Link to pattern please, do not post copy of this pattern to your website, group, or any other venue.
Thank you so much!