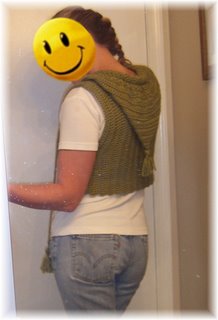
Cast on 36 (US#10.5 6.5mm)
Work in 2 x 2 rib st for 3 inches.
Switch to US#17 12.75mm needles and begin working in stocking knit st will piece measures 37 inches from beginning (including ribbing)
Switch back to #10.5 needle and continue in rib stitch for 3 inches. Bind off in pattern. Total piece 40 inches including ribbing.
Sew arms: Fold in 1/2 lengthwise, start at ribbing and sew up the arm for 8 inches on each side.
Trim/colar ribbing: From center of neck to center of back (does not really have a top and bottomm but where neck and center would be) using #10.5 needles pick up one stitch for each row making sure to have even numbers of stitches. Work rib stitch for 16 rows (about 4 inches), bind off loosly in pattern. Work same for other side.
Sew together ribbing together at starting and end point at neck and back.
With left overs make the scarf
With the larger #10.5 needle cast on 8
Row 1: knit 1, purl 1 till end kpkpkpkp
Row 2: purl 1, knit 1 till end pkpkpkpk
Work in pattern till out of yarn
Add fringe with left overs from other skeen.
Thursday, November 08, 2012
Sunday, November 28, 2010
Baby Bumble Bee hat

I hook
1 skein each of Homespun yellow and black
(Rest of skeins used to make spiral hex blanket)
Ch 4, st in first to make loop
Ch 2, hdc 10 times.
Ch 2, hdc1, 2hdc in next, round.
ch 2, hdc in next 2, 2hdc in next (15)
ch 2, hdc in next 3, 2hdc in next (20)
Switch to black
ch 2, hdc in next 4, 2hdc in next (25)
ch 2, hdc in next 5, 2hdc in next (30)
Yellow
ch 2, hdc in next 6, 2hdc in next (35)
ch 2, hdc in next 7, 2hdc in next (40)
ch 2, hdc in next 8, 2hdc in next (45)
back to black for 2 rows (45)
Yellow for 2 rows. (45)
Shell: ch3, 2dc in join space, *sk, sc, sk, 7dc* around sk, sc, sk, 4dc in same join space as first 2dc of round, ss to top of ch3. tie off.
I am sure there is more than one way to do the antenna, but here is how I did it…
Antenna: Cut a length of black about 2 ft. In the middle loop a cast on st. Join with a slip stitch though 2 stitches at the top of the hat at about 2nd round. Working with both stands of yarn ch 10 pulling last through. I added extra tassel on top by slip stitch 3-4 yarns pieces and trimming to about 1 inch.

Thursday, February 11, 2010
Spiral Hex

I hate changing colors so much I did this to make a two color hex… It is a bit awkward to get started, switching back and forth but once you get a few rows in it is mindless to create. I must say it worked out really cool.
Gauge and needle does not matter. I used an I hook with 1 skien each color of Caron Simply soft. I have not tried with a small hook, and I am not sure how that would work out since you need some stretch-ability for the beginning rounds to lay flat.
Edited 11/10 to add: I made one with a bulky yarn (Lion Brand Homespun) and used an N hook. Worked real well and came out cute.
With color A:
Ch 4 and join with a ss in first ch making a base loop.
Ch3.
Working in the loop (dc, ch1, dc). Drop color A (pull loop really large so it is not lost and you can easily pick it backup again)
Working in the loop (dc, ch1, dc). Drop color A (pull loop really large so it is not lost and you can easily pick it backup again)

Attach Color B with a ss in base loop. Working in the same direction (counter clockwise) Ch 3, dc, ch1, dc in loop.
Working in rounds: Working around ch3 post of color A (Ch 1 Dc, ch1, dc), dc in top of first color A dc of last row, (dc ch1,dc) in next ch space of last row. Drop Color B
Working in rounds: Working around ch3 post of color A (Ch 1 Dc, ch1, dc), dc in top of first color A dc of last row, (dc ch1,dc) in next ch space of last row. Drop Color B

Pick up Color A: Working around ch3 post of color B (Ch 1 Dc, ch1, dc), dc in top of first color B dc of last row, (dc, ch1, dc) in next ch space of last row, dc in top of next dc of last row, (dc, ch1, dc) in ch space of last row, dc in next dc of last row, (dc, ch1, dc) in next chain space, dc in each of the next 3dc of last row, (dc ch1 dc) in top of next ch space of last row. Drop color A

Pick up color B: Dc in top of next dc of last row, (dc, ch1, dc) in ch space of last row, dc in next dc of last row, (dc, ch1, dc) in next chain space, dc in each of the next 3dc of last row, (dc ch1 dc) in top of next ch space. Continue working in pattern, dc in top of last color rows dc, and (dc, ch1, dc) in each chain space. Drop colors and pick up as you work each round.

Keep going working in pattern and it quickly starts to look like a hexagon with more defined turns and sides. Make it as big as you want.

To finish I ended by stopping with 1 dc in a ch space color A. Then I ended with color B ½ way around the hexagon (3 ch spaces past where color A ended.)

Sunday, October 04, 2009
Sherpa Baby!

Sherpa baby
Size is about 6-12 months (18inchs)
MATERIALS 1 skein of each (one skein of each easily gets a hat and pair of booties)
1 - Lion Suede, mocha Color A
1- Patons Divine, Icicle (2 strands held together) white or other similar 1 strand bulk sheepskin looking yarn. Color B
Stitch markers
Crochet Hook size G
ABBREVIATIONS
Ch =chain
St= stitch
Sc=single crochet
Sk=Sk
Ss=slip stitch
Fpsc= Front post single crochet
Rnd= round
Sk= skip
This starts with a basic hat pattern but with using a st marker and no ch/joins or turns at end of rows
HAT
With Color A ch 3:
Rnd 1: 6 sc in 2nd ch from hook, mark last st and move to last st at end of each rnd
Rnd 2: 2sc in each st (12)
Rnd 3: *sc in next st, 2 sc in next * around (18)
Rnd 4: *sc in next 2 st, 2 sc in next* around (24)
Rnd 5: *sc in next 3 st, 2 sc in next st* around (30
Rnd 6: *sc in next 4 st, 2sc in next st* around (36)
Rnd 7: *sc in next 5 st, 2sc in next st* around (42)
Rnd 8: *sc in next 6 st, 2sc in next st* (48)
Rnd 9: sc without increase until hat measures 6 ½ inches from top to bottom.
Last Rnd: Ss in next 2 st, switch to color B. Ch 1, sc in same joining st. sc 1 complete round, ss to join, tie off.
Roll up brim
Ear flaps
Row 1: Working in inside of hat at bottom of rolled up brim, attach to a front post a sc of third to last row.
Row 2: Ch 1, , sc in same front post and continue working in fpsc in next 35 st of the third to last row.
Row 3: Ch1 turn. (leaving rest of round 11 sc unworked)
Row 2: Working on top of new row created sc in each next 35 st, ch 1 turn.
Row 3: Skip first sc, sc in next 13, ch 1 turn
Row 4: Skip first sc, sc in next 11 leaving last st, ch 1 tun,
Row 5: Skip first sc, sc in next 9 leaving last st ch 1 turn
Row 6- 9: Continue in pattern until 1 st left. Tie off.
Join with ss at first st of 2. ch1, sk first sc, sc in next 13, ch 1 turn
Follow rows 3-9.
Trim
Using B, join at joining st of row 1 of ear flaps. Working 1 sc for each row, beginning working down front of ear flaps sc trim on to ear flap, across the back and around the other ear flap. Leaving the front unworked. Tie off
Cut 3 strands of color A and 2 strand of color B 36 inches long
Holding all strans together fold in half and at ½ way point attach to bottom of each flaps.
Braid tightly stopping when braid is about 12 inches. Fasten braid and trim ends to make even tassels.
Make a Pompom with Color B and attach to top.
 Done
Done
Thursday, September 17, 2009
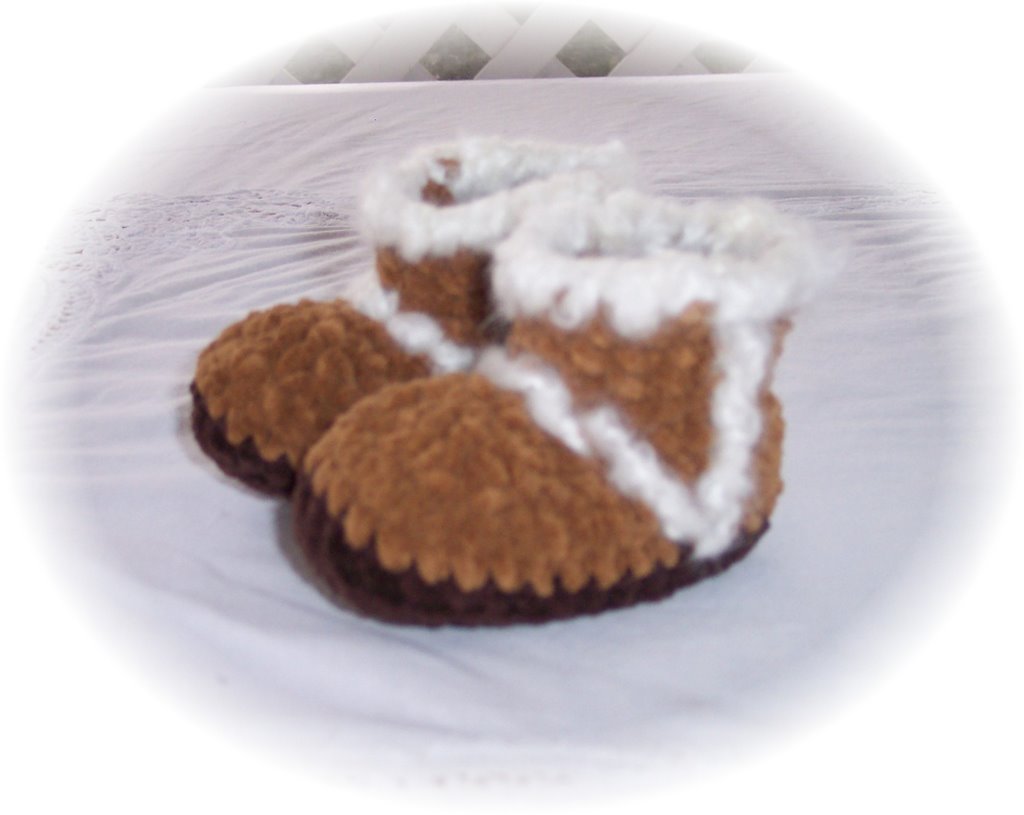
Ugg booties revisited
 These differ from the original suede booties. They are a bit bigger, have a flatter sole (less of a slipper look), and are a bit taller.
Size 3-6 months
MATERIALS 1 skein of each makes many booties
1 – Lion Suede, coffee Color A
1 - Lion Suede, mocha Color B
1- Patons Divine, Icicle white or other similar bulk (5) wt sheepskin look yarn
Notions: Crochet Hook size G, Tapestry needle, thin cord elastic. St markers (or yarn scraps to mark stitches)
ABBREVIATIONS
Ch =chain
St= stitch
Sc=single crochet
Hdc= half double crochet
Ss= slip stitch
Rnd= round
Dc= double crochet
Sk= skip
SOLE Make 2 in Color A and 2 in Icicle
.
RND1: Ch 10, 3 sc in 2nd ch from hook, sc in next 3, hdc in next, dc in next 2, 7 dc in next. Skipping last ch begin working across other side of ch, dc in next 2, hdc in next, 3 sc in last.
RND 2: 2 sc in each next 3st. sc 7, make 2 sc in each of next 5
RND 3: Sc 2, make 2 sc in next, sc 4, make 2 sc in next, ss in next and fasten off.
RND 4: (attaching row) Holding 1 suede and 1 icicle sole together, join color A with a ss though front posts of last row of both piece. Continiue working around the front posts of last row of both pieces, ss around the soles. Ss over first ss, fasten off.
.
BOOT
RND 5-6: Working in the loops of the joins ss row attach color B to back of heal loop of ss, ch. Working counter clockwise round the sole in each of the ss, *sc in each around, ss to join, ch1, do not turn * 2 times.
RND 7: ch1, sc in next ? sts, sk next, hdc in next, sk next, dc in next, dc next 2 sts together, dc in next, sk next, hdc in next, sk next, sc to end of row, st to join.
RND 8: ch 1, sk next, sc in next ?, sk next, sc in next, sk next, sc in next 2, sk next, sc in next, sk next, sc to end of row, sk last, st to join.
RND 9: ch 1, sc in next 7, (skip next, sc in next) 3 times, sk next, sc in next 9, sk last, ss to join.
RND 10-15: ch1, With front loops only, sc each st round, st to join, Switch to icicle.
RND 16: ch1, sc in each st around, tie off.
TRIM AND FINISHING TOUCHES
Follow the finishing touches and trim in the original bootie pattern
Here
Sunday, April 19, 2009
What yarn groupies find funny...
If you have come to find me through your love of crochet you must see this. This is the funnest blog I have seen in a long time. Check it out... Be sure to check out the Tampon Cozie.
http://whatnottocrochet.wordpress.com/
http://whatnottocrochet.wordpress.com/
Tuesday, February 20, 2007
Bandanna- headband


For the record, this is not an original idea. We purchased a few of these (for about $10 each) at Clair’s. The ones we bought were small. Since my girl’s main area of hair loss is in the back and top - the homemade one provide better coverage. Great for keeping her head out of the sun.
Ok,… There are 2 ways to do this. With a hot glue gun and sewing machine.
Sewing it makes a nice loose fit to the head band. However, the glue one is much easier and convenient.
Supplies
Bandanna - 1 bandanna makes 2. Some craft stores have novelty bandannas and a
large variety of colors.
Head band - I got 6 for 3 dollars at CVS. It does not matter what color they are since it will be covered
Glue gun and hot glue
Sewing machine - Optional
Step 1
Fold the bandanna in half point to point
Cut like shown in Pic 1 - about 11 inches long
Cut straight - not on a curve like I did in Pic 2
Pic 1 & Pic 2


If you are sewing it sew about a ½ inch rolled hem (or just a bit thicker then the headband you are using) at the raw edge, thread the head band through and jump to step 4.
Hot glue continue with Step 2

Step 2- Run a bead of hot glue along the head band, center it and glue it to the raw edge of the edge of the headband (the part that was cut). You should have excess bandanna hanging from each end of the headband.
Hot glue continue with Step 2

Step 2- Run a bead of hot glue along the head band, center it and glue it to the raw edge of the edge of the headband (the part that was cut). You should have excess bandanna hanging from each end of the headband.
Step 3-
After it cools, wrap the headband around the headband. (…kind of like rolling in up in the bandanna one full roll)
Another way to describe this is pull the bandanna into the headband and then flip it over and pull taunt.
Step 4- Add a line of hot glue to the end of the bandanna that is hanging over (Pic 4) and then fold up to glue to the inside of the headband (Pic 5). Repeat on the other side.
Pic 4 & Pic 5


Ta ta,… You’re done.
If you find the head band has a bit of a flying nun look to it - you can add a dab of glue on the inside of bandanna, or stitch it with a needle and thread, at the red spots on the picture below. Cutting the bandanna a bit smaller in step 1 also helps.

Monday, October 23, 2006
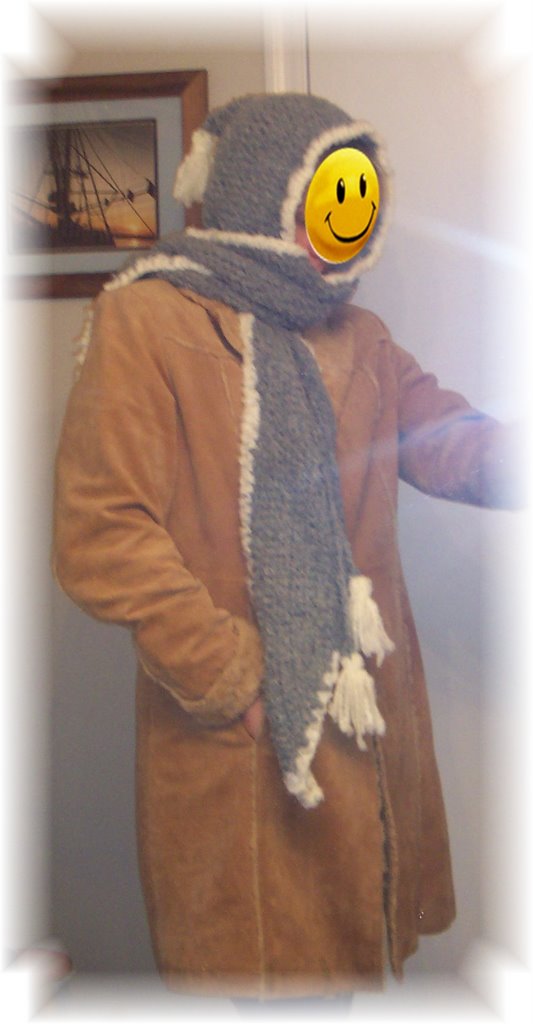
Hooded Scarf
 ~~~~~~~~~~~~~~~~~~~~~~~~~~~~~~~~~~~~~~~~~~~~~~~~~~~~~~~~~~~~

Gauge in single crochet
10 stitches = 4.5 inches
6 rows = 2 inches
10 ½ K Hook
Color A – 2 skeins Berbat Soft Boucle' Color B – ½ skein Red Heart Baby Clouds
*Hood only version = 20 inches from nape to end (32 inches total length) I made this to be worn as just a hood with a short jean jacket
With Color A Ch 31
Row 1 - Sc in second ch from hook and in each remaining ch (30st), now Ch an additional 61 chains (Hood only version ch 46).
Row 2 - Sc in second ch from hook and in each remaining ch, continue working sc in back of each sc of last row, sc 2 in last st, continue working sc down back of original chain, then ch an additional 61 (Hood only version ch 46)
Row 3 – Sc in second ch from hook and in each remaining ch, continue working sc in back of each sc of last row until 1 from end, ch 1, turn
*Hood only version continued below
Row 4- Sk first st, Sc in each remaining sc of last row until 2 from the end, ch 1, turn. (This will decrease 1 st at one end and 2 st at other end of each row)
Row 5- 27 – Repeat row 4, tie off at end of row 27
*Hood only version
Row 4- Sk first st, Sc in each remaining sc of last row until 1 from the end, ch 1, turn. (This will decrease 1 st at one end and 1 st at other end of each row)
Row 5- 13 – Repeat row 4, tie off.
Row 14- Sk first st, Sc in each remaining sc of last row until 2 from the end, ch 1, turn. (This will decrease 1 st at one end and 2 st at other end of each row)
Row 15- 27 – Repeat row 4, tie off at end of row 27
Edging
Beginning at back of hood (the nape of neck) - Using Color B sc around all edges. When working on sloped edge sc 2 st for each row, St to join, tie off.
With Color A using ch st, make a chain approximately 48 inches long.
Starting in middle of front, level with nape of neck, and working around front edge of the hood directly behind edging, weave in and out of every 2 sc of last row until you reach the other side of the front edge level with the nape of neck.
Attach tassels or pom-poms to ends of chain and point of hood.
Friday, October 06, 2006
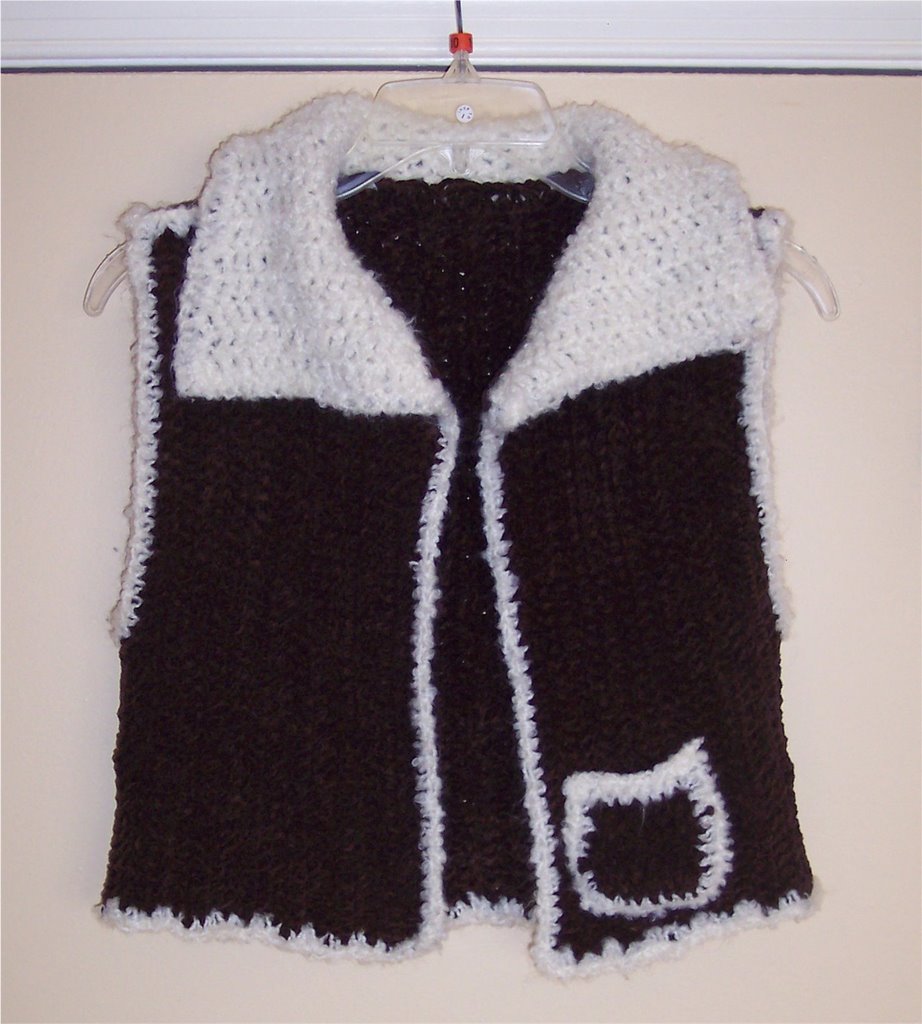
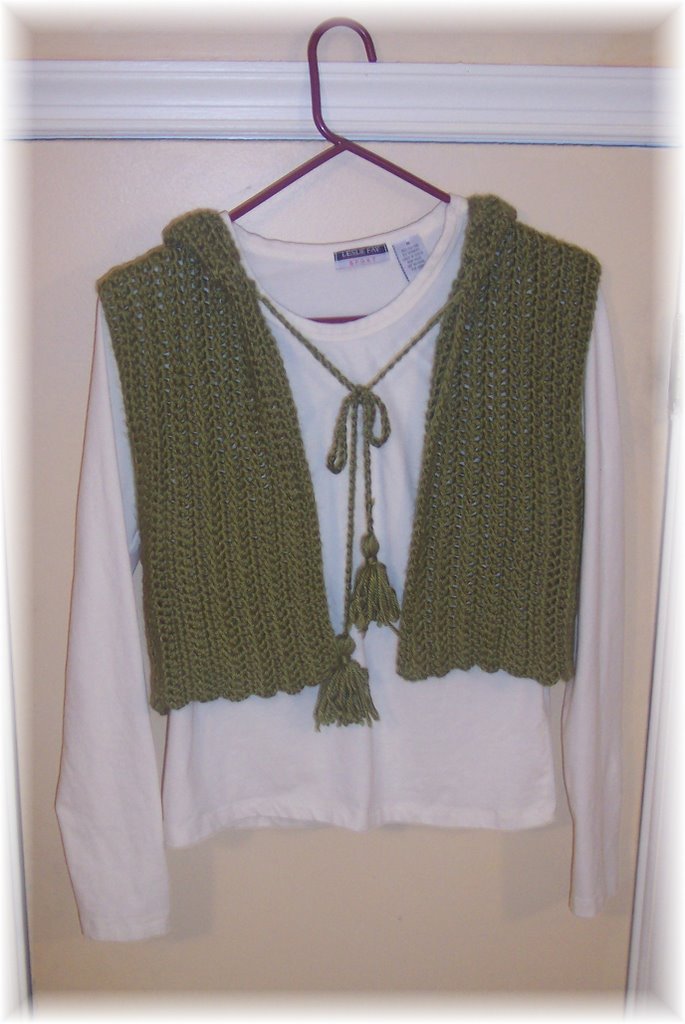
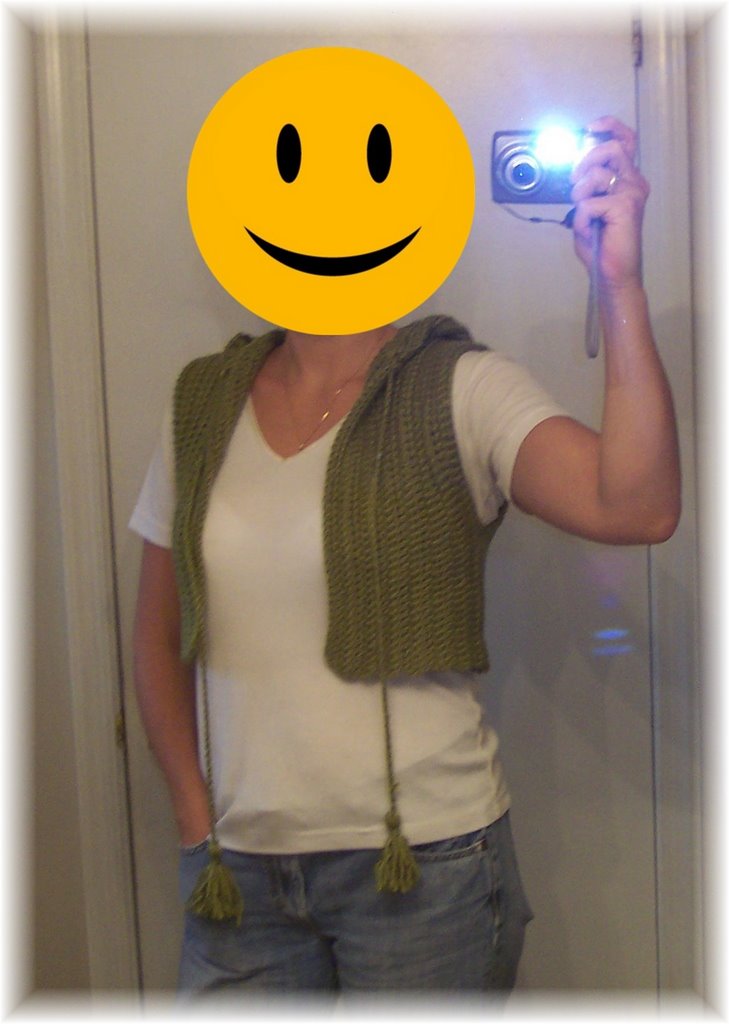
Making a vest from the "Jewel Tone Sweater"
.
Here is a how to make a vest out of this pattern
.
Keep an open mind. I do not think the 20 year old picture they use does the pattern any justice.
.
It is easy since it is made in one piece. I was also very happy with my choice of yarns. Red Heart Soft Yarn for the green hooded version shown. It is a lighter weight but was true to the gauge for me and gave it a different look. The lion suede vest is much heavier and required a size G hook to keep with in the gauge. So like always, but particularly with this pattern and yarn substitutions…. BE SURE TO CHECK GAUGE!!! But don't be afraid to try different yarns it is a very forgiving pattern.
.
To make the vest
Follow the pattern directions from the beginning up to and including joining shoulders on page 4. Then pick up the directions below depending on your preference for collar and optional trim.
.
.
Directions for hood
Row 1: Ch 37 for small/medium (41, for large/extra large), dc in the 4th ch from hook and in each rem ch across, ch 3, turn. (35, 39 sts)
All sizes continue with same directions
Row 2: Dc across to the last st, 3 dc in last st, do not turn and continue dc down back side of original chain, ch 3, turn. (66, 74 st)
Row 3: Dc in first dc and in each rem dc, ch 3 turn.
Row 4-8: Rep row 3
Row 9: (increase 1 st at beginning and end of row) 2 dc in first st, dc to last st, 2dc in last st, ch 3 turn.
Row 10, 12, 14, 16: Rep row 3
Row 11, 13, 15: Rep row 9
Row 17: Rep row 9, fasten off.
.
Joining hood
With RS together of hood and left front together, work in same fashion as joining shoulders. (2 sc in each end of rows, and be careful to not include spot where shoulders join as a row) fasten off at end.
.
Make a chain to desired length, (mine was long at approximately 72 inches but extra long) starting at one front edge seam where hood attaches to front and working around front edge of the hood, weave in and out of every 2 dc until you reach the seam of the other front edge seam.
.
I added tassels to the hood point and end of ties on the vest. These could easily be left out and beads could be used for the ends of the ties instead.
Saturday, August 19, 2006
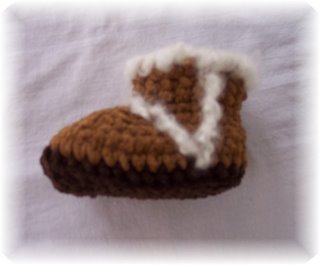
Crochet Suede Baby Booties
I fell in love with the knitted version of these found all over the internet. I prefer to crochet projects like this; however, I could not find a suitable pattern. So I finally made up my own.
.
My Ugg looking booties
.
 Size approximately 6-9 months with insole
 and 9-12 months with insole taken out
Not recommended for new walkers on hard wood floors ; )
Machine wash / reshape and air dry
Washing Tip ~ Place booties inside a knee high and tie at top before washing.
MATERIALS 1 skein of each makes many booties
1 – Lion Suede, coffee Color A
1 - Lion Suede, mocha (I think it would be terribly cute to substitute this color with rose, denim or accrue) Color B
1- Patons Divine, Icicle
Notions: Crochet Hook size G/6 & H, Tapestry needle, thin cord elastic. St markers (or yarn scraps to mark stitches)
ABBREVIATIONS
Ch =chain
St= stitch
Sc=single crochet
Hdc= half double crochet
Ss= slip stitch
Rnd= round
Dc= double crochet
Sk= skip
INSOLE Using Icicle
ABBREVIATIONS
Ch =chain
St= stitch
Sc=single crochet
Hdc= half double crochet
Ss= slip stitch
Rnd= round
Dc= double crochet
Sk= skip
INSOLE Using Icicle
With H hook chain 10
RND 1 - Sc in 2nd ch from hook, sc in next 5, hdc in next, 2 hdc in next, 5 hdc in next (do not use the last ch, pull through to back side of insole). Now working down opposite side back loops of starting ch, 2 hdc in next, hdc in next, sc in next 5, 2 sc in next.
RND 2 - 2 sc in first sc of last rnd, sc in next 8 sts, *2 sc in next, sc in next* 3 times, sc in next 8, 2 sc in next, sc in next, ss, tie off.
.
(BOTTOM) SOLE
Using Color A and G/6 hook chain 10
RND 1 - Sc in 2nd ch from hook, sc in next 5, hdc in next, 2 hdc in next, 5 hdc in next (do not use the last ch, pull through to front). Now working down opposite side back loops of starting ch, 2 hdc in next, hdc in next, sc in next 5, 2 sc in next.
RND 2 - 2 sc in first sc of last rnd, sc in next 8 sts, *2 sc in next, sc in next* 3 times, sc in next 8, 2 sc in next, sc in next.
RND 3 - 2 sc in next, sc in next 9, 2 sc in next, *sc in next, 2sc in next* 3 times, sc in next 9, 2 sc in next, sc in next, ss in next, ch 1, turn.
RND 4 - Working in back loops only, sc in each st around (34), ss to join. (forms into sole with ridge with yarn from chain in the inside of boot)
BOOT
RND 5-6 - Change to color B ch 1 & do not turn. Working both loops, *sc in each around, ss to join, ch1, do not turn * 2 times. (mark 6th st from beginning and 5th st from end of first row) Put insole in place after weaving in stray yarn on both boot sole and insole.
RND 7 - ch1, sc in next 11 sts, sk next, hdc in next, sk next, dc in next, dc next 2 sts together, dc in next, sk next, hdc in next, sk next, sc in next 12, st to join.
RND 8 - ch 1, sk next, sc in next 9, sk next, sc in next, sk next, sc in next 2, sk next, sc in next, sk next, sc in next 10, sk last, st to join.
RND 9 - ch 1, sc in next 7, (skip next, sc in next) 3 times, sk next, sc in next 9, sk last, ss to join.
RND 10 - ch 1, using front loops only sc in next 7, sk 1, sc next 2, sk 1, Sc next 9, st to join.
RND 11-13 – ch1, Continuing with front loops only, sc each st round (18st), st to join, tie off.
TRIM AND FINISHING TOUCHES
Tie elastic to first marked stitch. Weave elastic from st mark to st mark across front of boot. Tie off at second st mark. (It is ok if it shows, it will be covered with icicle or baby clouds)
Using tapestry needle and icicle (threaded button style using both strands of thread. Try and make long so you do not have to tie off and re-tread). Tie on at last st. Oversew/overcast each st around. Tie off. (When stitching with icicle or baby clouds use loose stitches to better simulate the sheepskin look)
Rethread needle only using only 1 strand for stitches, tie on at side of boot top directly above where elastic was tied off. Using a backstitch, stitch in a straight line down to elastic. Continue using back stitch following over top of elastic to other side of boot, then continue up to top of the boot. Tie off and weave in ends. (simulates seam on real Uggs, look at picture for a visual guide).
.
How to back stitch and over sew -
http://www.alternative-windows.com/stitches.htm
If any corrections need to be made to this pattern, please email me and let me know. I would love to see how it turns out for others, please feel free to send me pictures.
Subscribe to:
Posts (Atom)
