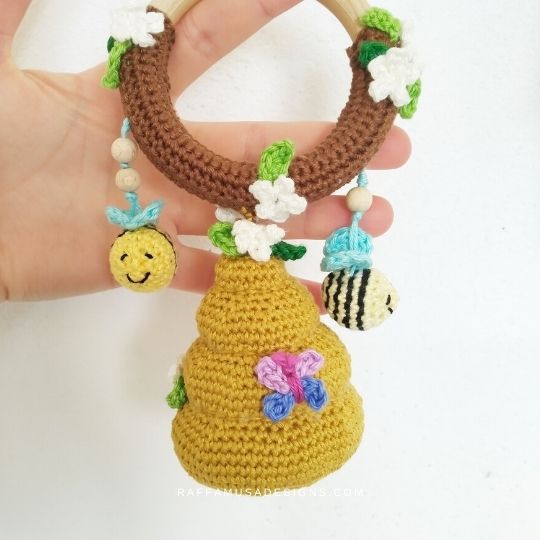
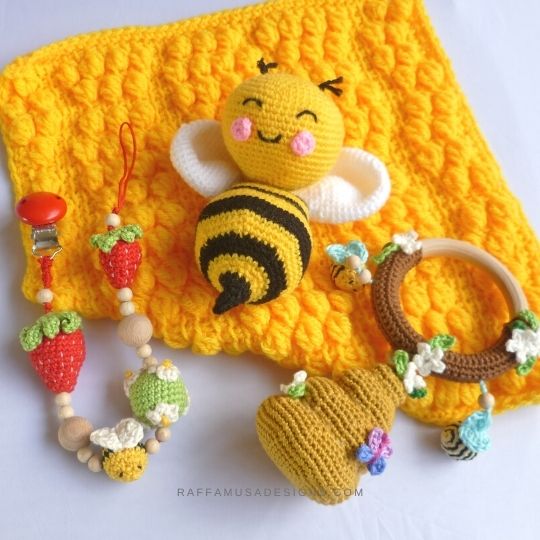
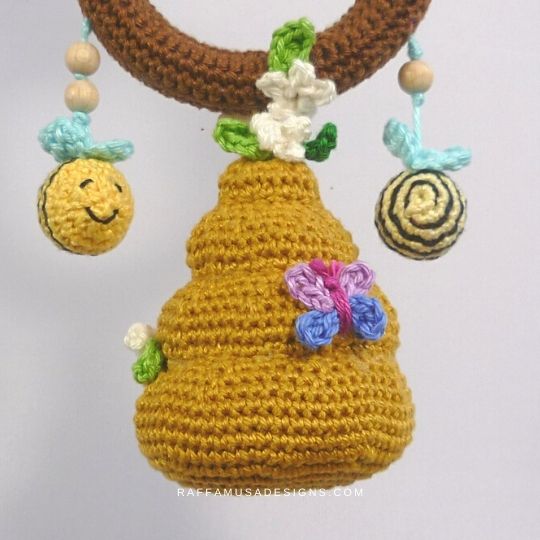
Bees and beehives have always been one of my favorite things to crochet! So, I am very happy to share with you my free pattern of the Amigurumi Beehive Baby Rattle!
This pattern is extra special to me because it is the first pattern for which I got a yarn sponsor! Pretty amazing, isn’t it? So, a big shout out to Lammy Yarns who sent me a few colors of their amazing Rio Cotton.
Lammy Yarns is a French/Dutch company that still produces its yarn in the Netherlands. They are the only ones who haven’t relocated their production facility somewhere else in the world.
If you would like to try Rio cotton, there is a very useful function on the Lammy Yarns website to locate the closest Lammy Yarns store near you. Otherwise, any equivalent yarn can be used.
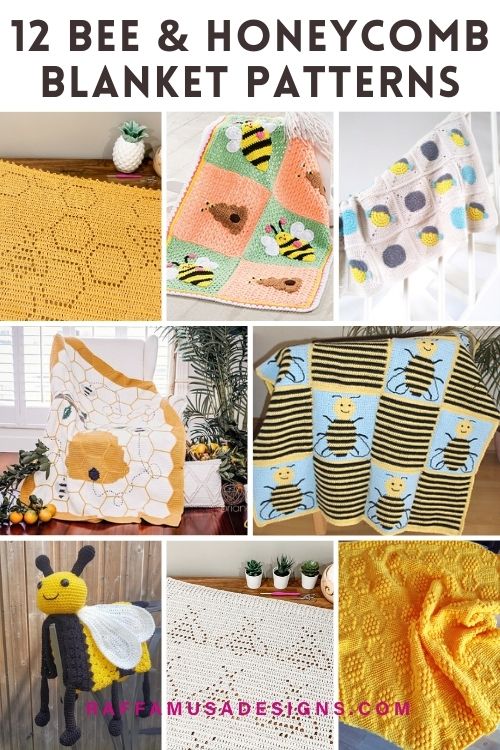
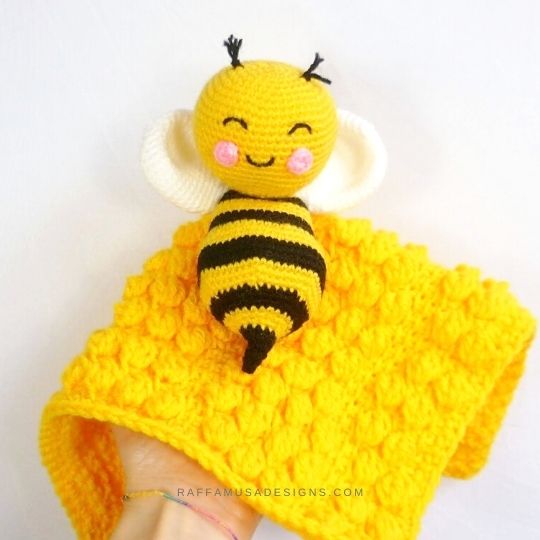
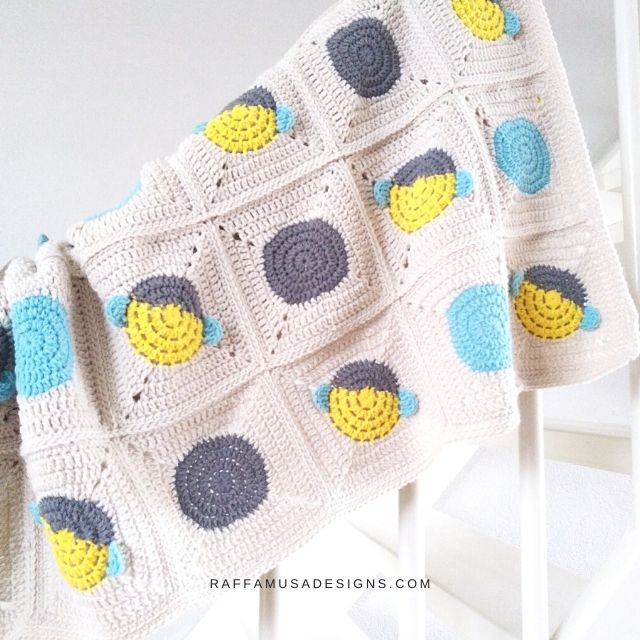
Find a few bee-autiful patterns here on the blog!

Add this pattern to your Ravelry queue here or pin it for later to your favorite Amigurumi Pinterest board!

Note: this post contains affiliate links. This means that if you purchase something through the links on my blog, I might earn a commission. This will not have any effect on the price you pay. For more info, please, see my Privacy Policy.
AD-FREE DOWNLOADABLE PDF
If you’d like to print this pattern, you can purchase the ad-free, PDF pattern for a very inexpensive price in my Ravelry, LoveCrafts, and Etsy stores!


Materials
- 3.0-mm (C USA, 11 UK) Hook
- Sport-Weight (2, Fine) Yarn. I used Rio cotton from Lammy Yarns
- Natural Wood Teething Ring, 7 cm (2.8”) internal diameter
- Two Natural Wood Beads with a diameter of 2.00 cm (0.8”)
- Four Natural Wood Beads with a diameter of 1.00 cm (0.39”)
- One Stitch Marker to Work in the Round
- Tapestry Needle
- Embroidery Needle
- Embroidery Thread for the Eyes and Mouth of the Bee
- Fiberfill or Cotton Stuffing
Color Reference
I used Rio Cotton from Lammy Yarns. You can use any comparable yarn, such as Schachenmayr Catania.
Below, you can find the colors and amounts of yarn.
- 846, Gold, 25 g, for the beehive
- 112, Brown, for the tree branch
- 844, White, 16 g, for the flowers
- 046, Light Green, 12 g, for the leaves
- 373, Dark Green, 12 g, for the leaves
- 371, Yellow, 16 g, for the body of the bees
- 001, Black, for making the stripes of the bees
- 459, Light Blue, 10 g, for the wings of the bees
- 740, Light Pink, and 022, Light Purple, for the butterfly
- 850 for the body of the butterfly
Crochet abbreviations (US Terms)
Ch – Chain
Dc – Double Crochet
Hdc – Half Double Crochet
Inc – Increase
Inv Dec – Invisible Decrease
MC – Magic Circle
Sc – Single Crochet
Sl St – Slip Stitch
St – Stitch
Tr – Treble Crochet
How to Read the Pattern
- (…) – Repeat the instruction within brackets for the indicated number of times.
- […] – Crochet all the instructions within brackets in the same indicated stitch.
- If the pattern says “sc 5”, it means that you have to make one single crochet in each of the next 5 stitches.
Special Stitches
Increase (Inc)
Throughout the pattern, an increase consists of 2 sc in the same st
Invisible Decrease (Inv Dec)
Find a step-by-step tutorial on how to crochet the invisible decrease here.
Magic Circle (MC)
For a free video tutorial on how to make a magic circle, check out this blog post.
Picot Stitch (Picot)
To crochet a picot, ch 3 and sl st into the first ch made.
Size
The beehive is 3″ (7.5 cm) tall by 2.6″ (6.5 cm).
Including the wooden ring, the entire Amigurumi Beehive Baby Rattle measures 6.75″ (18 cm).
Gauge
25 sc for 27 rows in 4″ (10 cm).
Beehive Amigurumi Pattern
With gold yarn (color 846), make a MC.
Round 1. Sc 8 in MC. (8 sts)
Round 2. 8 inc. Do not forget to mark your first st. (16 sts)
Round 3. (Sc inc 1, sc 1) 8 times. (24 sts)
Round 4. (Sc inc 1, sc 2) 8 times. (32 sts)
Round 5. (Sc inc 1, sc 3) 8 times. (40 sts)
Round 6. (Sc inc 1, sc 4) 8 times. (48 sts)
Round 7. (Sc inc 1, sc 5) 8 times. (56 sts)
Round 8. (Sc inc 1, sc 6) 8 times. (64 sts)
Round 9-12. Sc around. (64 sts)
Round 13. (Sc 6, 1 inv dec) 8 times. (56 sts)
Round 14. (Sc 5, 1 inv dec) 8 times. (48 sts)
Round 15. (Sc 4, 1 inv dec) 8 times. (40 sts)
Round 16. (Sc inc 1, sc 1, sc inc 1, sc 2) 8 times. (56 sts)
Round 17-18. Sc around. (56 sts)
Round 19. (Sc 5, inv dec 1) 8 times. (48 sts)
Round 20. (Sc 4, inv dec 1) 8 times. (40 sts)
Round 21. (Sc 3, inv dec 1) 8 times. (32 sts)
Round 22. (Sc inc 1, sc 3) 8 times. (40 sts)
Round 23-24. Sc around. (40 sts)
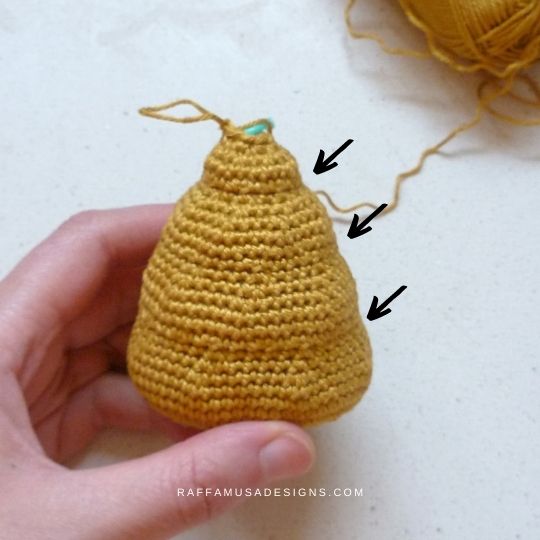
Start stuffing your beehive.
Round 25. (Sc 3, inv dec 1) 8 times. (32 sts)
Round 26. (Sc 2, inv dec 1) 8 times. (24 sts)
Round 27. (Sc 1, inv dec 1) 8 times. (16 sts)
Round 28. (Sc inc 1, sc 1) 8 times. (24 sts)
Make sure the beehive is properly stuffed with fiberfill or cotton stuffing so that it looks cute and puffy!
Round 29. Sc around. (24 sts)
Round 30. (Sc 1, inv dec 1) 8 times. (16 sts)
Round 31. Inv dec 8. (8 sts)
Tie off and close the hole on top of the beehive by sewing it tightly.
When cutting your yarn, leave a long tail for attaching the beehive to the wooden ring.
Finishing
Model the beehive by threading a length of yarn around its circumference in between rounds 15-16, 21-22, and 27-28.
Tie off and weave in all ends.
Tree Branch or Anchor to the Wooden Ring
With brown yarn, ch 46.
Row 1. Sc in the second chain from the hook, sc until the end. (45 sts)
Row 2-10. Ch1, turn. Sc across. (45 sts)
Fasten off leaving a 27″ (70 cm) long tail for sewing.
Flowers (make 8)
With white yarn, ch 4.
First petal. Make a picot by sl stitching into the third ch from your hook. Sl st into the first ch.
Petals 2-5. (Ch 3, picot, sl st into the first made ch) four times.
Fasten off leaving a long tail for sewing the flowers on the beehive or on the tree branch.
Small Leaves (make 6)
With light green or dark green yarn, ch 4.
Row 1. Sc in the second ch from your hook, hdc 1, sc 1.
Fasten off leaving a long tail for sewing the leaves.
Big Leaves (make 6)
With light green or dark green yarn, ch 5.
Row 1. Sc in the second ch from your hook, hdc 2, sc 1.
Fasten off leaving a long tail for sewing the leaves.
Butterfly
With pink yarn, ch 4.
Top wings. Make a picot by sl stitching into the third ch from your hook. Sl st into the first ch. Ch 3, 1 picot, sl st into the first made ch.
Bottom wings. Join the light purple yarn. (Ch 3, picot, sl st into the first made ch) twice.
Fasten off leaving a long tail for sewing the butterfly on the beehive.
Bee (make 2)
For a step-by-step tutorial on how to crochet around beads, you can visit this blog post.
With yellow yarn, make a MC.
Round 1. Sc 6 in MC. (6 sts)
Round 2. Sc inc 6. (12 sts)
Round 3. (1 inc, 1 sc) 6 times. (18 sts)
Round 4-7. Sc all around. (18 sts)
Round 8. (Sc 1, inv dec 1) 6 times. (12 sts)
Round 9. Inv dec 6. (6 sts)
Tie off.
Using black yarn and a tapestry needle, sew the stripes of the bee on the bottom half of the body.
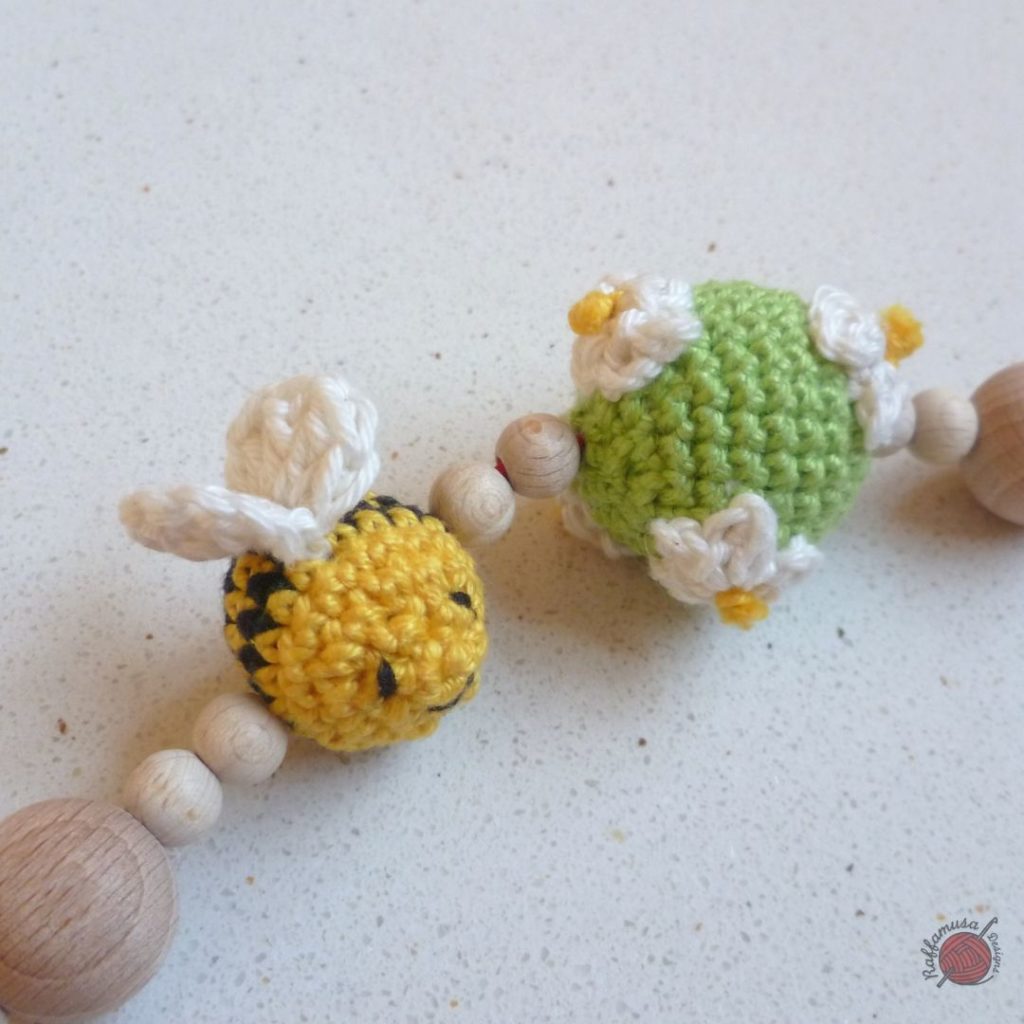
Bee Wings
Using white yarn, ch 4.
Round 1. [Dc 1, tr 1] in the third chain from your hook, [tr 1, dc 1] in the next ch (the first made ch), ch 2, and sl st into the same ch. Working on the other side of the initial ch, ch 2, [dc 1, tr 1] in the first made ch, [tr 1, dc 1] in next ch, ch 2, sl st into the same ch.
Tie off leaving a long tail for sewing the wings on the bee bead.
Finishing
Using black embroidery floss and embroidery needle, embroider the eyes and mouth of the bee.
Attach the wings on top of the bee bead.
Tie off and weave in all ends.
Assembling the Baby Rattle
Using a tapestry needle, pass the long yarn tail of the beehive through the middle of the rectangular piece of brown branch. Anchor the beehive to the wooden ring by passing the tail around the wooden ring, the branch, and the beehive several times.
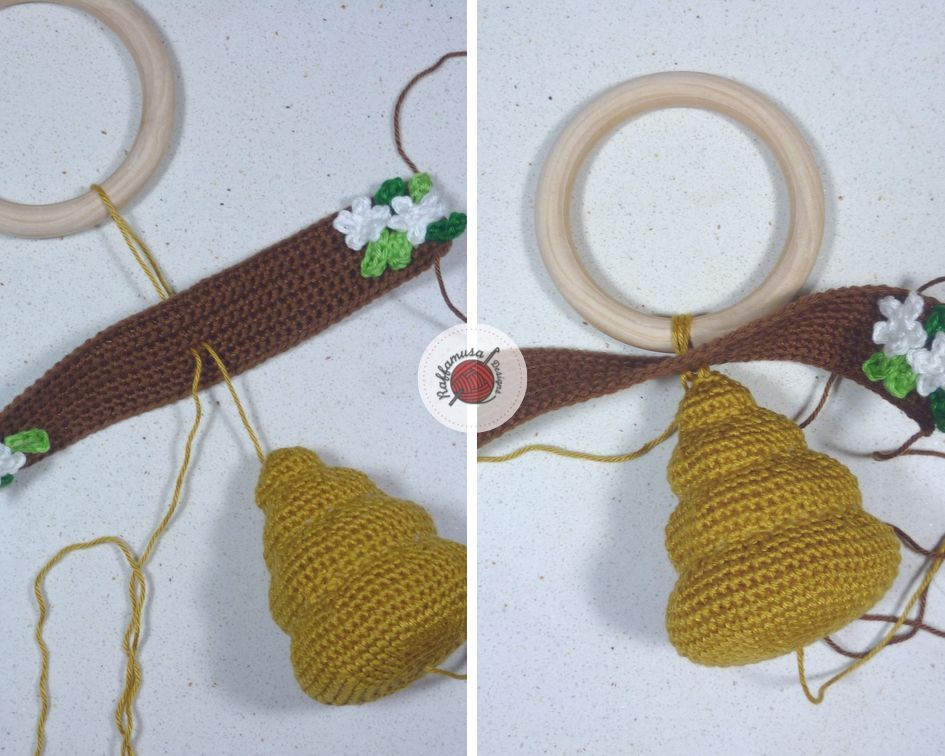
Sew the rectangular, brown piece of branch on the wooden ring.
Decorate the two ends of the branch by sewing on some flowers and leaves. I actually decorated the brown branch before sewing it on the wooden ring, but that made it more complicated to sew. This is why I suggest you attach the flowers after sewing the branch, but it is your choice.
Sew the rest of the flowers and leaves on the top of the beehive and on the body of the beehive.
For the butterfly, you will embroider the body while sewing the wings on the beehive. Using pink yarn, pass the yarn vertically, in the middle of the wings a couple of times. Fasten off the top/head of the butterfly with a regular knot and cut the yarn leaving some short tails to make the antennae.
Your Amigurumi Beehive Baby Rattle is ready!
I’d love to see your work!
I hope you enjoyed this pattern and would love to see your beehive Amigurumi! Tag @raffamusa_designs on Instagram or use the #raffamusadesigns hashtag so that I can see your creations!
Find more free crochet patterns…