

It’s cold outside so you may be looking for a cozy, striped crochet beanie to wear through the rest of the winter. If that’s the case, you’ll love The Wilhelmina Beanie by guest contributor, Ashley from Through The Loop Yarn Craft! This is a simple pattern that you can work up in a few hours to wear on your next cold night out on the town.

This post contains affiliate links. I may receive compensation (at no added cost to you) if you make a purchase using these links. Photos in this post are © Ashley Edmonds/Through The Loop Yarn Craft and are used with permission. Yarn was generously provided by Yarnspirations Red Heart.
About Through The Loop Yarn Craft

Ashley Edmonds is the creator and yarn artist at Through The Loop Yarn Craft. Ashley is inspired by her busy life as a wife, full-time working mom of 7, and her amazing surroundings on Vancouver Island. Ashley knows firsthand how crazy the mom-life can be and is passionate about designing products and patterns that will ease the daily chaos and bring warmth to you and your loved ones.
Show your support by following Ashley on Website | Etsy | Facebook | Instagram | Pinterest | Ravelry
The Wilhelmina Beanie
Striped Crochet Beanie Pattern by Through The Loop Yarn Craft
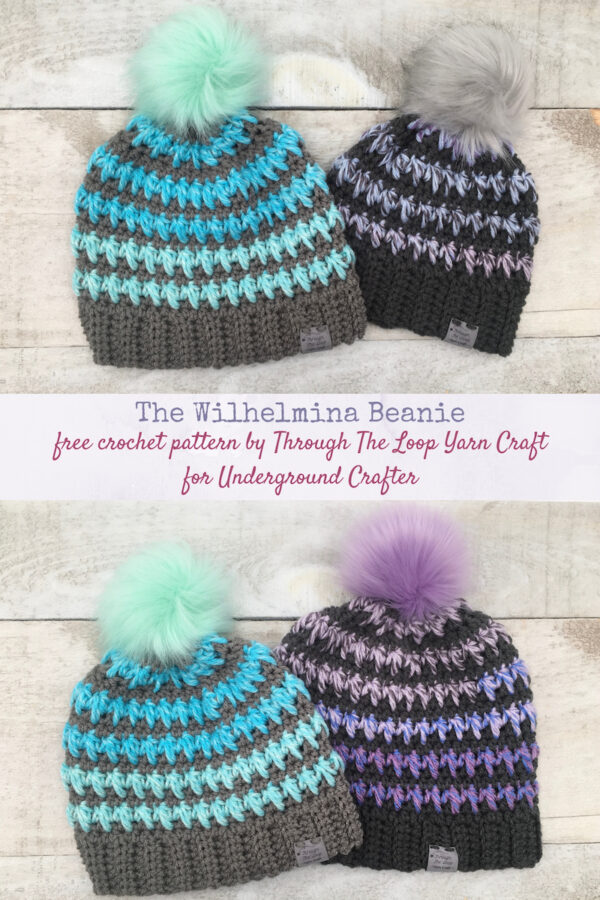
The Wilhelmina Beanie is a quick and fun crochet pattern. The beautiful feather stitch gives it loads of texture and so many colour possibilities!
Materials
- Approx. 80-120 yds worsted weight yarn in two colours. I used Red Heart Roll With It Tweed in 9655 Marine and Red Heart With Love in 1401 Pewter.
- US size H crochet hook (5.0 mm).
- Scissors.
- Yarn Needle.
Difficulty
- Advanced or adventurous beginner.
Gauge
- Gauge is not as important as finished measurements. Follow measurement guidelines for brim and height.
Sizing
- Teen/Adult Small. Best fit for 21″ (53.5 cm) head circumference.

Pattern Notes
- All CH1 or CH2 do not count as a stitch.
- For changing colours, use your preferred method. I like to drop the yarn behind, and pick up the next colour, switching back and forth when needed. This reduces the amount of ends to weave in.
- Add to your queue or buy the ad-free PDF version of this pattern with additional sizes on Etsy or Ravelry.
Stitches Used & Abbreviations (US Terms)
- CH – Chain
- CHSP – Chain Space
- FS – Feather Stitch
- HDC – Half Double Crochet
- HDCBLO – Half Double Crochet Back Loop Only
- HDC2TOG – Half Double Crochet 2 Together. A helpful video tutorial for this stitch is shown below.
- If you can’t see the tutorial for the hdc2tog above, click HERE to watch it on YouTube.
- RND – Round
- SK – Skip
- SLST – Slip Stitch
- ST(S) – Stitch(es)
- YO – Yarn Over
Special Stitch Instructions
- Feather Stitch (FS) – YO, insert hook into same ch-1 sp as last feather stitch, or starting HDC, YO and pull up a loop in line with loops on hook (3 loops on hook), YO, insert hook into skipped st one row below same sp, YO and pull up a loop in line with loops on hook (5 loops on hook), YO, insert hook in next ch-1 sp, YO and pull up a loop in line with loops on the hook, YO and pull through all 7 loops on the hook, ch1 to ‘lock’ the stitch.

The Pattern
Brim
- 18″ (46 cm) band (best fit for 21″/53.5 cm head circumference).
- With Colour 1
- CH 8.
- Row 1: HDC in second CH from hook, and each CH across, CH 1, turn (7HDC).
- Row 2 – 32: HDCBLO in each stitch across, CH 1, turn (7 HDC).
- Continue until you’ve reached a brim length of 18″ (46 cm) unstretched. For me this was a total of 42 rows.
- Do more or less until you have reached the right measurements.
- Once rows are complete, bring the ends together and slip stitch closed, being careful not to twist the brim. Turn/flip so seam is on the inside, CH 1 to begin body of the hat.
Hat Body
- Height from bottom of brim to top 8″ (20.5 cm).
- Continue with Colour 1
- Rnd 1: HDC evenly around the brim, SLST to first HDC, CH 2 (60 HDC).
- Rnd 2: Skip next ST after the CH2 join ST, (HDC, CH1, SK next ST) repeat around, SLST after last CH1 to the top of the first CH2 of the Rnd (30 HDC).
- For two colour hat change colours here to colour 2. Going forward do rows like 1-2 in same colour and switch colours for the Feather Stitch rows.
- Rnd 3: CH 1, FS around, See page 3-6 for photo tutorial and written instructions, SL ST to the top of the first HDC of the round (30 FS).
- Change to Colour 1
- Rnd 4: CH 1, HDC in the first HDC of the FS Rnd, (HDC in the CH space, HDC in the top of the FS) repeat around, SLST to the first HDC, CH 2 (60 HDC).
- Rnd 5: Sk first ST after CH2, (HDC in next ST, CH1, SK next ST) repeat around, SLST to top of CH2 (30 HDC)
- Change to Colour 2
- Rnd 6: CH 1, HDC in same ST as CH1, FS around, SLST to top of first HDC, (30 FS).
- Change to Colour 1
- Rnd 7: Repeat Rnd 4.
- Rnd 8: Repeat Rnd 5.
- Change to Colour 2
- Rnd 9: Repeat Rnd 6.
- Rnd 10: Repeat Rnd 4.
- Rnd 11: Repeat Rnd 5.
- Change to Colour 2
- Rnd 12: Repeat Rnd 6.
Decrease and Finishing
- Change to Colour 1
- Rnd 13: CH1, HDC2tog, repeat around SLST to first HDC, CH2 (30 HDC).
- Rnd 14: Skip next ST after the CH, (HDC, CH1, SK next ST) repeat around, SLST after last CH1 to the top of the first CH2 of the Rnd (15 HDC).
- Change to Colour 2
- Rnd 15: CH 1, HDC in sam ST as CH, FS around, SLST to top of first HDC, ( 15 FS).
- Change to Colour 1
- Rnd 16: HDC2TOG around, SLST to first ST of round, Tie off leaving long tail to sew hat closed (15HDC).
- If your hat hasn’t reached the 8″ (20.5 cm) height, you may need to add another row.
- With long tail and yarn needle weave through final round and pull tight to close top of hat. Weave in all ends and you’re done!
- ***For a messy bun beanie, weave in ends without closing the top!
Terrific beanie pattern!!
Thank you soooo much.
Will make many of these!!
So cute and actually super easy once you get the hang of it! Also the feather stitch makes it look so unique, made one for my boyfriend and starting another for my favorite coworker, gonna work on making where my rows meet look a little more seamless