
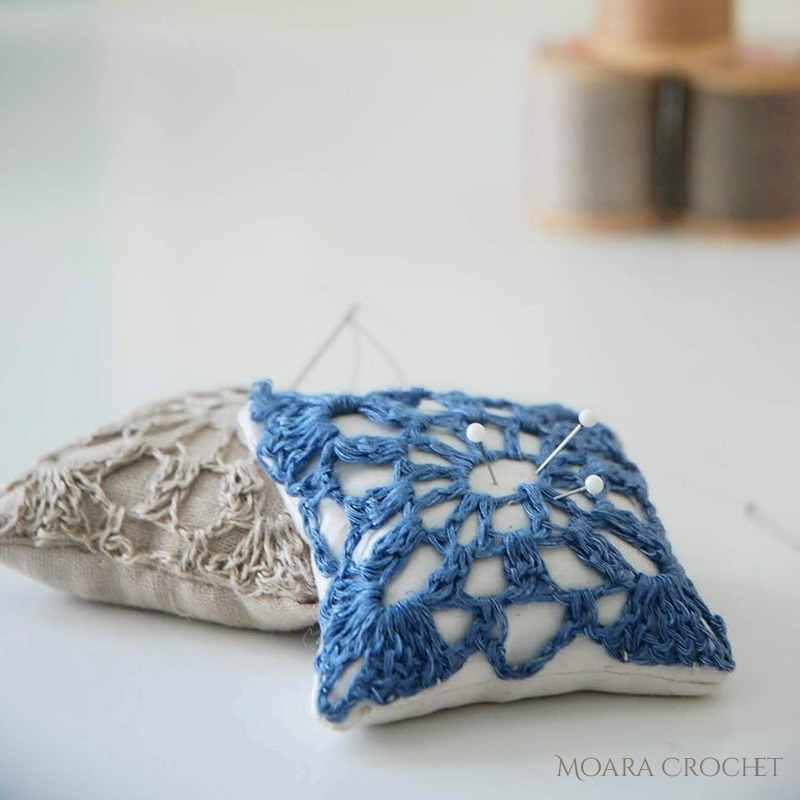
Learn how to crochet a pincushion with my free easy crochet pattern. This gorgeous little pin cushion is both quick and easy to make. Ideal to store your pins and needles in one stylish little parcel or add some lavender & make your own scented bags.
These also make perfect handmade wedding favors or make a set of 3 as beautiful gift for someone special.
Make your own crochet pincushion with my simple step by step written photo tutorial or if you prefer a video tutorial, I have also made a Youtube video.
The crochet pincushion pattern is also available as a print friendly PDF in my ETSY Store.
Materials
- 25m Fingering Yarn of your choice (I have used some gorgeous pure Linen Yarn)
- 2mm Crochet Hook
- Yarn needle
- Two 9x9cm pieces of fabric (I have used Linen to match my thread but any non-stretch fabric is ideal)
- Sewing Machine (this can also be sewn by hand)
- Pincushion – Sand for the filling (this will help sharpen your pins & needles)
- Lavender Bag – Cushion filling & 2tbs of dried Lavender
Gauge : 26 dc stitches and 12 rows to measure 10x10cm
Notes: Each granny square is worked in the round. Finished size is 7x7cm square pincushion.
How to crochet a pincushion
Row 1: Begin with a magic circle. Ch 4 (count as dc and ch1), *dc in ring, ch1* repeat * to * 11 times, sl st into the 3rd chain from the first ch. Total: 12(dc, ch1)

Row 2: Ch 2, dc2tog in first ch1 space, ch3 *dc3tog in next ch1-sp, ch3 * repeat * to * 11 times, join with a sl st into top of the first dc2tog. As shown in the photo below. Total 12 (dc3tog, ch3).

Row 3: Ch 1, sc in same ch-3 sp, *ch5, sc in next ch3-sp * repeat * to * 11 times, ch2, join with dc to top of the first sc. Total: 12 ch-sps.
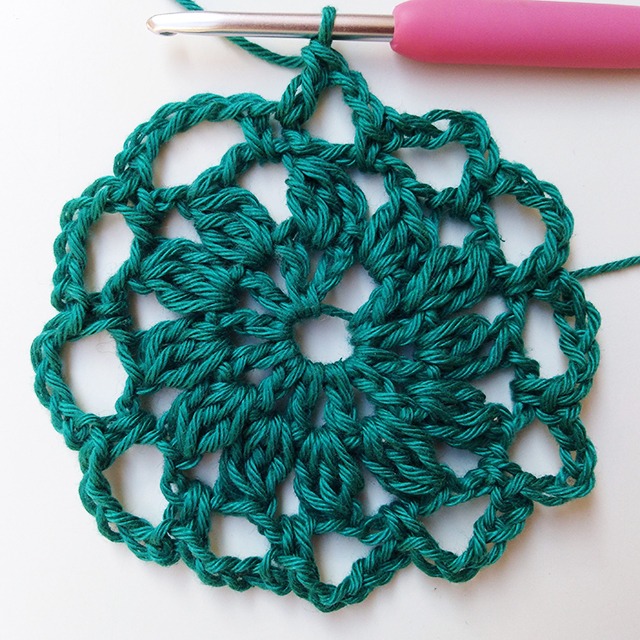
Row 4: Ch1, sc in space made by joining dc, ch5, sc in next ch-sp, ch1, (5dc, ch3, 5dc, ch1) in next ch-5 sp, * sc in next ch5-sp, ch5, sc in next ch5-sp, ch1, (5dc, ch3, 5dc, ch1) in next ch5-sp, * repeat * to * 3 times, sl st into first sc. Fasten off. Block your Granny Square.

Fabric Bag
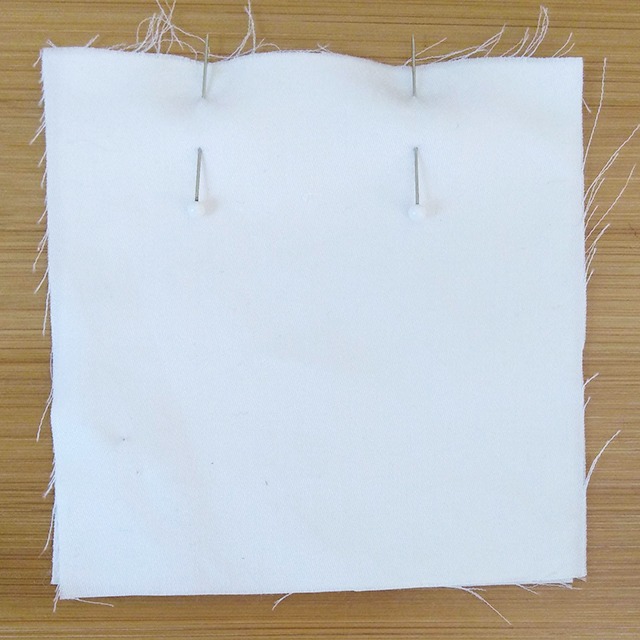
Pin the two 9cm square pieces of fabric right sides together. Place 2 pins 4cm apart on one side (as shown in the photo below), this will create the opening of the bag to add your filling.
Use a sewing machine or by hand (if sewing by hand ensure your stitches are very tight together to hold the filler), sew 1cm from the opening marker pin all the way around until you reach the 2nd opening marker pin.

Trim your corners to help ease the turning of your bag. Add your filling (I used a funnel to help me with this part), hand sew your opening with an invisible stitch. Finally hand sew your crochet motif to the top.

Congratulations you have made your Crochet Pincushion! I would love to see you crochet creations, please tag me on @moara_crochet on Instagram to share your work.
WANT TO MAKE MY CROCHET PINCUSHION?
PIN IT TO YOUR CROCHET OR CRAFT BOARD TO SAVE FOR LATER!


FIND ME ON

FOR MORE FREE CROCHET PATTERNS!
Many thanks for sharing. Love your work.