
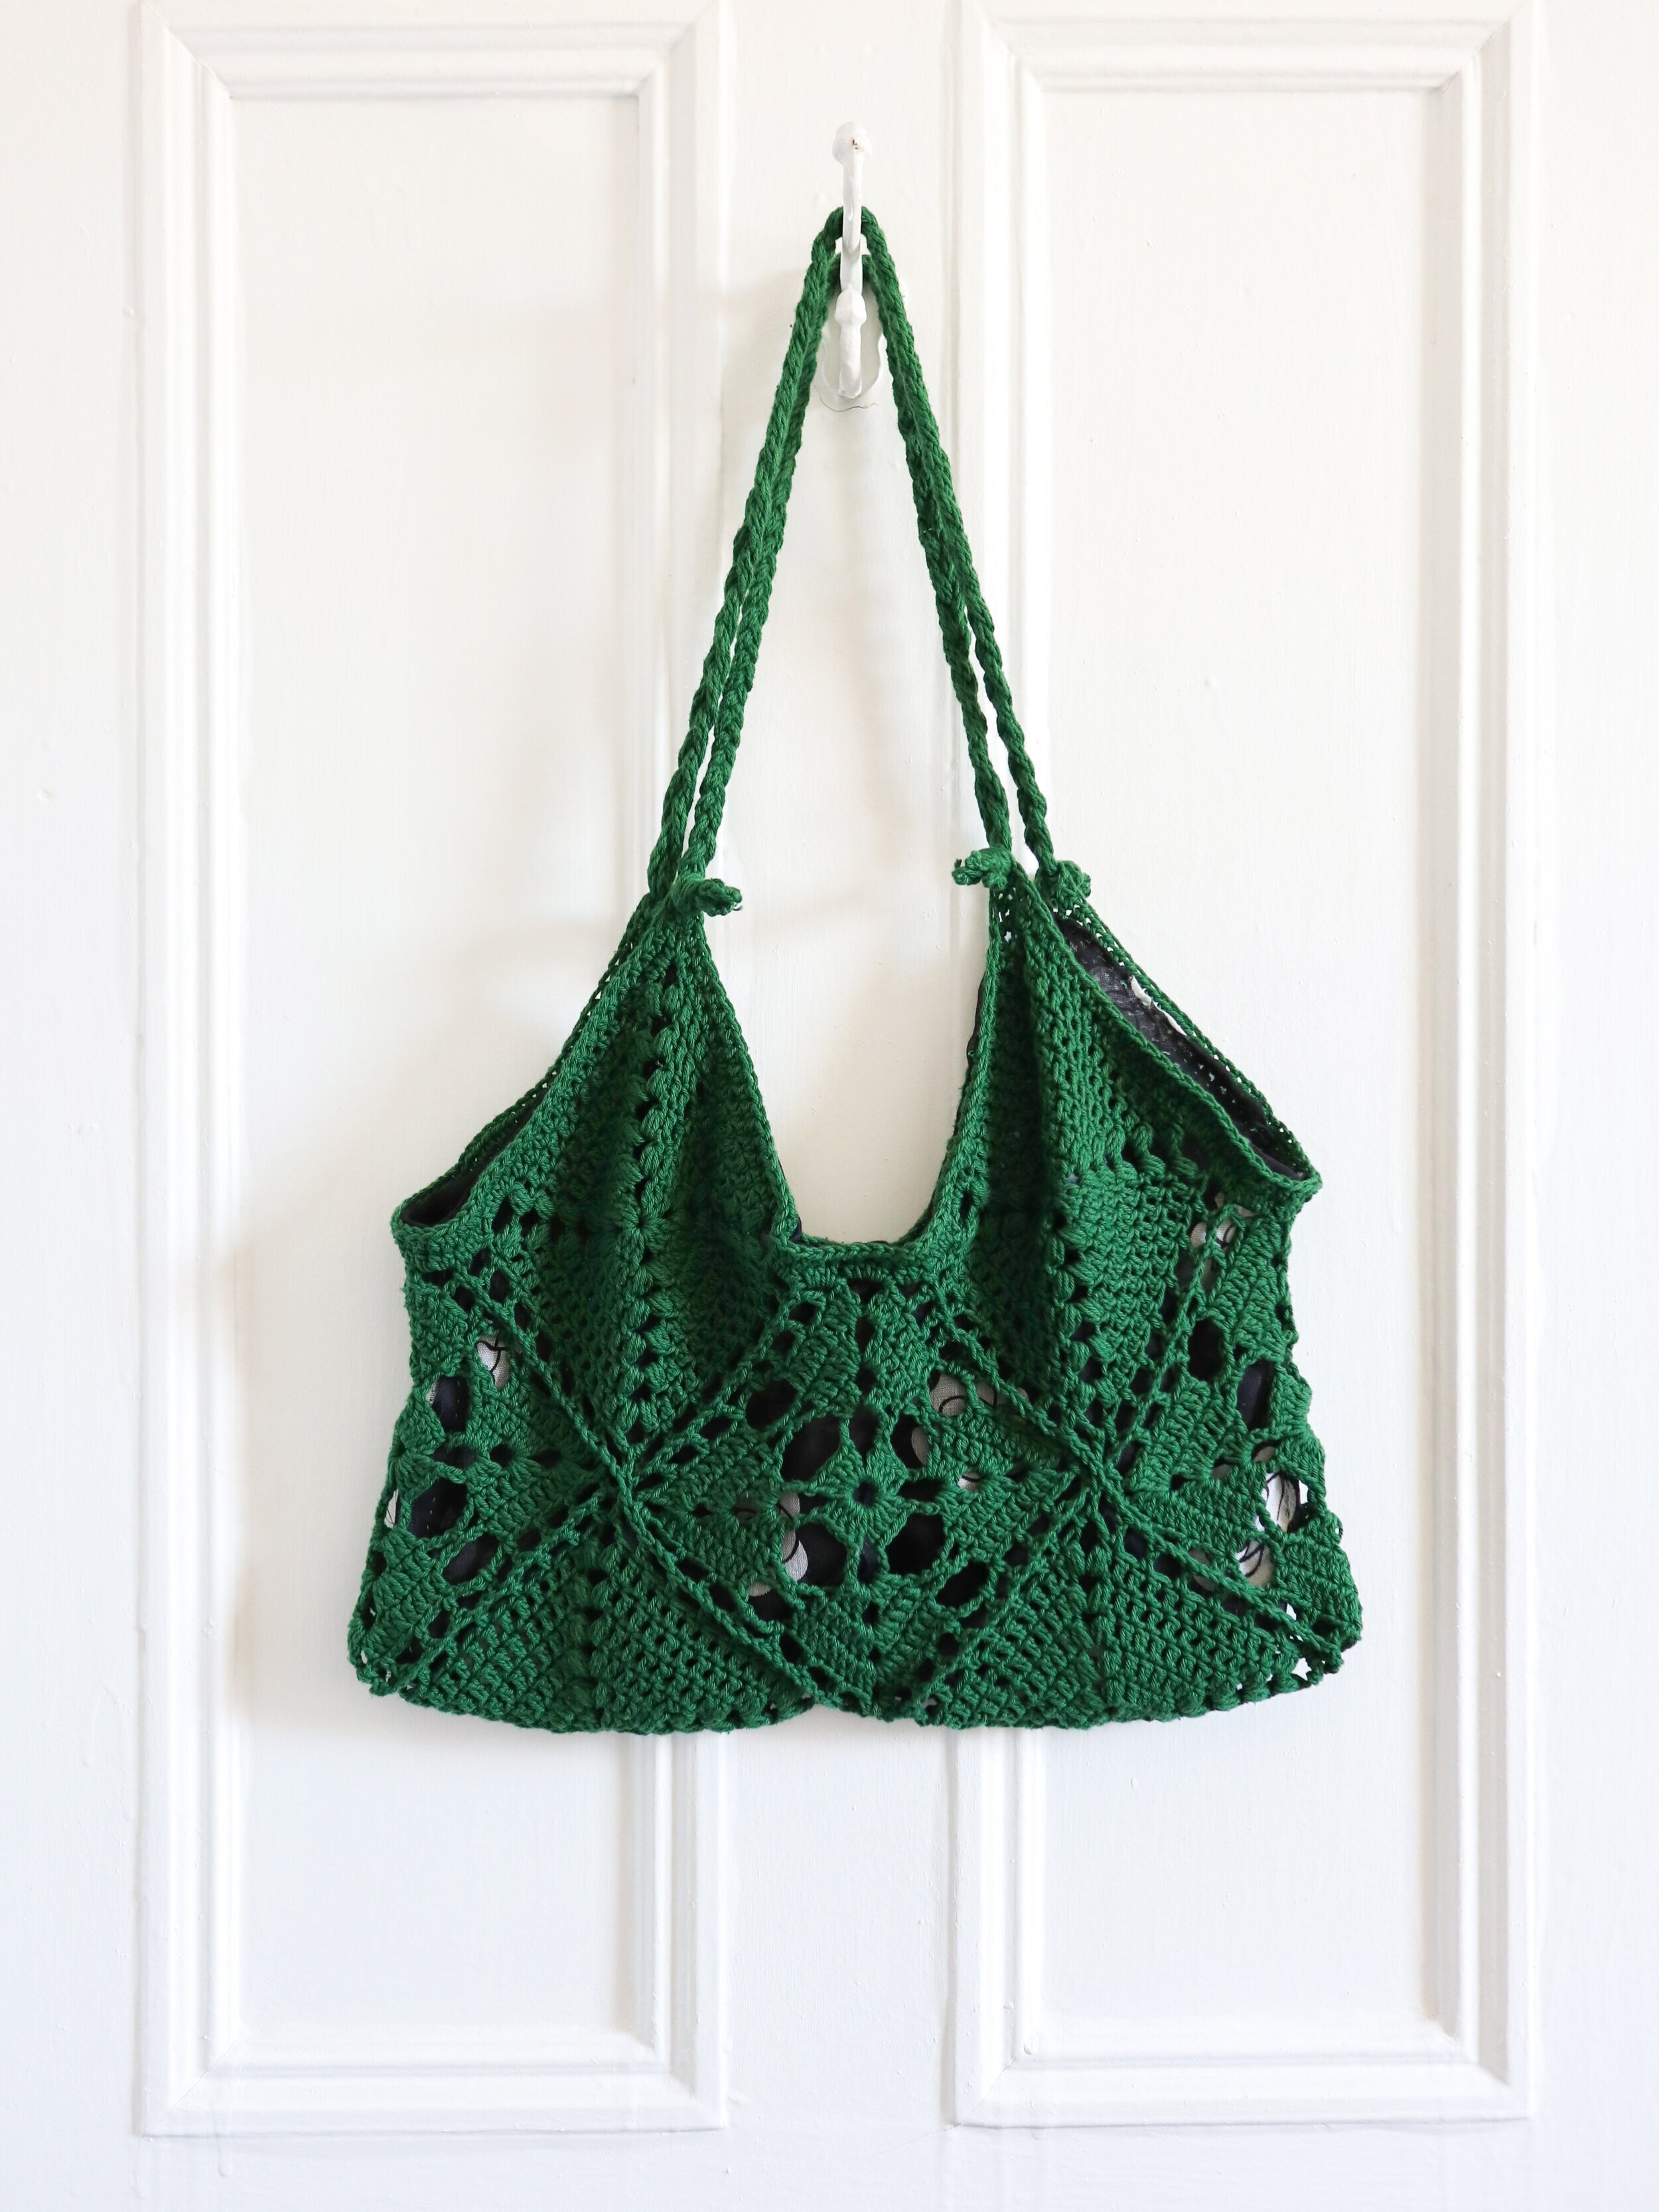
4luck Market Bag

It’s March! Spring is coming, and I just can’t wait! I’m so ready for the flowers, the mild weather, and heading to the Jean Talon market here in Montreal.
And, with it being March, you know what great holiday comes soon. Here’s some hints, it’s Irish, the color is green, and it’s filled with leprechauns! If you guess St. Patricks Day, then you’d be RIGHT!
With the holiday incoming, I wanted to make something that was slightly St. Patrick’s Day themed but still wonderful at any time of the year. So, here’s the 4Luck Market Bag.
About This Bag:
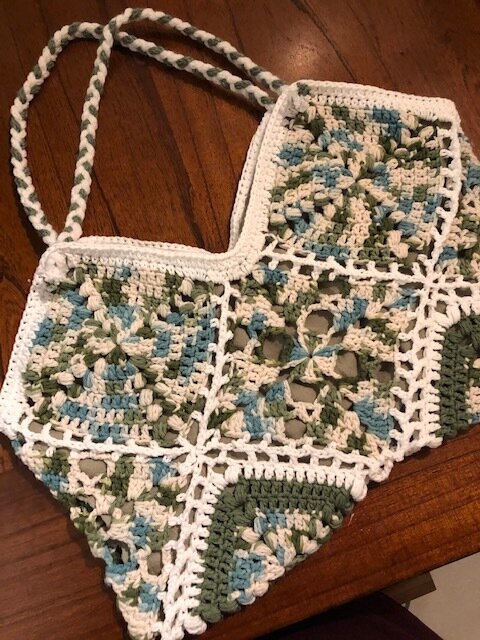
Created with 2 typed of granny squares, one of which has a slight 4 leaf clover motif, this market bag is easy to make and absolutely adorable in every color (not just green).
Not only is it adorable, but in my constant wish to use more sustainable methods in my every day life, this market bag helps eliminate plastic shopping bags! Cute and environmentally friendly!
This market bag is made out of cotton. Cotton is probably the best type of yarn to use for this project because it won't stretch as much after you block it. I used Paintbox Yarns Cotton DK in Racing Green. It gives the motif a cute shamrock feeling to it! But, this bag would be great in a variety of different colors too! Make this in any weight 3 DK cotton yarn, and you’ll be set! Some other yarns that would work well for this bag would be Lion Brand Coboo, Lion Brand Comfy Cotton, and King Cole Cottonsoft.
Happy crocheting!
Thank you!
to my awesome testers!

I LOVE TO SEE WHAT YOU CREATE!
Please share your creations with the community on social media by tagging @ravinsekaidesigns and hashtag #4luckmarketbag
I can’t wait to see the beautiful things you come up with!
Facebook: Ravin Sekai Designs
Ravelry: RavinSekai
Instagram: @ravinsekaidesigns
Pinterest: Ravin Sekai Designs
Patreon: Ravin Sekai Designs

Pin to Pinterest

What You Need:
Hook Size: 4mm hook
Yarn: Light Weight 3 DK yarn. (cotton is best) Sample crocheted in Paintbox Yarns Cotton DK, 375 yards.
Gauge: 13st/10 rows= 4” in double crochet (gauge is after blocking)
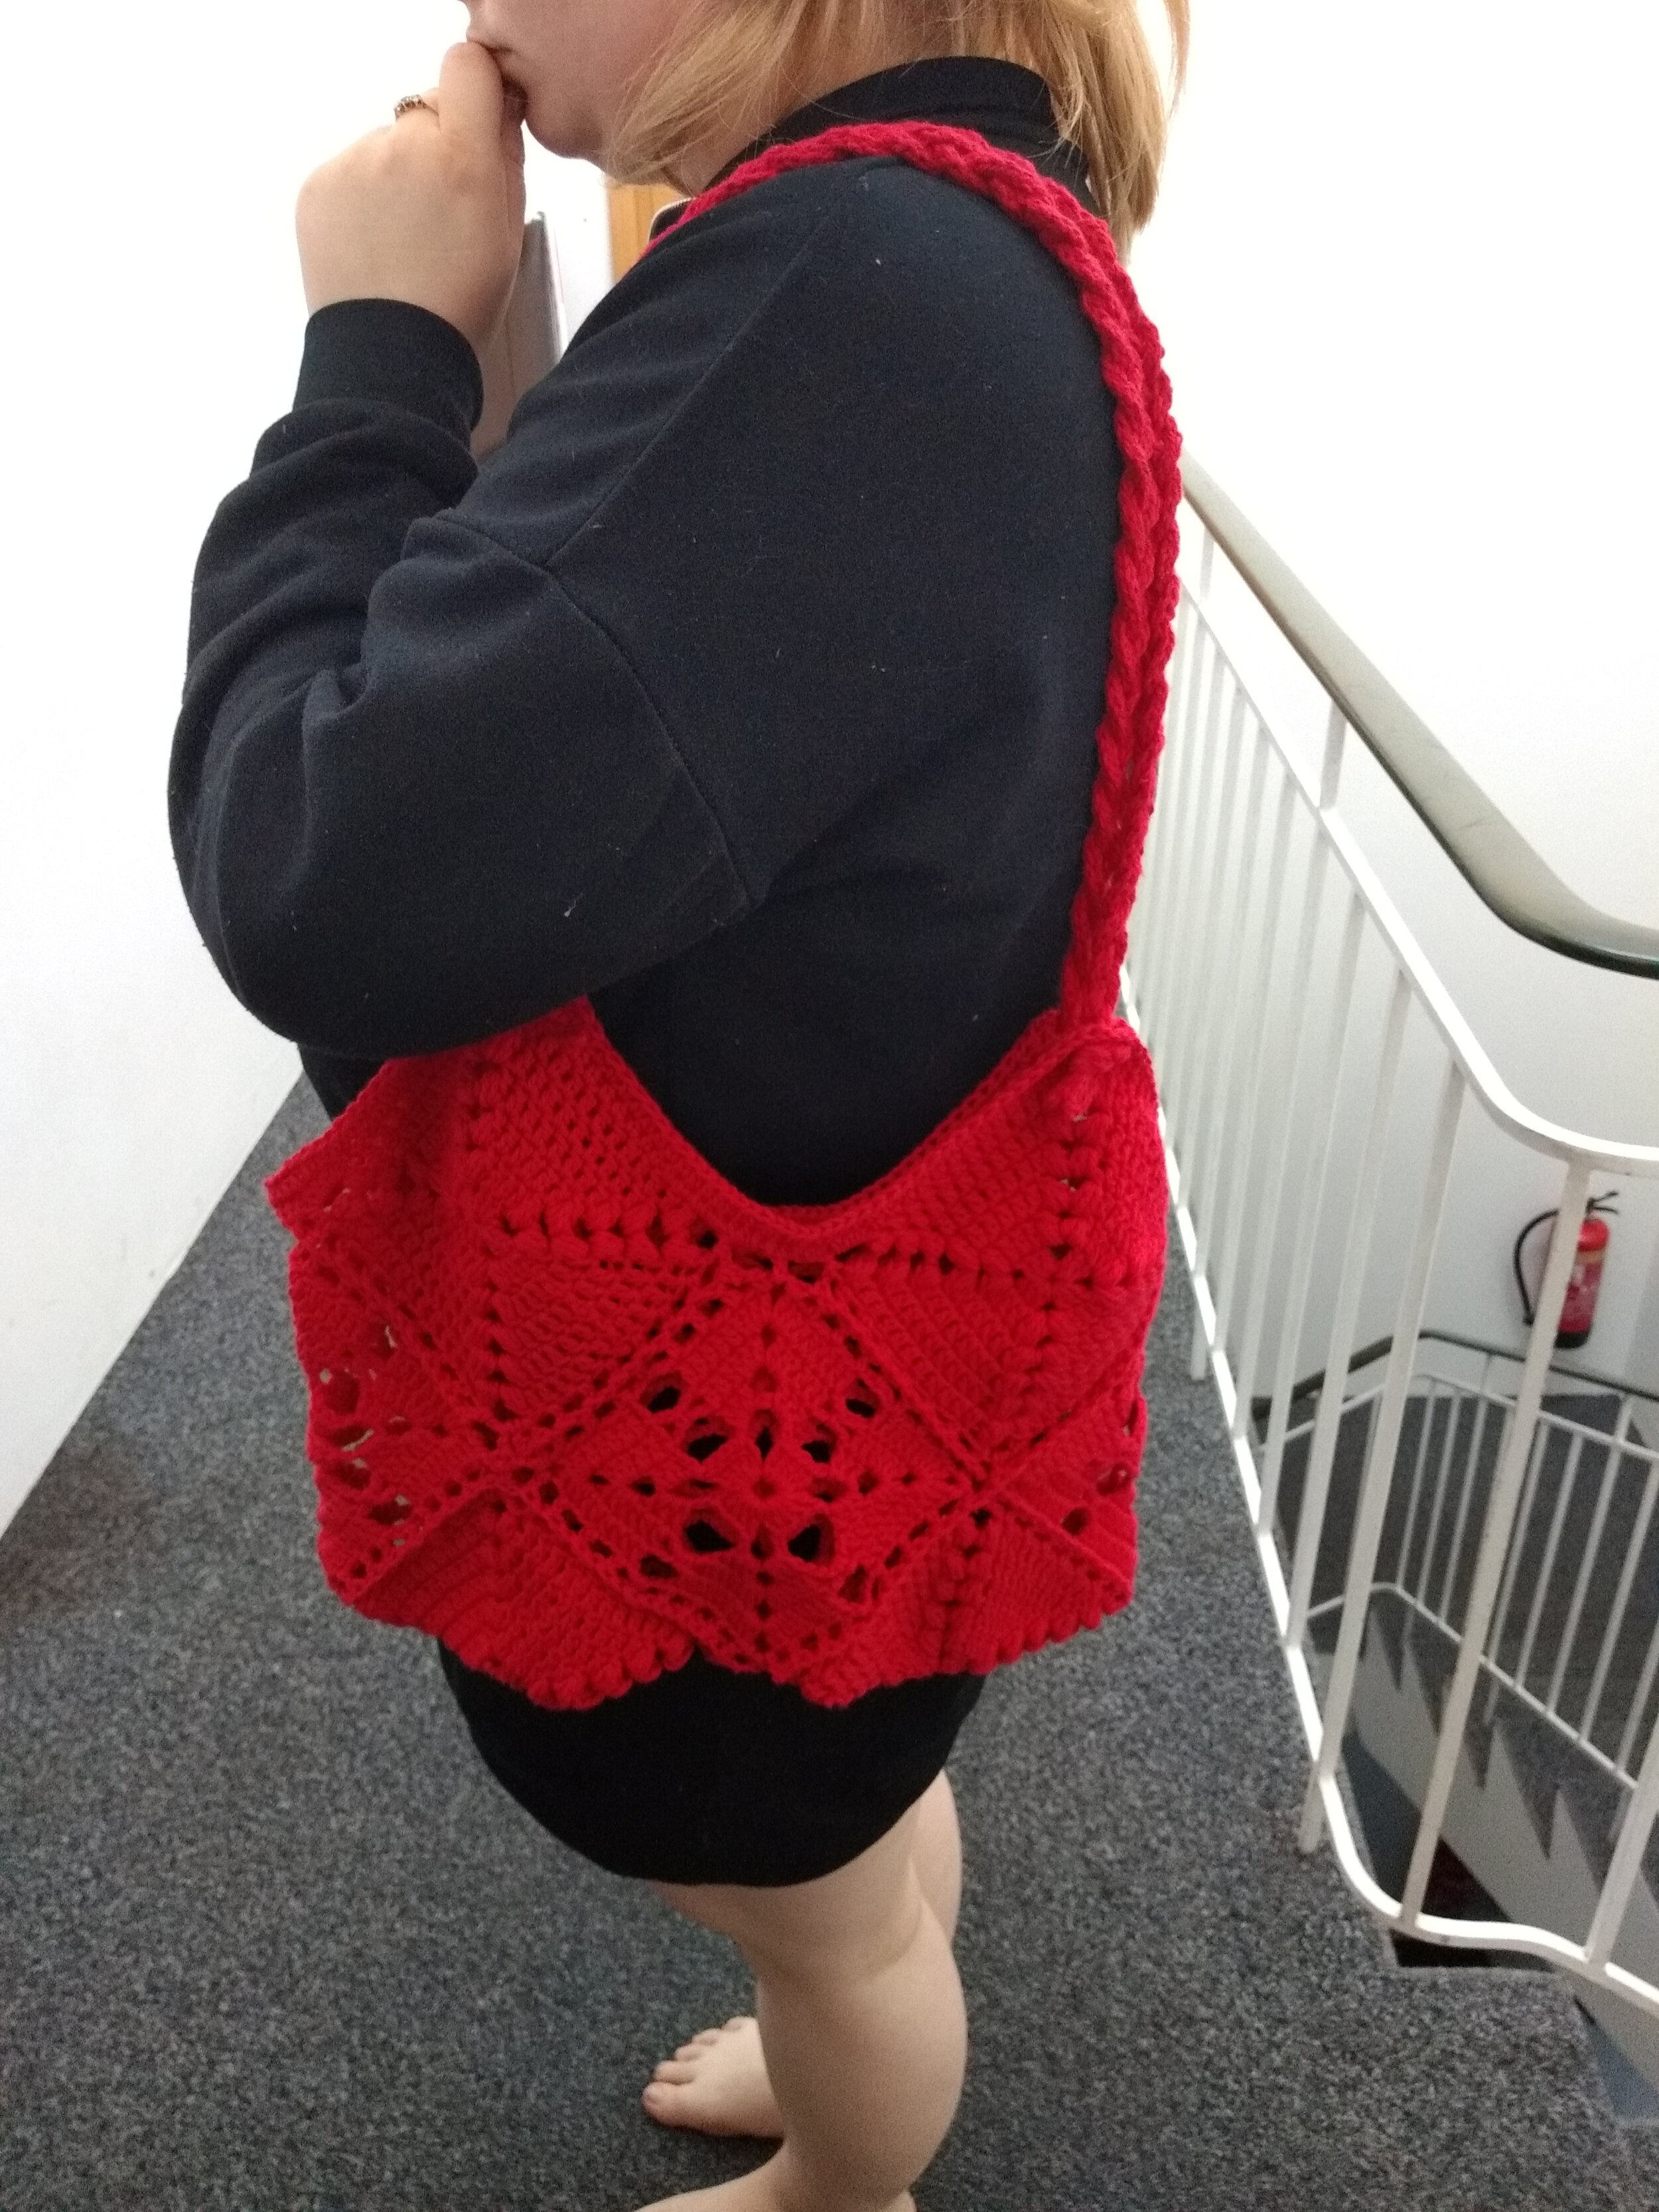
Finished Garment Sizing: each granny square is approx. 5.5” x 5.5” after blocking. Put together, the purse is approx. 16” wide x 13” tall at straps.
Skills Needed/Abbreviations
Abbreviations in US terms
T1: granny square type 1
T2: granny square type 2
Ch: chain
Sl st: slip stitch
Sc: single crochet
Hdc: half double crochet
Dc: double crochet
Yo: yarn over
Pf st: puff stitch, YO, insert hook into st, YO, pull through just the st, YO, insert hook into same st, YO, pull through just the st, YO, insert hook into same st, YO, pull through just the st, YO, pull through 6 loops, YO, pull through last 2 loops. This makes a 7 loop puff.
S1, s2, s3, etc: granny square #1, #2, #3 etc.
Notes:
- Ch3 in T1 and T2 count as 1dc.
The Pattern:
For the free pattern for this garment please continue on this page. Please consider supporting me by purchasing the 100% ad-free PDF download with full crochet charts for this pattern on my Ravelry or ETSY pages. Or consider joining my Patreon for member perks.
Main Bag:
1. First, you must make 10 granny squares. Four of T1 and Six of T2
T1:
Ch6, sl st in 1st ch
Row 1: ch3, 4dc into circle, *ch8, 5dc into circle* rep * * twice more, ch8, sl st into top of starting ch3.
Row 2: Sl st across next 4 st, then sl st into 1st ch of ch8, ch3, 2dc into ch8, ch3, 3dc into same ch8 space, *ch5, [3dc, ch3, 3dc] all into ch8 below* rep * * twice more, ch5, sl st in top of starting ch3.
Row 3: ch3, dc in each of next 2 dc, *[3dc, ch3, 3dc] all in ch3 space below, 3dc, ch2, sc into center of ch5 below, ch2, 3dc* twice more, [3dc, ch3, 3dc] all in ch3 space below, 3dc, ch2, sc into center of ch5 below, ch2, sl st into top of starting ch3.
Row 4: ch3, dc in each of next 5 dc, *[3dc, ch3, 3dc] all in ch3 space below, 6dc, ch5, 6dc* twice more, [3dc, ch3, 3dc] all in ch3 space below, 6dc, ch5, sl st into top of starting ch3.
FO
T2:
Ch4, sl st in 1st chain (makes a circle)
Row 1: ch 7, *3dc in center of circle, ch4* rep * * twice more, 2dc in circle, sl st in ch3 of starting ch7.
Row 2: ch3, *[pf st, ch4, pf st] all in ch4 below, 3dc*, rep * * twice more, [pf st, ch4, pf st] in final ch4, 2dc, sl st in top of starting ch3.
Row 3: ch3, 1dc, *[pf st, ch4, pf st] all in ch4, 5dc* rep * * twice more, [pf st, ch4, pf st] in final ch4, 3dc, sl st in top of starting ch3. Row 4: ch3, 2dc, *[pf st, ch4, pf st] all in ch4, 7dc* rep * * twice more, [pf st, ch4, pf st] in final ch4, 4dc, sl st in top of starting ch3. Row 5: ch3, 3dc, *[pf st, ch4, pf st] all in ch4, 9dc* rep * * twice more, [pf st, ch4, pf st] in final ch4, 5dc, sl st in top of starting ch3. Row 6: ch3, 4dc, *[pf st, ch4, pf st] all in ch4, 11dc* rep * * twice more, [pf st, ch4, pf st] in final ch4, 6dc, sl st in top of starting ch3. FO
Block Squares aggressively. They should block out to the same size, approx 5.5”x 5.5”
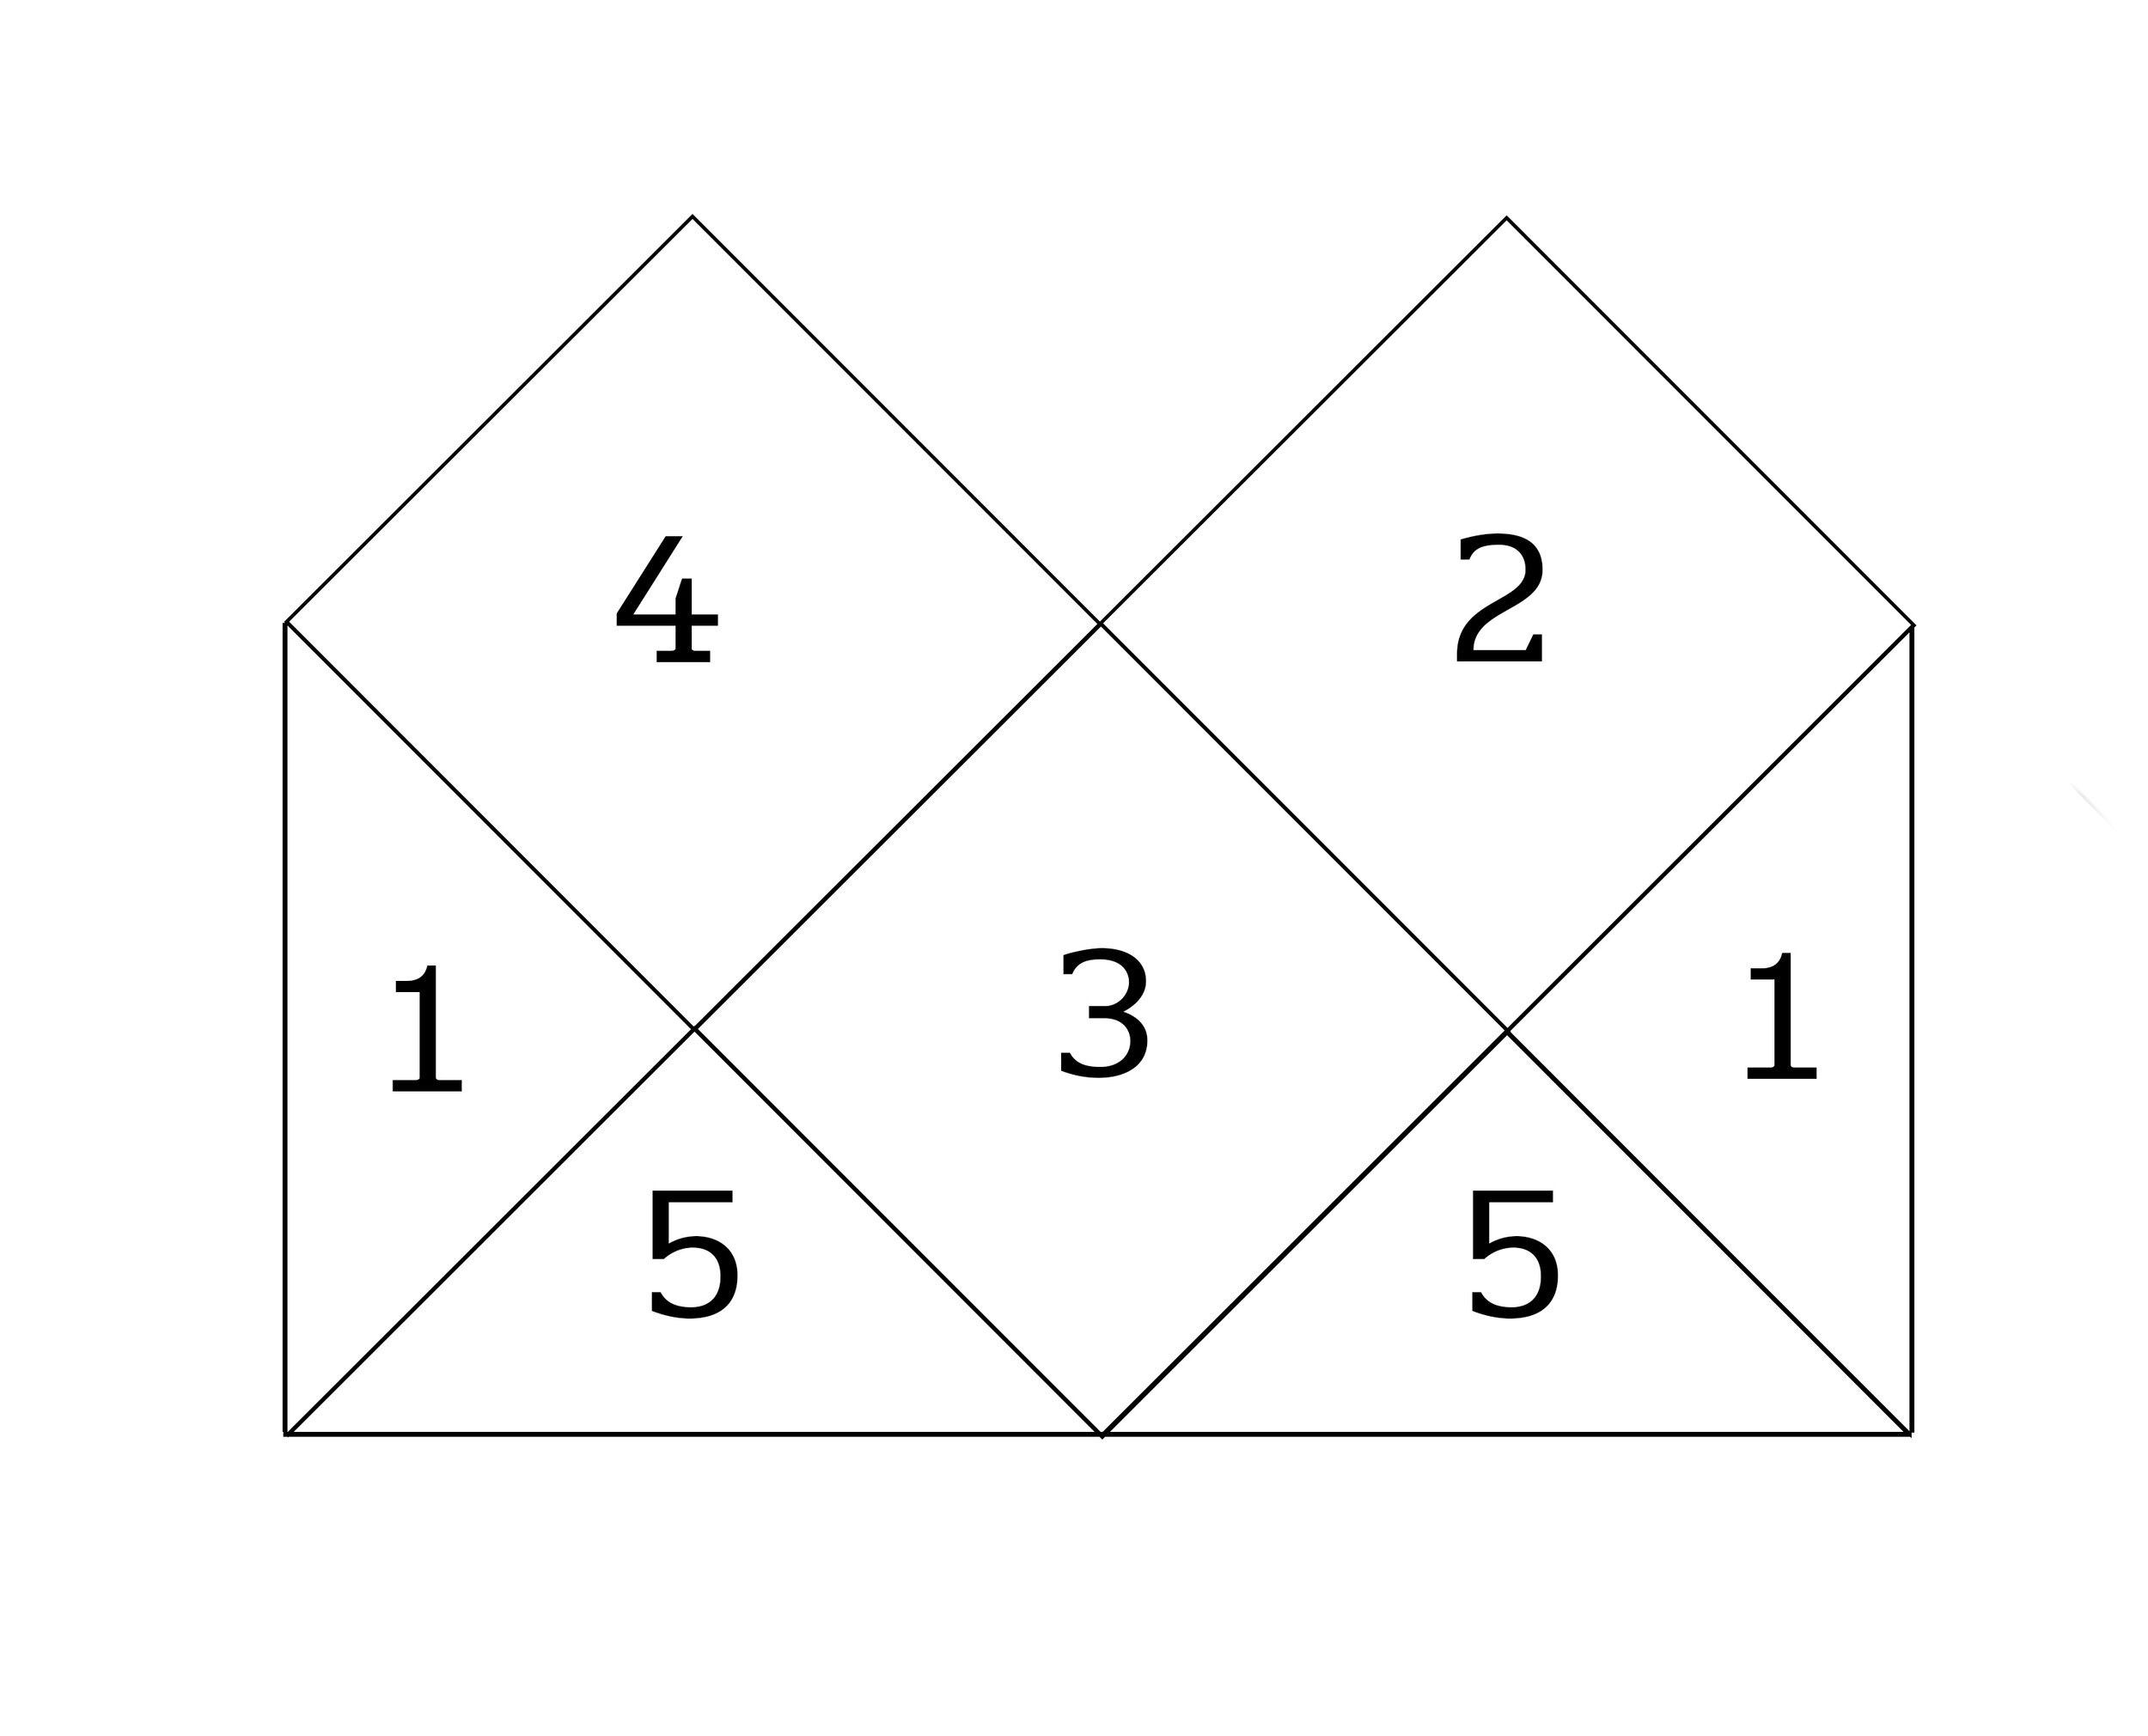
2. Next, lay out your squares in this pattern.


This is how the squares will come together. You can either seam them flat, then fold the purse into shape and finish seaming. OR completely fold the purse into shape, held together with pins or st markers, and seam that way. I prefer the seam flat, then fold method. That is the method I will show here. S1 and S3 are T1 and S2, S4, and S5 are T2. This does not have to be exact, just make sure that you are seaming the squares evenly throughout so that everything lines up.
3. Attach S1 to S2:

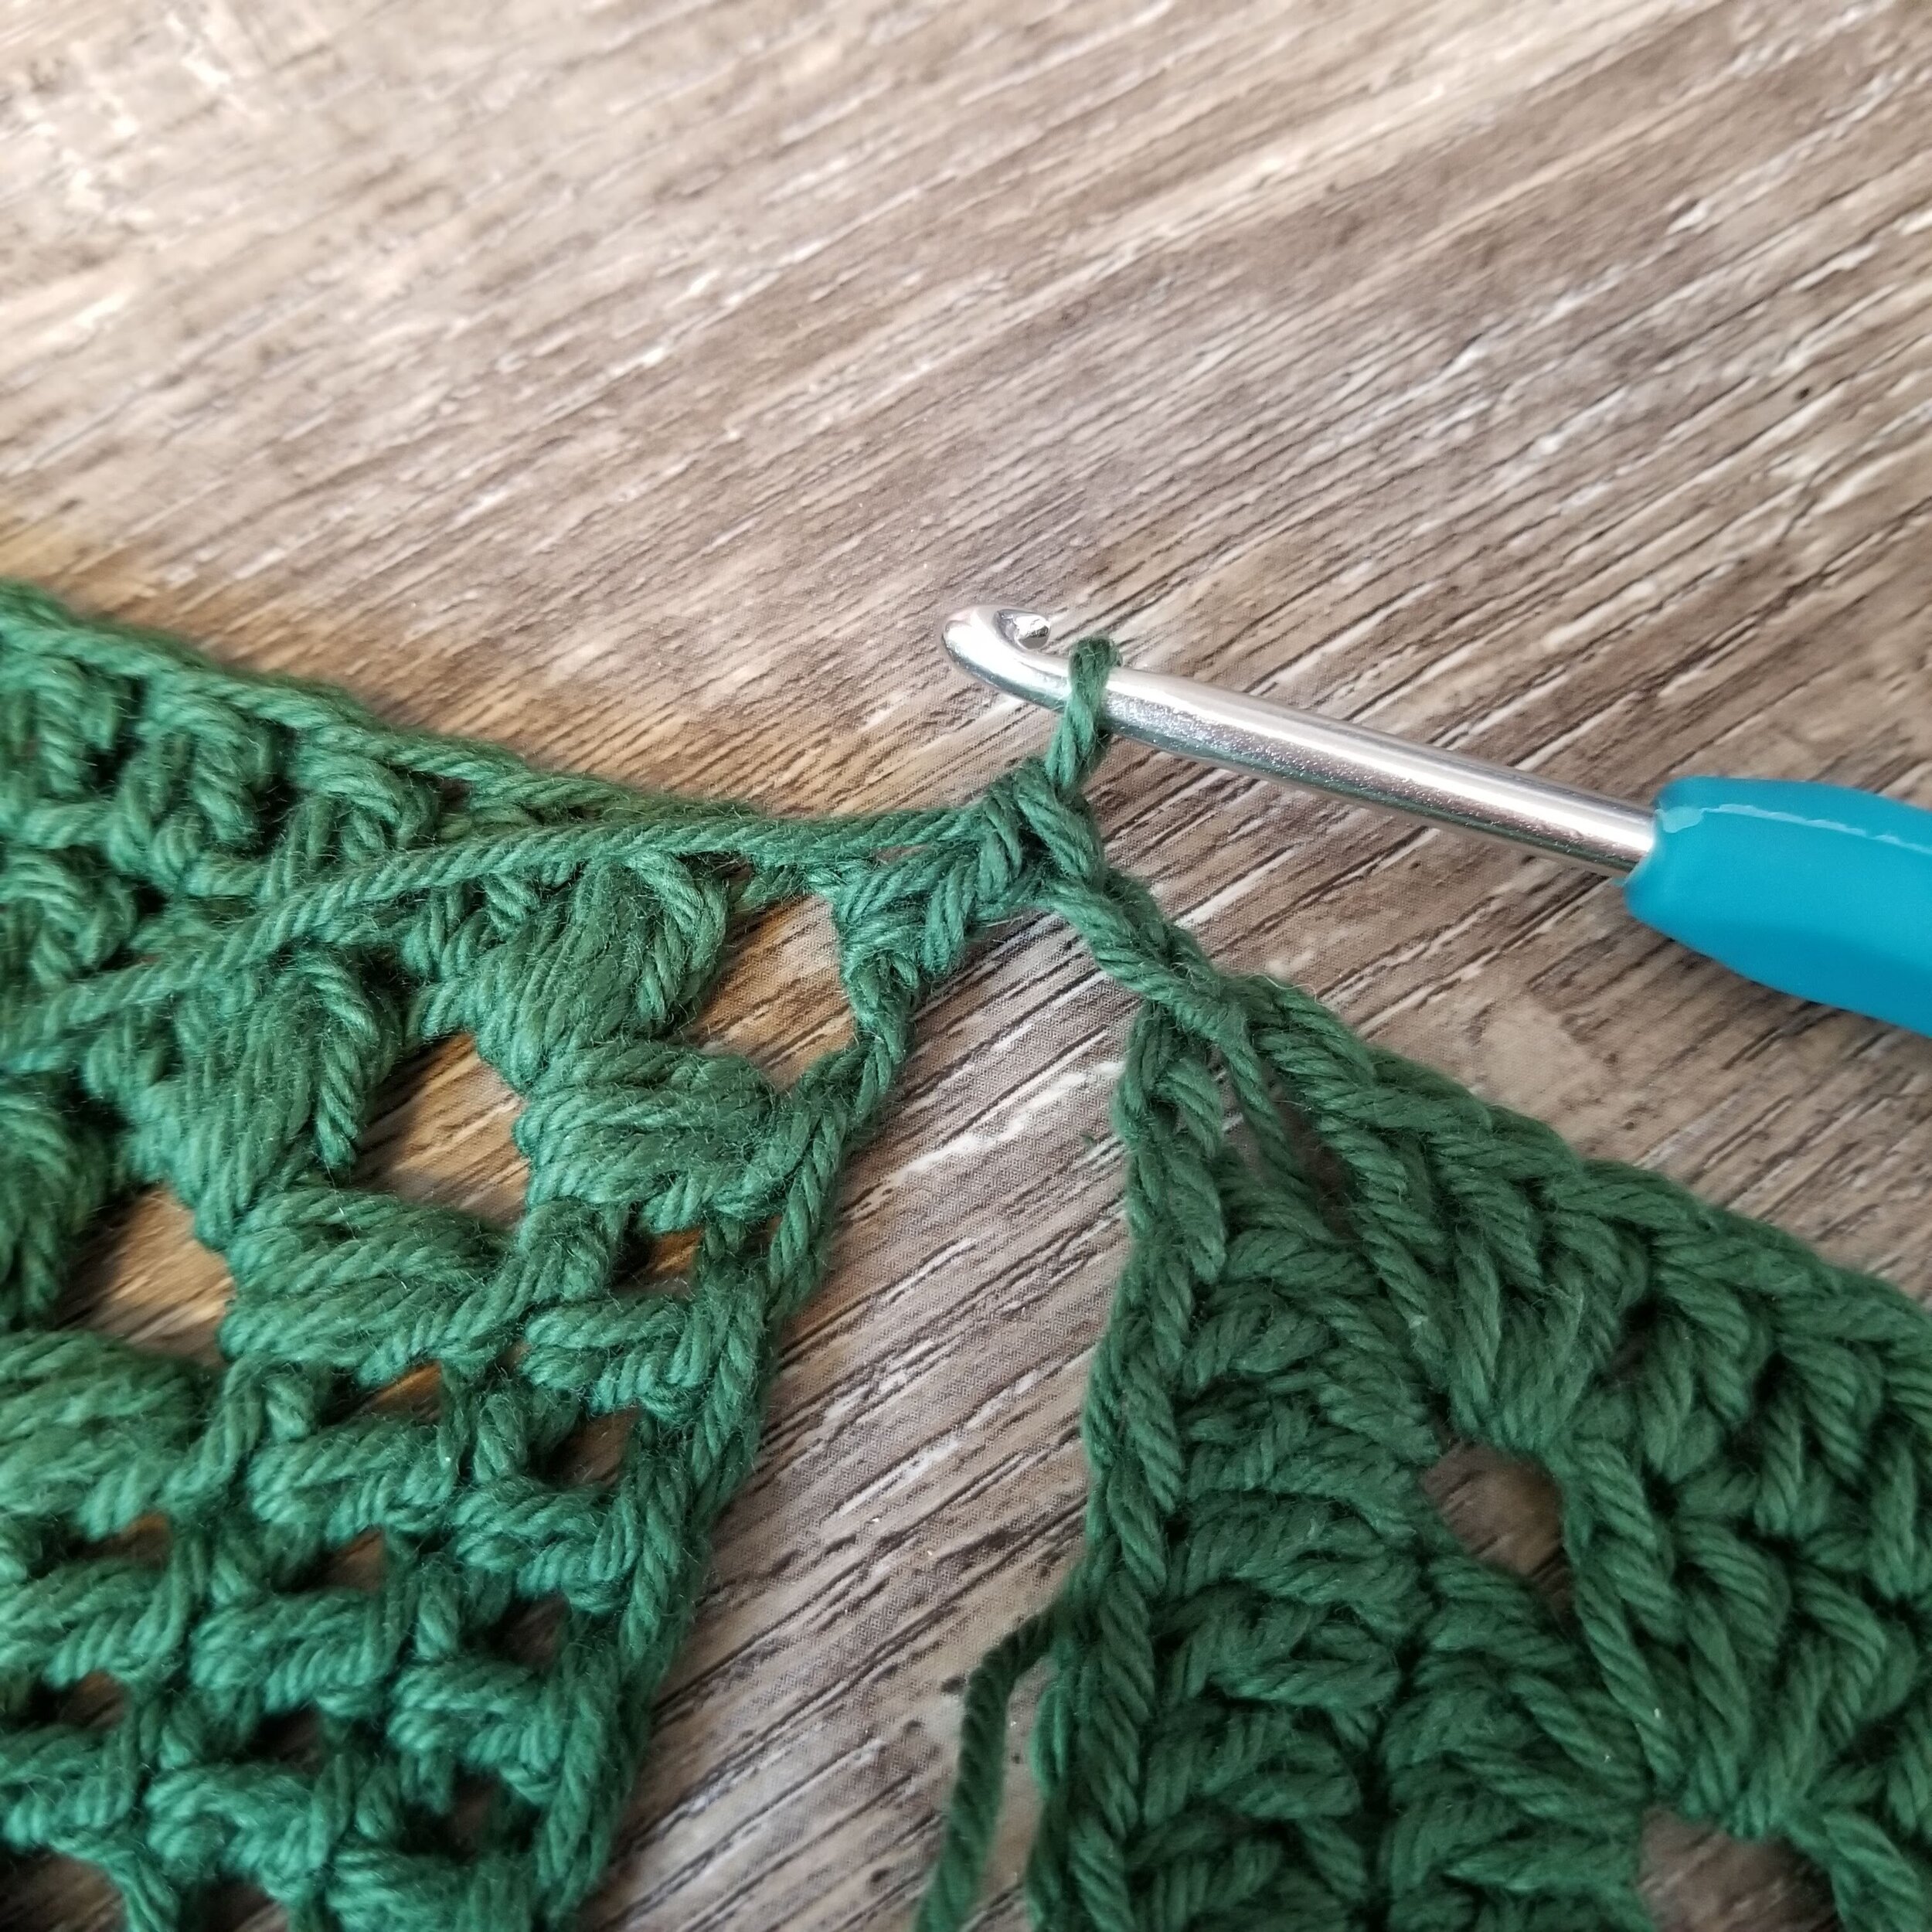
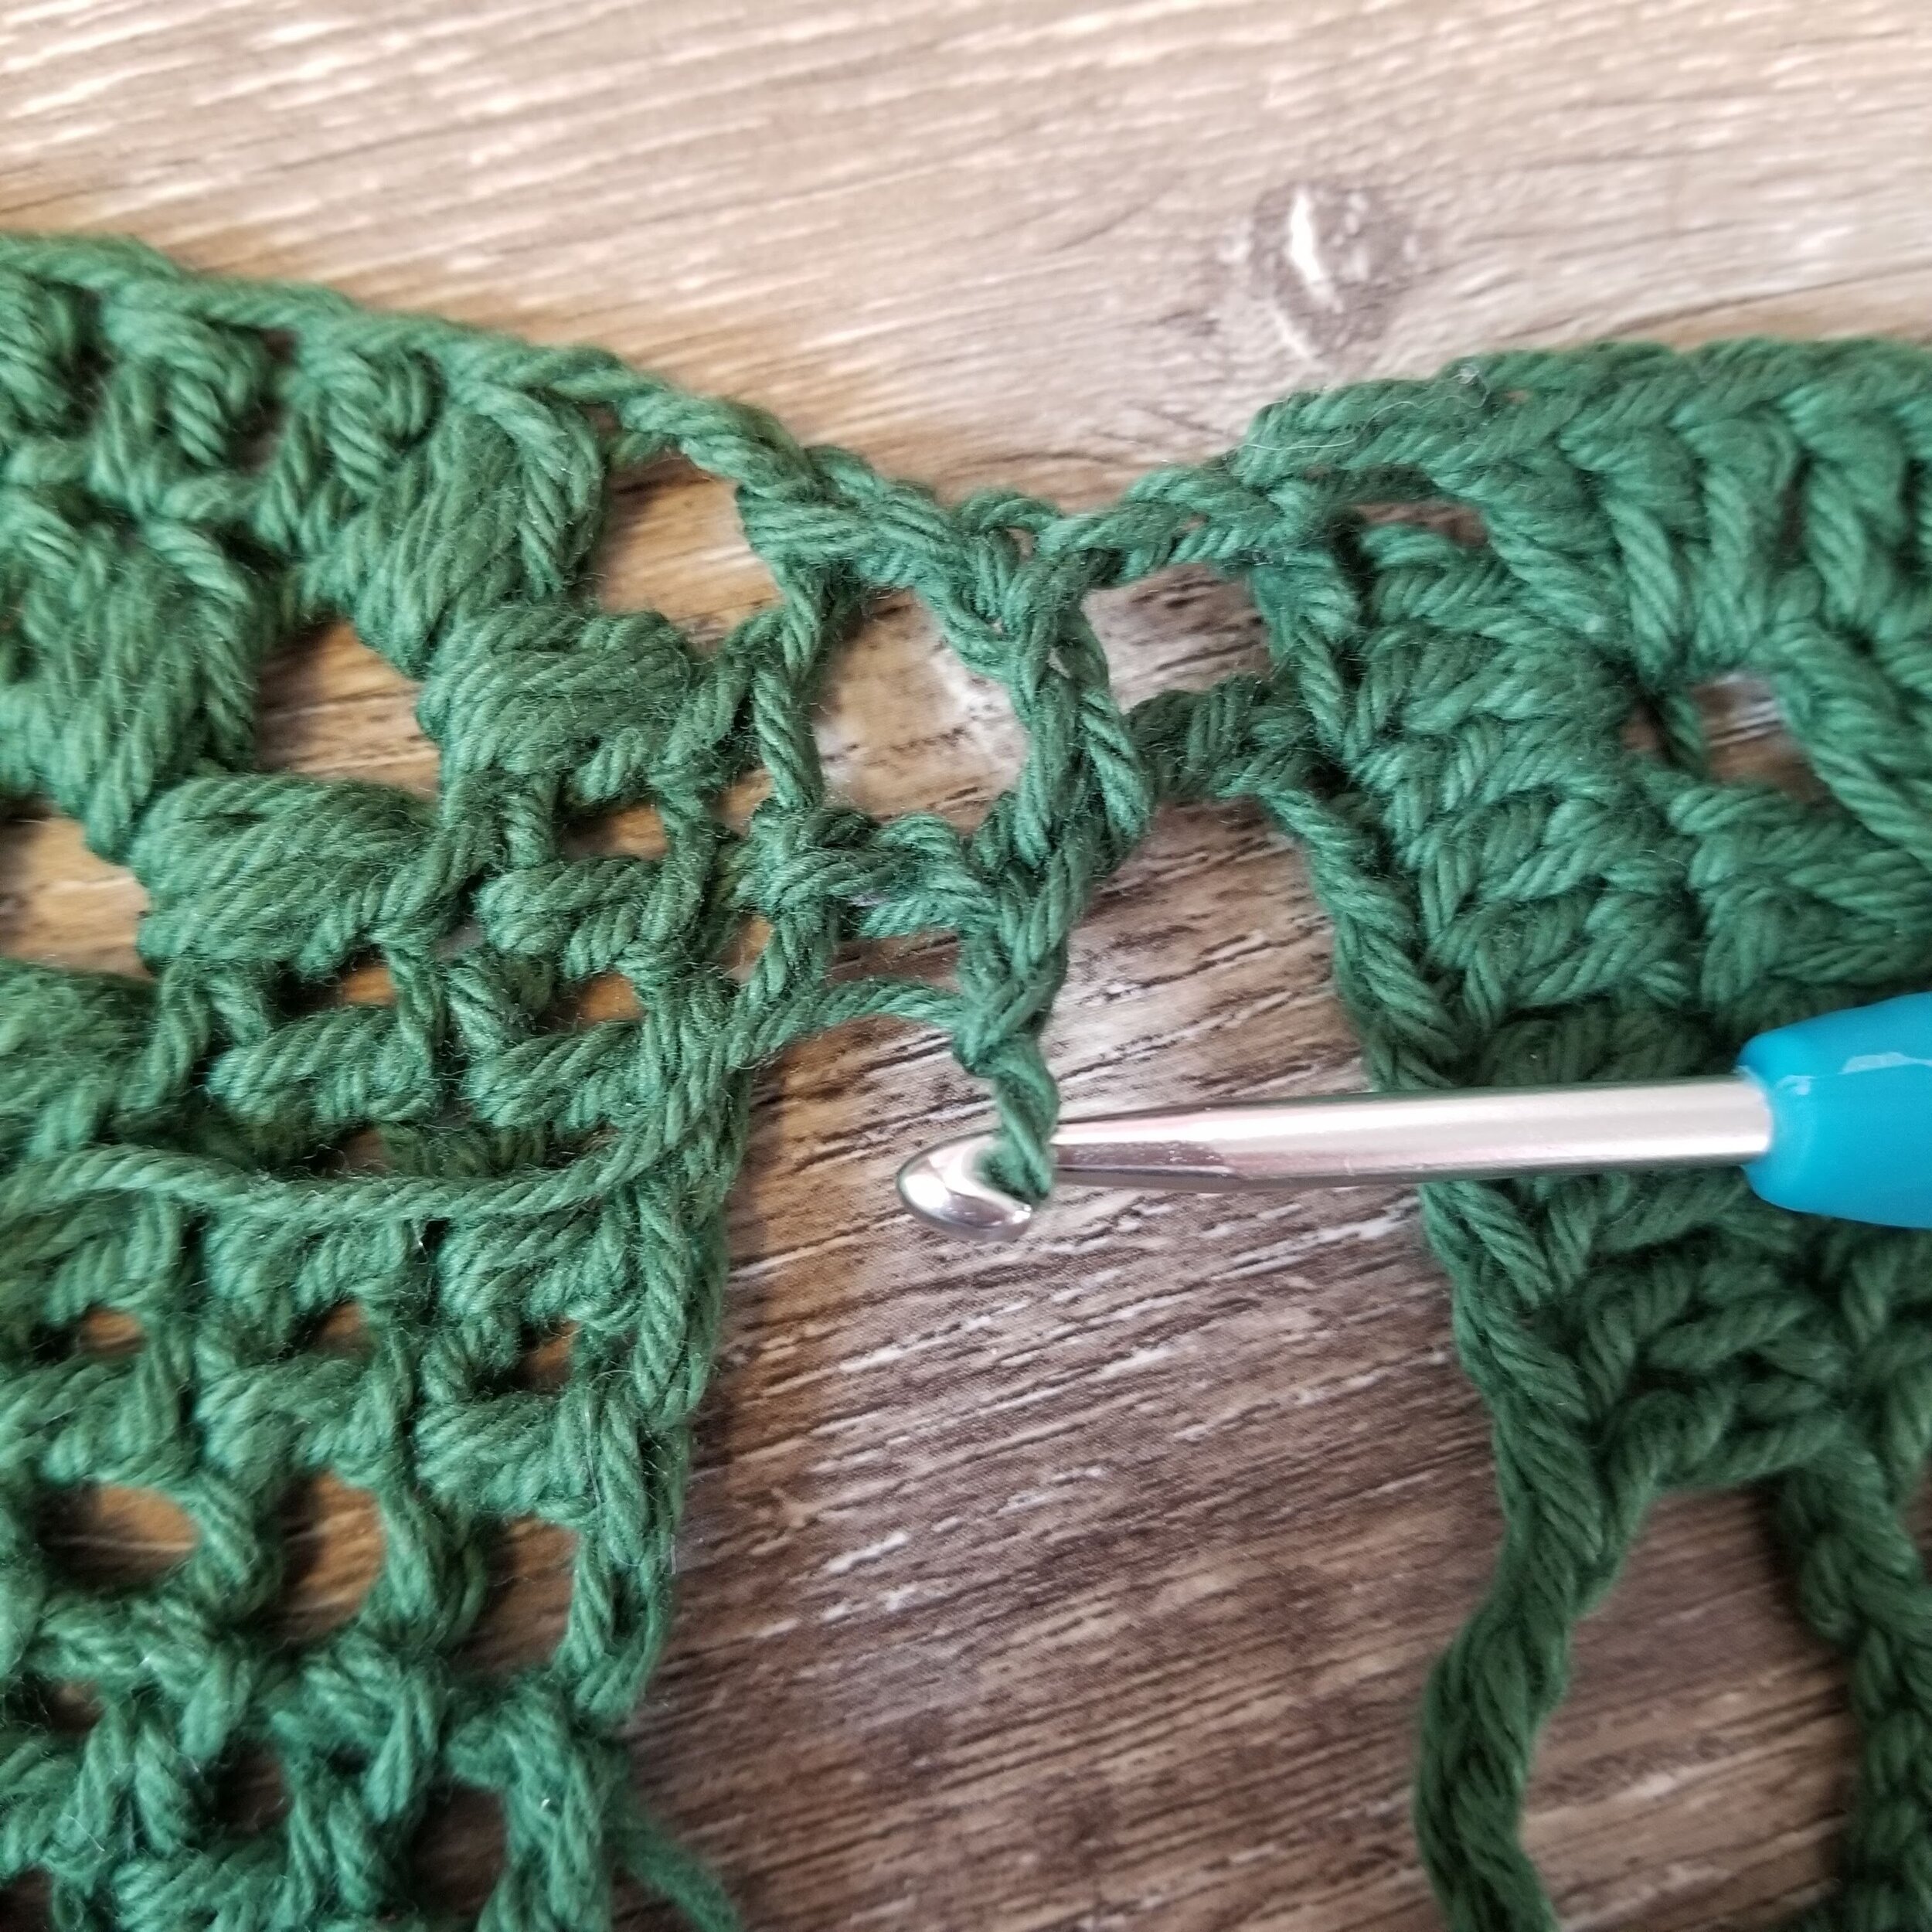
(1.) Attach yarn in any corner of S1 (this should be a T1 square) with sl st, ch2. (2.) Dc in corner of S2 (this should be a T2 square), ch1. (3.) Sk2 st on S1, dc in next. (4.) Sk1 st on S2, dc in next, ch1.
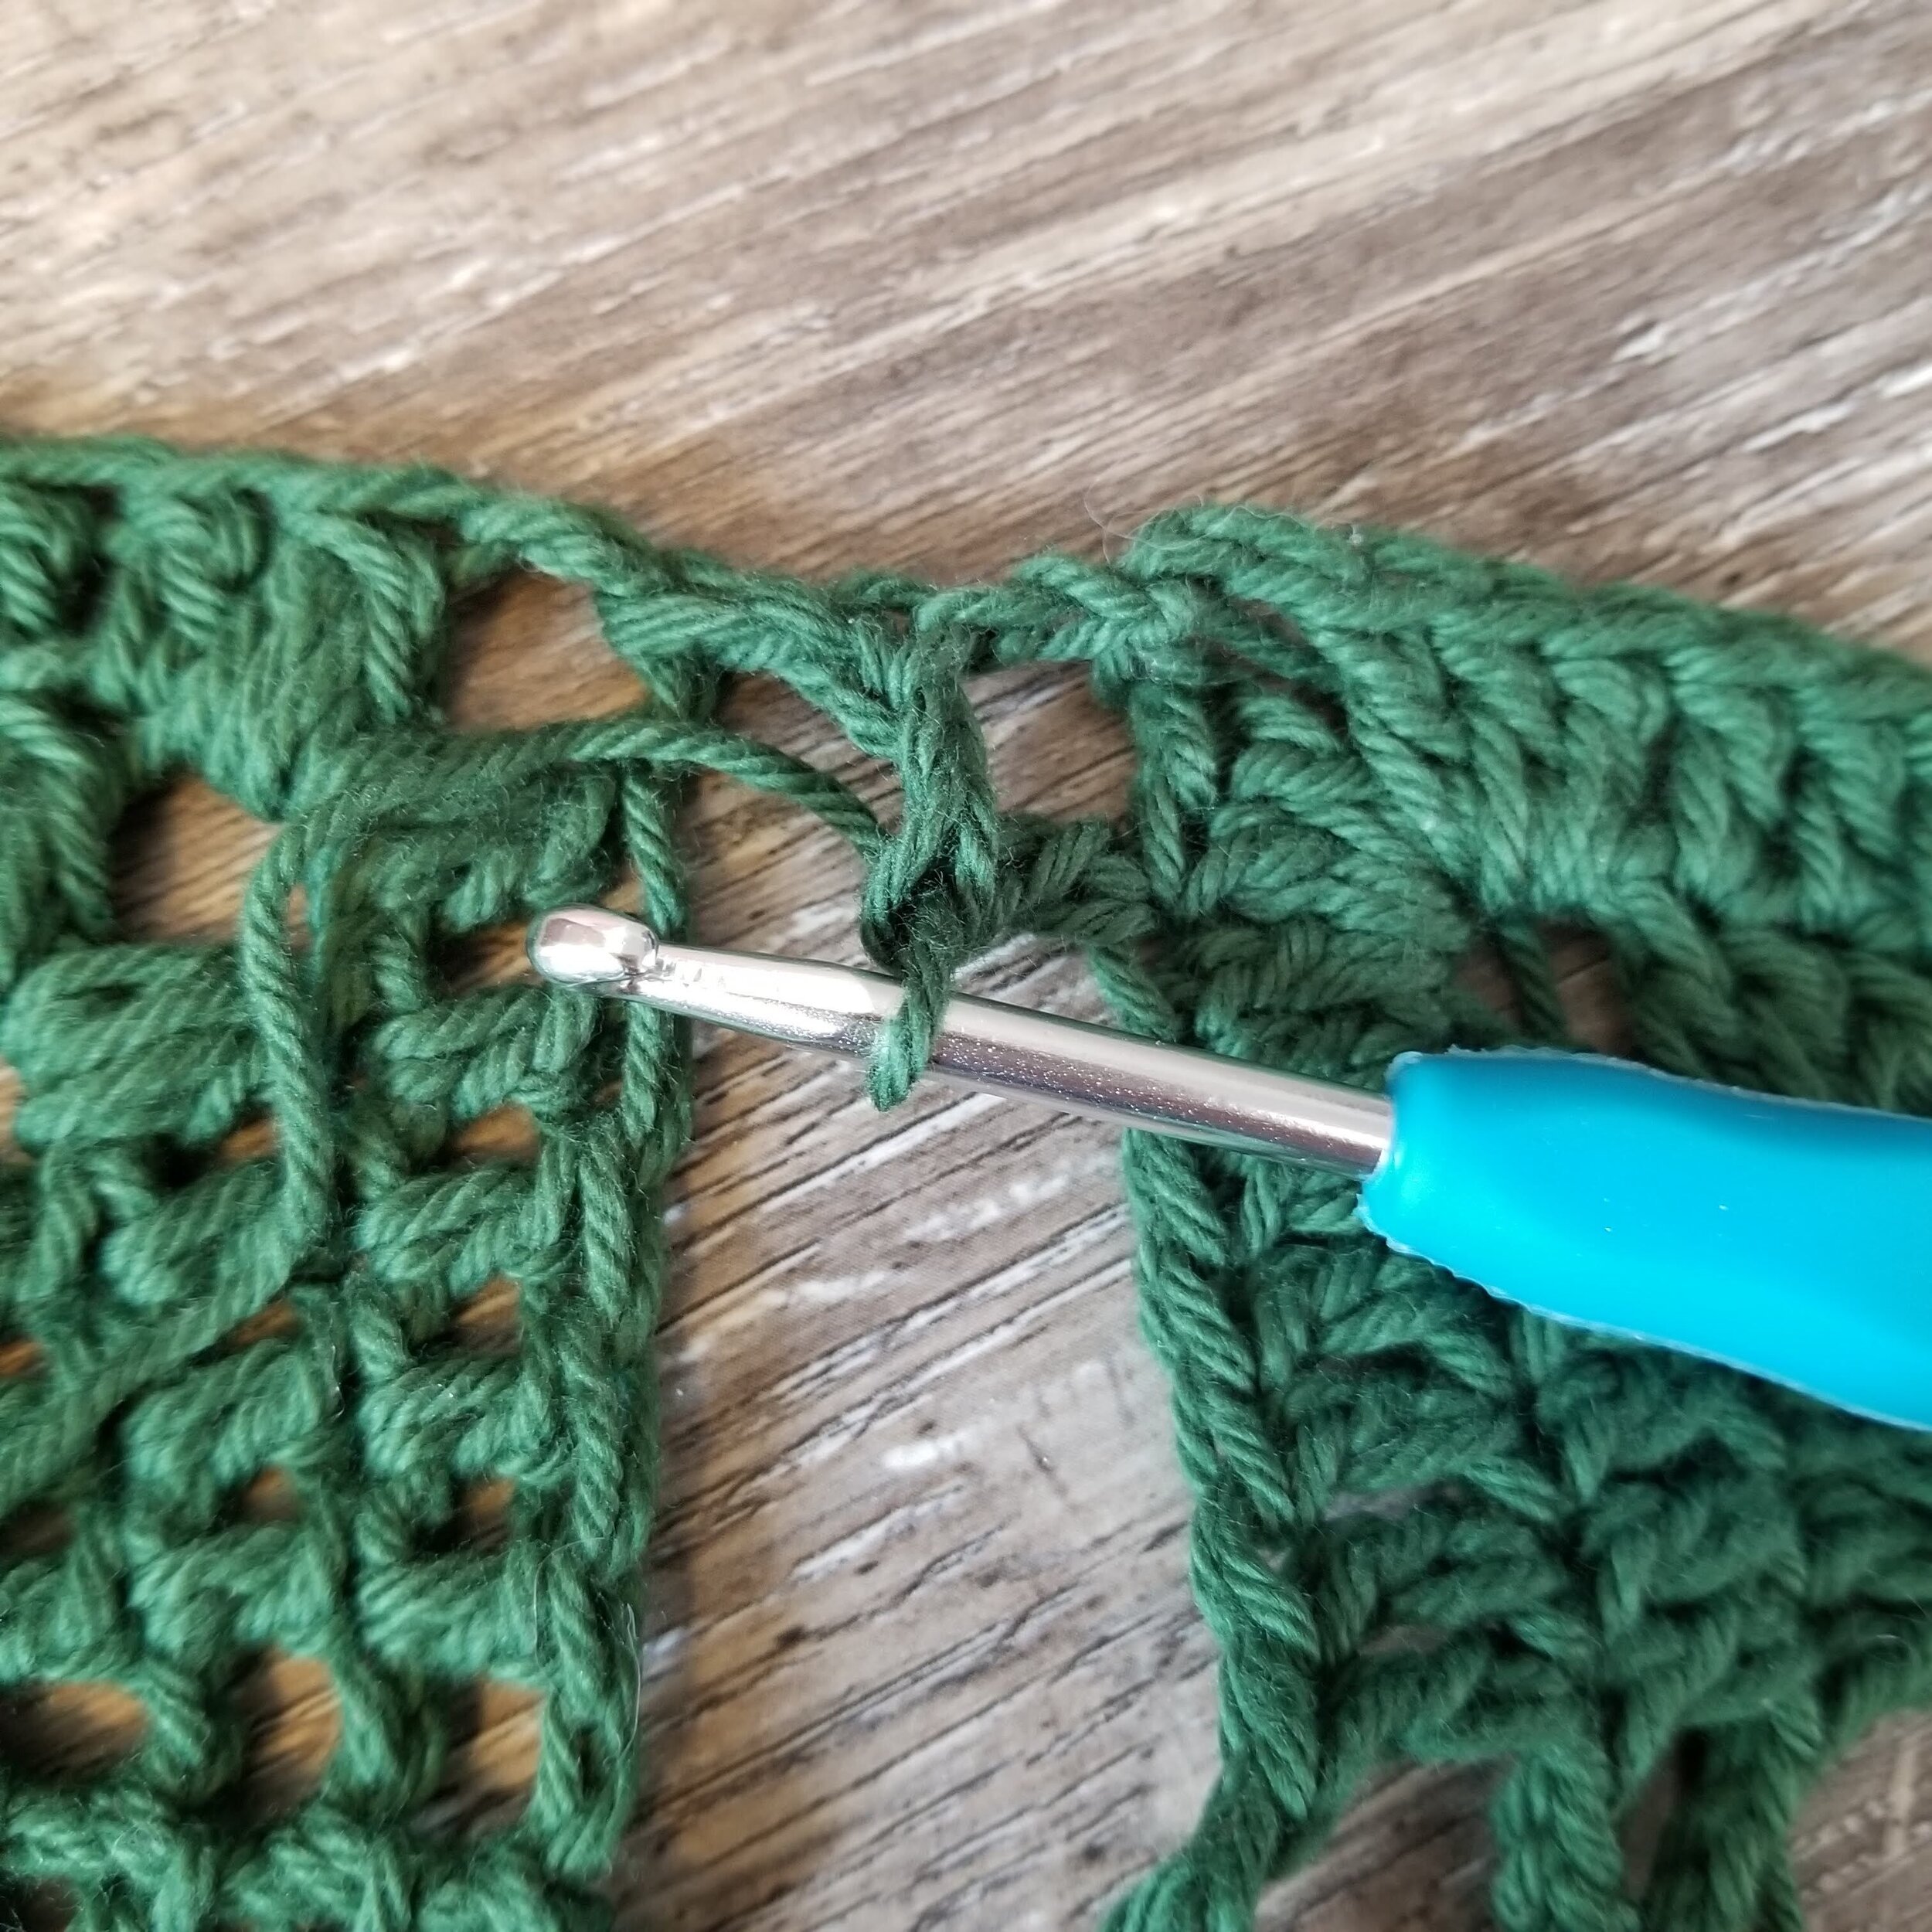
4. Continue down seaming S3 and S5

Dc into top corner of S3, ch1, then into the top corner of S5. Continue down attaching squares.
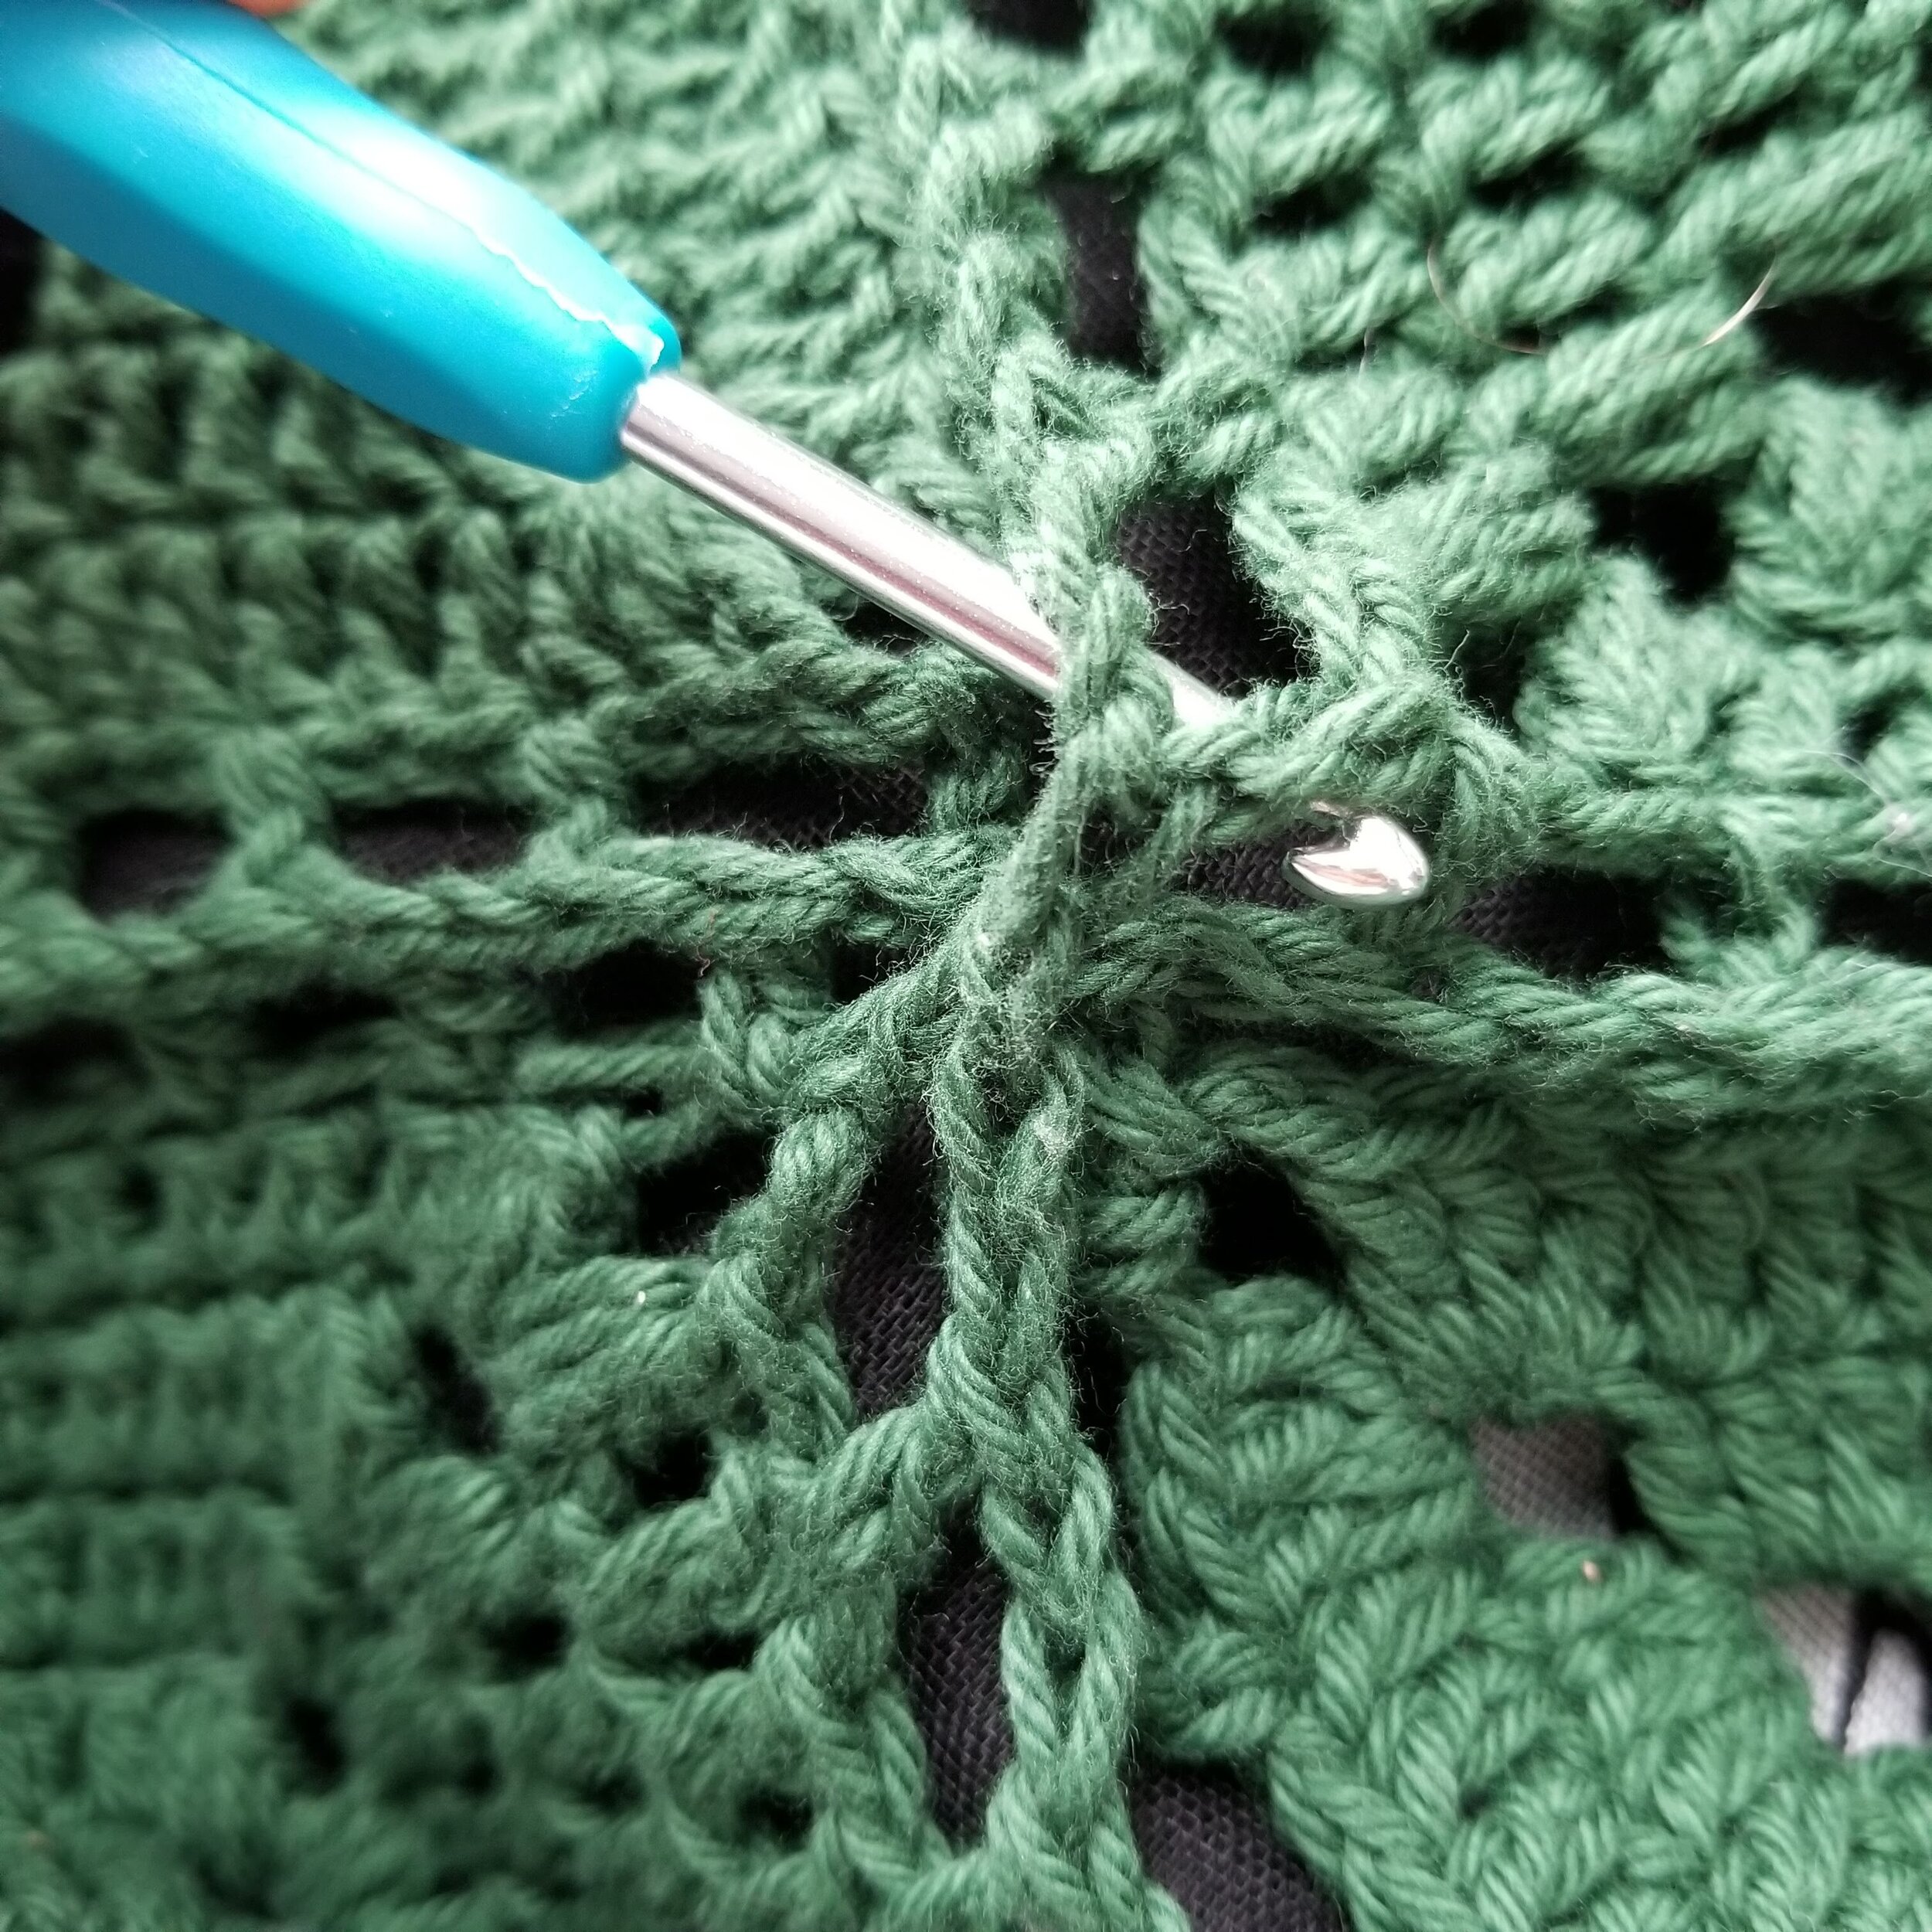
5. Finish attaching all squares (if you are using the seam flat method)
When seaming the 4 corners together, repeat the same process as step 4, which will create an X in the 4 corner space.

6. Fold like in diagram if you haven’t already. Continue in pattern and finish seaming. Finish sewing the rest of the sides together and weave in all ends.

Border:
Row 1: Sl st in corner of right side top (ch4) and ch2, hdc evenly across the top until you get to the left side top (ch4), [2dc, ch2, 2dc] in ch4 space, hdc evenly across the side of bag, Rep around the rest of the bag placing [2dc, ch2, 2dc] in each ch4 point. When you get back around to the first corner, [2dc, ch2, 1dc], sl st into top of ch2.
Row 2: ch2, hdc around again placing [1hdc, ch2, 1hdc] in each corner, sl st into top of starting ch2.
FO
Straps:
Make six 3st icords approx 27” long.
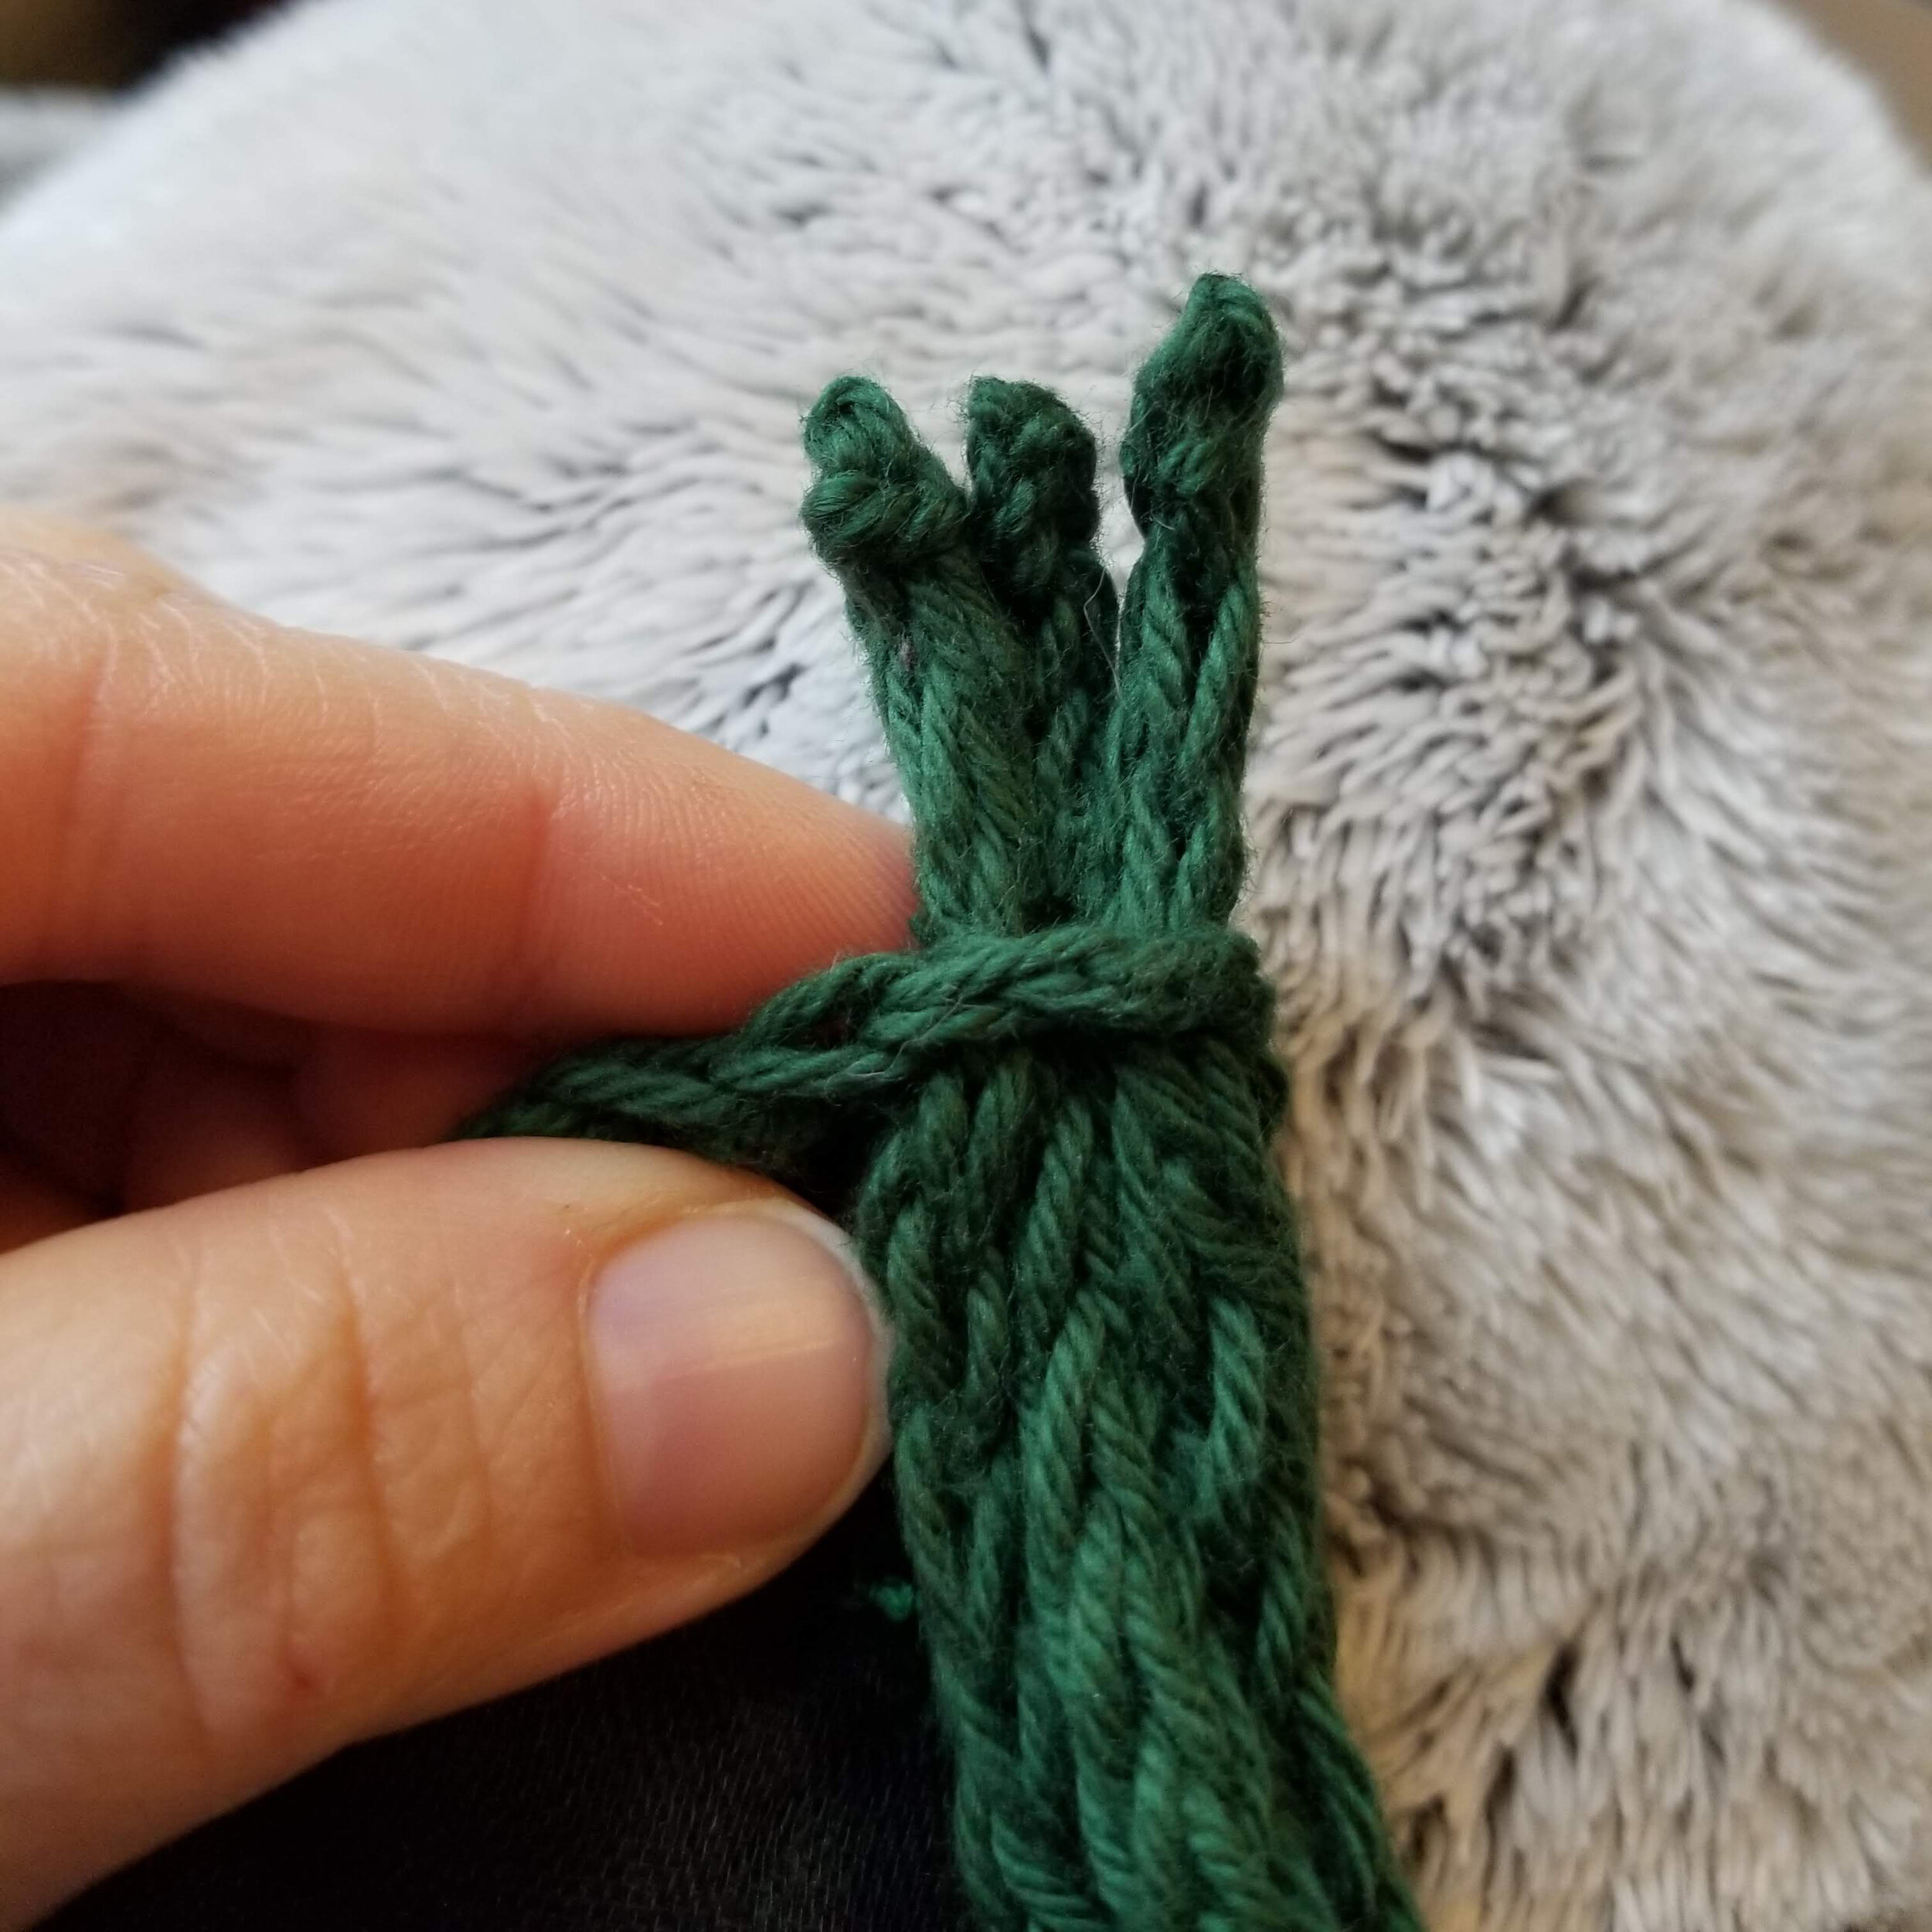

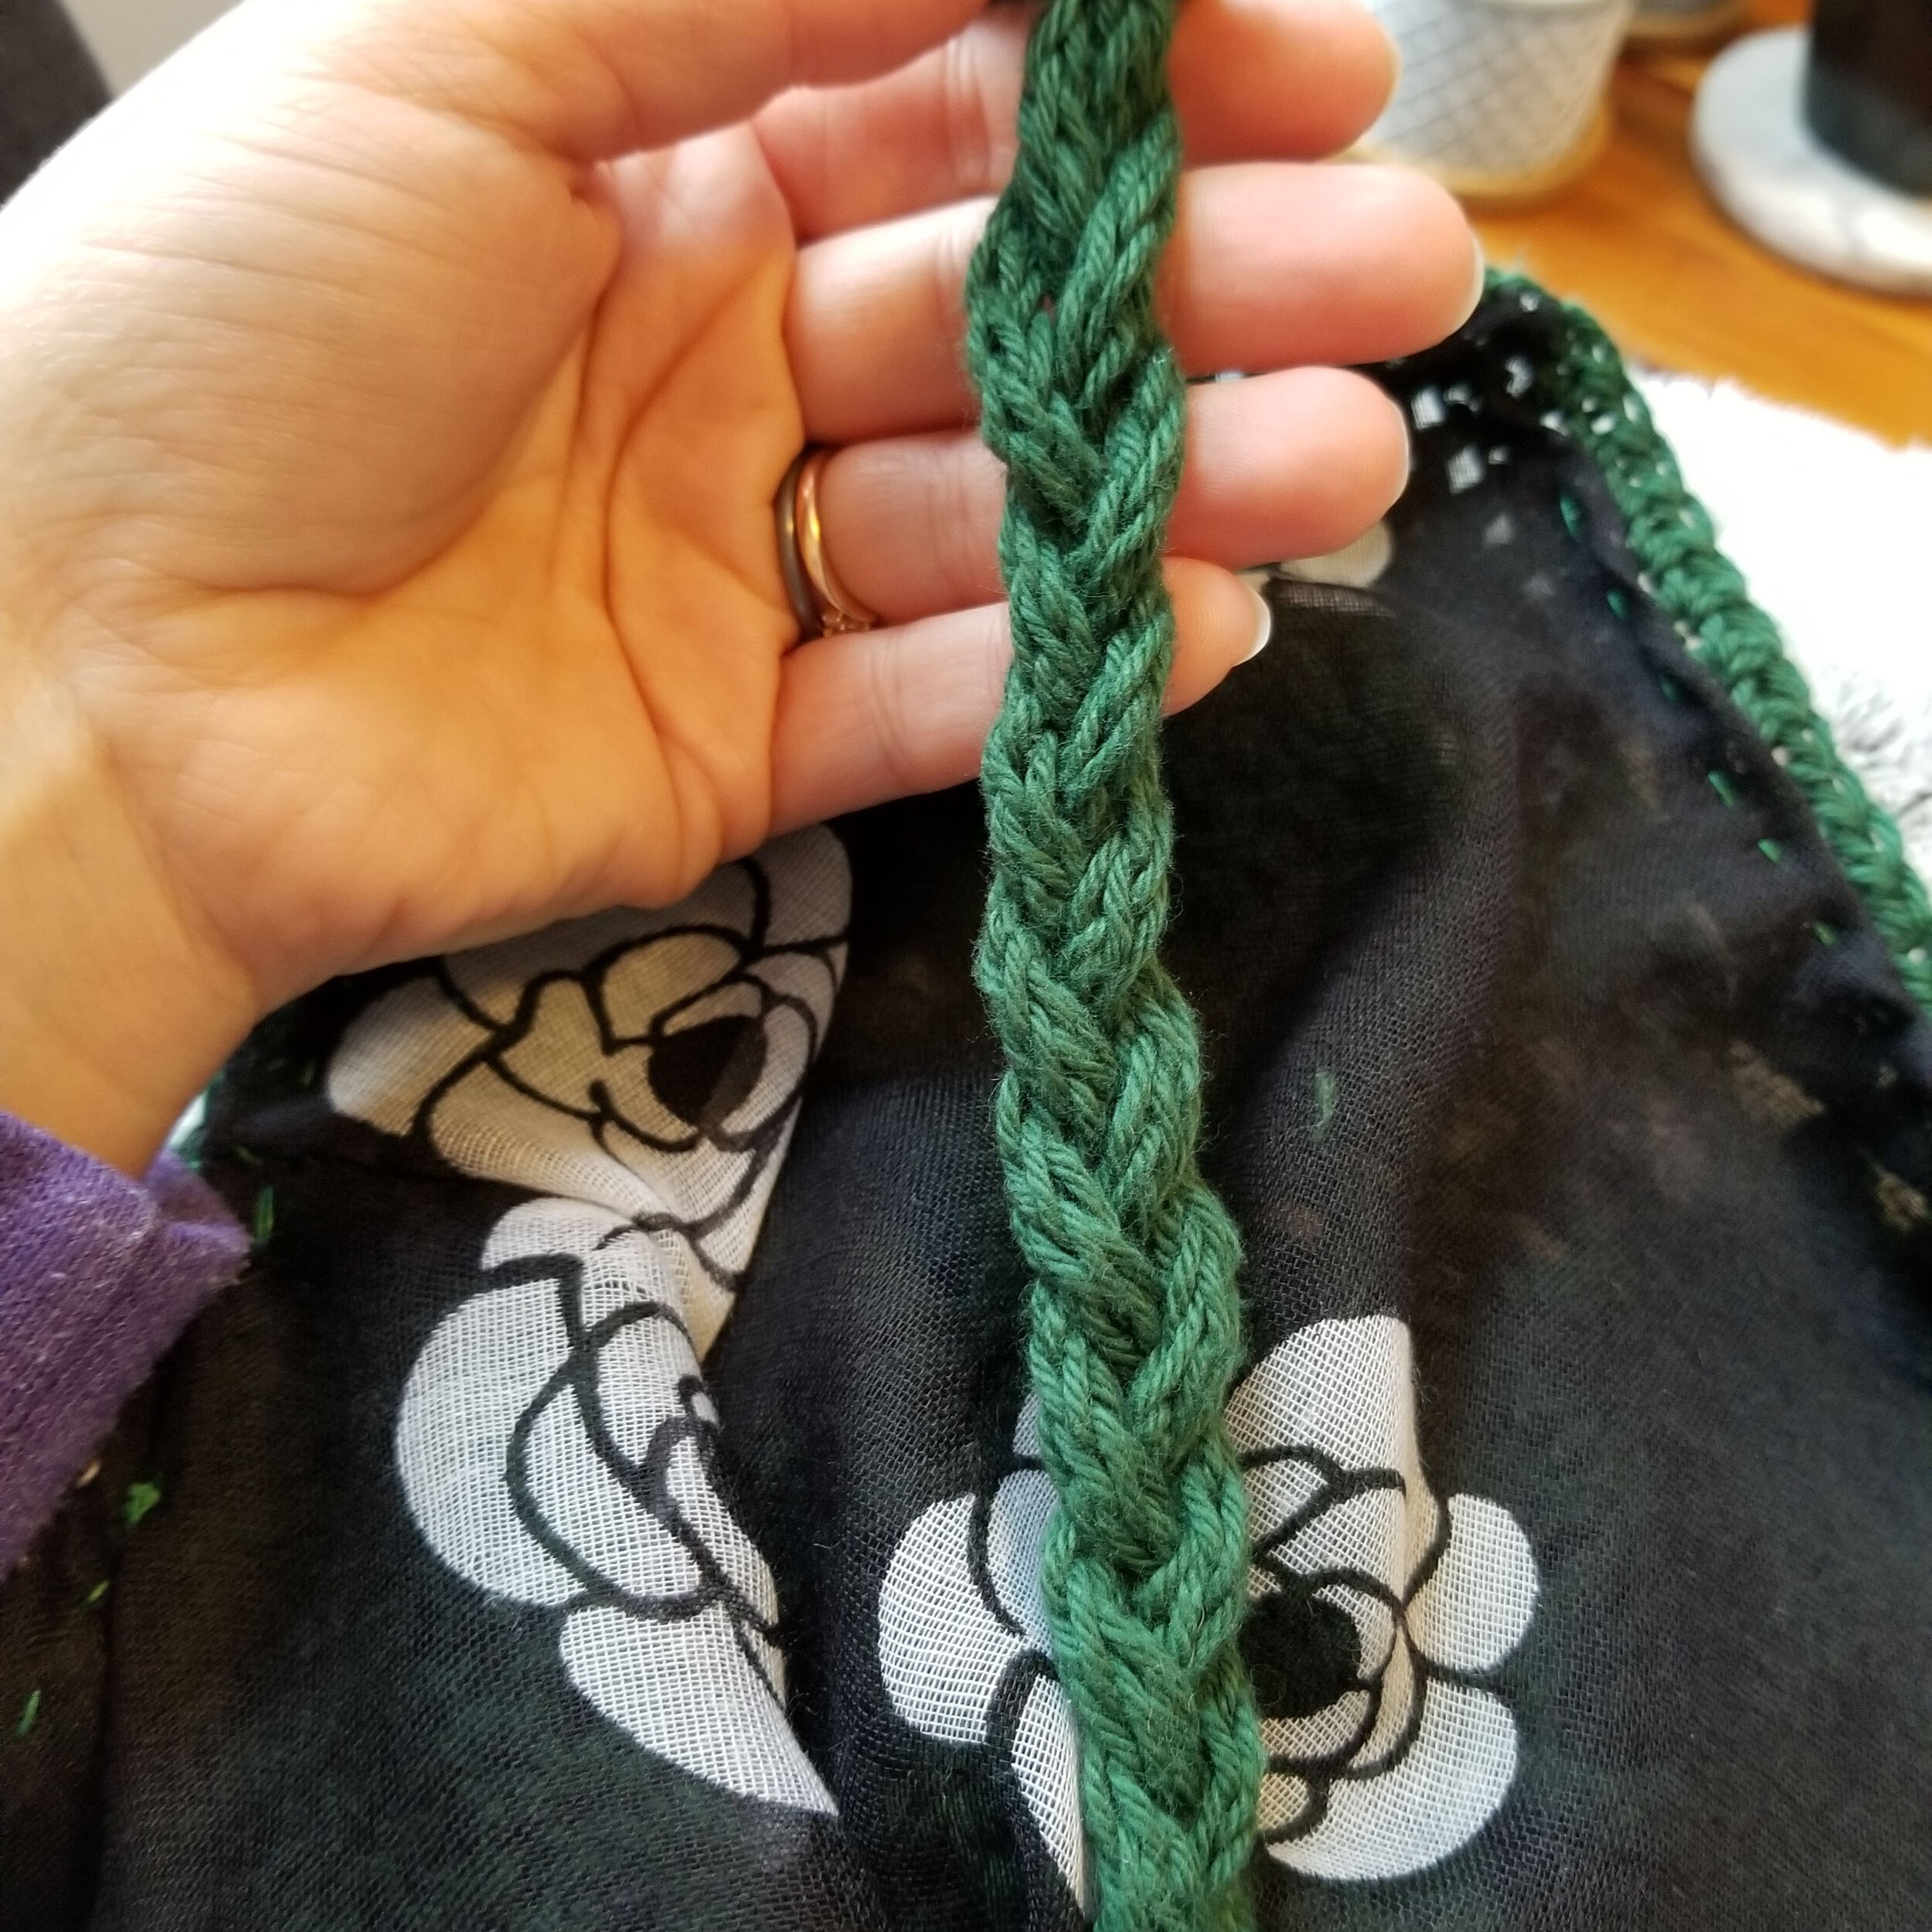
Take 3 cords together and push the end through the top corner of one side of the bag, back to front. Tie a knit in the cords. Braid the cords together (make sure you don’t braid them too tightly or too loosely) and push through opposite side, back to front. Tie Knot.
Repeat for the other side.
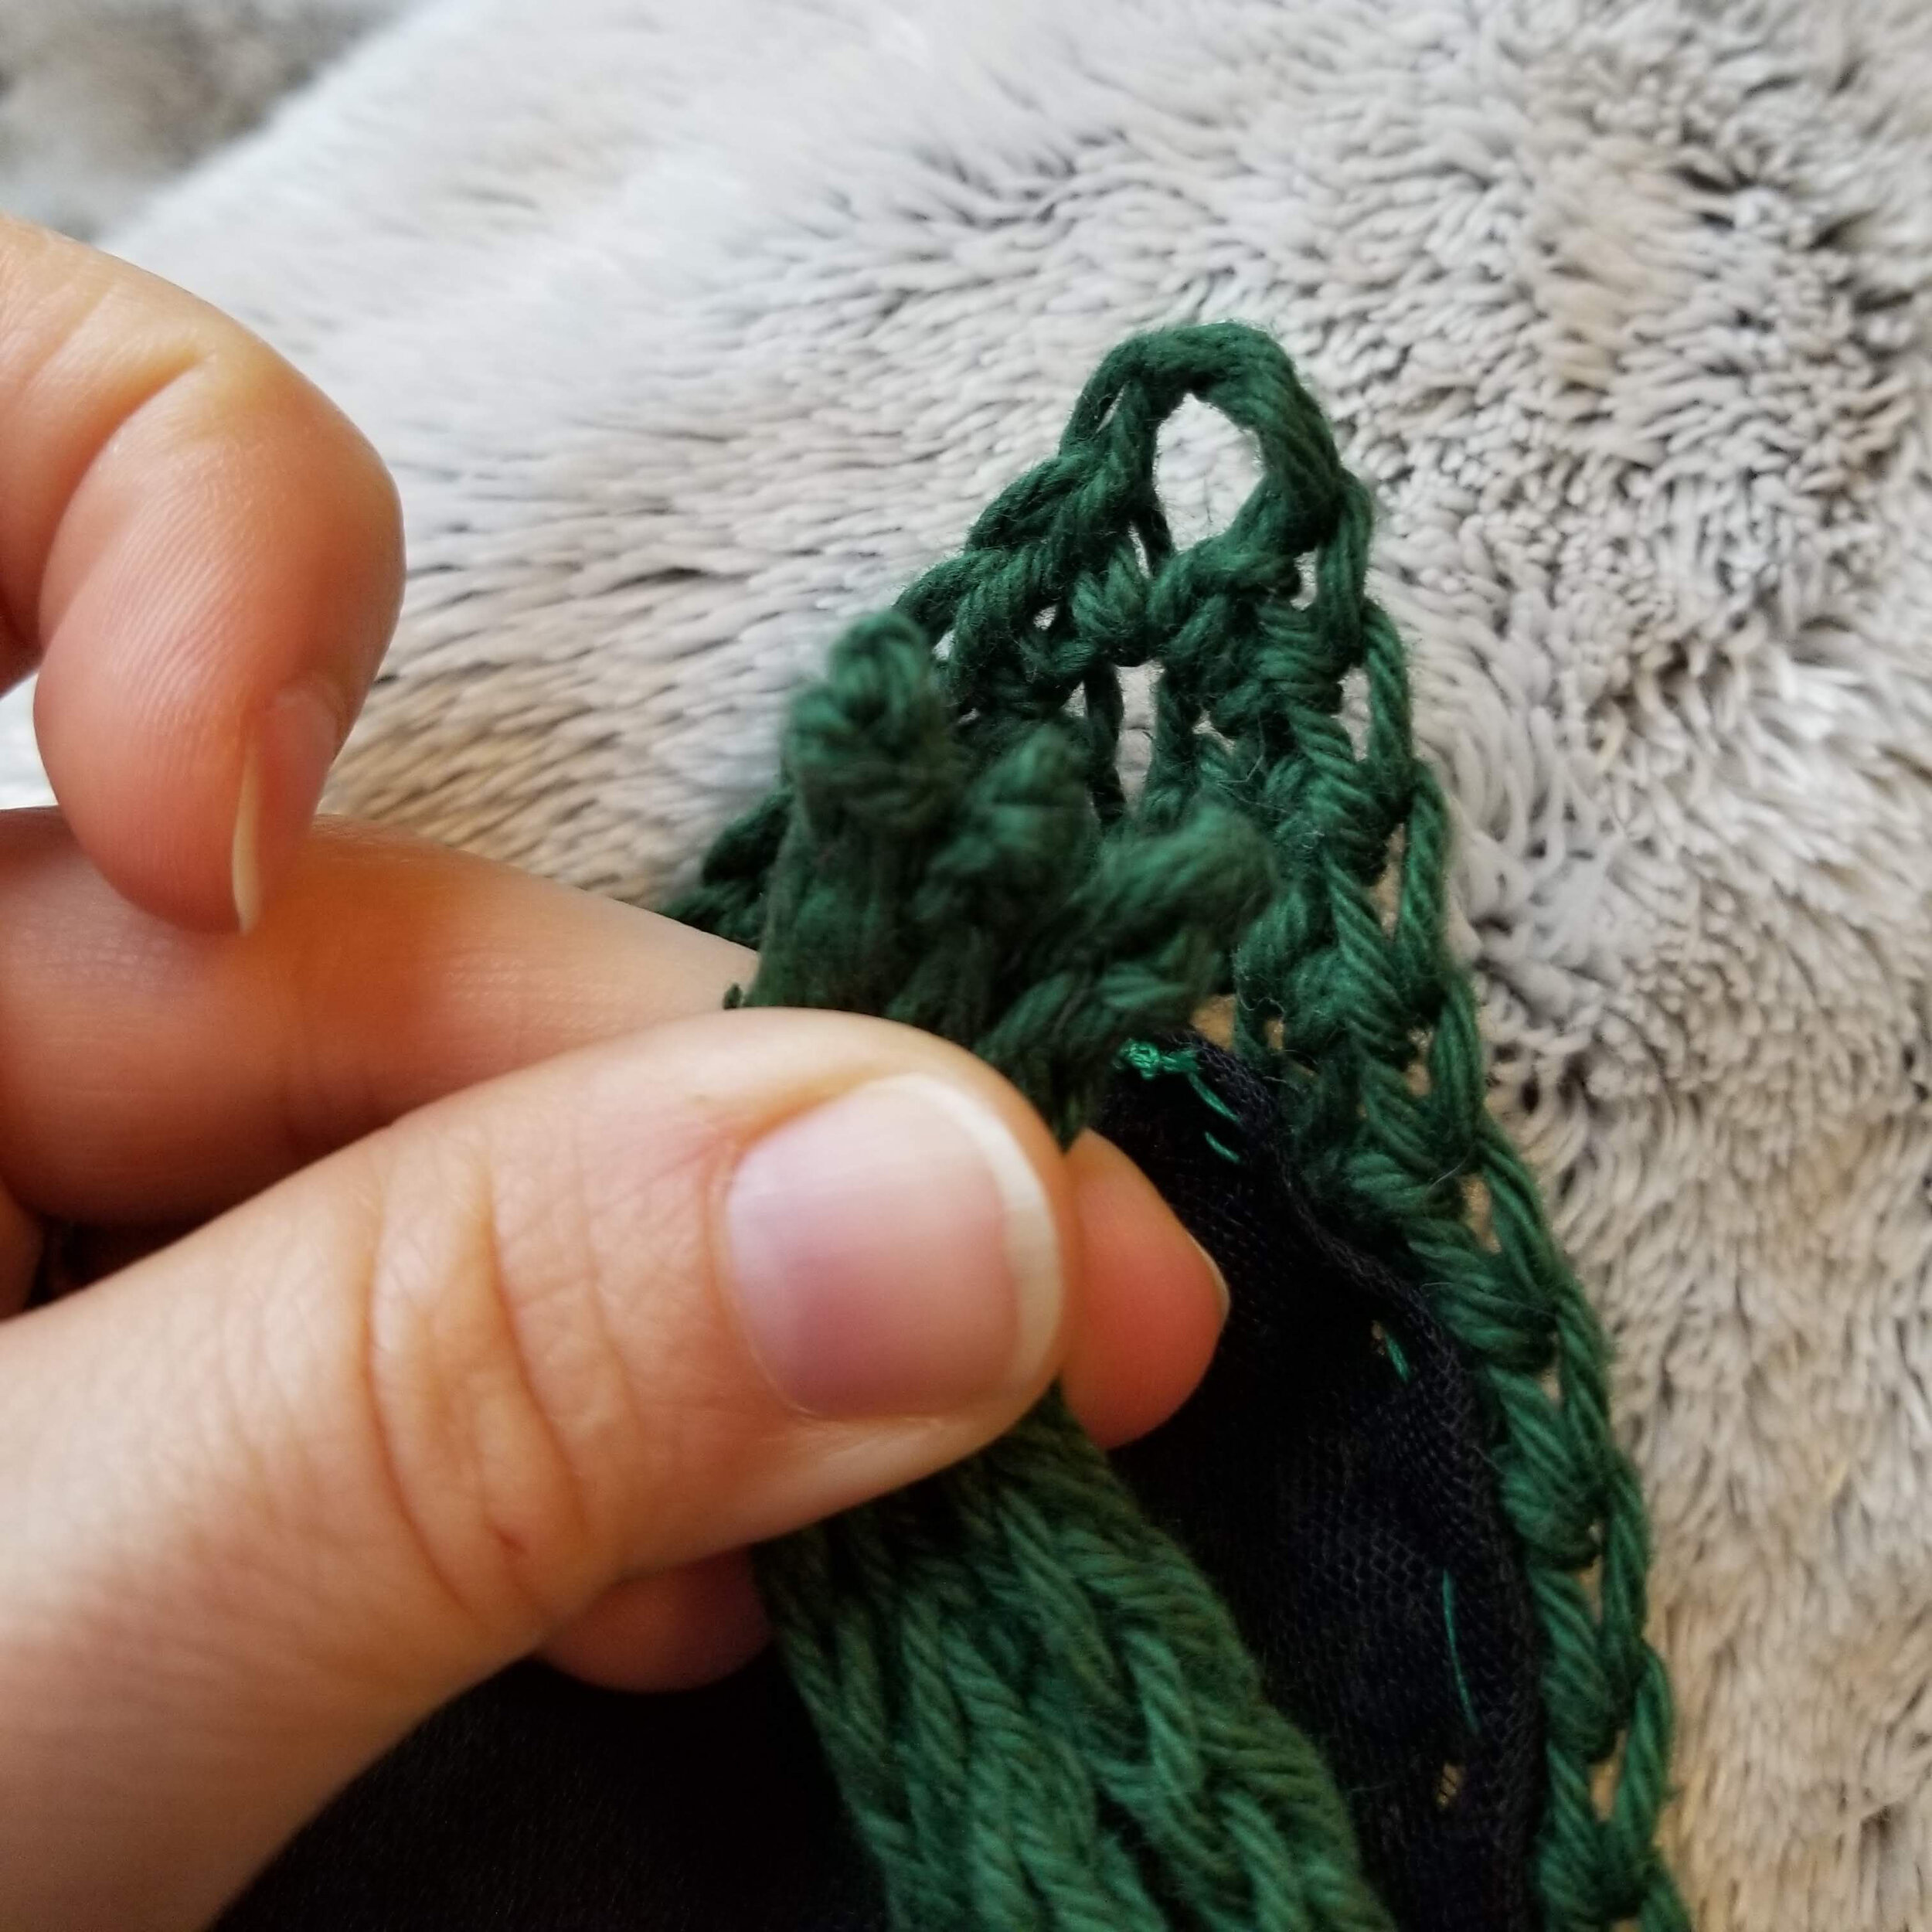
Finishing:
After I assembled my bag, I sewed a lining into it as well. I would suggest doing this if you can, as a lining will keep the bag from losing its shape.

iF YOU LIKED THIS PATTERN, PLEASE SUPPORT ME ON PATREON OR BUY ME A COFFEE!

BUY ME A COFFEE
Support me on Patreon


I LOVE TO SEE WHAT YOU CREATE!
Please share your creations with the community on social media by tagging @ravinsekaidesigns and hashtag #4luckmarketbag
I can’t wait to see the beautiful things you come up with!
Facebook: Ravin Sekai Designs
Ravelry: RavinSekai
Instagram: @ravinsekaidesigns
Pinterest: Ravin Sekai Designs
Patreon: Ravin Sekai Designs