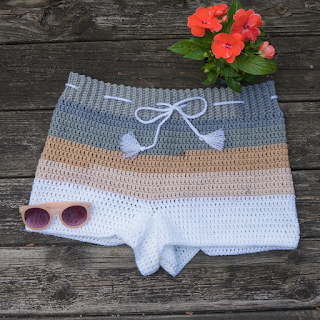
The Beachside Shorts Pattern
I created these shorts just as a fun practice summer project
for a day at the beach or to wear around the house and they only took a few
days for me to crochet so I wanted to share this fun and easy project with you!
I also have a pdf pattern posted on my Ravelry account as well that has some
helpful photos to create these!
The pair in the photo was made based on my measurements, which I normally wear a size large
(10-12) and measured my waist to see how wide to make the waistband. Personally
I think the easiest way of getting the right size is to just try it around your
waist as you go, but generally measuring your waist and crocheting the band to
that length works as well, as I crocheted my waistband to a length of around
33”.
In US sizes for waistband would be:
XS: 25-26”, S:
27-28”, M: 29-30”, L: 31-33”, XL: 34-36”, 2XL: 37-39”, 3XL: 40-42”,
but using your exact
measurements are probably best for these shorts.
The stitches and abbreviations for this project are:
Ch- Chain
Sts- Stitches
Blo- Back loop only single crochet
Dbc- Double crochet
Sl st- Slip stitch
Materials:
-5.00mm Hook (US H-8)
-Any worsted weight or aran weight yarn that you enjoy working with. I
personally used a skein of Bernat Pop! in the color Foggy Notion and finished
with Red Heart Super Saver in white so it took about 1 and 1/3 skeins for the
total project.
- Tapestry needle for weaving in ends (which are minimal,
yay!)
Pattern:
Waistband- (based on my size measurements)
Ch 11
Row 1: Blo in the second chain from the hook and Blo in the
next 9 stitches. Ch 1 (10 sts)
Row 2-128: Blo in each st, Ch 1
Once you have done 128 rows or your desired rows for the
size you need (which you can wrap around your waist to see the comfort of the
waistband), it can be joined.
Join waistband: Sl st in one leg from the right side and
one from the left side down the 10 sts. (see photo) Turn the work inside out and you should
have a nicely stitched waistband.

Body of the shorts-
Row 1: Here you will be working around the length of the
waistband starting at the last slip stich done. Each rib in the band will have
two dbc sts, so in my shorts I had 64 ribs around, so 128 dbc sts around the
band + 2 dbc sts where the waistband was slip stitched together for a total of
130 sts. Sl st into the first dbc of the row.
Row 2: Ch 2 and dbc into the st that was just sl st into and
continue dbc sts in the round. At the end of the round sl st into the first
dbc.
Row 3-16: repeat row 2.
Legs-
Row 17: This will be where the shorts are split into 2 legs.
This is done by chaining 24 sts and then connecting the chain with a slip
stitch into the middle of your piece. For my shorts, the middle was at st 65
(130÷2= 65), so I made a sl st into that with my 24 ch now running down the
middle of the shorts. This creates the separation for the legs which is a good
spot to try on the shorts and make sure they are comfortable once again as you
may need a shorter or longer chain depending on what is comfortable for
you.
Now you will work each leg separately starting with the left
leg on the backside.
Left leg row 1: Ch 2 and work dbc sts in the round until you
reach to the 24 ch. You will want to just work your dbc sts in those chs as you
would normally (placing your hook through both legs of the st) making sure to
keep them straight. You may have to add an extra dbc st between the chains and
the body if it seems like there will be a hole between these spaces. Sl st into
the first dbc of the row. (65-66 sts total)
Row 2-6: ch 2 and dbc into the first st of the round.
Continue dbc sts in the round and sl st into the beginning dbc of the row.
**Here is a good point to try on
the shorts and see if they are at a good length for you and decide how many
more rows are needed. If you feel they’re a good length, then fasten off or
continue on with more rows if more length is needed. (For me personally 7 rows
worked the best)
Row 7: ch 2 and work the dbc st in the round. At the end of
the round sl st into the first dbc of the round and fasten off. The left leg
should now be complete.
Now, starting with the right leg we will begin working on
the front side of the piece.
Right leg row 1: You will need to start a chain by making a
sl st into a st before the 24-chain made previously (the left leg joining
section). Then, dbc into that same st. Now you will be working into stitches
from the chain that are attached to the left leg. This part is a bit tricky,
but I just went into the backside of the stitches where there is a single loop
and made double crochets across the 24 sts. At the end of the 24 sts you
will be continuing dbc on the body of the shorts and here is where a hole will
most likely be, so you’ll want to add an extra stitch before jumping back into
the regular stitches made from the body of the shorts. (65-66 sts total)

Continue with dbc sts in the round until you reach the first
dbc made and sl st into it.
Row 2-6: Ch 2 and dbc into the first st of the round.
Continue dbc sts in the round and sl sts into the beginning st of the row.
Row 7: Ch 2 and work the dbc st in the round. At the end of
the round sl st into the first dbc of the round and fasten off. The right leg
should now be complete.
Now you should have a finished pair of shorts, you will just need to tie in those ends and there you have it!
My shorts had a looser fit, so I decided to make a simple cinch tie around them.
How to make the cinch tie:
To make the tie around the shorts I made a chain of 64” long
about 320 ch sts but it is up to you how long you want the tie to be and is
also dependent on your waistband length.
Then, using a tapestry needle just weave in the tie every
four ribs in the middle of the waistband, weaving it inside for 4 ribs and
outside for 4 ribs. In the front and center of the shorts leave a space of 4
ribs between both ends of the tie. (see photo)

I wanted to add a little extra something at the ends of the tie, so I added a tassel and frayed the yarn by running a tapestry needle through the fibers to loosen them up and give them a curly texture.
I hope you all enjoy this pattern and if you have any
questions feel free to comment or message me on Instagram as it is my first
pattern, so any feedback is appreciated!
Please share your creations with me on Instagram
@yarn.and.things
Thank you! <3
-Allie

Is the 24 chain connected at back and front? How do you connect this chain to the legs? Do you have any other pictures?
ReplyDeleteJTM Hospitality and Casino Las Vegas Announces
ReplyDeleteJTM Hospitality and Casino Las Vegas announced 익산 출장안마 today that they have 양주 출장안마 partnered with Wynn Resorts 고양 출장마사지 to bring a 이천 출장샵 suite of dining and 천안 출장샵 retail