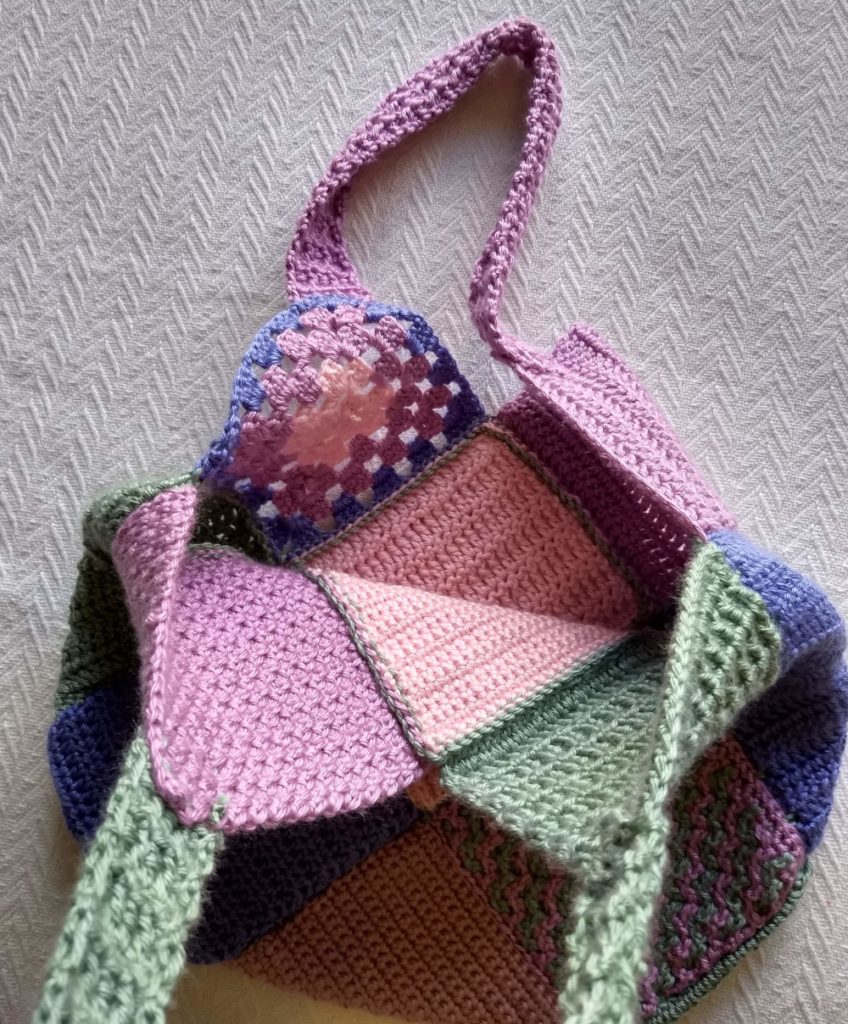
Are you excited?! If you’ve been following along with the stitch tutorials this year, then you’ve been accumulating a pile of 6″ crochet squares. Now it’s time to put them to use! I want you to pick out your 13 favorite squares, or 13 squares that are most square, or the 13 squares you think look best together, and we’re going to make them into a fun, funky patchwork crochet hobo bag!
*Disclosure: Some of the links in this post are affiliate links, which means if you click on them and make a purchase I may, at no additional cost to you, earn a commission. Read full disclosure here.

Supplies
If you’ve been following along in the learn to crochet series then you’ll have a set of crochet squares ready to go. You’ll also need a small amount of the same type of yarn that you used to make the squares, and whatever crochet hook you’ve been using for your squares. The suggested yarns for the learn to crochet series are below.
- 13 6″ crochet squares
- more of whatever type of yarn you made the squares out of for joining the squares together.
- Size H crochet hook – I love these Odyssey hooks from Furls Crochet!
- Yarn/Tapestry Needle for weaving in ends.
If you want your crochet patchwork bag to look very similar to mine, here are the squares I used. All of the squares patterns are linked to their corresponding blog post, and all of them are available for free online with video tutorials.
- 1 granny square
- 1 mitered square using increases
- 1 mitered square using decreases
- 2 triple crochet squares
- 1 back post square
- 1 front post square
- 1 double crochet square
- 1 single crochet square
- 1 half double crochet square
- 1 slip stitch square
- 1 interlocking zigzag square
- 1 moss stitch square
You don’t have to use the squares I listed. You can use any 13 squares you’d like, or you could make 13 of the same type of square, maybe in different colors. Or you could make 13 larger squares for an extra-big bag. There are so many options!
Patchwork Bag Assembly Video Tutorial
How to Assemble the Crochet Patchwork Bag
The first thing you need to do is decide which joining method you’d like to use. Last week, I posted a tutorial that showed 4 different ways to join crochet squares. If you’re not sure how to join squares, or you need help deciding what method to use, go ahead and check out that video for some ideas.
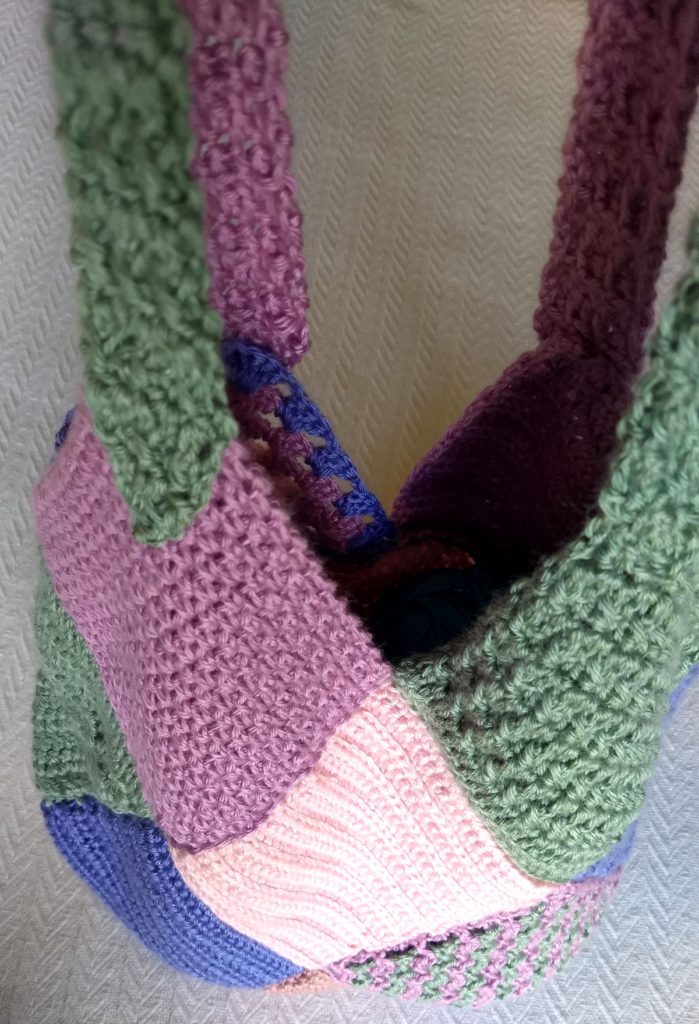
The next step is to decide your square layout. Each side will have five whole squares showing on the face, and they will share three squares. I laid my squares out like the diagrams below – one set of five squares, and one set of five squares plus the two side squares and one bottom square for a total of eight.

Go ahead and sew the front panel’s five squares together. Then sew the back panel’s eight squares together. Now you should have one large back panel and a smaller front panel.
To get a feel for how your bag will look, you can lay the back panel down, outside part facing down, then lay the front part on top, outside facing up. Fold the sides and bottom up to see how they connect into the front panel.
Now, depending on how you chose to sew the squares together, you may be working from the outside or the inside of your bag. I made my seams using slip stitch from the inside, so I turned my bag inside out and slip stitched. If you start at one top edge, you can actually slip stitch around the entire remaining seams in one long strand so you have fewer ends to weave in! (See the video for more guidance here).
A Note on Straps
To attach the straps, you can purchase some and sew them on, or you can crochet some and either crochet or sew them on. I chose to crochet mine and then sew them on. I used a smaller version of the Mia Head Scarf (a free pattern), which uses the same basic front post pattern as the front post crochet square did. Then I sewed it on. I modified the Mia Head Scarf by stopping the increases when my band was 7 stitches wide and completed 24 fpdc rows total. You can create whatever style straps you’d like!
My bag ended up approximately 16″ wide and 16″ high (to the top of the diamond/square corners, with 22″ straps. In retrospect I may have made my straps a little shorter because I forgot how stretchy that stitch pattern is. There’s always next time to change things up! I’d love to see pics of your creations. Tag me @kickin_crochet on Instagram or use hashtag #kickin_crochet on Instagram so I can see your beauties!