

I’m happy to welcome back Veronika from Blue Star Crochet for the second in a series of guest post designs. Today, Veronika is sharing an easy and cozy pair of crochet leg warmers! The pattern for the Mountain Legwarmers include instructions for adjusting the size for a perfect fit around your calves.

This post contains affiliate links. I may receive compensation (at no added cost to you) if you make a purchase using these links. Photos in this post are © Veronika Cromwell/Blue Star Crochet Company and are used with permission. Yarn for the sample was generously provided by Paintbox Yarns.
About Blue Star Crochet

Veronika Cromwell is the crochet fashion designer behind Blue Star Crochet Company. She was born in picturesque Slovakia but moved to the United Kingdom a few years ago where she lives with her husband, Darren, and sons, Jacob and Cole.
She was taught to crochet as a young girl by her mum, but it wasn’t until she was expecting her son when she found a real passion for designing and creating patterns for garments and accessories for the whole family.
The lack of cool and fun clothes for boys has led her to come up with her own designs. She set up Blue Star Crochet Company in December 2016.
Her wide range of designs have since been published in all major UK crochet magazines including Inside Crochet, Crochet Now and Simply Crochet.
She set up Blue Star Crochet blog in May 2020 to enjoy creative freedom and share free patterns and tutorials.
Show your support by following Veronika on Website | Etsy | Facebook | Instagram | LoveCrafts | Pinterest | Ravelry | YouTube

Mountain Legwarmers
Crochet Leg Warmers Pattern by Blue Star Crochet Company

I love winter season and with my Mountain Legwarmers I can stay cosy and warm. Check out the free crochet pattern!

I must admit this is the first pair of crochet leg warmers I have ever made! After I put them on, they made my legs super cosy and warm. Now I can’t imagine not wearing a pair around the house and while snuggled in front of the telly.

And that made me think – why didn’t I make a pair sooner?!
These crochet legwarmers are super easy and quick to make. I used Paintbox Yarns Simply Chunky yarn with a large hook, so they really don’t take long to make at all! You could make these as a very last-minute crochet Christmas gift, too. They are super handy to wear at home over a pair of leggings. But I can easily see these being worn in a pair of wellies for a dog walk on a crisp morning!

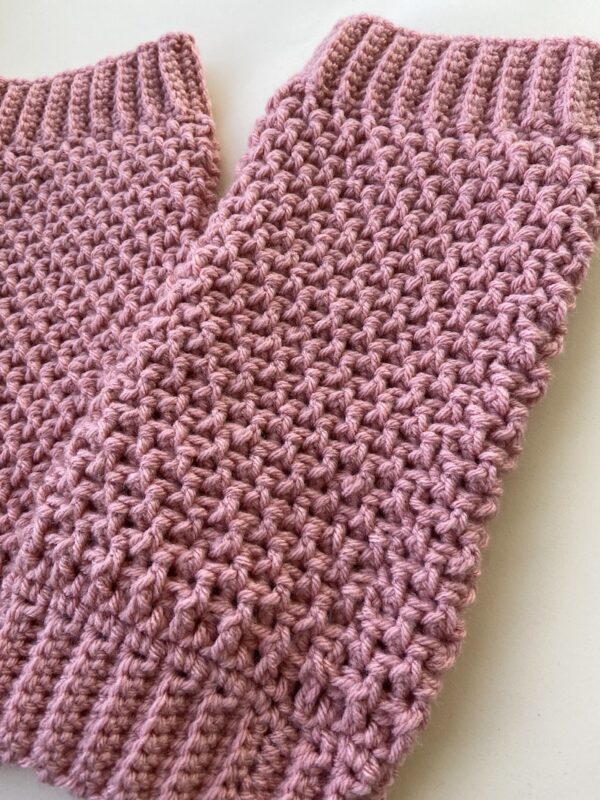
I used a simple rice crochet stitch that creates a great texture. It alternates front and back post stitches in round to create a simple but effective look. The crochet legwarmers are finished off with a cuff on both ends.

This pair of legwarmers has been designed to fit a calf up to 39 cm (15.5”) circumference. But you can easily adjust the pattern to fit perfectly with my size adjustment notes below.

Staying cosy and warm is vital so I would love you to check out my Working Girl Cardigan – beginner friendly construction with a simple textured stitch. There are two alternatives for sleeves and neckline so you can customise your very own cardigan.
MATERIALS
- Paintbox Yarns Simply Chunky (bulky; 136 m per 100 g ball; 100% acrylic) 3 balls in 353 Blush Pink
- 6 mm crochet hook
- Yarn needle
- Scissors
- Tape measure
FINISHED SIZE
- 32 cm (12.5”) circumference x 36 cm (14”) height (to fit calves up to 39 cm/15.5” circumference)
TENSION
- 13 st x 9 rows measures 10 x 10 cm (4” x 4”) worked in FPdc and BPdc
STITCHES AND ABBREVIATIONS (US CROCHET TERMS)
- beg- beginning
- BPdc- back post double crochet- double crochet stitch worked around the post of next stitch inserting hook from back to front to back, yarn over and pull through, finish off as double crochet. A video tutorial for this stitch is available below.
- ch- chain stitch
- dc- double crochet
- FPdc- front post double crochet- double crochet stitch worked around the post of next stitch inserting hook from front to back to front, yarn over and pull through, finish off as double crochet. A video tutorial for this stitch is available below.
- prev- previous
- RS- right side
- sc- single crochet
- sc blo- single crochet stitch worked through back loop only
- sl st- slip stitch
- WS- wrong side
See below for video tutorial for BPdc and FPdc.
If you can’t see the video tutorial for the BPdc and FPdc above, click here to watch it on YouTube.
PATTERN NOTES
- The pattern starts with working the bottom cuff using sc blo
- The cuff is then joined with sl st or sewn together (whichever method you prefer) at the short ends
- Main body of the legwarmer is worked round the long edge of the cuff in rounds
- The top cuff is worked onto the main body at the end using sc blo
SIZE ADJUSTMENTS
- The finished size of the legwarmers can be easily adjusted
- To make nice fitting legwarmers that don’t slide down, measure your calf at the widest point
- Take away 7 cm (2-3/4”) from this measurement to allow for the stretch of the fabric to make legwarmers that do not slide down
- Start the pattern for the cuff and continue working until you reach the desired circumference you have just measured
- Make sure you have EVEN number of rows of the cuff for the pattern repeat to work
MAIN PATTERN
CUFF
- Chain 9.
- Row 1: starting in second chain from hook, 1 sc in each ch across, turn. 8 sc
- Row 2: 1 ch (doesn’t count as a st throughout the pattern), 1 sc, 6 sc blo, 1 sc in last, turn. 8 sc
- Repeat Row 2 another 38 times or as many times as you need if you are adjusting the size.
- Fold the cuff in half and sl st or sew together the first and last row on WS to form a ring. Turn RS out. Do not fasten off.
- Continue working around the long edge of the cuff.
MAIN BODY
- Rnd 1: 3 ch (counts as first dc), 1 dc around end st of each row of the cuff, sl st to top of beg 3 ch to join. 40 dc
- Rnd 2: 2 ch (doesn’t count as a st throughout), 1 FPdc around the beg 3 ch from prev rnd, 1 BPdc around next st, * 1 FPdc around next st, 1 BPdc around next; rep from * around, sl st to top of first FPdc. 40 sts
- Rnd 3: 2 ch, * 1 BPdc, 1 FP dc; rep from * around, sl st to top of first BPdc. 40 sts
- Rnd 4: 2 ch, * 1 FPdc, 1 BPdc; rep from * around, sl st to top of first FPdc. 40 sts
- Repeat Rnd 3 – Rnd 4 another 10 times. Do not fasten off.
TOP CUFF
- With yarn still attached, chain 9.
- Row 1: starting in second ch from hook, 1 sc in each st across chain sts just made, sl st to same st on main body of legwarmer, sl st into next st, turn. 8 sc
- Row 2: 1 ch, 1 sc blo in each of the next 7 sts across cuff, 1 sc in last st, turn. 8 sc
- Row 3: 1 ch, 1 sc, 7 sc blo, (sl st to next st on main body of legwarmer) twice, turn. 8 sc
- Repeat Row 2- Row 3 around all sts. Fold the cuff in half and sl st or sew together on the WS.
FINISHING INSTRUCTIONS
- Fasten off. Sew in all ends.
Your leg warmers are so lovely! I can’t wait to make a pair for myself. Thank you so much for the pattern.
Thank you for this pattern. My mom is 102 yo and in a wheelchair. Her legs require warmth provided by something that won’t rub her fragile skin raw. I think I will make these (soft baby yarn?) and see if this helps as her lap blanket keeps falling off her legs and then she’s cold.
Thank you for the pattern, the leg warmers look stunning.