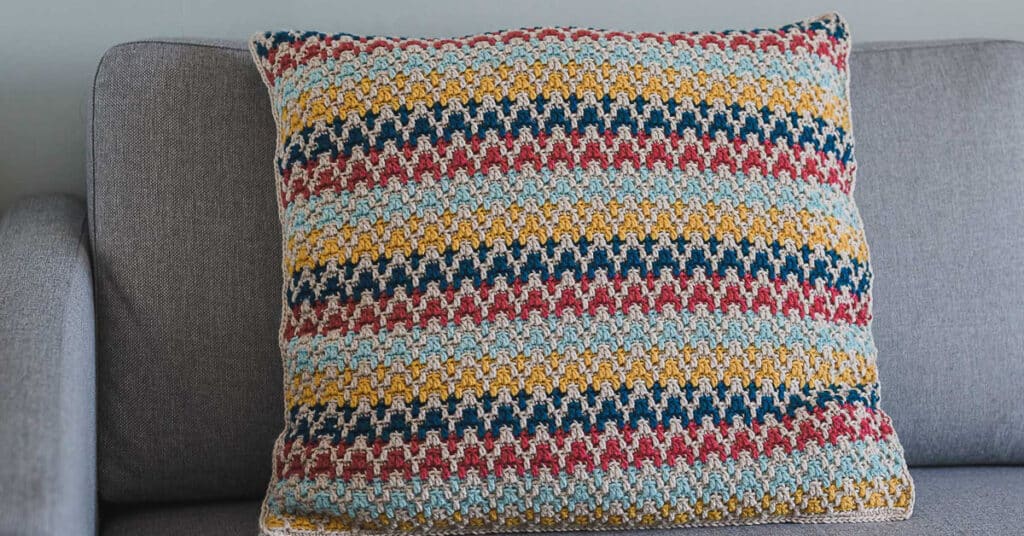
You’re going to love this mosaic crochet pillow pattern.
It’s a fun way to try mosaic crochet, and this throw pillow has an impressive look, without being difficult to make.
Find more: 8+ Pillow Crochet Pattern Collection.

How to get this crochet pattern:
Option 1: Scroll down to see the FREE Crochet Pattern ⬇️
Option 2: Purchase the printable PDF:
Option 3: Get the printable version inside the crochet pattern membership.
Option 4: Most of my crochet patterns can also be found on Ravelry, Love Crafts and Etsy.
The Yarn
The yarn to crochet this pillow was sent to me by We Crochet as yarn support, but I’m not otherwise compensated.
The Swish Worsted yarn is a 100 % super wash merino wool, which is one of my favorite yarn fibers.
Pick your favorite yarn colors to crochet this striped crochet pattern.

Home Decor Crochet Pattern Bundle
Like this? Get the ad-free version + 19 other crochet patterns with the “Home Decor Crochet Pattern Bundle“.
Learn more about the Home Decor Pattern Bundle
PILLOWS = A GREAT WAY TO TRY MOSAIC CROCHET
Mosaic crochet has quickly become one of my favorite techniques for crochet colorwork.
It’s simple, because you only work with one color per row.
A square crochet piece, such as those needed to crochet a throw pillow cover, is a great way to try this technique for the first time.
Since you like this mosaic crochet pillow pattern, these might interest you too?
- Crochet Pillow Pattern
- Crochet Cushion Cover
- Simple Crochet Pillow Cover Pattern
- Spikes and Stripes Pillow Cover
- Clover Leaf Granny Square Pillow
- Fight of the Dragonfly Pillow
- Zigzag Bobble Pillow
- Your Weekday Cowl
- Mosaic Crochet Hot Pad
Love this pattern? Save on Pinterest!

How Long Does It Take To Crochet That?
How long it takes to crochet something varies depending on your skill & how fast you crochet. But that isn’t a helpful answer is it?
Well, I’ve developed a yarn calculator to help you get the answer to this question.
It will help you calculate exactly how much time you’ll spend crocheting a project.
All you need to know is how much yarn you will use on the project in either meters, yards or skeins. Then crochet your test square & time it.
Calculate how long it takes to crochet that.
Buy the Mosaic Crochet Pillow Pattern
Get the downloadable PDF crochet pattern for this crochet pattern, or join the Crochet Everyday Bliss Membership and get access to download ALL crochet patterns and more
MOSAIC CROCHET PILLOW PATTERN – THE FREE CROCHET PATTERN
About The Pattern
This mosaic crochet pillow pattern is a great way to introduce some color to your home, with the use of 5 different yarn colors.
It’s a great way to try crochet colorwork with mosaic crochet.
The crocheted pillow cover is an easy pattern, and it’s exciting to see the crochet stitch pattern appear as you crochet.

Project Level
WHAT’S YOUR CROCHET SKILL LEVEL?
Take the Quiz
Get helpful tips for your next crochet project & increase your skills!
Materials Needed
Crochet Hook
Hook I used: Symphonie Rose Crochet Hooks from Knitpro
Yarn
Yarn used:
We Crochet – Swish Worsted Weight in color Nutmeg Heather (CA), Honey (CB), Wonderland Heather (CC), Rose Heather (CD) & Marine Heather (CE).
Yarn amount used:
Color A (CA): 6 skeins / 300 g / 600 m / 660 yards
Color B (CB): 2 skeins / 80 g / 160 m / 176 yards
Color C (CC): 2 skeins / 80 g / 160 m / 176 yards
Color D (CD): 2 skeins / 80 g / 160 m / 176 yards
Color E (CE): 2 skeins / 80 g / 160 m / 176 yards
Yarn characteristics:
- 4 medium yarn, worsted yarn.
- 100 % Fine Superwash Merino Wool
Other Materials Needed
- Needle
- Pillow 24 x 24 inches // 60 x 60 cm
Gauge
Measured with on mosaic stitch pattern crocheted in rows:
17 stitches & 17 rows per 10 cm / 4”.

Notes
- This crochet pattern is written in US terms.
- All measurements given are unblocked.
- Note that measurements are given as exact as possible. But crochet tension & technique might give variations in the result, that changes from person to person.
- Read pattern instructions carefully before beginning to make sure you understand everything. It might save you hours frogging your work & crocheting it again!
- Make a swatch that measure at least 10 x 10 cm / 4 x 4 inches using the stitch the gauge is given for. If your swatch matches the gauge, you’re good to go. If the gauge is wrong, you might need to change your hook. Go up in crochet hook size if your stitches are smaller & go down in crochet hook size if your stitches are bigger. Learn more about testing gauge.
- Check yarn info if you want to find an alternative or test your yarn against the gauge. Learn more about substituting yarn.
- This pattern is written for 1 size, however size adjustments are suggested under the heading “Size & Measurements”.
- At the end of each row, the stitch count is given in parenthesis.
Size & Measurements
Width: 57 cm / 22.5 inches
Height: 57 cm / 22.5 inches
*Note that the with & length are smaller than the pillow. But it will stretch just fine to fit inside the pillow when assembled.
Size Adjustments
- This pillow could be made in other sizes, such as a 20 x 20 inch / 50 cm x 50 cm pillow. If so, reduce the amount of stitches you start with & crochet less rows.
Abbreviations
- BLsc = back loop single crochet
- ch = chain(s)
- FL = front loop
- Ldc = long double crochet
- RS = right side
- sc = single crochet
- st = stitch (es)
We try our best to include all crochet abbreviations in the list above for the crochet pattern, but sometimes we may forget one or two.
Learn more about crochet abbreviations & find a complete list on our Crochet Abbreviations & Terms post.
Techniques You Will Need
CROCHETING IN THE FRONT AND Back LOOP:
This means that you will not crochet through the whole stitch as usual. A typical stitch contains two loops. One in the front, nearest you, and another stitch in the back, furthest away from you. One is called the front loop (the one nearest you), the other one the back loop, the one furthest away from you.
For this pattern you will crochet double crochet stitches through the front loop & single crochet stitches (BLsc) through the back loop.
MOSAIC CROCHET:
To crochet this pattern you will use the mosaic crochet technique, following these 4 simple rules:
- You will use color A every other row, alternating with either CB, CC, CD or CE.
- All single crochet stitches are worked in the back loop.
- All double crochet stitches (long double crochet/ Ldc) are worked 2 rounds below in the front loop & this front loop are always the same color as the one you’re working with.
- You will always work on the right side. That means you’ll cut yarn at the end of each row and reattach at the beginning of the row. I recommend working over yarn tails both at the beginning and end or the row. You can see yarn tails that have been worked over in the photo below.

READ THE MOSAIC COLOR CHART:
To crochet this pattern you can choose to follow the mosaic crochet chart (starting on row 2), following these rules:
- Read from the bottom up, from right to left.
- The first and last column are the regular sc worked at the start and end of each row.
- The colors in the diagram itself shows how it will look, but don’t pay too much attention to it when working each round. Rather…
- Crochet single crochet for each empty box, and long double crochet for each box with an “X”.
MOSAIC COLOR CHARTS:
Below you have 2 mosaic color charts. The first one illustrates just the stitch repeat.
The second shows it including the color changes, not that the width doesn’t reflect the number of stitches needed for the pillow.


Mosaic Crochet Pillow Pattern Instructions
To access this Exclusive Subscriber content, simply click the box below. Grow will appear and you can subscribe to my blog and Joy of Motion Crochet. Then enter email and create a password. Once you’ve done that, you can log in to your account whenever you see Exclusive Content on my Blog and enjoy all the benefits.
Share & Worth Noting
Thank you for sharing my FREE patterns & tutorials. When you do, you support me & the blog, which makes it possible to continue sharing free content with you.
Not all content on this blog website is free, but the more you share, the more free content I will be able to share. Note that all premium content are ad free.
My crochet patterns can be used to sell handmade pieces. You are required to credit Joy of Motion/Janne Kleivset as the designer by linking back to My website: https://joyofmotioncrochet.com. You can not use my pictures when selling your handmade items. Finally, you can not resell, reprint or share any parts of my patterns as your own.


