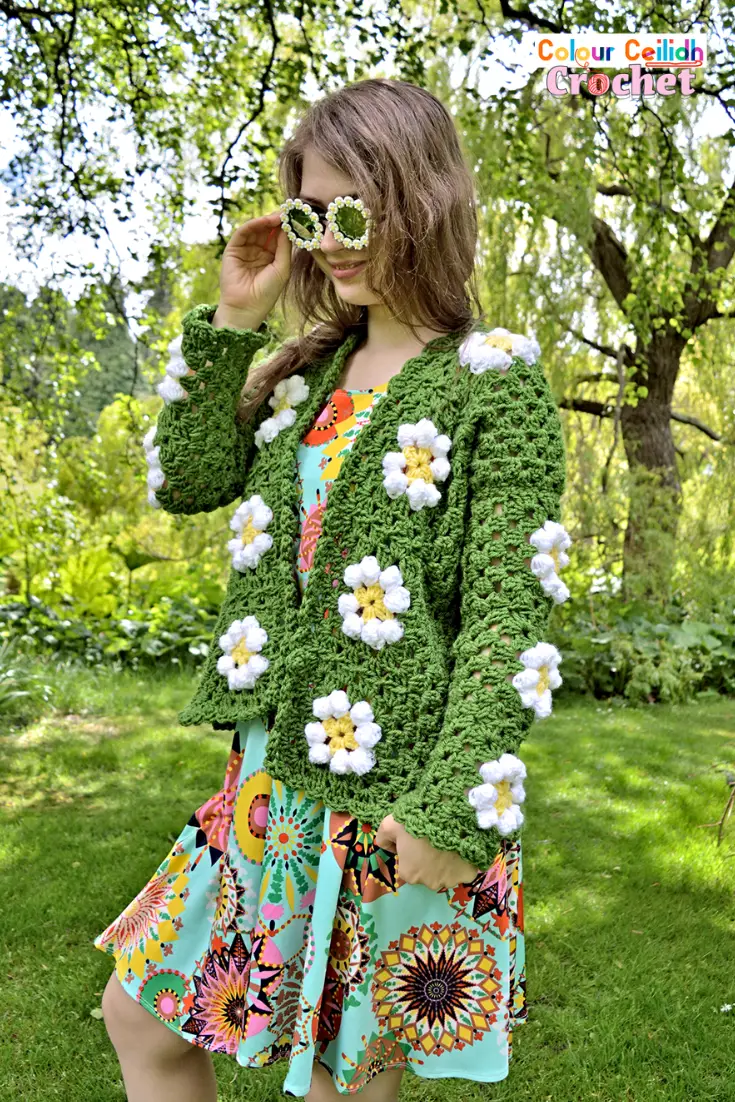
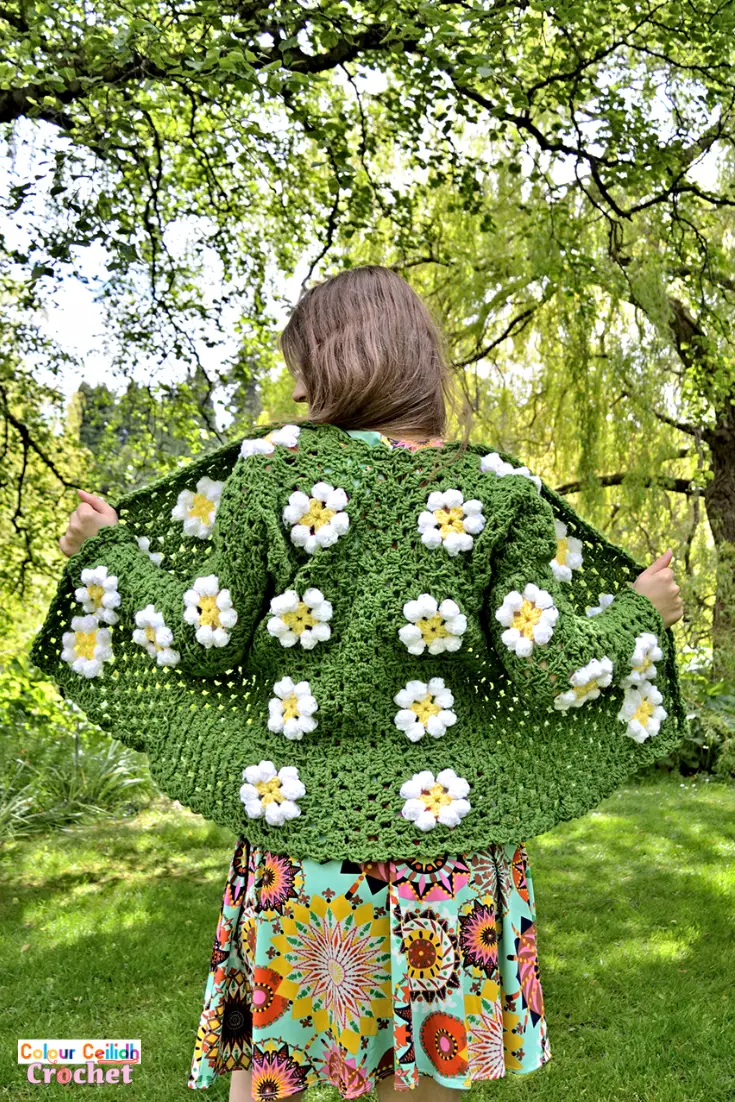
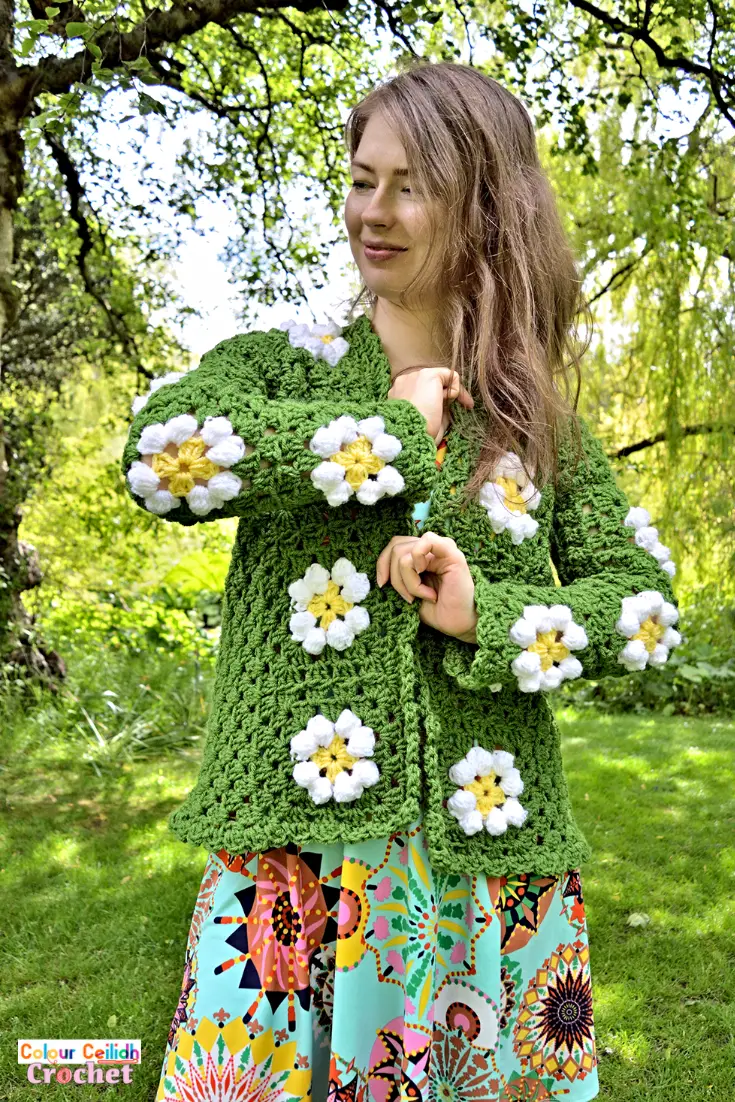
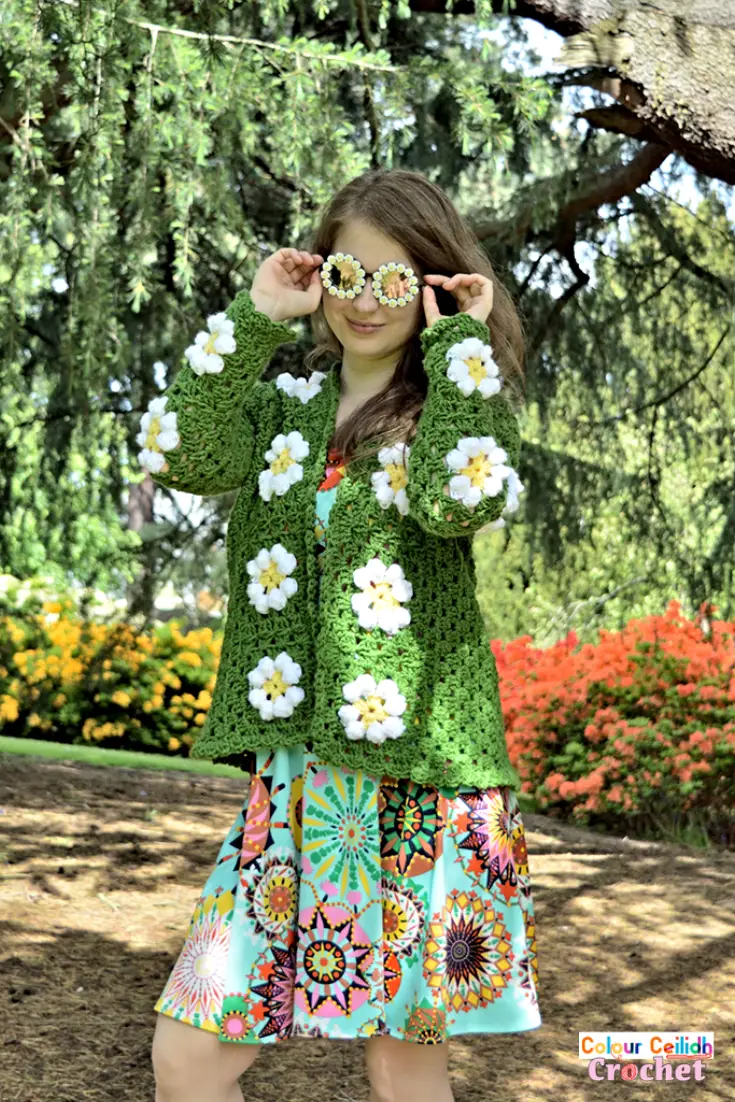
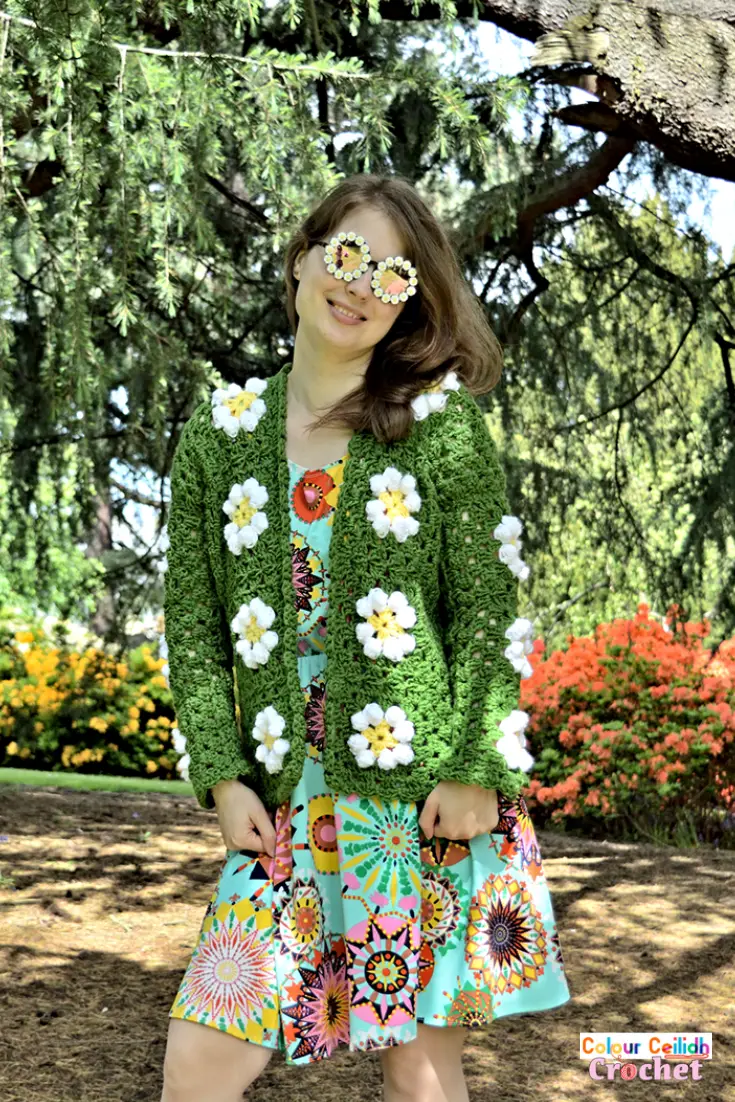
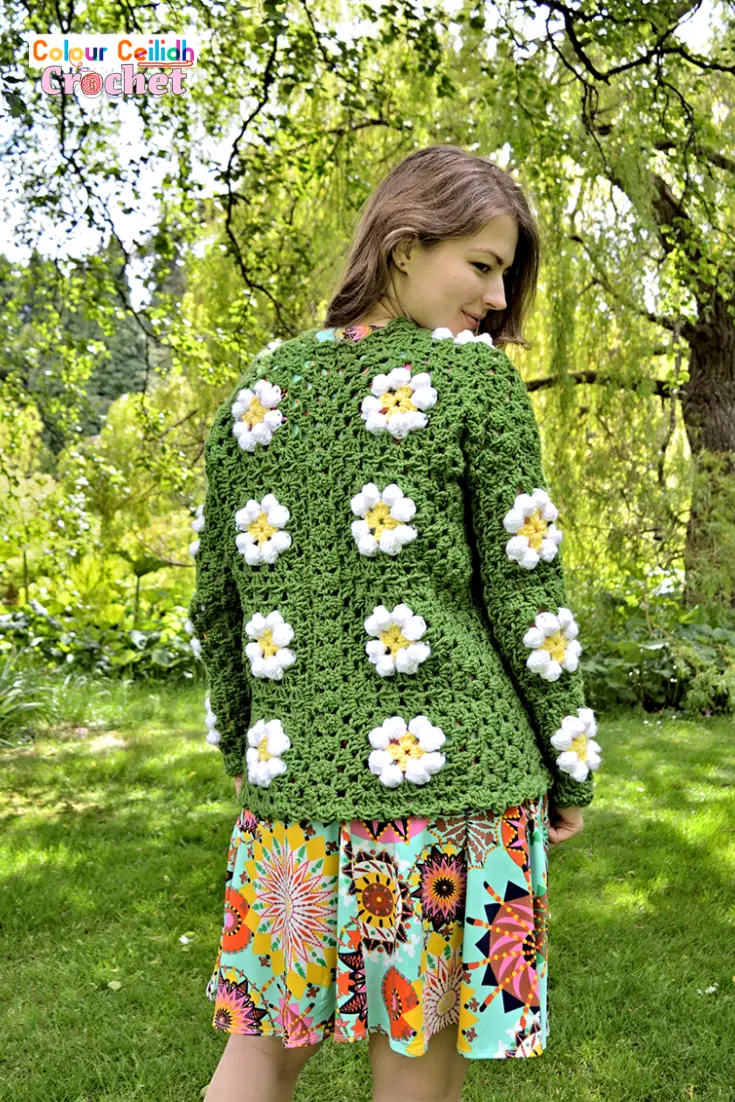
Learn how to crochet this daisy granny square cardigan (free pattern) in 7 easy steps AND in your size! This cardigan is fun to wear in spring and summer, especially if you add some funky daisy accessories!
Hello beginners, we’re going back to the basics with the good old granny squares that never go out of fashion!
Do check out my video tutorial as well (link below) to help you understand the instructions easier.
This post contains affiliate links to products. I may receive a small commission for purchases made through these links.
Yarn
For this crochet daisy granny square cardigan I’m using Lion Brand Vanna’s Choice in Kelly Green, Lemon & White.
Stitches
This is of course the good old granny stitch and granny square that’s been modified just a little bit. To make the daisy petals pop, I used the bobble stitch. And that’s it!

Crochet Daisy Granny Square Cardigan – Free Pattern
- PIN it for later.
- Add this pattern to your Ravelry queue.
- Ready to crochet but don’t want the ads in your way? PRINT it here*.
* a print friendly version for a small fee.

Description
This beginner crochet daisy granny square cardigan comes in 9 different sizes. It’s fun & easy to make as it uses medium weight yarn and a large hook. What is more, the daisy granny square is worked almost the same as the traditional simple granny square as the rounded shape of the daisy flower petals is provided by the bobble stitch. Finally, this crochet cardigan jacket features a simple shell border. This pattern also includes a link to the video and photo tutorials that explain how to change color without any tails and how to join granny squares together. This free crochet pattern includes a youtube video tutorial and a diagram layout as well.
Sizes
This cardigan is available in 9 sizes: XS, S, M, L, XL, 2X, 3X, 4X, 5X.
The cardigan is approx 23.6 (23.6, 23.6, 23.6, 23.6, 25.9, 32.2, 32.2, 32.2) inches long (but in reality crochet garments can stretch by an additional 1 – 2″ when worn). Model is 5’7″, wears and is a size M.
These sizes are based on the Craft Yarn Council standard body measurements and sizing. But if you would like to check your size, search for “Craft Yarn Council woman size charts”.
Care Instructions
The Lion Brand Vanna’s Choice yarn is a 100% acrylic. It’s machine washable at 30 C / 86 F.
Pattern Notes
- Project Level: Beginner
- Read this if you want to learn how I change color without tails! To minimise weaving in the ends and because I love working with color so much I developed a method of how to change color in crochet without tails.
- If you have any questions, check the video tutorial (link below).
- The long sequence of numbers in the pattern corresponds to the 9 sizes starting from XS and ending with 5X, with XS being placed first and then others arranged in ascending order in brackets and separated by commas.
Crochet Daisy Granny Square Cardigan Free Pattern – Video Tutorial
Crochet Granny Square Jacket + Crochet Daisy Granny Square Pattern Video Tutorial
Materials
- Lion Brand Vanna’s Choice (4 / Medium / Aran weight, 100 g / 3.5 oz, 156 m / 170 yd, 100% acrylic) 5 (5, 6, 6, 6, 7, 8, 8, 9) skeins in Kelly Green, 2 skeins in White, 1 skein in Lemon
- 9 mm crochet hook (sizes XS, S, M, L, XL) or 10 mm crochet hook (sizes 2X, 3X, 4X, 5X)
Gauge
Following the pattern below, one granny square with a 9 mm or 10 mm hook measures about 5.6″ and 6.1″, respectively.
Abbreviations (US Terms)
- ch: chain
- dc: double crochet
- dc5tog: double crochet five together, or the bobble stitch. Work 5 double crochet stitches into the same stitch leaving the last loop of each on the hook. So yarn over, insert hook in the indicated stitch, yarn over and pull through, yarn over and pull through 2 loops and stop there. Repeat 4 more times. Yarn over and draw through all loops on hook
- hdc: half double crochet
- rep: repeat
- sc: single crochet
- sl: slip
- st: stitch
- t: turn
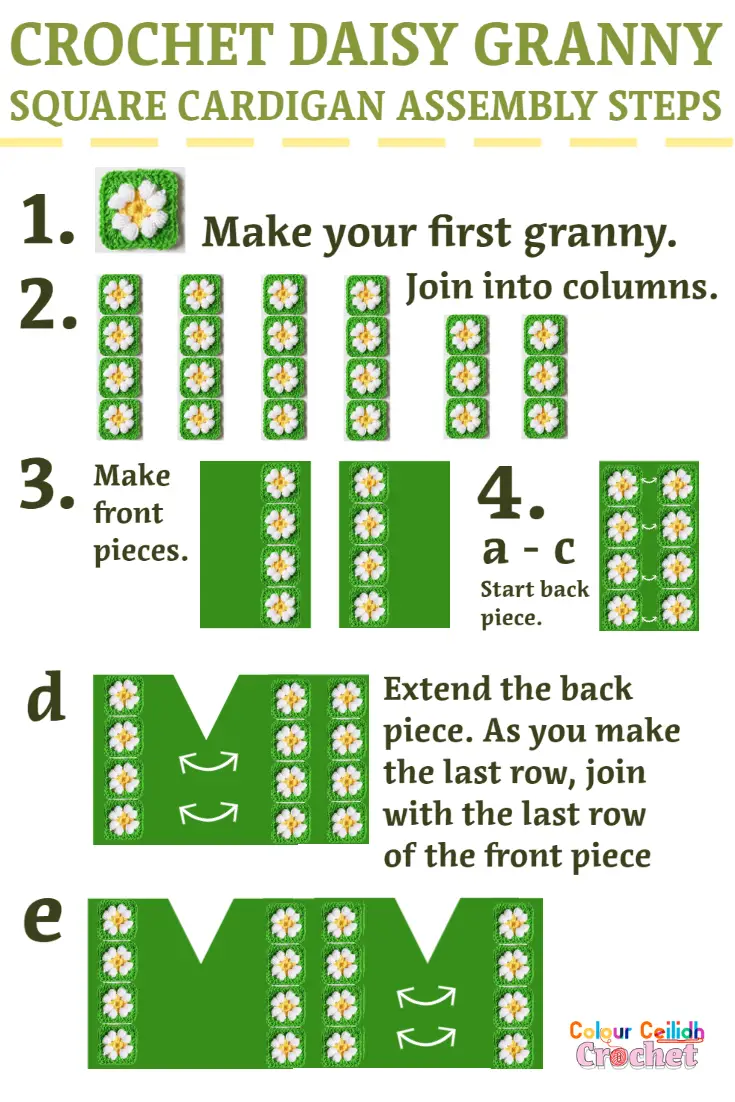
Pattern Overview – 7 Easy Steps
- Make your first granny.
- Join granny squares into columns (see diagram).
- Make two front cardigan pieces.
- Begin the back piece & join with the front pieces.
- Make the sleeves.
- Seam the shoulders, the sleeves and the sleeves into body.
- Add a border.
1. Make Your First Granny
Make the first granny square as follows.
Crochet Bobble Daisy Granny Square
Sizes XS, S, M, L, XL: use the 9 mm crochet hook. Sizes 2X, 3X, 4X, 5X: use the 10 mm crochet hook. With Lemon, ch 4, sl st to first ch to form a ring.
Rnd1 (Lemon) Ch 3 (counts as dc), 2 dc in ring, *ch 1 (corner space made), 3 dc in ring; rep from * two times, ch 1, join with sl st to top of ch-3, t. (16 sts: 12 dc)
Rnd2 (White) (Ch 3 (counts as dc), dc5tog, dc, ch 1, dc, dc5tog, dc) in same space, (dc, dc5tog, dc, ch 1, dc, dc5tog, dc) in each space around, join with sl st to top of ch-3, t. (28 sts)
Rnd3 (Kelly Green) Ch 3 (counts as dc), 2 dc in same space, 3 dc in next space and each space placing (3 dc, ch 1, 3 dc) in corner spaces, join with sl st to top of ch-3. (40 sts)
Rnd4 (Kelly Green) Rep rnd3, fasten off. (52 sts)
2. Join Granny Squares Into Columns (See Diagram)
Join the second and subsequent granny squares together on one side into “lines” or “columns” as follows. Make 4 columns of 4 (4, 4, 4, 4, 4, 5, 5, 5) granny squares joined together and 2 columns of 3 granny squares joined together as shown in the diagram below. The taller columns will be used to make the front and back pieces and the shorter columns will be used to make the sleeves.
Join The Granny Squares
To join granny squares: as you’re making the last round of your granny, leave one full side undone to be joined with the other square. We’ll start joining in the corner. Start making the corner but stop after the first 3 dc. Remove your hook from the loop, insert the hook front to back through the corner space of the other square you’re joining with, pick up the loose loop, pull it up and ch 1, 3 dc in the same corner space. *Remove the hook from the loop, insert the hook front to back through the next corresponding space of the other granny, pick up the loose loop, pull it up and ch 1, 3 dc in the next space. Rep from * until you joined the second corner with a ch 1.
For more details, see the how to join granny squares easy photo tutorial with 26 large picture step-by-step.
3. Make 2 Front Cardigan Pieces
Take your column of 4 (4, 4, 4, 4, 4, 5, 5, 5) granny squares joined together. Face the front and turn the granny squares so they’re aligned horizontally in front of you.
Join Kelly Green (I used the slip stitch method: make a slip knot on your hook, insert hook int the space indicated, yarn over and pull through the slip knot) in the top right corner of a granny square.
Row#1 Ch 3, dc in same space, 3 dc in next space and every space, placing 2 dc in last space, t.
Row#2 Ch 3, 3 dc in next space and every space, placing dc to top of ch-3, t.
Rep rows 1 & 2 until you have 4 (5, 7, 8, 10, 11, 11, 13) rows & fasten off. Turn your piece around / upside down. Facing the front, join Kelly Green in the top right corner of a granny square and rep row#1. Fasten off. Front piece complete. Repeat to make the second piece.
4. Begin Back Piece & Join With Front Pieces
To visually understand the following steps better, refer to the diagram above and the video tutorial.
a. Take your column of 4 (4, 4, 4, 4, 4, 5, 5, 5) granny squares joined together. Face the front and turn the granny squares so they’re aligned horizontally in front of you.
b. Join Kelly Green in the top right corner of a granny square. Rep rows 1 & 2 so you have two rows done. Fasten off.
c. Rep a & b but as you make your second row, join with the other second row from the first piece. Now you have two granny square columns joined together with 4 rows in between.
d. Face the front and turn your piece so the granny squares and your rows are aligned horizontally in front of you. Join Kelly Green in the top right corner of a granny square. Rep rows 1 & 2 until you have 4 (5, 7, 8, 10, 11, 11, 13) rows. As you make the last row, join with the other last row from the front piece (as shown in the diagram above), leaving 6 (6, 6, 6, 7, 7, 8, 9, 9) granny clusters unjoined on one side for the armhole (ch 3, dc, 2 dc, ch 3 + dc all count as your first cluster).
e. Turn your piece around / upside down and rep d, leaving the unjoined granny clusters on the same side as before for the armhole.
5. Make The Sleeves
a. Take your column of 3 granny squares joined together. Face the front and turn the granny squares so they’re aligned horizontally in front of you.
b. Join Kelly Green in the top right corner of a granny square. Rep rows 1 & 2 until you have 3 (3, 3, 5, 5, 5, 5, 5, 5) rows.
Row#3 Ch 1, sc in same st. For the next 6 (6, 6, 6, 6, 8, 8, 7, 8) granny clusters including 2 dc below, sc in every st. Then make 3 hdc in space below and next space, 3 dc in next space and every space, ending with dc to top of ch-3. Size L: fasten off and proceed to c. Sizes XS, S, M, XL, 2X, 3X, 4X, 5X: t.
Row#4 Ch 3 (counts as dc), dc in same space, 3 dc in next space and every space until you have 6 (6, 6, -, 6, 4, 4, 5, 4) granny clusters including 2 dc at the beginning, 3 hdc in next space twice, sc in next space. Sizes XS, S, M, XL, 2X: fasten off and proceed to c. Sizes 3X, 4X, 5X: t.
Row#5 Ch 1, skip same st and next st, sc in next st, 3 hdc in same space below and next space, 3 dc in next space and every space, dc to the top of ch-3. Size 3X: fasten off and proceed to c. Sizes 4X, 5X: t.
Row#6 Ch 3 (counts as dc), dc in same space, 3 dc in next space (size 4X: 3 dc in next space again), 3 hdc in next space twice, sc in next space, fasten off.
c. Turn your piece around / upside down. Face the wrong side and turn the granny squares so they’re aligned horizontally in front of you. Rep b. One sleeve complete.
d. Rep a, b & c for the second sleeve.
6. Seam
Seam the shoulders, the sleeves and the sleeves into body. I used the mattress stitch.
7. Add a Border
I added a simple scallop / shell border (see the video).
Join new yarn at the bottom of the cardigan (facing the front) between any two granny clusters (because I think it’s easier to start here). Make a dc in every granny cluster dc stitch & a slip st in between granny clusters. So you end up making 3 dc, sl st, 3 dc, sl st etc. When you run out of the granny squares and granny clusters and run into the granny rows, you’re dealing with the spaces behind first / last posts of each row. So in these spaces make a sl st & 3dc in each space. When it comes to corners, make 3 dc behind a post.
Weave in the ends.
More Ideas
This Revival Crochet Granny Square Cardigan is by Make & Do Crew. This Red Heart Coatigan in Grannies is by Yarnspirations.
And lastly, here is my crochet sunflower granny square cardigan, simple puff daisy granny square pattern & more crochet cardigan patterns!
Well Done!
I hope you enjoyed this free crochet pattern for my crochet daisy granny square cardigan. What should I crochet next? See you in my next pattern!
Happy crocheting!
Justina
This pattern is copyright protected. No plagiarism i.e. copy & paste of the patterns is permitted. For further details, see Copyright.