

I’m excited to share a book review along with an excerpted owl crochet pattern with you today, as well as a giveaway for your chance to win my review copy of the book! Read on for more details!

This post contains affiliate links. I may receive compensation (at no added cost to you) if you make a purchase using these links. GMC Publications Ltd provided me with a free review copy of Crocheted Birds: A flock of feathered friends to make (available through independent booksellers or here on Amazon) by Vanessa Mooncie. Although I accept free products for review, I do not accept additional compensation, nor do I guarantee a positive review. My reviews are based entirely on my honest opinions.
Book Review: Crocheted Birds
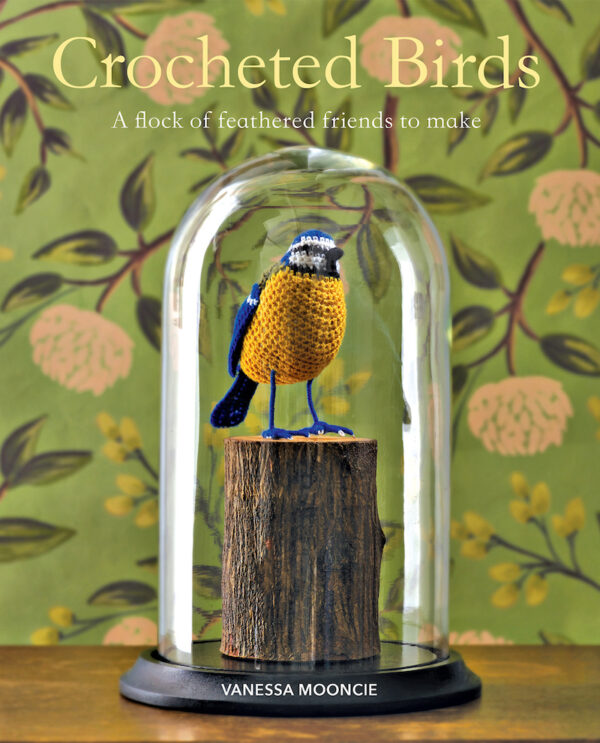
Crocheted Birds: A flock of feathered friends to make (available through independent booksellers or here on Amazon) by Vanessa Mooncie is a crochet pattern book that includes ten softie amigurumi patterns for birds. I’ve previously reviewed four other books by Vanessa (Crocheted Animal Rugs, Animal Heads: Trophies to Crochet, Crocheted Dogs, and Monster Hats: 15 Scary Head Warmers to Knit) and I love her creative approach to crochet.
In the Introduction, Vanessa explains that she gets to see many birds from her window and that the birds in the book, especially the larger ones like the Swan, are much smaller than their real-life counterparts and thus, can be worked up quickly. The book then includes a photo gallery with full-page color portraits of each bird against a stylized background. The next section is the patterns, which includes ten different types of birds: Blackbird, Robin, Blue tit, Wren, Budgerigaur (Parakeet), Dove, Cardinal, Swan, Barn Owl (shared as a pattern below this review), and Bald Eagle. Each pattern includes a short introduction, a list of materials, size of the finished project and tension (gauge). Method explains how the project is constructed and then the patterns are provided in sections using both UK pattern abbreviations and international stitch symbol charts. At the end of each pattern, the Making Up section explains how to join pieces and embellish the finished bird. Eight patterns are made in 4-ply/#1/super fine weight yarns and two patterns are made in DK/#3/light weight yarns. The birds range from a finished size of 3” to 12.75” (7.5 cm to 32.5 cm) and each includes a pattern for its eggs. Within each pattern, you’ll find multiple images of the bird from different angles against a white background and one full-page photo against a “natural” environment. Each pattern also includes one picture of the egg.

Seventeen pages of back sections following the patterns include Getting Started, Crochet Stitches, Finishing Touches, Abbreviations and Conversions, and Supplies. These sections includes written information about crochet hooks, yarn needles, yarn substitution, reading crochet charts, carrying unused colors, crocheting around wire (for bird legs), stuffing, adding safety eyes (glass eyes), and finishing . There are written and illustrated instructions for getting gauge (tension), holding the hook, basic crochet stitches, increasing, decreasing, crocheting into the front or back loops, long stitches (spike stitches), joining colors, joining pieces with back stitch, two embroidery stitches (straight stitch and chain stitch), adding Barn Owl feathers, making bird legs with wire, and sewing eyes with thread. There is also a glossary of pattern abbreviations, conversions from UK to US pattern abbreviations and measurements for hooks, and contact information for suppliers of yarn, hooks, stuffing, craft wire (for bird legs), and safety eyes (glass eyes). The book closes with an index.
Although it’s a paperback book, there are front and back flaps to help you keep your place while stitching. The bird patterns are very elegant and life like. The photos — especially the ones against stylized backgrounds — are wonderful eye candy and also inspirational for creating an indoor “environment” for your own bird patterns. As with Vanessa’s other books, while the patterns use simple stitches, the level of detail is quite high. These patterns are best for crocheters who are comfortable reading patterns (either using abbreviations or international stitch symbols) though they require only advanced beginner crocheters stitching skills. Most US readers would probably make the patterns with medium (worsted/#4/aran) yarn, and that would make the finished projects larger. If you love birds, or have bird lovers in your circle of “crochet-worthy” gift recipients, you will definitely enjoy Crocheted Birds: A flock of feathered friends to make (available through independent booksellers or here on Amazon) by Vanessa Mooncie!
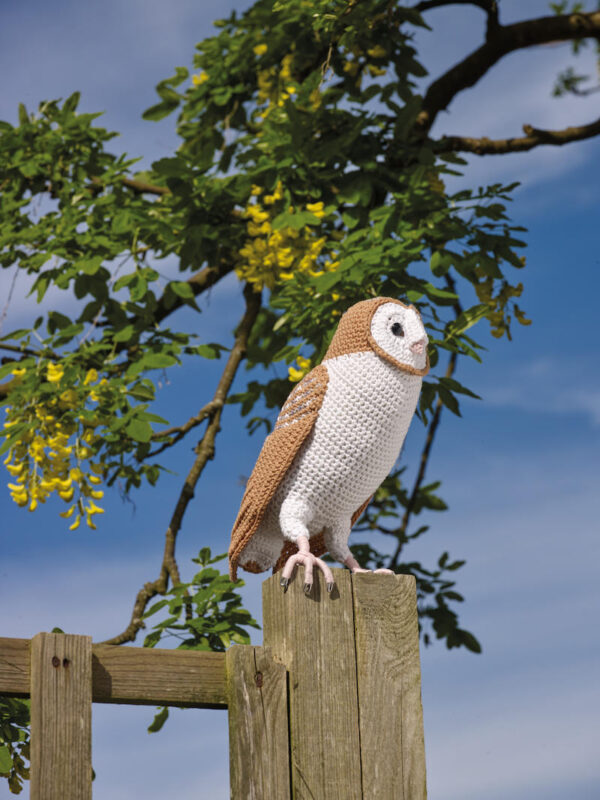
Barn Owl
Owl Crochet Pattern by Vanessa Mooncie
Published in Crocheted Birds: A flock of feathered friends to make (available through independent booksellers or here on Amazon) by Vanessa Mooncie. Text and designs © Vanessa Mooncie, 2018. Copyright in the Work © GMC Publications Ltd, 2018. Shared with permission from GMC Publications Ltd.
Add the Barn Owl crochet pattern to your Ravelry queue or favorites here.
Notes from Underground Crafter
- This pattern uses UK crochet pattern abbreviations and international stitch symbols. You can find a list of abbreviations and a comparison of US and UK pattern abbreviations here and a list of international stitch symbols here on the Craft Yarn Council website.
- Oombawka Design Crochet has helpful photo and video tutorials for the magic ring here.
- Yarn Obsession has a helpful video tutorial for the dc2tog (sc2tog in US terms) here.
Barn Owl
The facial disc of the barn owl is crocheted in rows of increased stitches, creating a curled piece that forms the shaping. The feathered details on the head and wings are embroidered, following the shape of the crochet stitches.
Materials
- Ricorumi DK, 100% cotton (63yd/57.5m per 25g ball), or any DK yarn:
- 2 x 25g balls in 053 Caramel (A)
- 2 x 25g balls in 001 White (B)
- 1 x 25g ball in 059 Mouse Grey (C)
- 1 x 25g ball in 008 Rose (D)
- 1 x 25g ball in 004 Pearl Grey (E)
- 1.75mm (UK2:US6) and 2.75mm (UK-:USC/2) crochet hooks
- Blunt-ended yarn needle
- Toy stuffing
- 42.5in (108cm) length of 32-gauge (2mm) craft wire for the legs
- 1 pair of 0.375in (10mm) looped glass teddy bear eyes or buttons
- Strong sewing thread
- Sewing needle
- Long-nose pliers
- All-purpose adhesive
Size
- Barn owl approximately 10in (25.5cm) from top of head to tip of wing
- Barn owl egg approximately 1in (2.5cm) wide by 1.375in (3cm) long
Tension
- 24 sts and 28 rows to 4in (10cm) over double crochet using 2.75mm hook
Method
- The head and body of the barn owl are worked in continuous rounds and rows of double crochet. An opening is created at the base of the body to insert the legs. The end of the body is joined by slip stitching into the back loops of the stitches from each side at the same time, forming a straight edge. The front loops of the stitches are crocheted into to begin the tail, which is worked in rows of double crochet. The wings are worked in rows of double crochet, half treble and treble stitches. The facial disc is also crocheted in rows of various stitches. The majority of stitches are increased to produce a curl in the fabric. The first few stitches from each side are joined, forming the front shaping of the face. The beak is crocheted in rounds and then folded to form a semi-circle. The stitches from each side are slip stitched together with a small amount of stuffing added before closing. The facial disc is sewn to the head and the beak is stitched in place underneath the front shaping. The eyes are sewn onto the face. The legs are made of craft wire wrapped in yarn and bent into shape. The feather markings are embroidered onto the surface of the head and wings. The owl’s eggs are worked in continuous rounds and stuffed.
- 1 ch at beg of the row/round does not count as a st throughout.

Body
Head
- Starting at the top of the head, with 2.75mm hook and A, make a magic loop (see Notes from Underground Crafter).
- Round 1: 1 ch, 6 dc into loop (6 sts).
- Round 2 (inc): (Dc2inc) 6 times (12 sts). Pull tight on short end of yarn to close loop.
- Round 3 (inc): (Dc2inc, 1 dc) 6 times (18 sts).
- Round 4 (inc): (Dc2inc, 2 dc) 6 times (24 sts).
- Round 5 (inc): (Dc2inc, 3 dc) 6 times (30 sts).
- Round 6 (inc): (Dc2inc, 4 dc) 6 times (36 sts).
- Round 7 (inc): (Dc2inc, 5 dc) times (42 sts).
- Rounds 8–16: 1 dc in each dc.
- Join B in last dc.

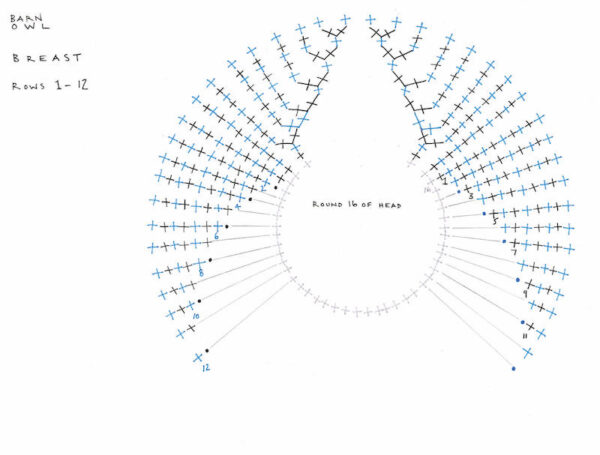
Breast
- Row 1: With B, work 1 dc in next 6 dc, sl st in next dc, turn.
- Row 2: 1 dc in same dc as sl st, 1 dc in next 7 dc, sl st in next dc, turn.
- Row 3 (inc): 1 dc in same dc as sl st, 1 dc in next 3 dc, (dc2inc) twice, 1 dc in next 4 dc, sl st in next dc, turn (44 sts).
- Row 4 (inc): 1 dc in same dc as sl st, 1 dc in next 5 dc, (dc2inc) twice, 1 dc in next 6 dc, sl st in next dc, turn (46 sts).
- Row 5 (inc): 1 dc in same dc as sl st, 1 dc in next 7 dc, (dc2inc) twice, 1 dc in next 8 dc, sl st in next dc, turn (48 sts).
- Row 6: 1 dc in same dc as sl st, 1 dc in next 21 dc, sl st in next dc, turn.
- Row 7 (inc): 1 dc in same dc as sl st, 1 dc in next 10 dc, (dc2inc) twice, 1 dc in next 11 dc, sl st in next dc, turn (50 sts).
- Row 8: 1 dc in same dc as sl st, 1 dc in next 27 dc, sl st in next dc, turn.
- Row 9 (inc): 1 dc in same dc as sl st, 1 dc in next 13 dc, (dc2inc) twice, 1 dc in next 14 dc, sl st in next dc, turn (52 sts).
- Row 10: 1 dc in same dc as sl st, 1 dc in next 33 dc, sl st in next dc, turn.
- Row 11 (inc): 1 dc in same dc as sl st, 1 dc in next 16 dc, (dc2inc) twice, 1 dc in next 17 dc, sl st in next dc, turn (54 sts).
- Row 12: 1 dc in same dc as sl st, 1 dc in next 39 dc, sl st in next dc, turn.
Shape back
- Row 13: 1 dc in same dc as sl st, 1 dc in next 41 dc; with A, work 1 dc in next 12 dc, sl st in first dc, turn.
- Row 14: With A, work 1 dc in next 12 dc; with B, work 1 dc in next 42 dc, turn.
- Row 15: With B, work 1 ch, 1 dc in next 42 dc; with A, work 1 dc in next 12 dc, sl st in first dc, turn.
- Row 16: As for row 14.
- Rows 17–28: Rep rows 15–16, 6 times.

- Row 29 (dec): With B, make 1 ch, (dc2tog, 6 dc) 5 times, dc2tog; with A, work 1 dc in next 12 dc, sl st to first dc, turn (48 sts).
- Row 30: With A, work 1 dc in next 12 dc; with B, work 1 dc in next 36 dc, turn.
- Row 31: With B, make 1 ch, 1 dc in next 36 dc; with A, work 1 dc in next 12 dc, sl st in first dc, turn.
- Row 32: As for row 30.
- Row 33 (dec): With B, make 1 ch, 1 dc in next 5 dc, (dc2tog, 6 dc) 3 times, dc2tog, 1 dc in next 5 dc; with A, work 1 dc in next 1 dc, dc2tog, 1 dc in next 6 dc, dc2tog, 1 dc in next dc, turn (42 sts).
- Row 34: With A, work 1 dc in next 10 dc; with B, work 1 dc in next 32 dc, turn.

Leg opening
- The following is worked in rounds.
- Round 1: With B, make 1 ch, 1 dc in next 8 dc, 16 ch, skip next 16 dc, 1 dc in next 8 dc; with A, work 1 dc in next 10 dc.
- Round 2: With B, work 1 dc in next 8 dc, 1 dc in next 16 ch, 1 dc in next 8 dc; with A, work 1 dc in next 10 dc, turn.

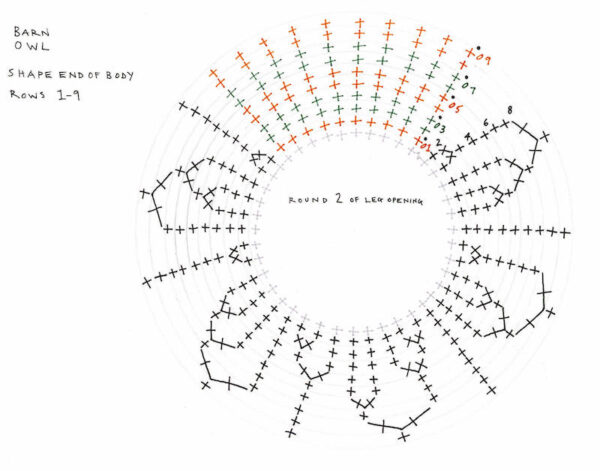
Shape end of body
- The following is worked in rows.
- Row 1 (WS): With A, make 1 ch, 1 dc in next 10 dc; with B, work 1 dc in next 32 dc, sl st in first dc, turn.
- Row 2 (RS) (dec): With B, work (dc2tog, 4 dc) 5 times, dc2tog; join C in last dc, 1 dc in next 10 dc with C, turn (36 sts).
- Row 3: With C, make 1 ch, 1 dc in next 10 dc; with B, work 1 dc in next 26 dc, sl st in first dc, turn.
- Row 4 (dec): With B, work 1 dc in next 2 dc, (dc2tog, 2 dc) 6 times; with A, work 1 dc in next 10 dc, turn (30 sts).
- Row 5: With A, make 1 ch, 1 dc in next 10 dc; with B, work 1 dc in next 20 dc, sl st in first dc, turn.
- Row 6 (dec): With B, work 1 dc in next dc, (dc2tog, 2 dc) 4 times, dc2tog, 1 dc in next dc; with C, work 1 dc in next 10 dc, turn (25 sts).
- Row 7: With C, make 1 ch, 1 dc in next 10 dc; with B, work 1 dc in next 15 dc, sl st in first dc, turn.
- Row 8 (dec): With B, work (dc2tog, 1 dc) 5 times; with A, work 1 dc in next 10 dc, turn (20 sts).
- Row 9: With A, make 1 ch, 1 dc in next 10 dc; with B, work 1 dc in next 10 dc, sl st in first dc, do not turn.
Join edges
- Next: Flatten the end with WS together and the next dc at the corner of the work. With B, make 1 ch, sl st into back loop only of next 10 sts on both sides at the same time to join, turn so RS of back of owl is facing.

Tail
- Row 1 (RS): With C, work 1 dc in remaining front loops of next 10 dc of row 9; with B, work 1 dc in front loops of next 10 dc, sl st in first dc, turn.
- Row 2 (WS): Continuing in both loops of each st; with B, work 1 dc in next 10 dc; with
C, work 1 dc in next 10 dc, turn. - Row 3: With A, make 1 ch, 1 dc in next 10 dc; with B, work 1 dc in next 10 dc, sl st in first dc, turn.
- Row 4: With B, work 1 dc in next 10 dc; with A, work 1 dc in next 10 dc, turn.
- Row 5: With C, make 1 ch, 1 dc in next 10 dc; with B, work 1 dc in next 10 dc, sl st in first dc, turn.
- Row 6: With B, work 1 dc in next 10 dc; with C, work 1 dc in next 10 dc, turn.
- Round 7 (dec): With A, make 1 ch, (dc2tog, 6 dc, dc2tog); with B, work (dc2tog, 6 dc, dc2tog), sl st in first dc, turn (16 sts).
- Row 8: With B, work 1 dc in next 8 dc; with A, work 1 dc in next 8 dc.
- Row 9 (dec): With A, make 1 ch, (dc2tog, 4 dc, dc2tog) twice, sl st in first dc (12 sts).
- Break yarn and thread through the last row, pull up tight to close the opening and fasten off.

Left thigh
- With RS of body facing and 2.75mm hook, skip the first 10 dc of the 16 dc of the opening for the legs and rejoin B to the next dc with a sl st.
- Row 1 (RS): 1 dc in same dc as sl st, 1 dc in next 5 dc, 1 dc in reverse side of next 6 ch, turn (12 sts).
- Row 2 (WS): 1 ch, 1 dc in each dc, turn.
- Rows 3–4: As for row 2.
- Row 5: 1 ch, (dc2tog, 2 dc) 3 times, turn (9 sts).
- Rows 6–8: As for row 2.
- Row 9: 1 ch, (dc2tog, 1 dc) 3 times (6 sts).
- Row 10: As for row 2. Fasten off, leaving a long tail of yarn at the end.

Right thigh
- With RS of body facing and 2.75mm hook, skip the 4 ch by the left leg and rejoin B to the reverse side of the next ch with a sl st.
- Row 1 (RS): 1 dc in same ch as sl st, 1 dc in reverse side of next 5 ch, 1 dc in next 6 dc of opening, turn (12 sts).
- Rows 2–10: As for rows 2–10 of left thigh (6 sts). Fasten off, leaving a long tail of yarn at
the end.

Facial disc
- With 2.75mm hook and B, make 27 ch.
- Row 1 (RS): 1 dc in 2nd chain from hook, 1 dc in next 4 ch, 1 htr in next ch, tr2inc, htr2inc, (dc2inc) twice, 1 htr in next ch, tr2inc, 1 tr in next 2 ch, tr2inc, 1 htr in next ch, (dc2inc) twice, htr2inc, tr2inc, 1 htr in next ch, 1 dc in next 5 ch, turn (36 sts).
- Row 2 (WS) (inc): 1 ch, 1 dc in next 4 sts, (dc2inc) twice, htr2inc, (tr2inc) 22 times, htr2inc, (dc2inc) twice, 1 dc in next 4 sts (64 sts).

Join centre front of face
- Next: With WS together, make 1 ch, sl st into back loop only of next 10 sts on both sides at the same time to join, turn. Fasten off, leaving a long tail of yarn at the end.

Feathered edging
- With RS of facial disc facing and 2.75mm hook, join A with a sl st to the back loop only of the first of the remaining 44 sts.
- Next: 1 dc in same st as sl st, 1 dc in next 3 sts, (dc2inc, 4 dc) 8 times (52 sts). Fasten off.

Wings (make 2)
- With 2.75mm hook and A, make a magic loop.
- Row 1: 1 ch, 6 dc into loop, turn (6 sts).
- Row 2: 1 ch, 1 dc in each dc, turn.
- Row 3 (inc): 1 ch, (dc2inc) 6 times, turn (12 sts). Pull tight on short end of yarn to close loop.
- Row 4: 1 ch, 1 dc in each dc, turn.
- Row 5 (inc): 1 ch, (dc2inc, 1 dc) 6 times, turn (18 sts).
- Row 6: 1 ch, 1 dc in each dc, turn.
- Row 7 (inc): 1 ch, (dc2inc, 2 dc) 6 times, turn (24 sts).
- Row 8: 1 ch, 1 dc in each dc, turn.
- Row 9: 1 ch, 1 dc in each dc to last 2 sts, dc2tog (23 sts).
- Row 10 (dec): 1 ch, dc2tog, 1 dc in each dc to end, turn (22 sts).
- Rows 11–14: Rep rows 9–10, twice (18 sts).

- Row 15: 1 ch, 1 dc in next 5 dc, sl st in next dc, turn.
- Row 16 (inc): 1 dc in same dc as sl st, 1 dc in next dc, 1 htr in next dc, htr2inc, 1 tr in next dc, tr2inc, turn (20 sts).
- Row 17: 1 ch, 1 dc in next 8 sts, sl st in next dc, turn.
- Row 18 (inc): 1 dc in same dc as sl st, 1 dc in next 4 dc, 1 htr in next dc, htr2inc, 1 tr in next dc, tr2inc, turn (22 sts).
- Row 19: 1 ch, 1 dc in next 11 sts, sl st in next dc, turn.
- Row 20 (inc): 1 dc in same dc as sl st, 1 dc in next 5 dc, 1 htr in next 3 dc, htr2inc, 1 tr in next dc, tr2inc, turn (24 sts).
- Row 21: 1 ch, 1 dc in next 14 sts, sl st in next dc, turn.
- Row 22 (inc): 1 dc in same dc as sl st, 1 dc in next 6 dc, 1 htr in next 5 dc, htr2inc, 1 tr in next dc, tr2inc, turn (26 sts).
- Row 23 (inc): 1 ch, dc2inc, 1 dc in next 17 sts, sl st in next dc, turn (27 sts).
- Row 24 (inc): 1 dc in same dc as sl st, 1 dc in next 8 dc, 1 htr in next 8 dc, htr2inc, 1 tr in next dc, tr2inc, turn (29 sts).
- Row 25 (inc): 1 ch, dc2inc, 1 dc in next 22 sts, sl st in next dc, turn (30 sts).
- Row 26 (inc): 1 dc in same dc as sl st, 1 dc in next 11 dc, 1 htr in next 10 dc, htr2inc, 1 tr in next dc, tr2inc, turn (32 sts).
- Row 27 (inc): 1 ch, dc2inc, 1 dc in next 27 sts, sl st in next dc, turn (33 sts).
- Row 28 (inc): 1 dc in same dc as sl st, 1 dc in next 15 dc, 1 htr in next 11 dc, htr2inc, 1 tr in next dc, tr2inc, turn (35 sts).
- Row 29 (inc): 1 ch, dc2inc, 1 dc in next 32 sts, sl st in next dc, turn (36 sts).
- Row 30 (inc): 1 dc in same dc as sl st, 1 dc in next 19 dc, 1 htr in next 12 dc, htr2inc, 1 tr in next dc, tr2inc, turn (38 sts).
- Row 31 (inc): 1 ch, dc2inc, 1 dc in next 36 sts, sl st in next dc (39 sts).
- Fasten off, leaving a long tail of yarn at the end.

Beak
- With 1.75mm hook and D, make a magic loop.
- Rounds 1–3: Follow the instructions and chart for rounds 1–3 of Head above (18 sts).

Join centre front of beak
- Next: Fold the piece in half, matching the last round of stitches and with the next dc at the corner. Make 1 ch, sl st into back loop only of next 9 sts on both sides at the same time to join, pushing a small amount of stuffing into the beak before closing. Fasten off, leaving a long tail of yarn at the end.
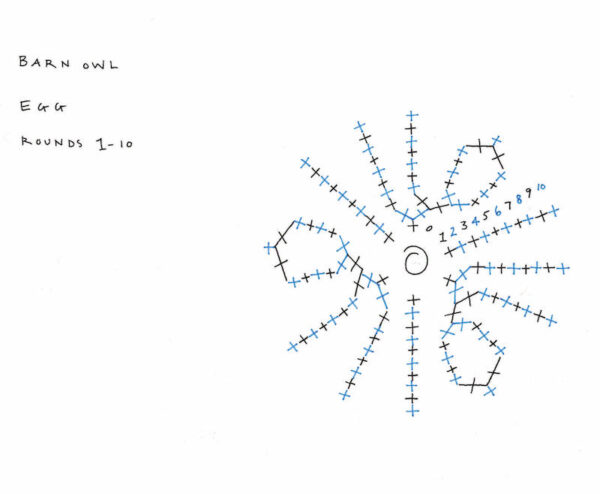
Egg (make 4–6)

- With 2.75mm hook and B, make a magic loop.
- Round 1: 1 ch, 6 dc into loop (6 sts).
- Round 2 (inc): (Dc2inc, 1 dc) 3 times (9 sts). Pull tight on short end of yarn to close loop.
- Round 3 (inc): (Dc2inc, 2 dc) 3 times (12 sts).
- Round 4 (inc): (Dc2inc, 3 dc) 3 times (15 sts).
- Rounds 5–8: 1 dc in each dc.
- Round 9 (dec): (Dc2tog, 3 dc) 3 times (12 sts).
- Round 10: 1 dc in each dc.
- Break yarn and thread through rem sts. Stuff egg, pull end of yarn tight to close the opening and fasten off.
Making up
Body and legs
- Stuff the body firmly, leaving a gap at the opening of the body to insert the legs. Follow the instructions to make the legs (see below). Make the talons 1.125in (3cm) long and wrap the wire in yarn D. Slip the legs into the opening at the base of the bird and adjust them so the owl stands without tipping over. Add plenty of extra stuffing inside the body until it is firm. Sew together the opening of the body and stuff the thighs before sewing the inside leg seams. Thread the yarn through the stitches of the last round of each thigh, pull up tight around the leg and fasten off. Following the shape of the double crochet stitches, embroider V-shaped stitches for the feather markings in B, C and E over the top of the head and neck.

Birds’ legs
The birds’ legs are made using wire that is bent into shape and wrapped in yarn. Choose a wire that is not too soft, as it could snap if overworked and may buckle under the weight of the bird.
Materials
- See each bird pattern for specified yarn and length of wire required
- Long-nose pliers
- All-purpose adhesive
- Using long-nose pliers, make a bend in the wire 6.75in (17cm) from each end for the swan, barn owl and bald eagle, or 0.375in (1cm) from each end for all other birds. Make three toes by bending the wire back on itself to the length stated in the pattern. Squeeze together with the pliers. For all birds excluding the swan, make a fourth toe the same length at the back of the foot.
- Wrap the short length left at each end of the smaller birds’ legs around the ankle to keep the wire toes in position and squeeze the wire end with the pliers. For the swan, barn owl and bald eagle, wrap the longer lengths of wire left at each end around the wire that joins both feet together, so the legs are double thickness. Use the pliers to squeeze the two sharp ends around the top of the wire legs where they will be hidden inside the body, securing them in place. Twist the bird’s feet so they both face the same direction.
- On each bird, bend the length of wire between the feet into a curved shape to fit inside the body of the bird. Bend the tips of the toes downwards to shape the feet and bend the legs into position. (Note: Illustration shows legs of smaller birds.)
- Starting at the ankle, wind the yarn around the wire. Bring the yarn to the end of each toe and then wind it evenly and tightly back along the length to the ankle. Wrap the yarn over the curved legs and around the toes of the other foot in the same way. Secure the end of the yarn with a dab of all-purpose adhesive and allow to dry.

Facial disc, beak and eyes
- Use the tail of yarn B left after fastening off to sew the outer edges of the facial disc to the head, leaving the inner edges and feathered edging unstitched. With the curved, joined edges at the top, position the beak underneath the centre front of the facial disc so the tip of the beak protrudes. Stitch the top end of the beak to the head. Wrap the front of the facial disc around the beak and sew the inner edges down to the head on each side of the beak. Use strong thread to sew the eyes to the head (see below).
Eyes
As these birds are decorative and unsuitable for children, glass teddy bear eyes with wire loops can be sewn onto your finished project. The birds in this book have glass eyes, but you can also use buttons made for dolls’ clothes, or beads.
Mark the position of both eyes on the bird’s head with glass-headed pins. If using glass eyes with wire loops, use a yarn needle to make a hole at the markers. This will make it easier to insert the wire loop when attaching the eyes. Use strong sewing thread to sew on glass eyes, such as upholstery or buttonhole thread, matching the colour of the bird’s head. Check the thread you are going to use does not break easily. Beeswax can be used to strengthen all-purpose sewing thread. Draw the thread across the beeswax a few times to coat it.
Attaching glass teddy bear eyes
- Cut a length of strong sewing thread, such as upholstery or buttonhole thread. It should be four times the total measurement of the depth of the head, from front to back, plus approximately 4–6in (10–15cm) extra. Double the thread and pass both loose ends through the wire loop of the glass eye. If using all-purpose sewing thread coated with beeswax, cut the length eight times the total measurement, and double it twice before using it to attach the eyes, as it is finer than the strong sewing thread.
- Thread both the ends of thread onto the yarn needle and insert the needle at the point of the marker, right through to the back of the head. Leave the ends of the thread hanging at the back of the head. Attach the second eye in the same way, pulling the threads through to the back of the head, close to the threads
of the first eye. - Remove the needle and pull tight on the threads of both eyes. Check the position of the eyes and tie the threads together, knotting them securely. Thread all the strands onto the needle and pull them through to the inside of the bird to hide the ends. Trim the excess ends that poke out of the bird.

Wings
- Flip one wing so the wings mirror each other and embroider markings as for the head and neck. Position the wings on the owl with the last row at the lower edge of each wing. Use the tail
of yarn left after fastening off to sew the top, curved edge of each wing to the body.
- Weave in the short ends of yarn.

Giveaway
After reading my review of Crocheted Birds by Vanessa Mooncie and trying out the Barn Owl crochet rug pattern, you are probably ready to get your hands on this book! You can buy it now through independent booksellers or on Amazon, or enter the giveaway below by 11:59 p.m. Eastern on Sunday, April 24, 2022 for your chance to win my review copy. While my copy of the book was provided by GMC Publications Ltd, the giveaway is organized by Underground Crafter. Enter using any of the options on the Rafflecopter widget below. One winner will be chosen from the entries at random to win my review copy of the book. Winner will be contacted approximately 1 week after the entries close. Winner will have 3 days to claim the prize. If winner does not respond within 3 days, prize will be awarded to an alternate. By entering this giveaway, you are agreeing to share your contact information with Rafflecopter and/or Underground Crafter. You can read the Rafflecopter Privacy Policy here and the Underground Crafter Privacy Policy here to understand how this information is used. This giveaway is open worldwide, except where prohibited by law. Good luck!
a Rafflecopter giveaway
Love what I see and would love the book! Mary
What a beautiful pattern. This is definitely a book I need.
Thank you for the review and pattern
What a great review! I love this owl.
OH my love the review and love the owl. thank you so much can not wait to make this.