
Sweet Summer Tee

It’s just starting to get warm here in Montreal, and I am so excited! My husband and I just recently moved into a new complex, and we found a huge nature reserve (huge for being in the city) that is just a 20 minute walk from our house. I’m so happy that it’s there! The other day, we took a walk, and there was an entire family of foxes playing in the field! Mommy Fox, Daddy Fox, and 3 kits! It was really fun and relaxing to watch them frolic around for awhile.
I hope the start of your summer is going well, too! Now, let’s get to the pattern!
ABOUT THIS Design:
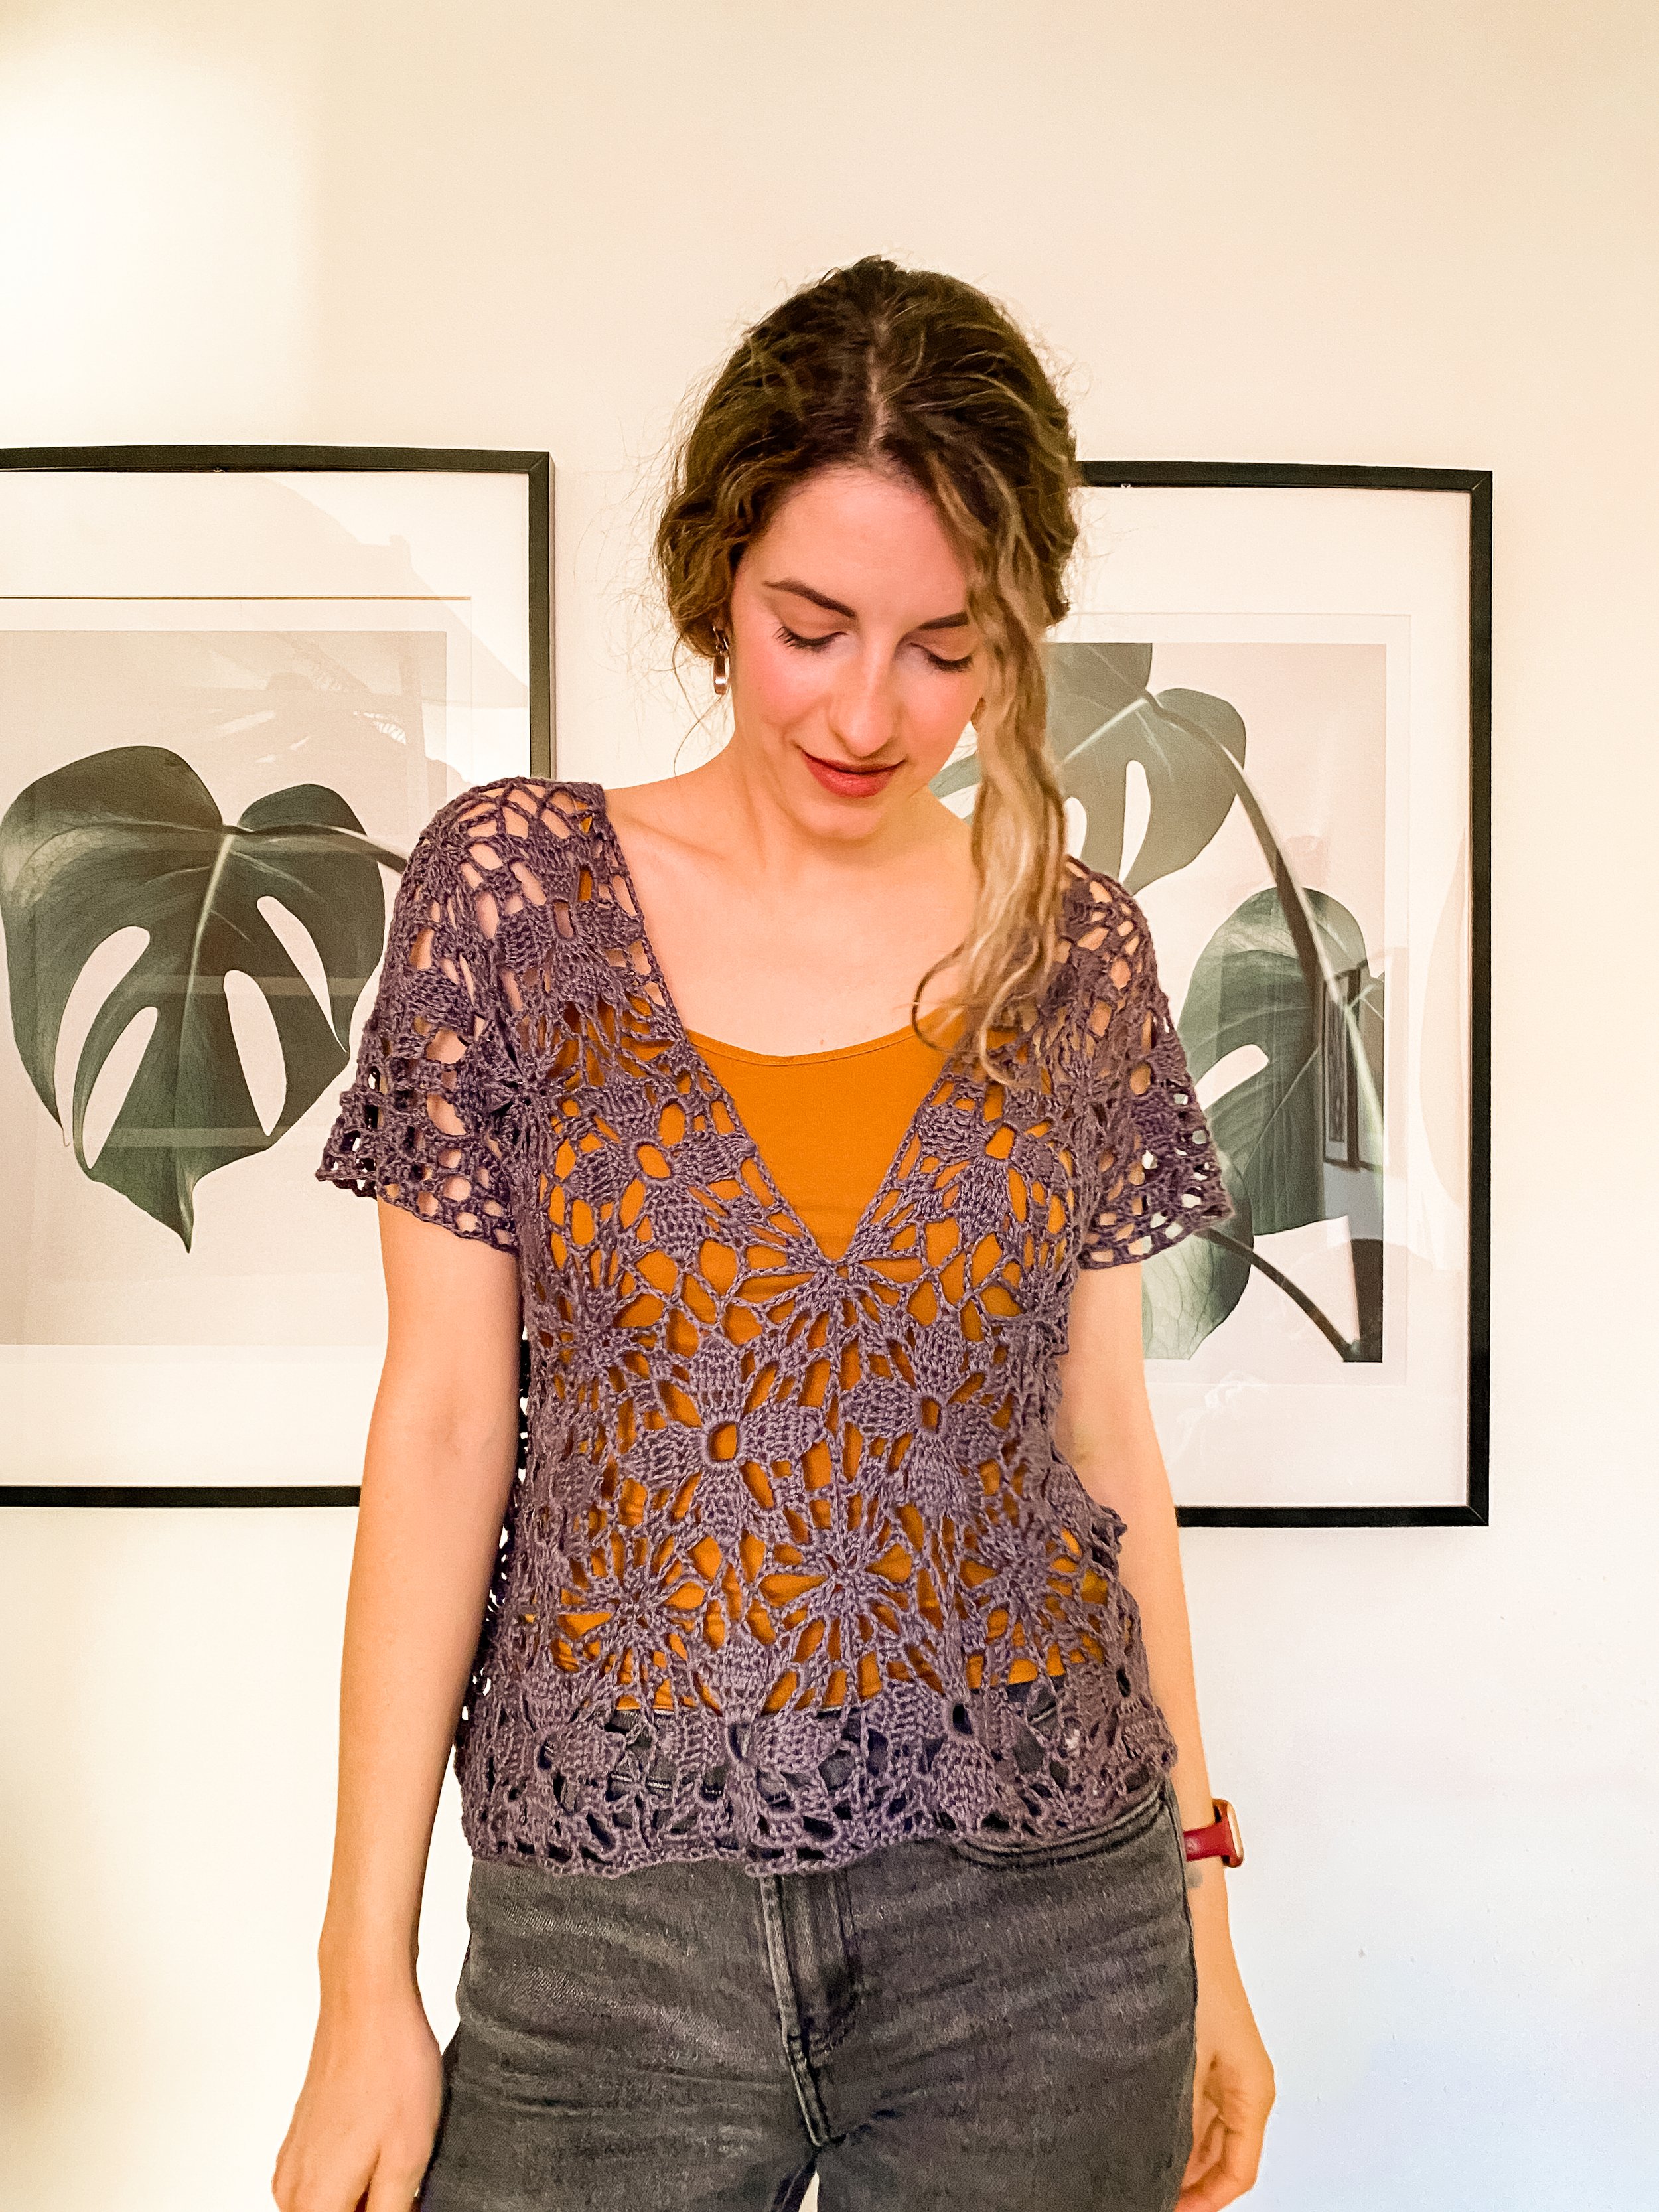
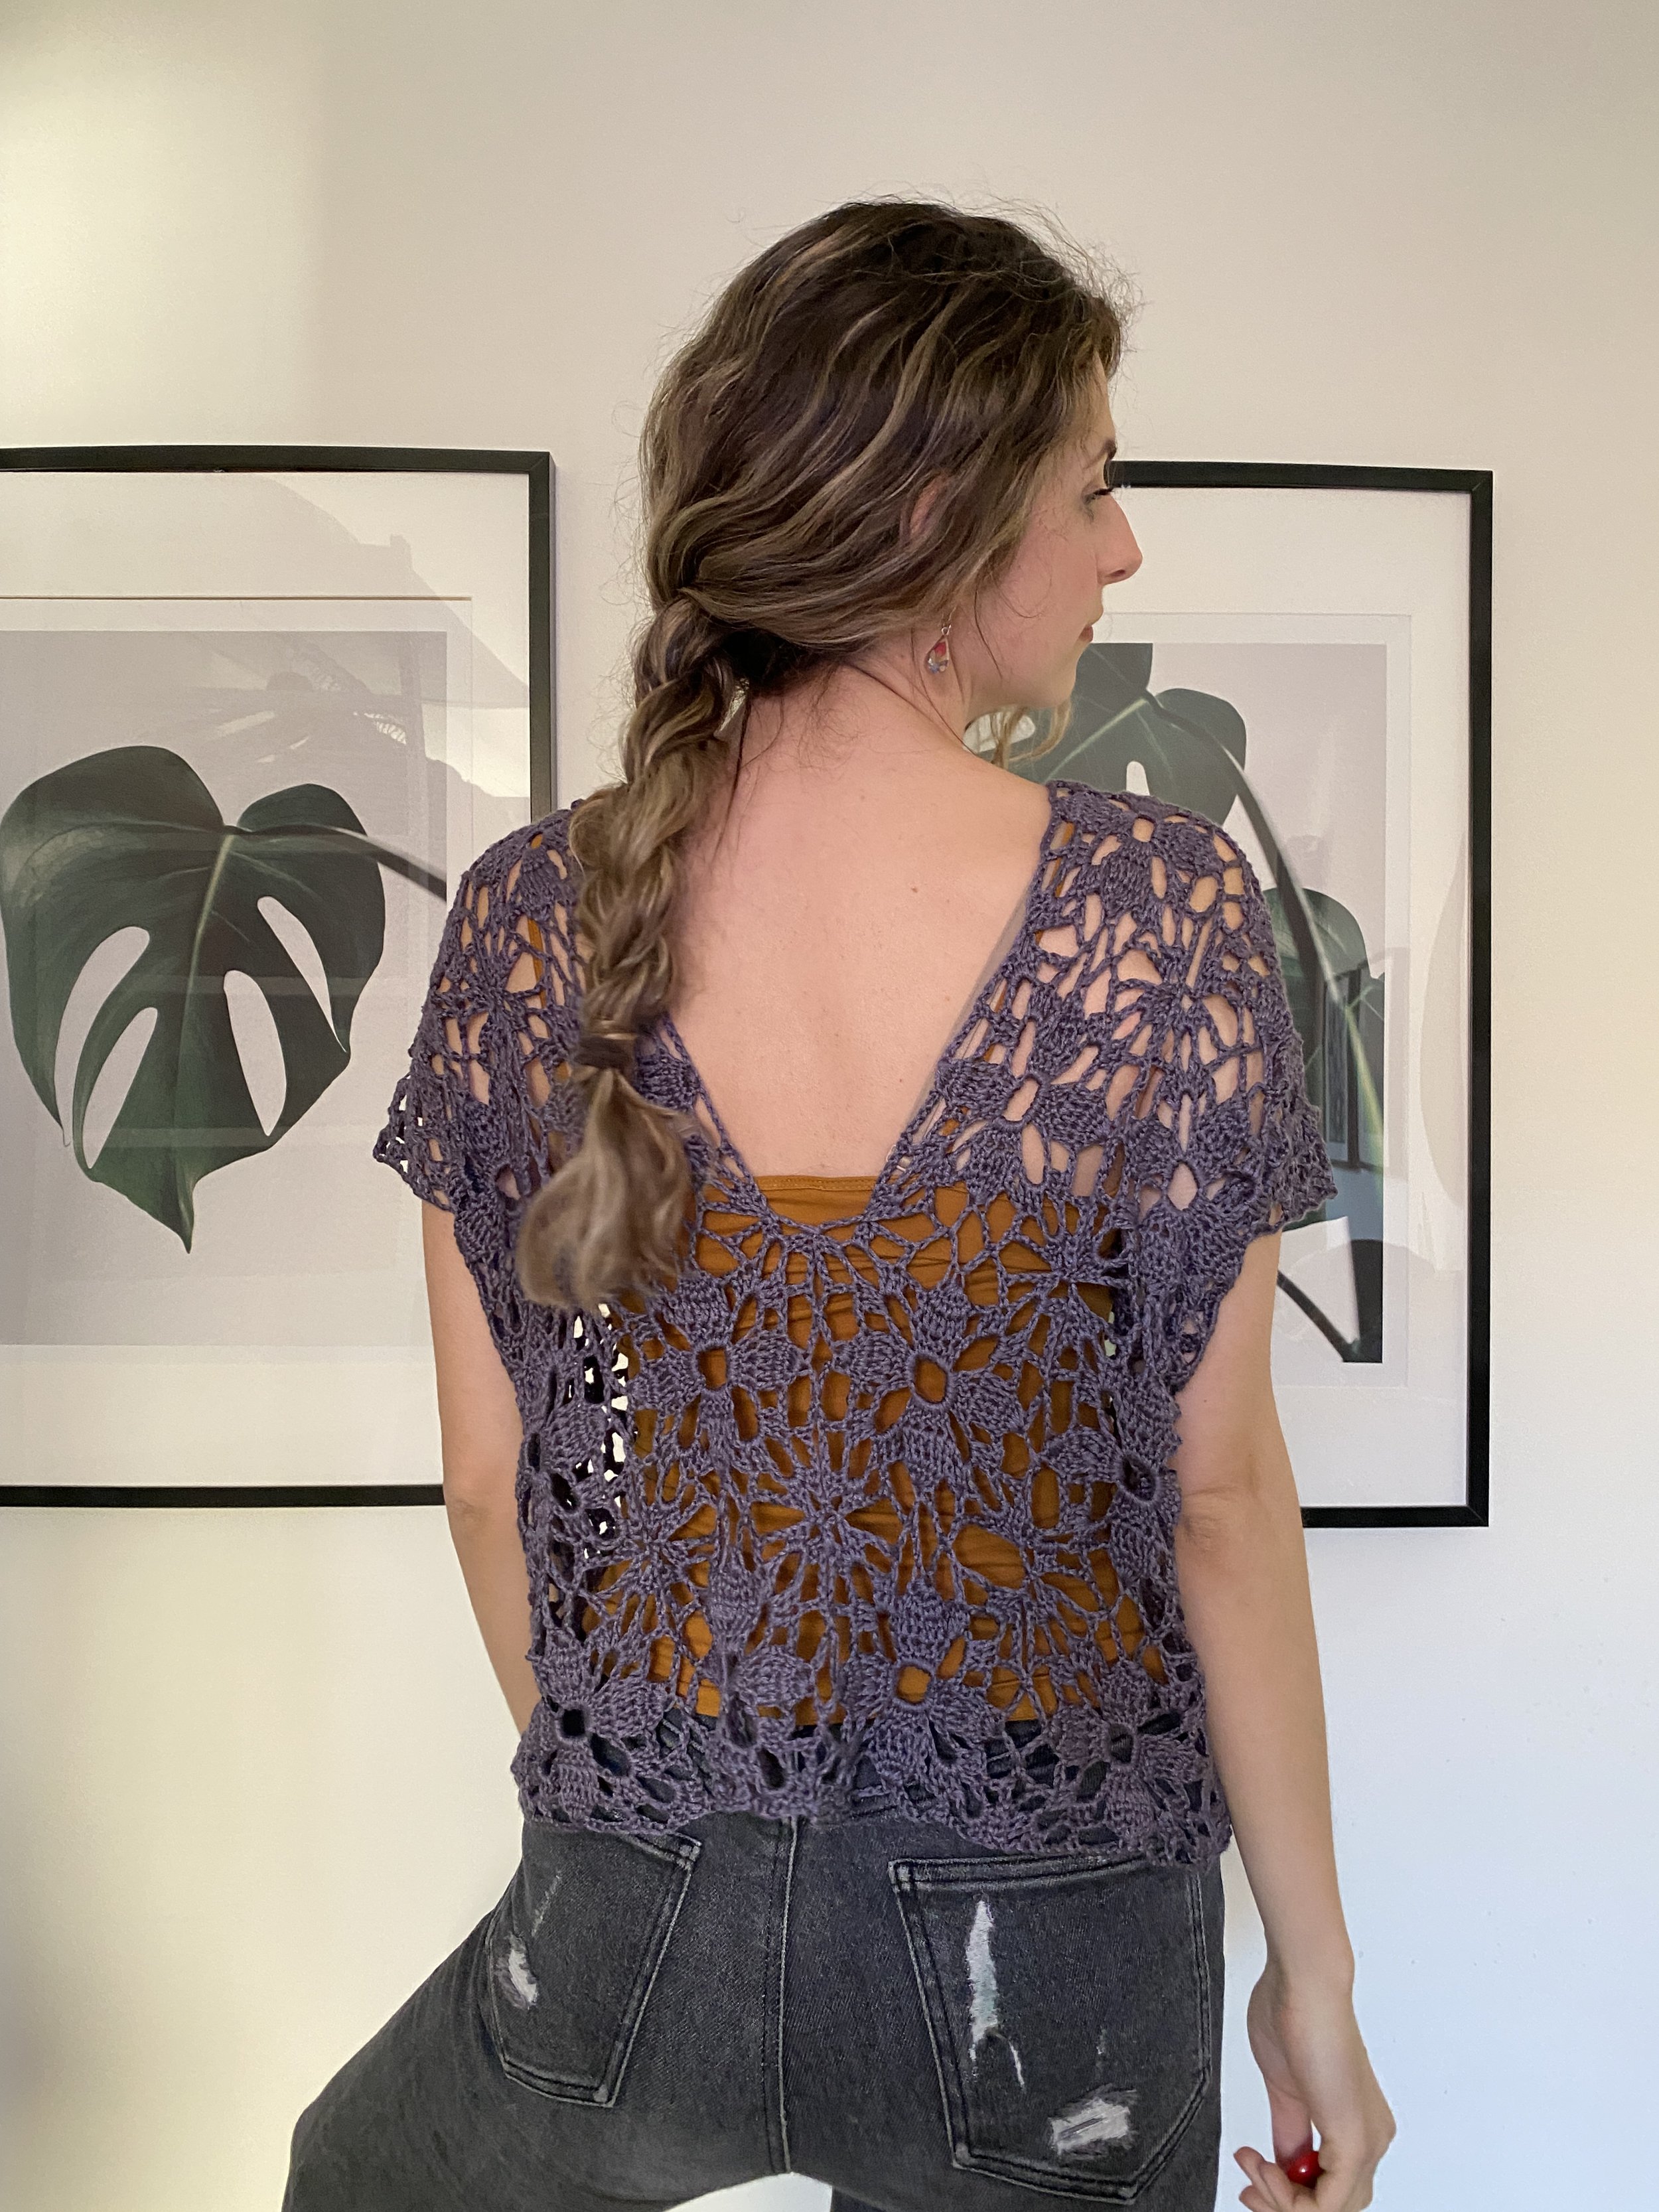
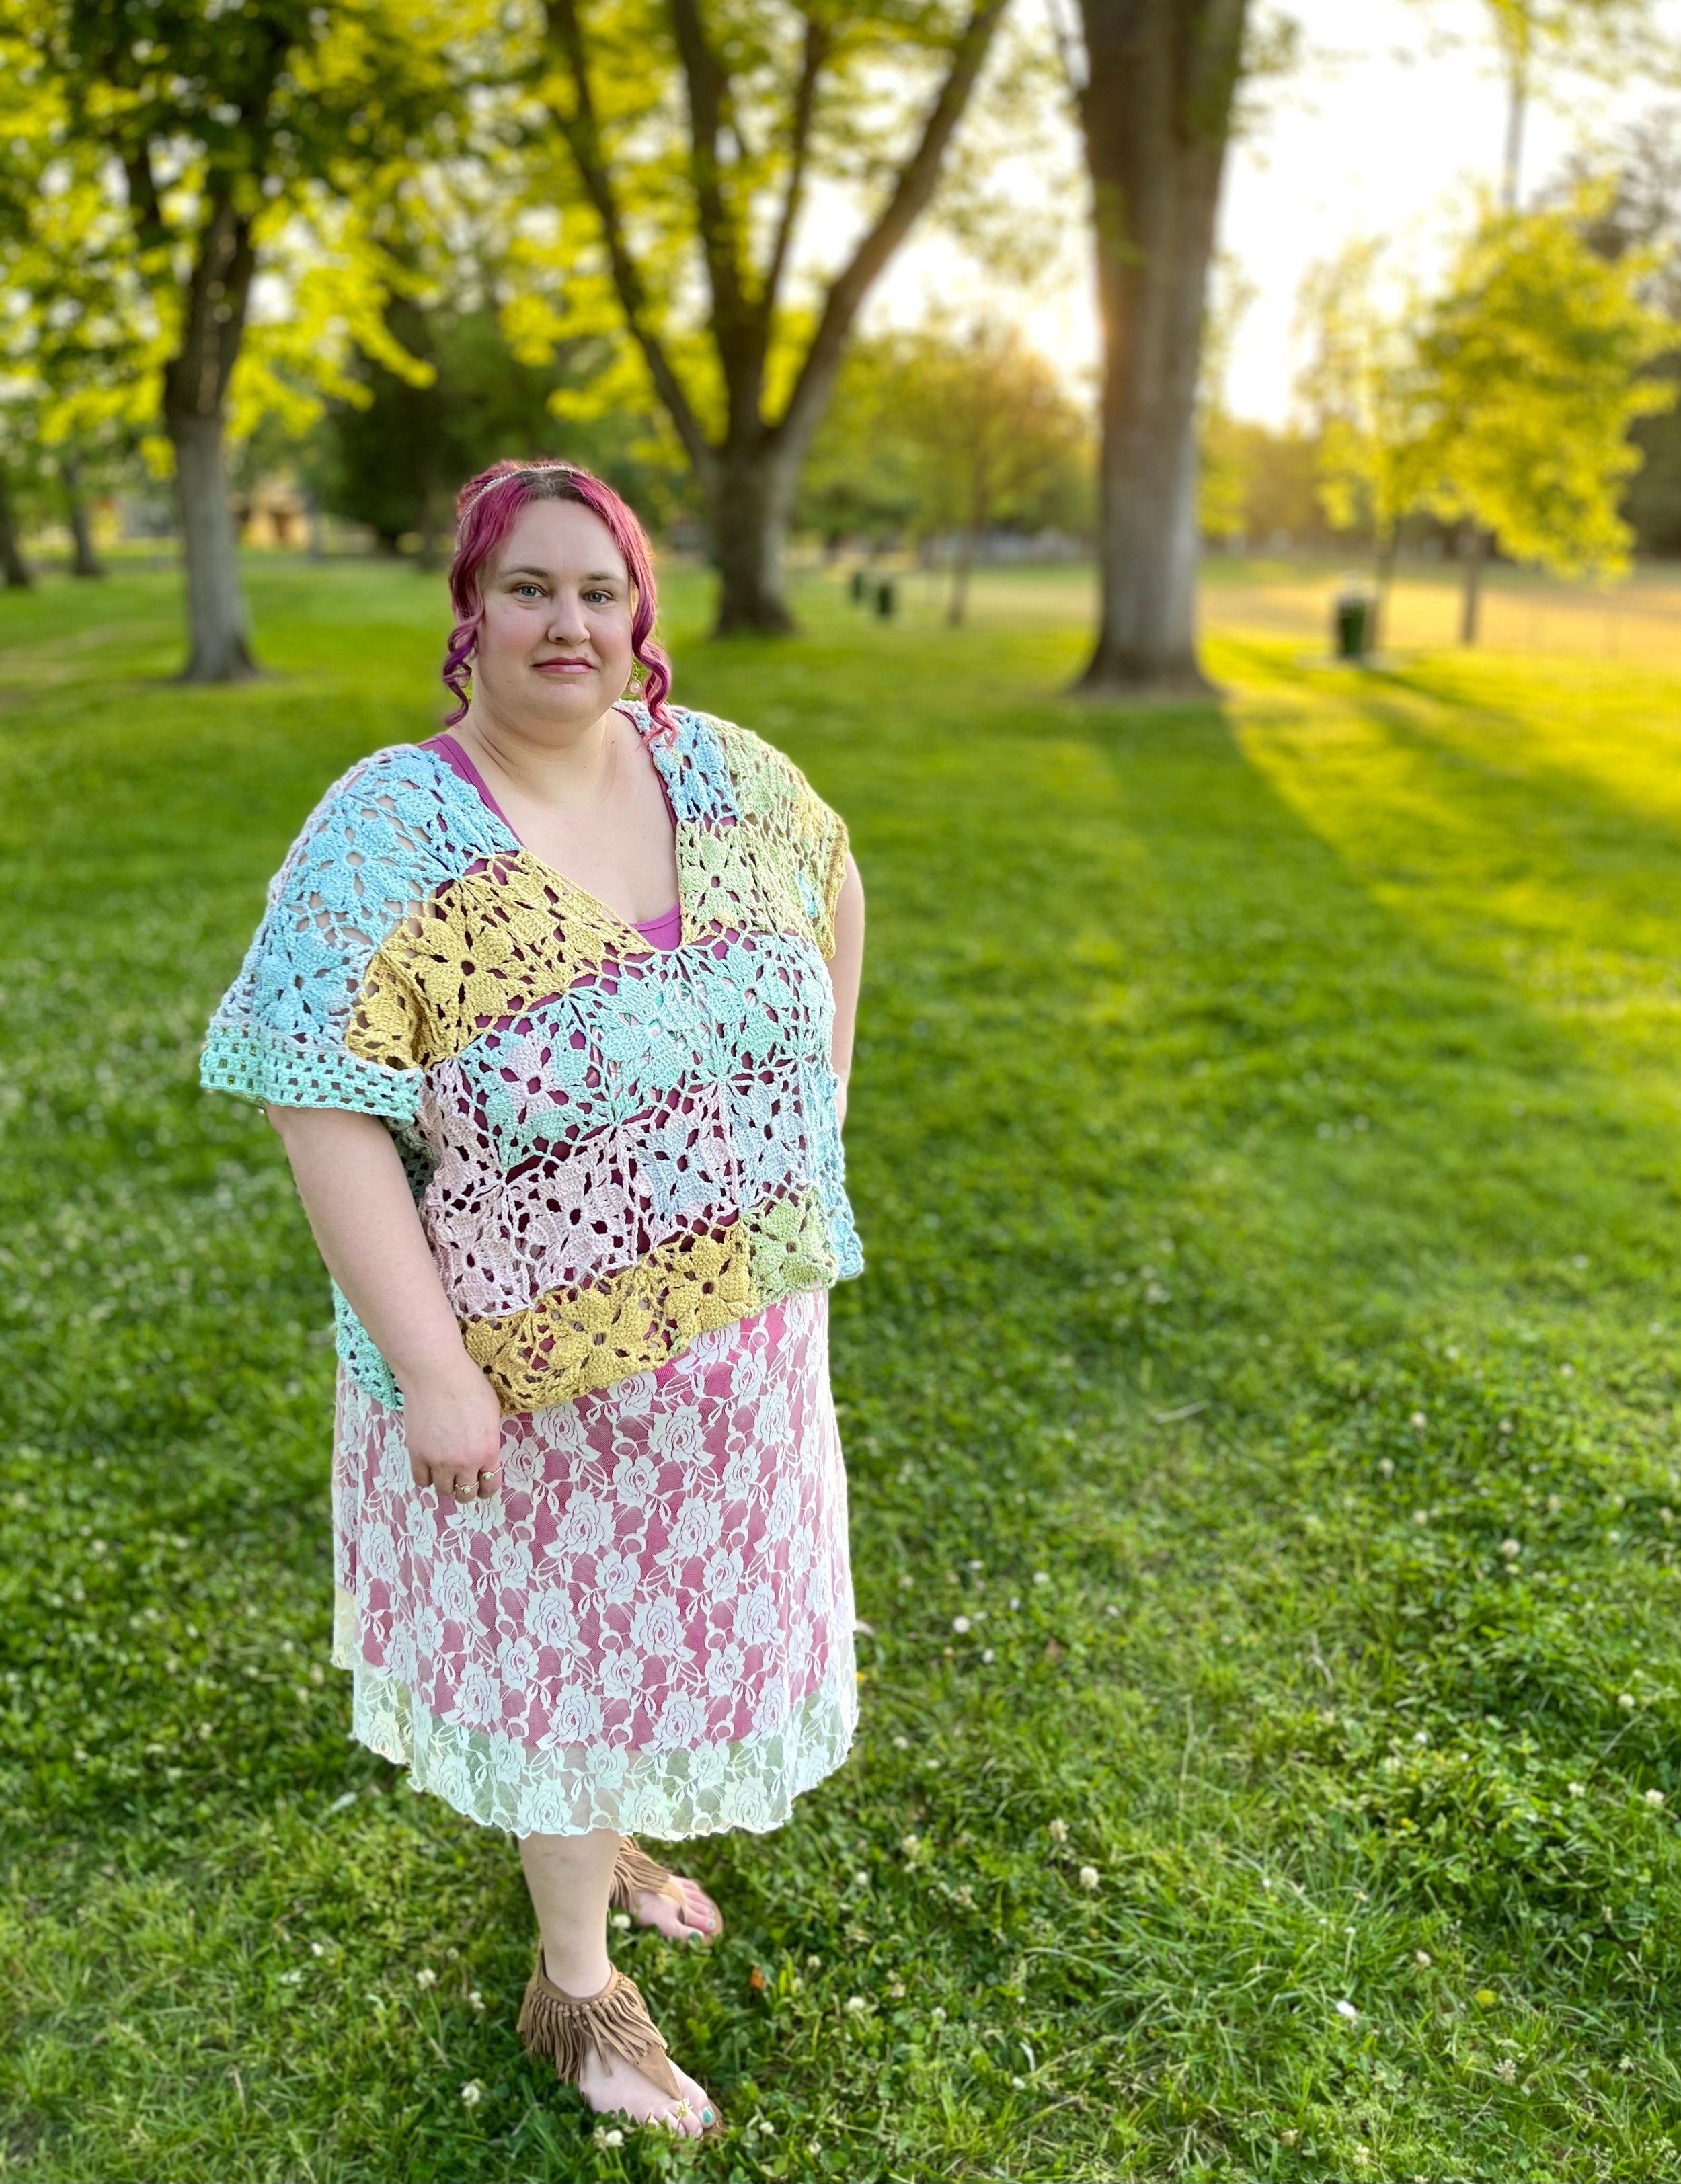
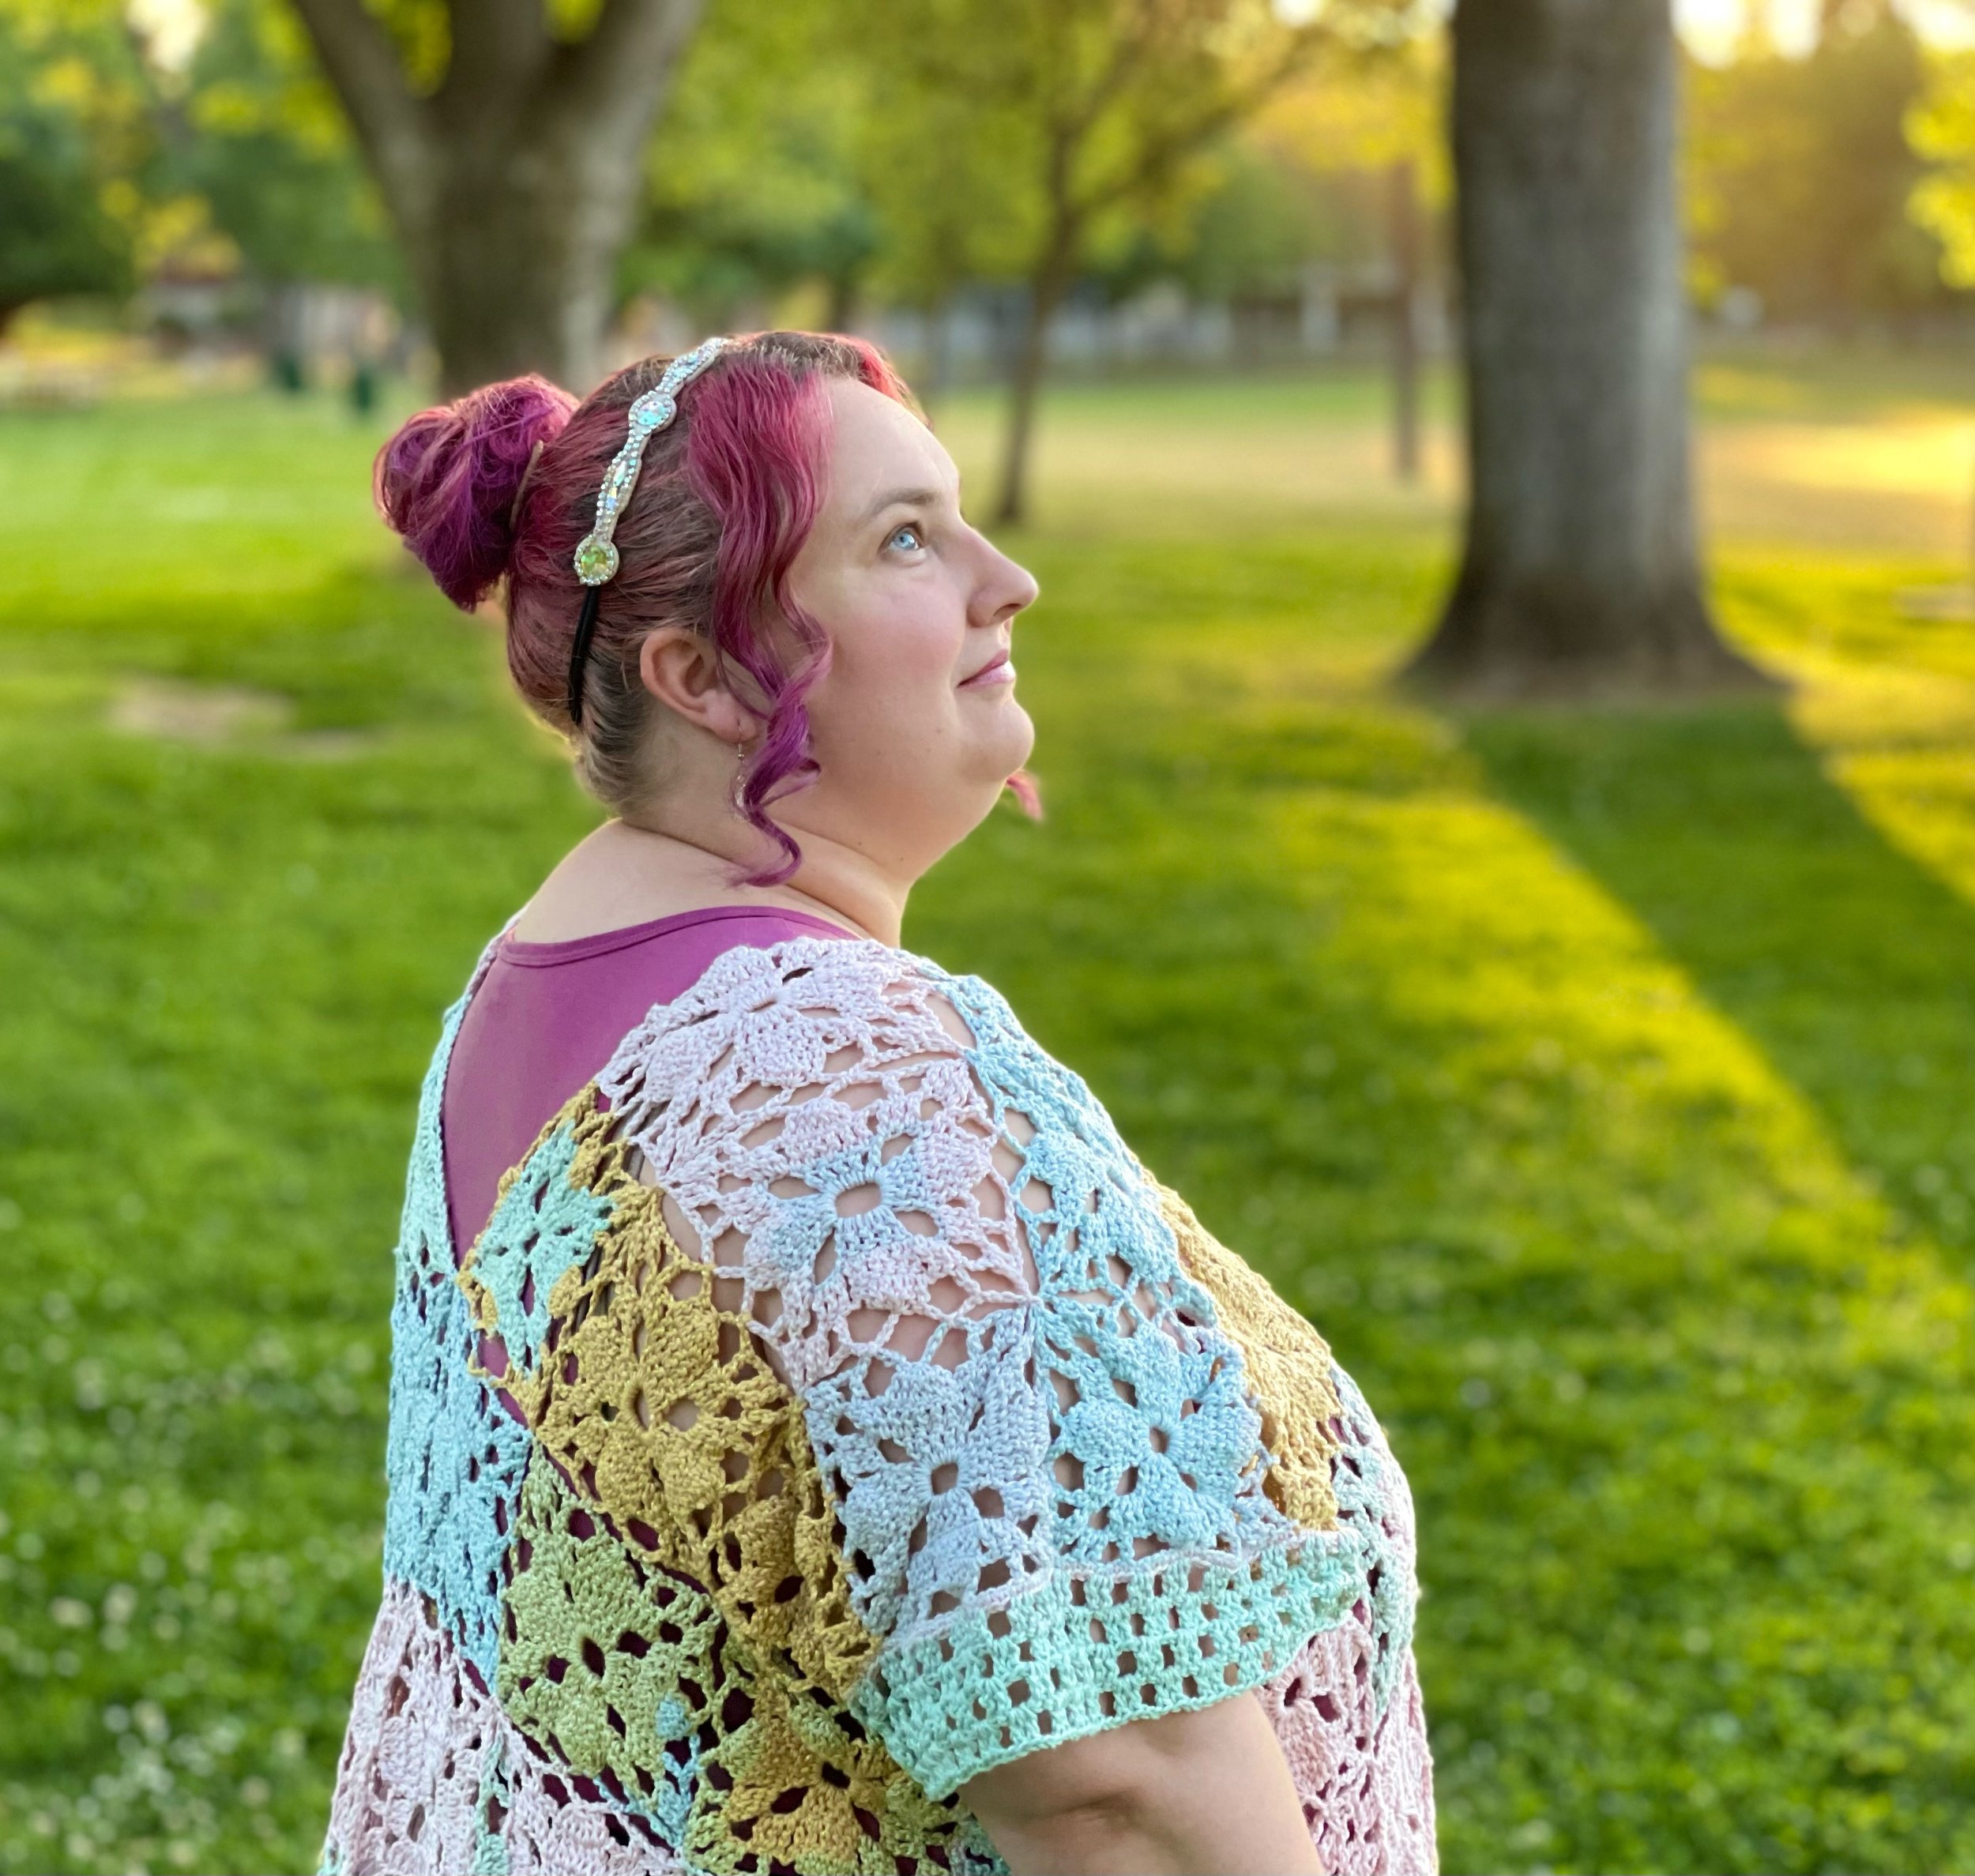
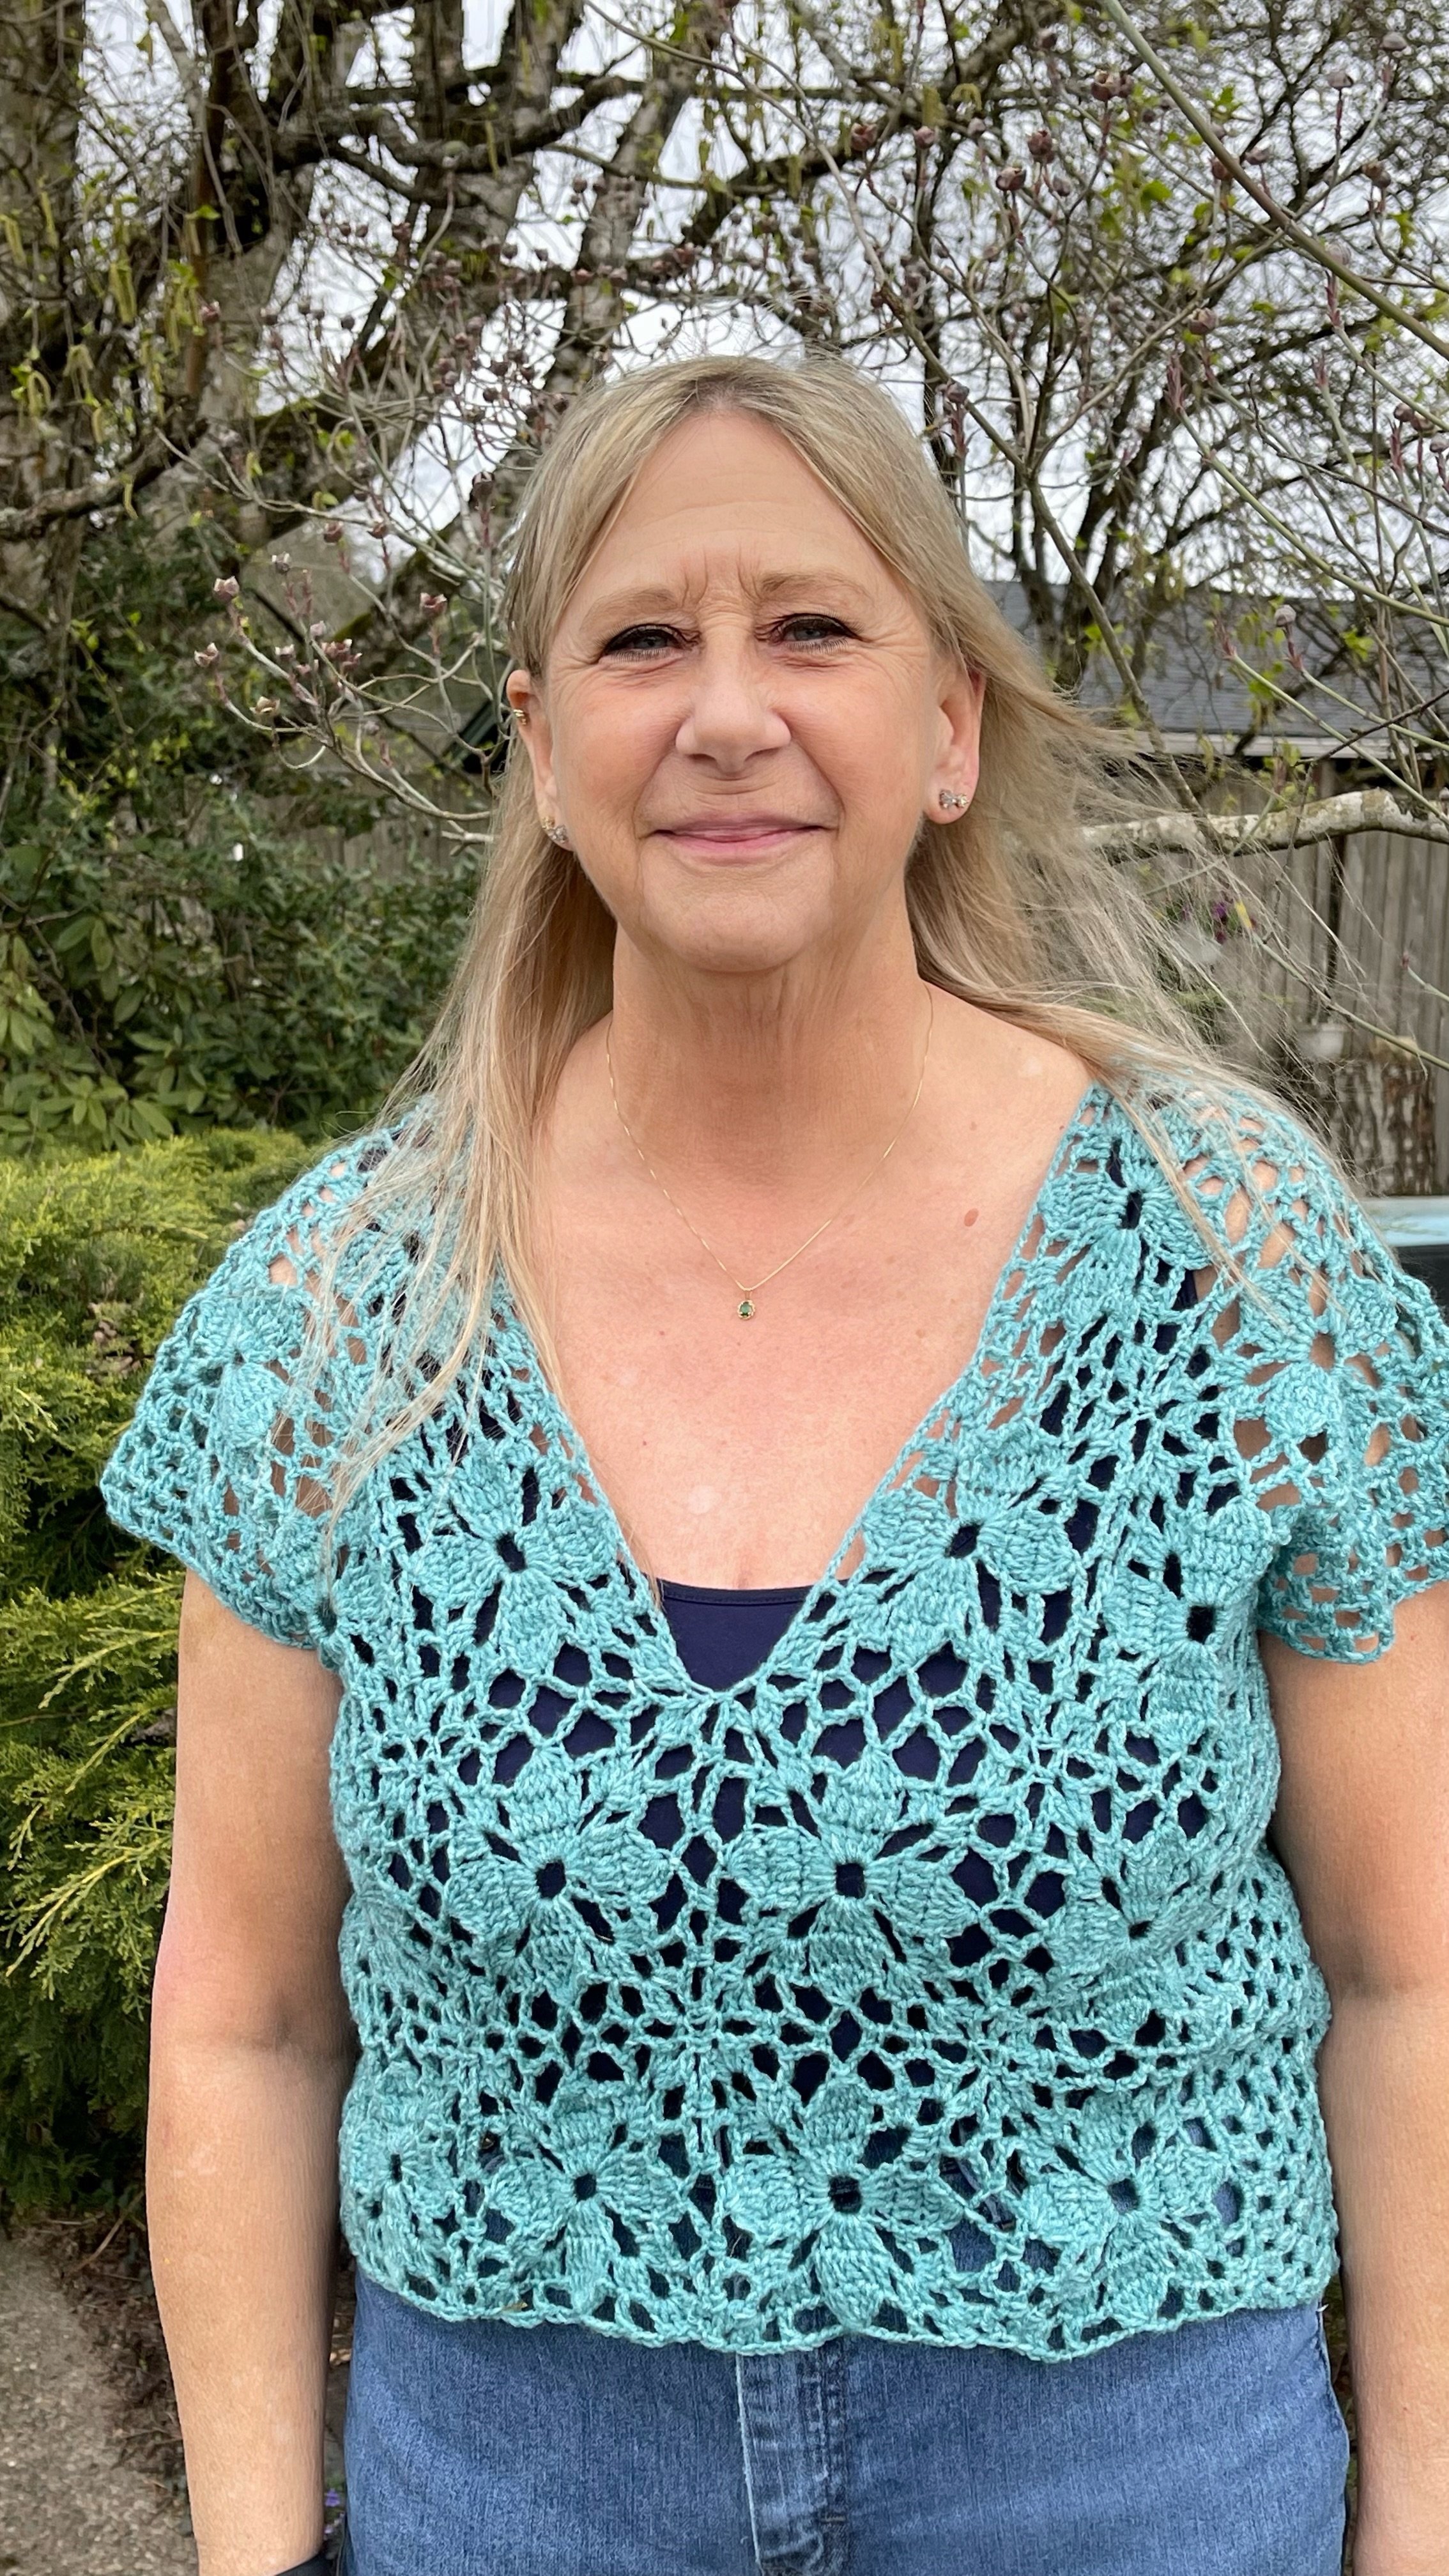
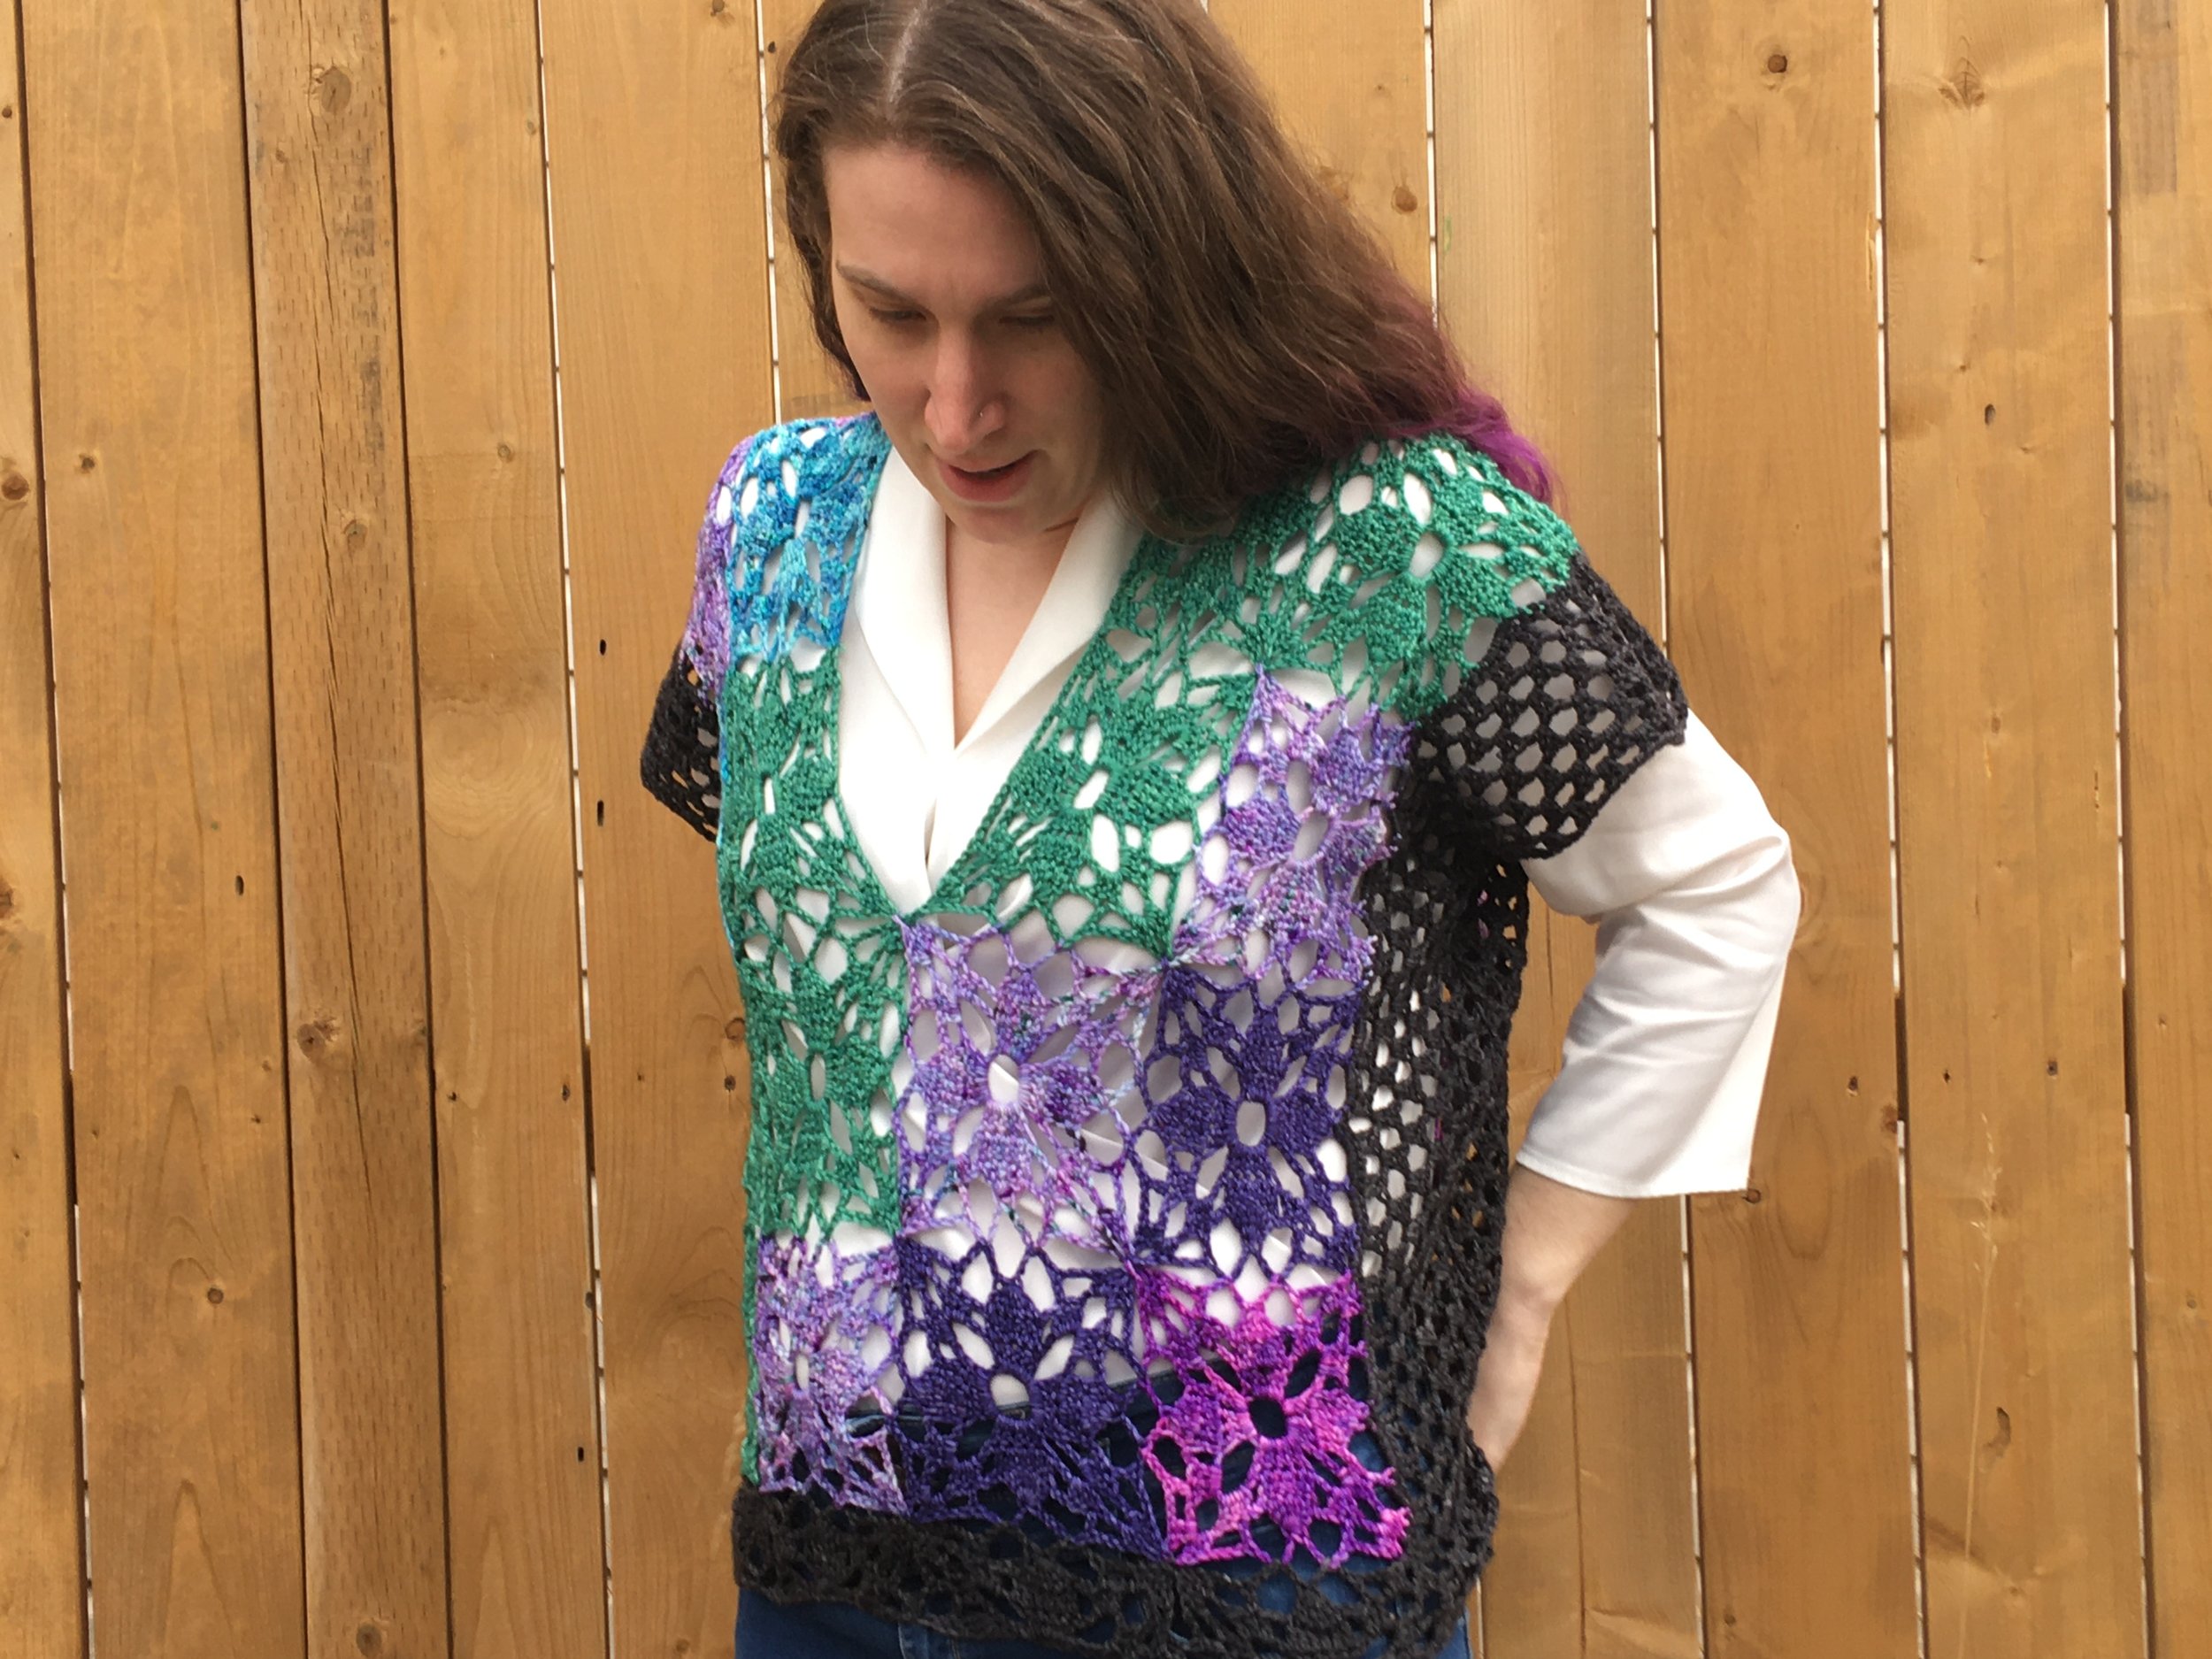
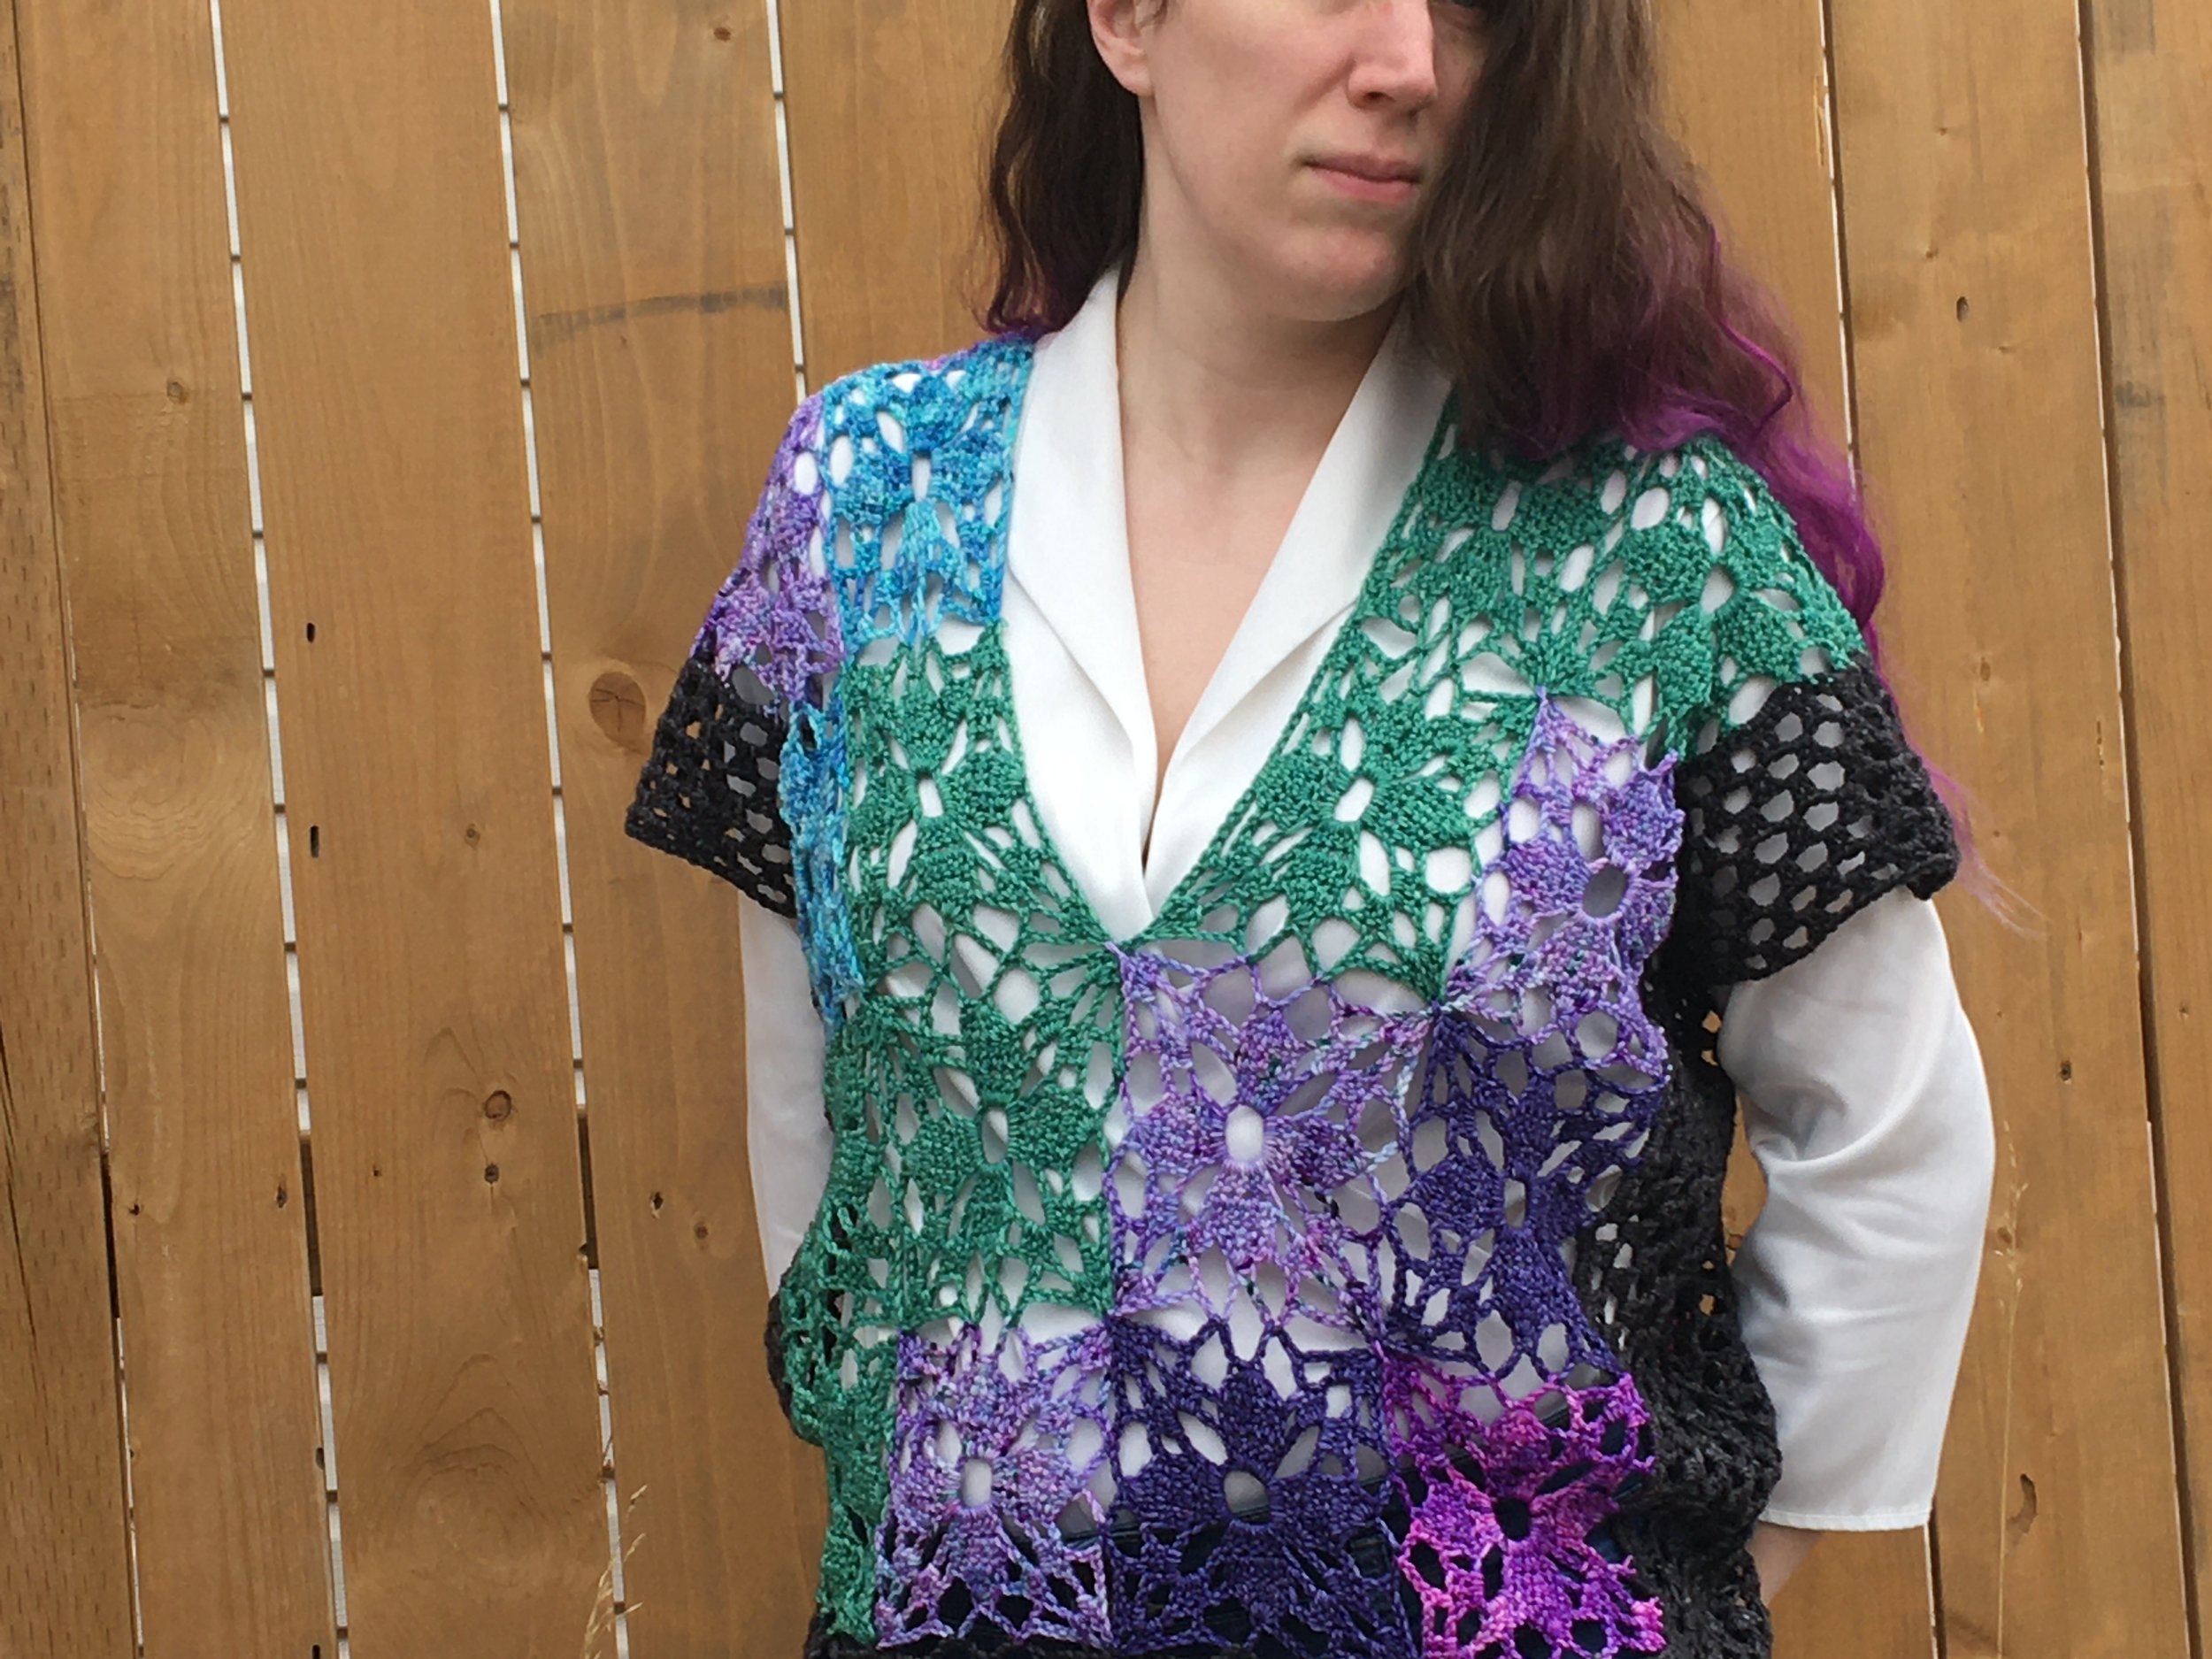
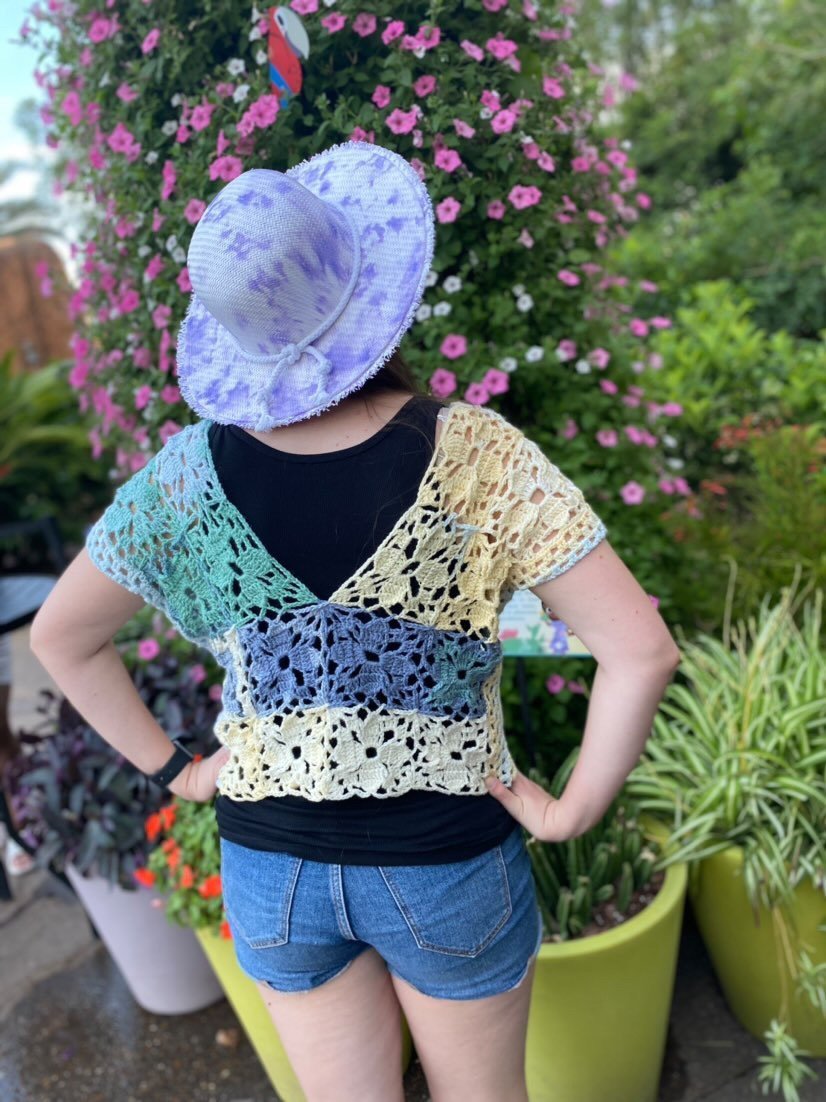
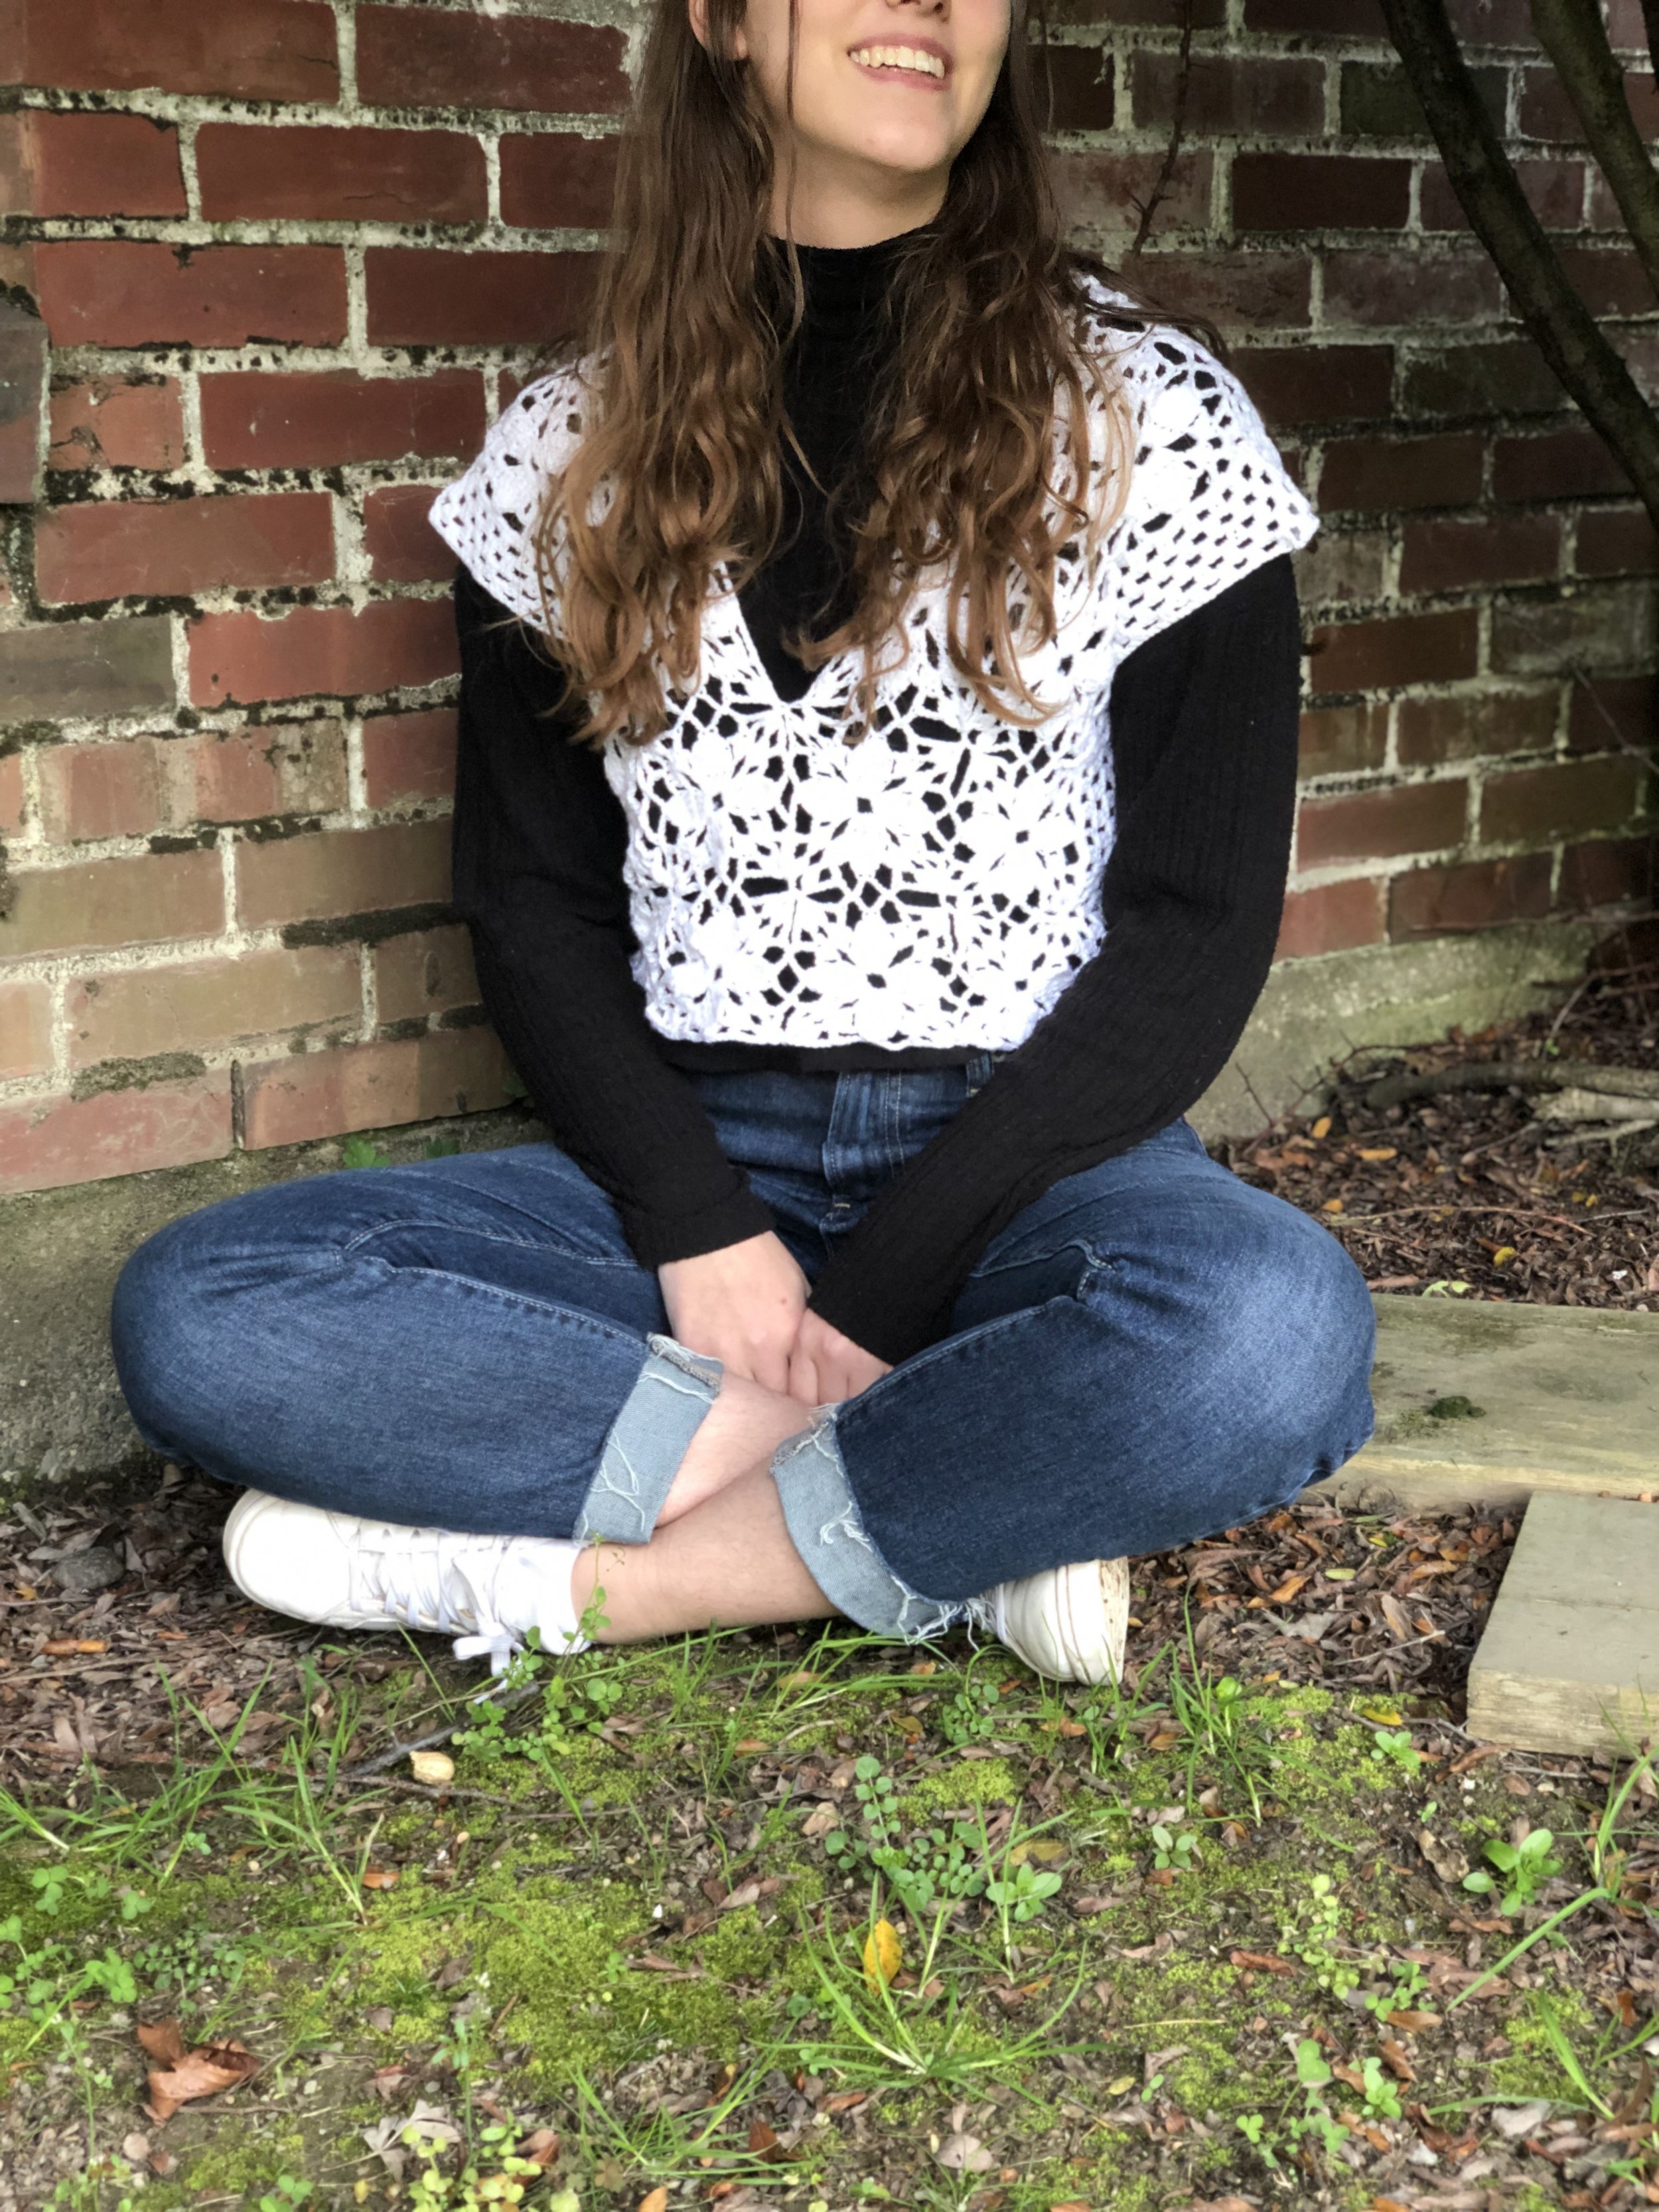
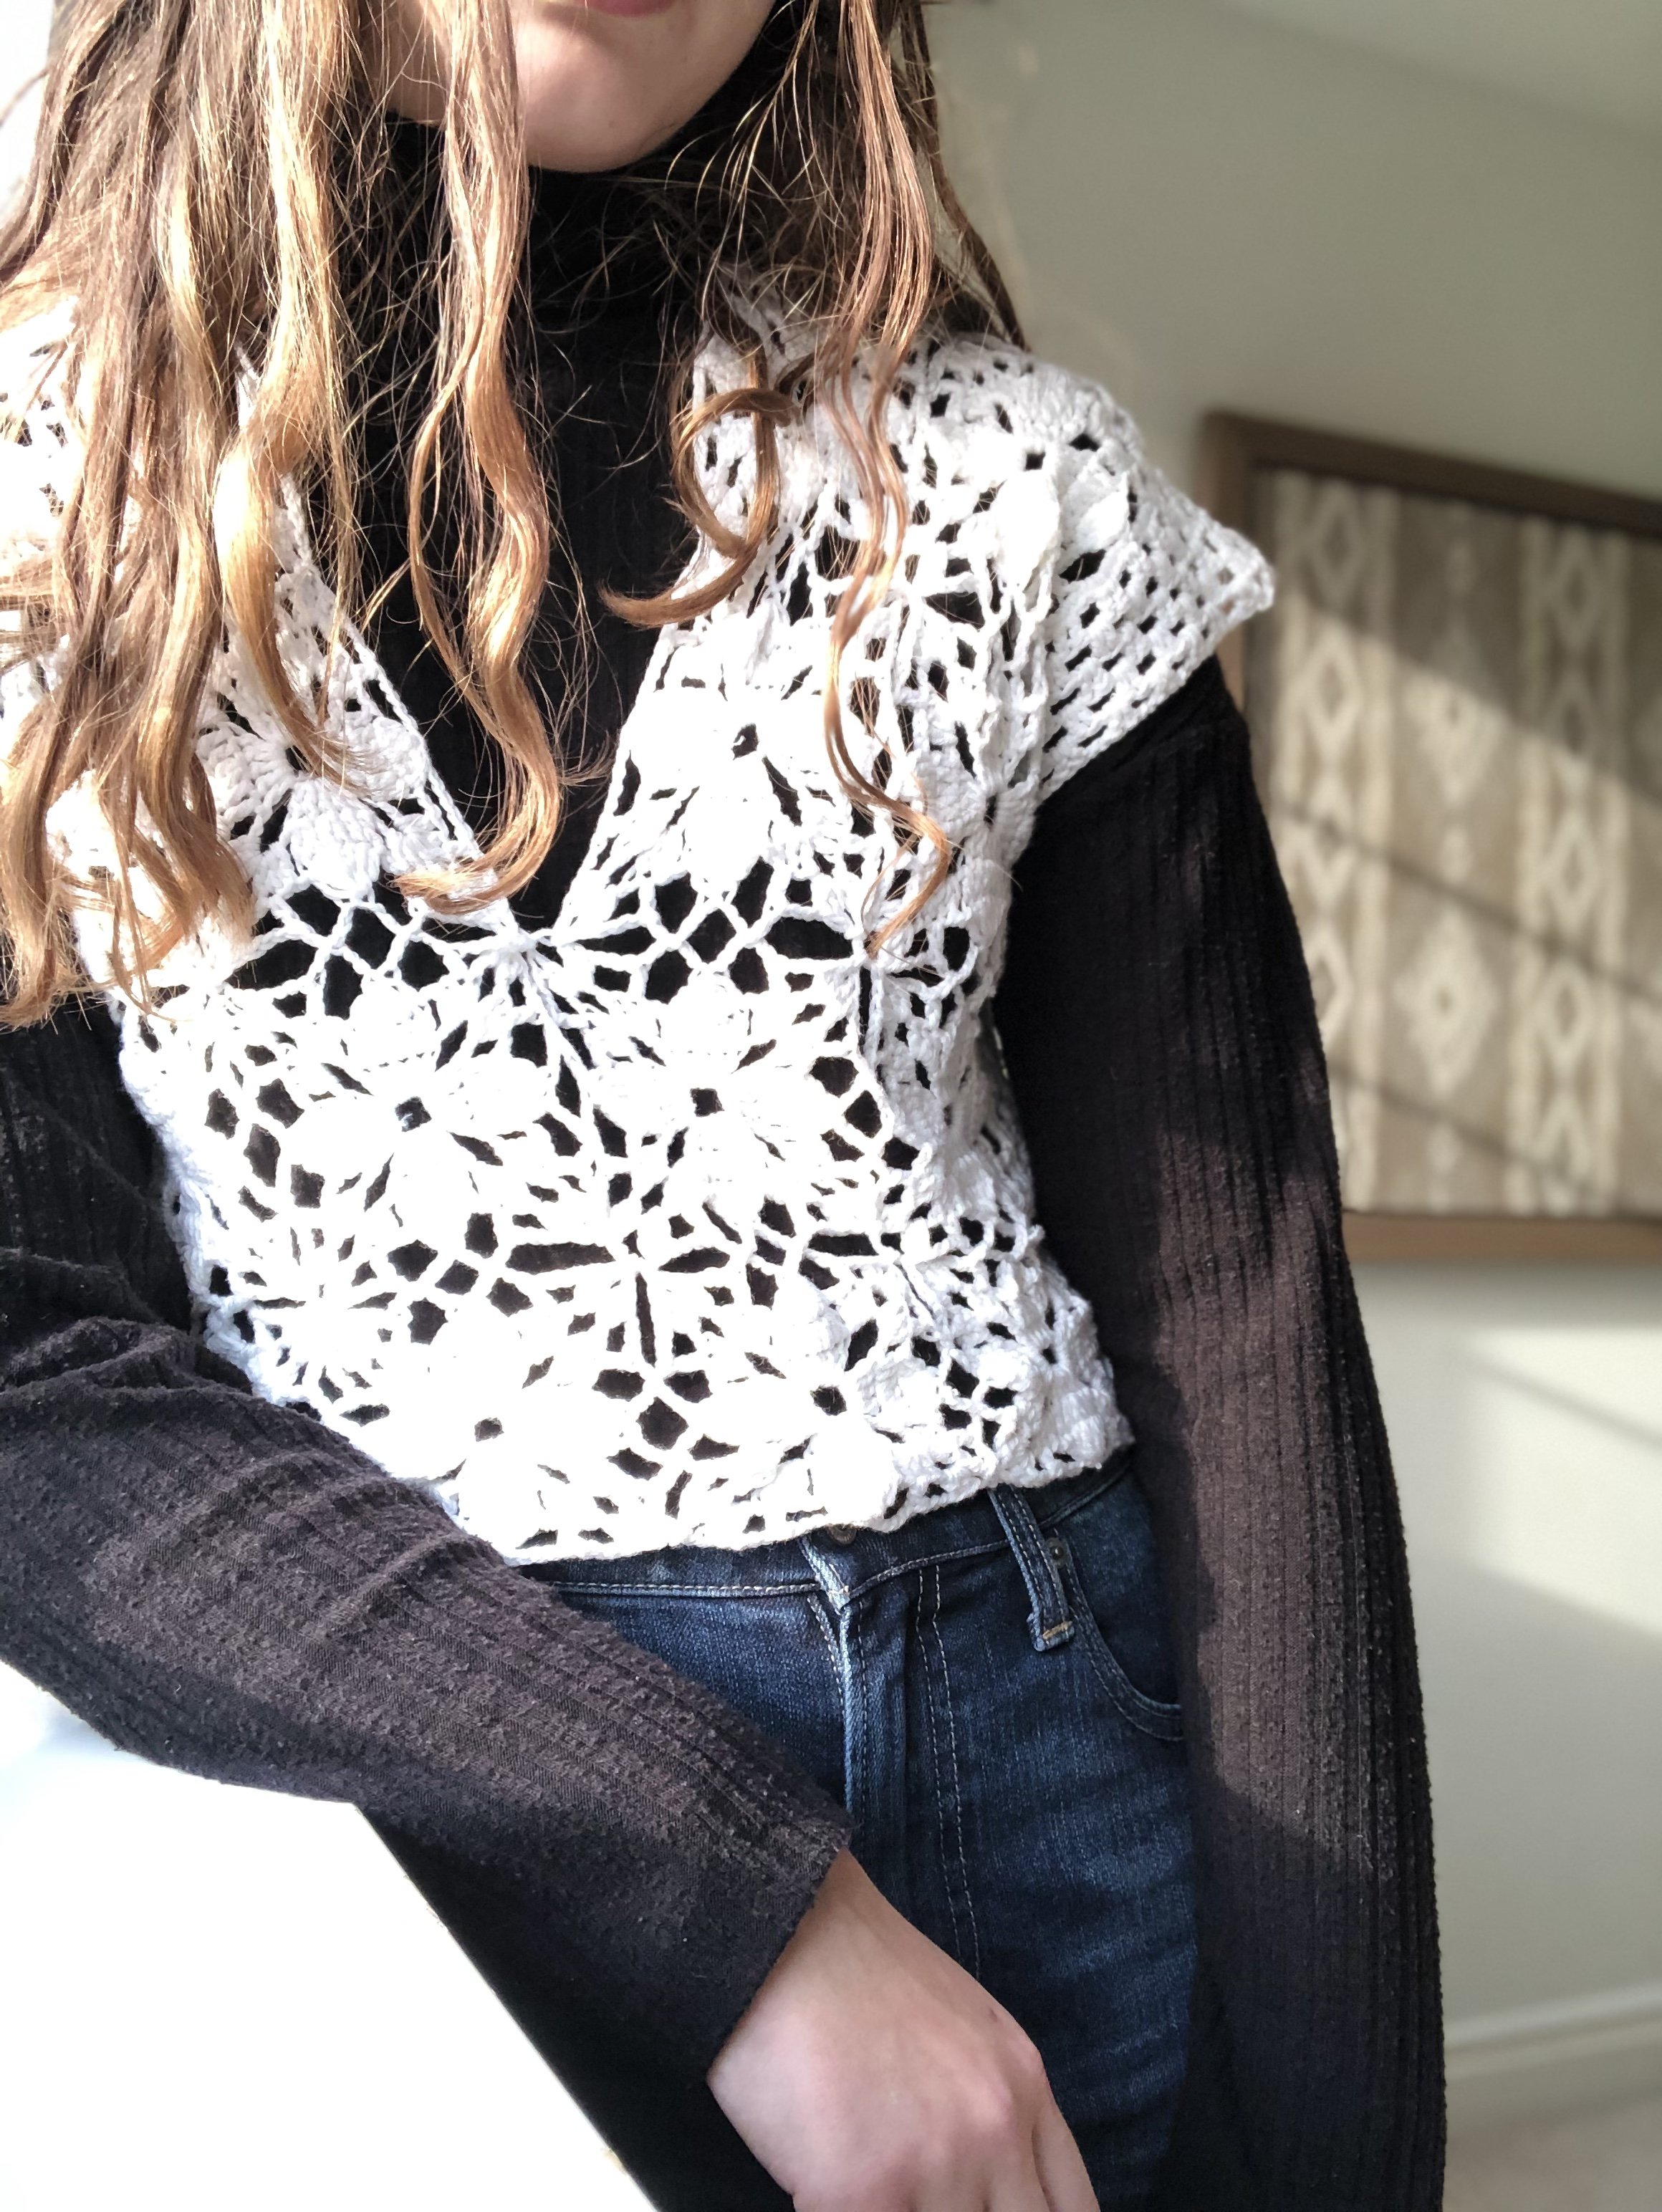
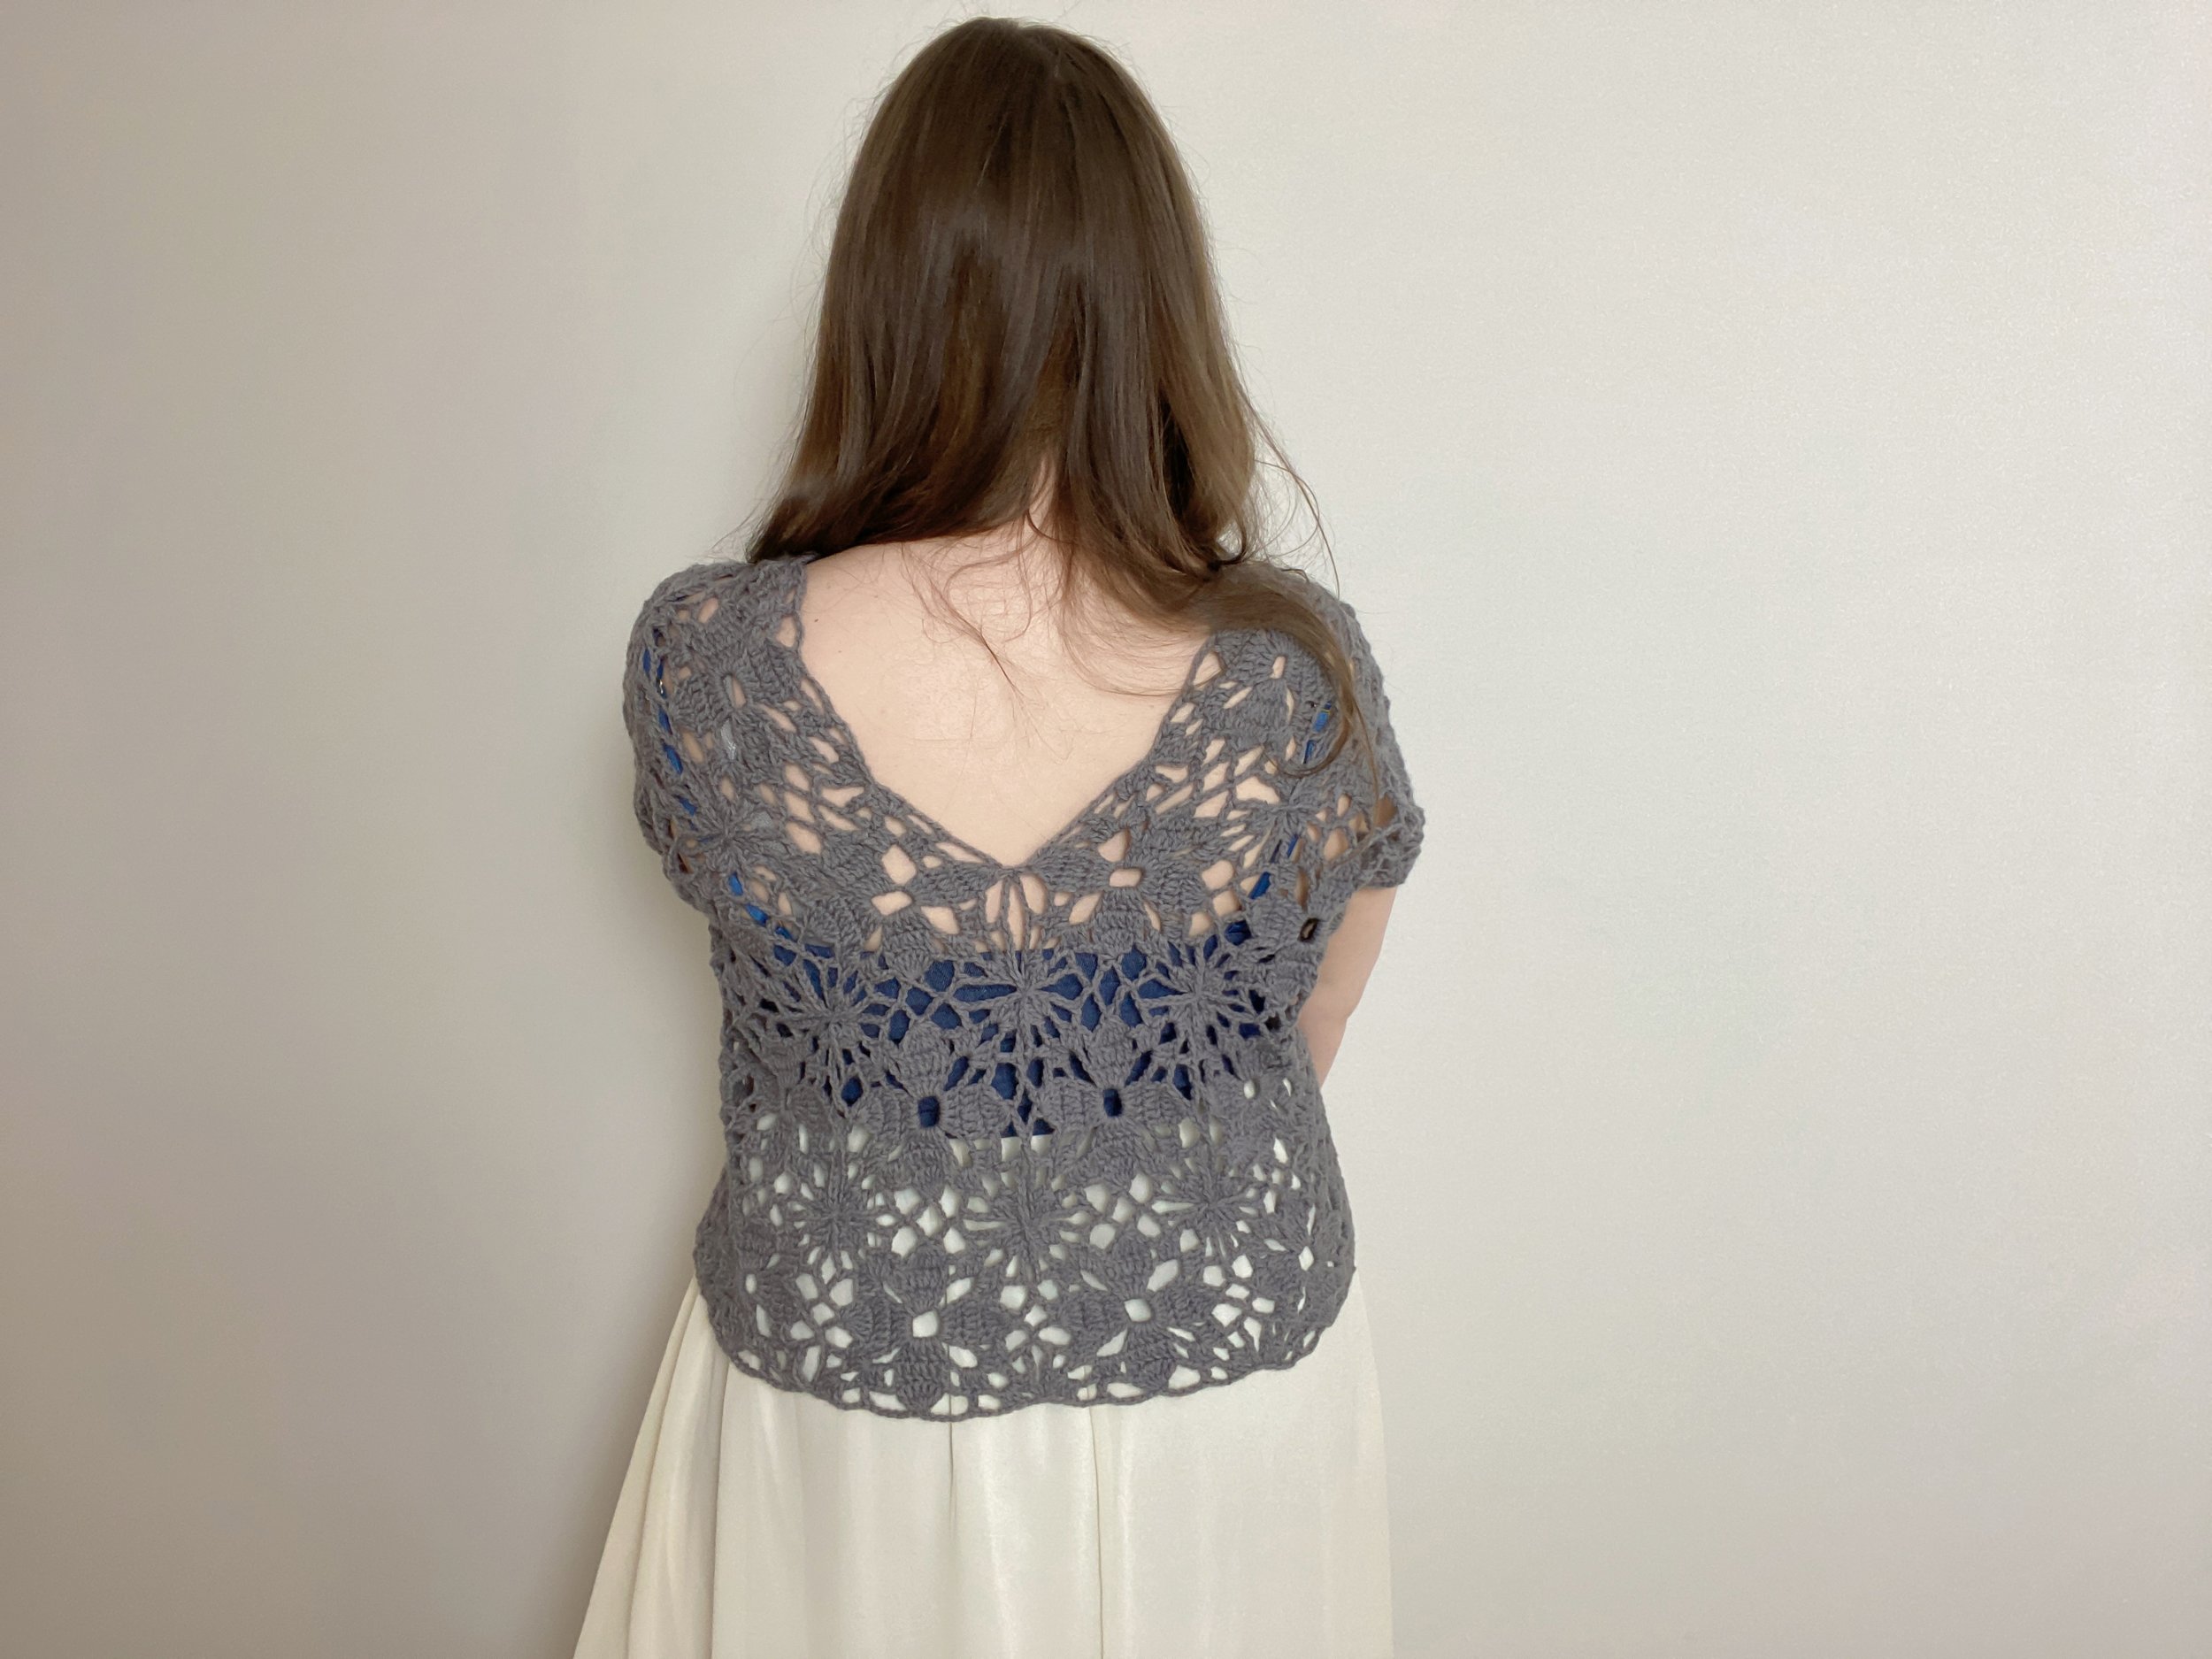
This is the Sweet Summer Tee, and the second installation in my Sweet Summer Collection. It is the perfect top to throw over a cute summer dress for a more complete look or to wear with a pair of shorts and a tank. You could even wear it over a bathing suit as a cover up top. Made with lightweight yarn, and with an open lacework pattern, this tee will be perfect on those hot hot summer days.
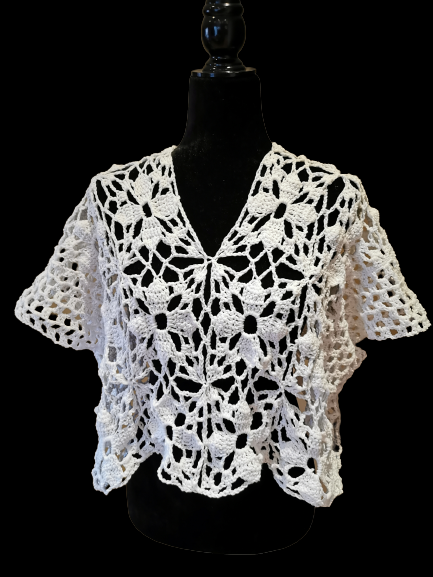
This adorable lace granny square t-shirt is made with the Dogwood Flower granny square. It’s a simple motif that creates such a beautiful pattern. Utilizing the “join as you go” method of crochet, it creates beautiful openwork lace without chunky seams.
The construction of this top makes it easy to adjust and make it exactly how you’d like to wear it. You can add length to the top by connecting full or half squares to the bottom, or you can make the top oversized by adding squares to the sides.
The sample is crocheted with Paintbox Yarns Baby DK which is a weight 3 acrylic yarn. Because of the openness of the lace, this top can be made with a variety of types of a weight 3 yarn.


I LOVE TO SEE WHAT YOU CREATE!
Please share your creations with the community on social media tagging @ravinsekaidesigns and hashtag #sweetsummertee
I can’t wait to see the beautiful things you come up with!
FOLLOW ME ON SOCIAL MEDIA
Facebook: Ravin Sekai Designs
Ravelry: RavinSekai
Etsy: Ravin Sekai Designs
Instagram: @ravinsekaidesigns
Pinterest: Ravin Sekai Designs
Patreon: Ravin Sekai Designs

WHAT YOU NEED:
Hook Size: 4mm hook, or size needed to obtain gauge
Yarn: Light/DK weight 3 yarn. Sample crocheted in Paintbox Yarns Baby DK. 612(685, 830, 907, 1034, 1114, 1200) yards
Gauge: Each full granny square is 4.5” x 4.5” (11.5cm x 11.5cm) Gauge is after blocking.
Suggested Bust Measurements: Measurements will be in inches throughout. Check out the chart on pg.3 for measurements in cm.
S: 32”-35”, M: 36”-39”, L: 40”-43”, XL: 44”-47”, 2XL: 48”-51”, 3XL: 52”-55”, 4XL: 56”-59”
Finished Garment Sizing: Size is after blocking. Worn with 10” - 16” of positive ease. S: bust - 45“ x Length - 18“, M: bust - 49.5“ x Length - 18“, L: bust - 54“ x Length -20.25 “, XL: bust - 58.5“ x Length - 20.25“, 2XL: bust - 63“ x Length - 22.5“, 3XL: bust - 67.5“ x Length - 22.5“, 4XL: bust - 72“ x Length - 22.5“
Model: model is 4’11” tall, 35” bust, 28” waist, 39” hips wearing size small, with 10” positive ease in bust.


ABBREVIATIONS:
Abbreviations in US terms
Ch: chain
Sl st: slip stitch
Hdc: half double crochet
Dc: double crochet
Rep: repeat
Sk: skip
Cont.: continue
Dc2tog: double crochet 2 sts together.
Dc3tog: double crochet 3 sts together.
Dc5tog: double crochet 5 sts together.
Dc6tog: double crochet 6 sts together.
FO: fasten off
S1, S2, S3, S4: Square 1, 2, 3, and 4 respectively
Sm: Stitch Marker
Notes:
Directions: Where there are different numbers of rows/sts for each size, pattern is written: S(M, L, XL, 2XL, 3XL, 4XL)
Blocking: It is critical that you block this top. The Dogwood Flower granny square tends to be a bit scrunched after crocheting. Blocking will open the stitches up and give each square the definition it needs to look its best.
Length: You can make your top longer if needed. Each square is 4.5” long and each half square is 2.25” long. To add length, add the same number of squares/half squares onto each end of the tee. I recommend doing this after connecting all the required squares to make sure you keep your neckline centered.
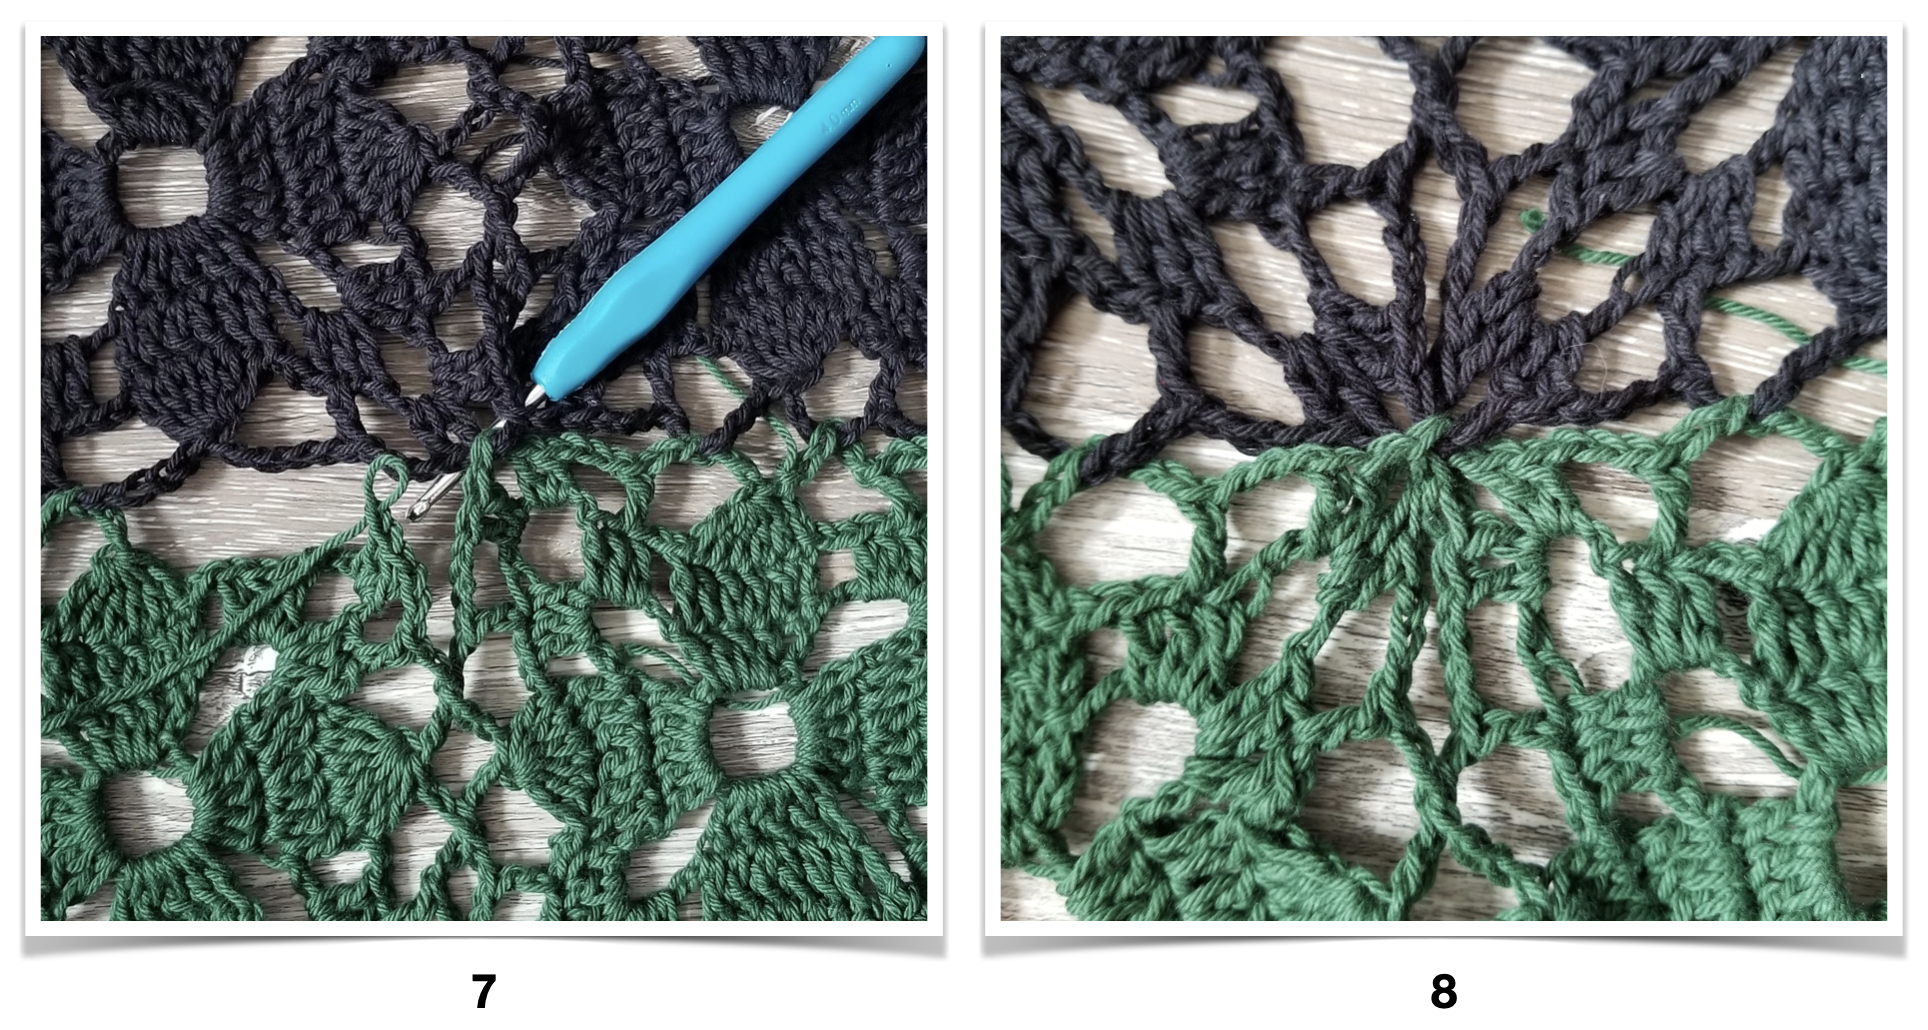
Connecting: Squares are connected on round 3 using a join-as-you-go method shown below. Half granny squares are connected in the same manner as full granny squares, except I would sl st the points of the half flower petals together to prevent gapping.
Side Panels: For the side panel lace, you need a multiple of 4 +2 sts. If you make your top longer by adding squares, make sure you maintain that multiple of 4 +2 sc along the sides.

Save It For Later
Pin to Pinterest
THE PATTERN:
For the free pattern of this design please continue on this page. Please consider supporting me by purchasing the 100% ad-free PDF with all extras/charts for this pattern on my Ravelry or ETSY pages. Or consider joining my Patreon for member perks.
For this garment, you are going to attach the squares as you make them (join as you go method) according to the diagram below, leaving the squares at the thick red line unconnected to create the neckline. 2XL/3XL/4XL will use half granny squares at the bottom of the shirt (shown in gray).


Granny Squares:
The Full Granny:
Ch10, sl st in 1st ch (makes a circle)
Row 1: ch3(counts as dc), 4dc into circle, *ch7, 5dc into circle* rep * * twice more, ch7, sl st into top of starting ch3.
Row 2: ch3(counts as dc), 1dc in next dc, 2dc in next (center) dc, 1dc in each next 2 dc, *ch2, 3dc in ch7 below, ch5, 3dc in ch7 again, ch2, 1dc in each next 2 dc, 2dc in center dc, 1dc in each next 2 dc* rep * * twice more, ch2, 3dc in ch7 below, ch5, 3dc in ch7 again, ch2, sl st into starting ch3.
Row 3: ch2(counts as dc), dc5tog, *ch5, 1dc in center dc of 3 dc below, ch3, [2dc, ch2, 2dc] all in ch 5 below, ch3, 1dc in center dc of 3 dc below, ch5, dc6tog* rep * * twice more, ch5, 1dc in center of 3 dc below, ch3, [2dc, ch2, 2dc] all in ch5 below, ch3, 1 dc in center dc of 3 dc below, ch5, sl st into starting ch2.
FO

The Half Granny:
Ch5 sl st in 1st ch (makes a circle)
Row 1: ch3(counts as dc), dc in circle, ch7, 5dc into circle, ch7, 2dc in circle, turn.
Row 2: ch3(counts as dc), dc in same st, dc in next, ch2, 3dc in ch7 below, ch5, 3dc in ch7 again, ch2, 1dc in each next 2 dc, 2dc all in center dc, 1dc in each next 2 dc, ch2, 3dc in ch7 below, ch5, 3dc in ch7 again, ch2, 2dc in next dc, 1dc in top of ch3 below, turn.
Row 3: ch2(counts as dc), dc2tog, ch5, 1dc in center dc of 3 dc below, ch3, [2dc, ch2, 2dc] all in ch 5 below, ch3, 1dc in center dc of 3 dc below, ch5, dc6tog, ch5, 1dc in center dc of 3 dc below, ch3, [2dc, ch2, 2dc] all in ch 5 below, ch3, 1dc in center dc of 3 dc below, ch5, dc3tog.
FO
How to Connect Granny Squares:
Note: Make sure you are not twisting your squares as you connect and you connect the right side of each square facing the same direction.
Square 1: Crochet the first granny square in full.
Square 2 - Square 4(4, 4, 4, 6, 6, 6):
Row 1 - Row 2: Make your next square through Row 2
Row 3: ch2, dc5tog, ch3, remove loop from hook, insert hook in ch5 space (#1) of S1 and pull loop through, ch2, 1dc in center dc of the 3 dc below, ch3, 2dc in ch5 below, ch1, remove loop from hook, insert hook in ch2 space (#2) of S1 and pull loop through, ch1, 2dc in ch5 below, cont. Row 3 until last corner, cont. directions.

Square 2 - Square 4(4, 4, 4, 6, 6, 6) cont.:
Row 3 cont: 2dc in ch5 below, ch1, remove loop from hook, insert hook in ch2 space (#3) of S1 and pull loop through, ch1, 2dc in ch5 below, ch3, dc in center dc of 3 dc below, ch3, remove loop from hook, insert hook in ch5 space (#4) of S1 and pull loop through, ch2, sl st into top of dc5tog.
FO

Square 5(5, 5, 5, 7, 7, 7) and all right-most squares:
Row 1 - Row 2: Make your next square through Row 2
Row 3: ch2, dc5tog, ch3, remove loop from hook, insert hook in ch5 space of S1 and pull loop through (#5), ch2, 1dc in center dc of 3 dc below, ch3, 2dc in ch5 below, ch1, remove loop from hook, insert hook in ch2 space of S2 directly across and pull loop through (#6), ch1, 2dc in ch5 below, cont. Row 3 from S2 to finish connecting square.
FO

All Other Squares:
Row 1 - Row 2: Make your next square through Row 2
Row 3: rep directions from S5(5, 5, 5, 7, 7, 7) until you get to the last corner joining all 4 squares together, 2dc in ch5 below, ch1, remove loop from hook, insert hook in ch2 space of square directly across and pull loop through (#7), ch1, 2dc in ch5 below, finish Row 3 as you would S2 (#8).
FO Continue connecting squares according to the chart above
Note: For sizes 2XL-4XL, Half granny squares are connected in the same manner as full granny squares. It is best to connect them last, and the tips of the half petals should be sl st together to prevent gapping.
Right Side All Sizes:
Lay the garment out w/ RS facing, and re-attach the yarn to the bottom right-hand corner with a sl st.
Row 1: ch1, 202(202, 202, 202, 226, 226, 226) sc evenly along the side of the garment. Turn. (Note: I put 25 sc in each full granny square, then spaced any extra sts out along the side. For the S-XL, I would put 1 extra st between between the 3rd and 4th square, and 1 between the 5th and 6th squares. I would suggest putting the 1 extra st between the 5th and 6th squares for the 2XL - 4XL.).
Row 2: ch3 (counts as 1 dc throughout), dc in next st, *ch2, sk2, 1 dc in each next 2 sts*, rep * * placing the last 2 dc in the last 2 sts of the row. Turn.
Row 3: ch4 (counts as 1 dc and ch1), 2dc in first ch2, *ch2, 2dc in next ch2*, rep * * until the last 2 sts, ch1, dc in turning ch from the previous row. Turn.

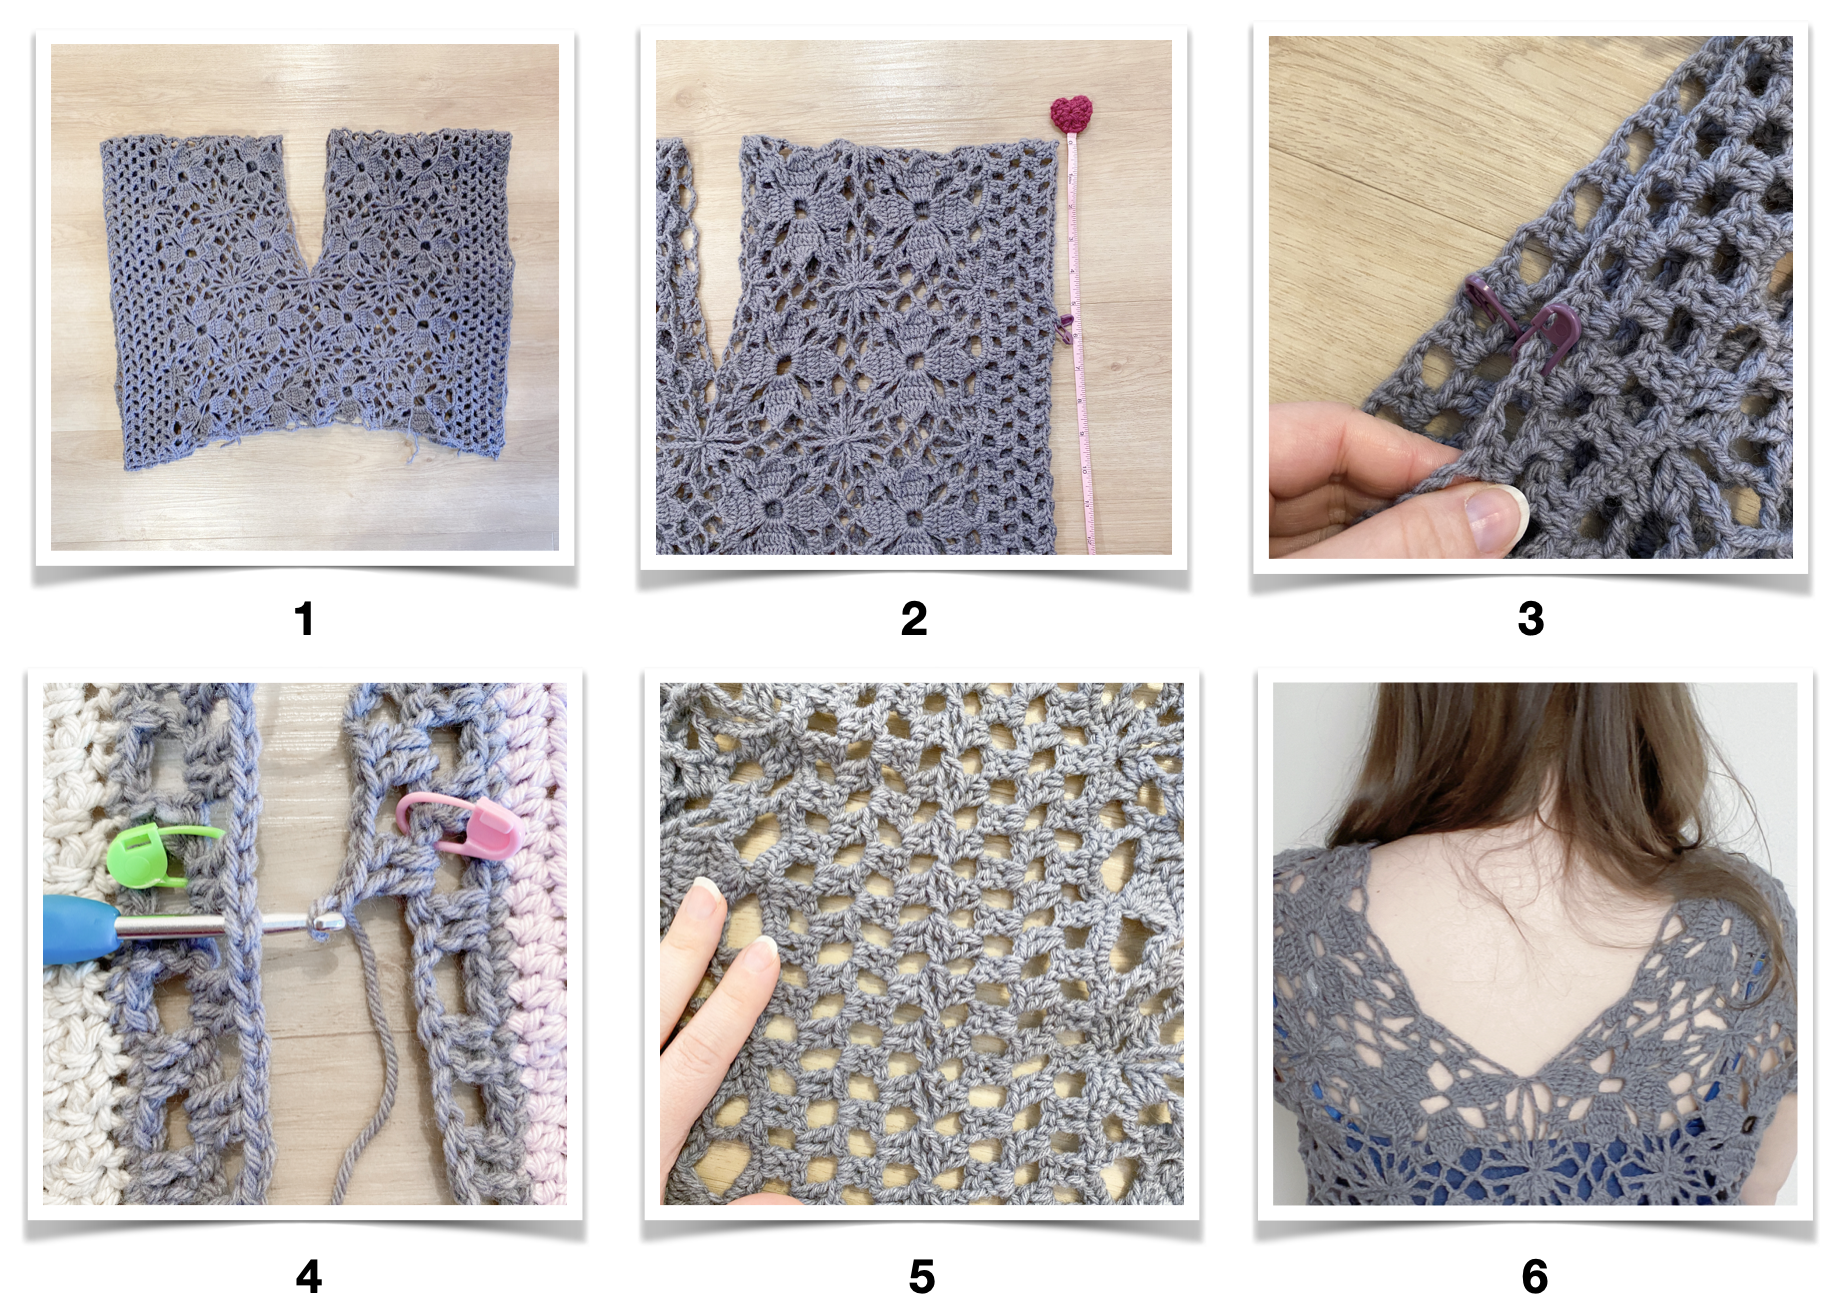
Side Seaming: (reference pictures 1 - 5 at the end)
Size S Only:
Lay the top out and fold it in half so that it looks like a v-neck t-shirt. (1) Place a sm about 5.5” from the top of the shoulder in a ch space on either side of the garment. (2) Count your chain spaces from the bottom to make sure the sm is in the same place on both sides(3)
Row 4: ch3, dc in ch1, *ch2, 2 dc in ch2*, rep * * across, past your 1st sm, until you are placing 2dc in the space with your second sm, *ch1, remove hook from loop, place hook through the ch2 space on the other side of the top at the same place (4) and pull loop through, ch1, 2dc in next ch2 space*, rep * * placing the last 2 dc in last ch2, ch1, remove hook from loop, place hook through the ch4 space on the other side of the top and pull loop through, ch1, 1dc in the starting ch3 space of the row (5)
FO
Size M Only:
Row 4: ch3, dc in ch1, *ch2, 2 dc in ch2*, rep * * across, placing the last 2dc in the ch4 space from the previous row. Turn.
Row 5: Rep Row 3
Lay the top out and fold it in half so that it looks like a v-neck t-shirt (1). Place sm 6” from the top of the shoulder in a ch space on either side of the garment. (2) Count your chain spaces from the bottom to make sure the sm is in the same place on both sides.(3)
Row 6: ch3, dc in ch1, *ch2, 2 dc in ch2*, rep * * across, past your 1st sm, until you are placing 2dc in the space with your second sm, *ch1, remove hook from loop, place hook through the ch2 space on the other side of the top at the same place (4) and pull loop through, ch1, 2dc in next ch2 space*, rep * * placing the last 2 dc in last ch2, ch1, remove hook from loop, place hook through the ch4 space on the other side of the top and pull loop through, ch1, 1dc in the starting ch3 space of the row (5)
FO
Size L/XL Only:
Row 4: ch3, dc in ch1, *ch2, 2 dc in ch2*, rep * * across, placing the last 2dc in the ch4 space from the previous row. Turn.
Row 5 - Row 7(9) rep Rows 3 - 4
Lay the top out and fold it in half so that it looks like a v-neck t-shirt (1). Place sm 7(7.5)” from the top of the shoulder in a ch space on either side of the garment. (2) Count your chain spaces from the bottom to make sure the sm is in the same place on both sides. (3)
Row 8(10): ch3, dc in ch1, *ch2, 2 dc in ch2*, rep * * across, past your 1st sm, until you are placing 2dc in the space with your second sm, *ch1, remove hook from loop, place hook through the ch2 space on the other side of the top at the same place (4) and pull loop through, ch1, 2dc in next ch2 space*, rep * * placing the last 2 dc in last ch2, ch1, remove hook from loop, place hook through the ch4 space on the other side
of the top and pull loop through, ch1, 1dc in the starting ch3 space of the row (5)
FO

Size 2XL Only:
Lay the top out and fold it in half so that it looks like a v-neck t-shirt (1). Place sm 8” from the top of the shoulder in a ch space on either side of the garment. (2) Count your chain spaces from the bottom to make sure the sm is in the same place on both sides. (3)
Row 4: ch3, dc in ch1, *ch2, 2 dc in ch2*, rep * * across, past your 1st sm, until you are placing 2dc in the space with your second sm, *ch1, remove hook from loop, place hook through the ch2 space on the other side of the top at the same place (4) and pull loop through, ch1, 2dc in next ch2 space*, rep * * placing the last 2 dc in last ch2, ch1, remove hook from loop, place hook through the ch4 space on the other side of the top and pull loop through, ch1, 1dc in the starting ch3 space of the row (5)
FO
Size 3XL Only:
Row 4: ch3, dc in ch1, *ch2, 2 dc in ch2*, rep * * across, placing the last 2dc in the ch4 space from the previous row. Turn.
Row 5: Rep Row 3
Lay the top out and fold it in half so that it looks like a v-neck t-shirt (1). Place sm 9” from the top of the shoulder in a ch space on either side of the garment. (2) Count your chain spaces from the bottom to make sure the sm is in the same place on both sides. (3)
Row 6: ch3, dc in ch1, *ch2, 2 dc in ch2*, rep * * across, past your 1st sm, until you are placing 2dc in the space with your second sm, *ch1, remove hook from loop, place hook through the ch2 space on the other side of the top at the same place (4) and pull loop through, ch1, 2dc in next ch2 space*, rep * * placing the last 2 dc in last ch2, ch1, remove hook from loop, place hook through the ch4 space on the other side of the top and pull loop through, ch1, 1dc in the starting ch3 space of the row (5)
FO
Size 4XL Only:
Row 4: ch3, dc in ch1, *ch2, 2 dc in ch2*, rep * * across, placing the last 2dc in the ch4 space from the previous row. Turn.
Row 5 - Row 7 rep Rows 3 - 4
Lay the top out and fold it in half so that it looks like a v-neck t-shirt (1). Place sm 10” from the top of the shoulder in a ch space on either side of the garment. (2) Count your chain spaces from the bottom to make sure the sm is in the same place on both sides.(3)
Row 8: ch3, dc in ch1, *ch2, 2 dc in ch2*, rep * * across, past your 1st sm, until you are placing 2dc in the space with your second sm, *ch1, remove hook from loop, place hook through the ch2 space on the other side of the top at the same place (4) and pull loop through, ch1, 2dc in next ch2 space*, rep * * placing the last 2 dc in last ch2, ch1, remove hook from loop, place hook through the ch4 space on the other side of the top and pull loop through, ch1, 1dc in the starting ch3 space of the row (5)
FO
Left Side All Sides:
Rep Row 1 - Row 4(6, 8, 10, 4, 6, 8) along the opposite side.
FO
Block your top.
Fit and Finish:
Weave in all your ends and try on your top. You may like your neckline to be a bit less open. You can seam together the tips of the petal on the squares closest to the v to close the neckline (image 6 below). You can do this on one of both sides of the garment. For my fit, I wanted
my back neckline to be less deep than the front, so I sl st together the petals on the back to close the v a bit on the back side.
Happy Creating!
IF YOU LIKED THIS PATTERN, PLEASE SUPPORT ME ON PATREON OR BUY ME A COFFEE!

BUY ME A KO-FI

SUPPORT ME ON PATREON
I LOVE TO SEE WHAT YOU CREATE!
Please share your creations with the community on social media tagging @ravinsekaidesigns and hashtag #sweetsummertee
I can’t wait to see the beautiful things you come up with!
FOLLOW ME ON SOCIAL MEDIA
Facebook: Ravin Sekai Designs
Ravelry: RavinSekai
Instagram: @ravinsekaidesigns
Pinterest: Ravin Sekai Designs
Patreon: Ravin Sekai Designs

Hi! I’m Rachel.
I’m a quirky world traveller, avid knitter, crochet lover, pattern maker, and all around nerd! I spend a lot of time clowning around, and I often have the goofiest smile on my face. This website is the landing place for my new patterns, random thoughts, and general craziness. I hope you enjoy my randomness and my yarnie goodness!
Archive
- September 2023
- March 2023
- November 2022
- October 2022
- September 2022
- August 2022
- July 2022
- June 2022
- May 2022
- April 2022
- March 2022
- February 2022
- January 2022
- November 2021
- October 2021
- September 2021
- August 2021
- July 2021
- June 2021
- May 2021
- April 2021
- March 2021
- February 2021
- January 2021
- December 2020
- November 2020
- October 2020
- September 2020
- August 2020
- July 2020
- June 2020
- May 2020
- April 2020
- March 2020
- February 2020
- January 2020
- December 2019
- November 2019
- October 2019
- September 2019
- August 2019
- July 2019
- June 2019
- May 2019
- April 2019


