
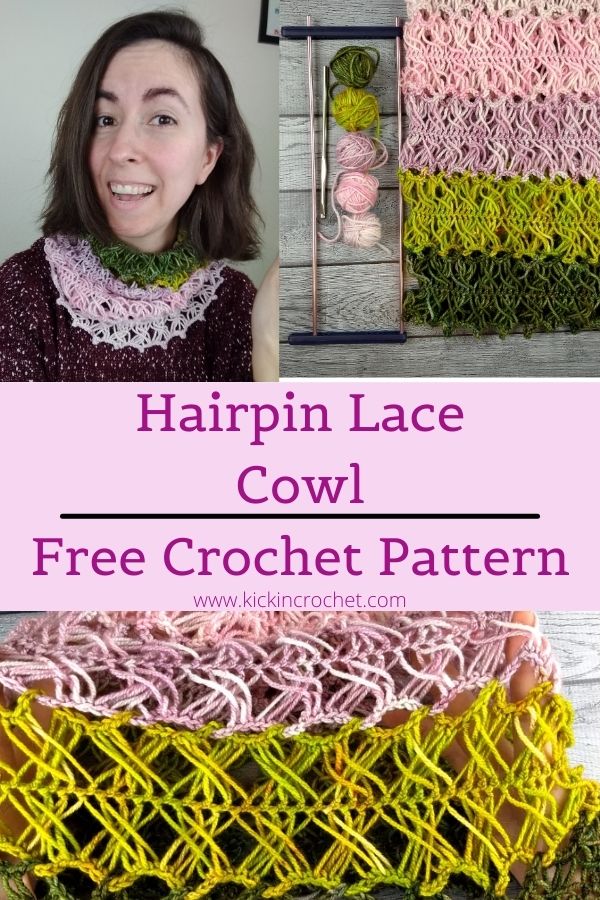
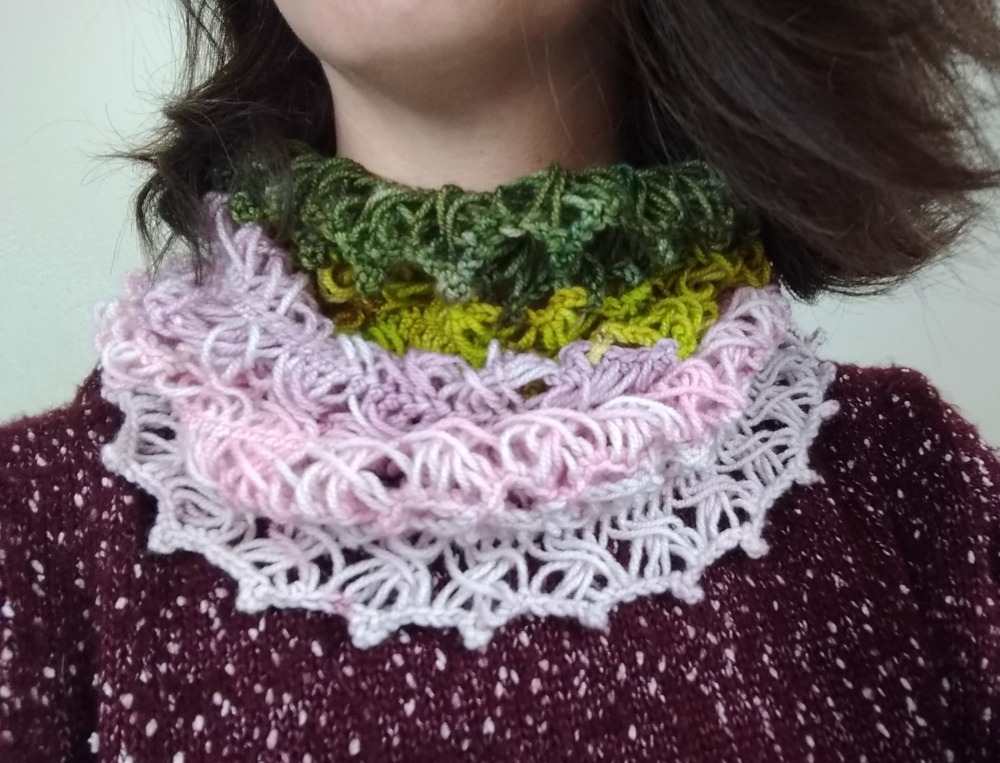
This hairpin lace cowl pattern is a great small project for those who want to dip their toes into the world of hairpin lace. It uses 5 different colors of DK weight yarn, less than 20g each, so it’s great for a DK mini set or for scrapbusting! This pattern is completely free on my blog right here. I’ve also got several video tutorials to walk you through making hairpin lace strips, using guide yarns to keep your loops straight, and the specific joining technique used for this cowl. Enjoy!
*Disclosure: Some of the links in this post are affiliate links, which means if you click on them and make a purchase I may, at no additional cost to you, earn a commission. Read full disclosure here.
This pattern is free below, or you can purchase an ad-free PDF copy using these buttons. If you scroll down, you can also get a free PDF of my how to make hairpin lace guide!
Supplies
- Hairpin Lace Loom – these can be found at craft stores or purchased online for typically less than $10
- DK yarn in 5 colors, 20g each. I used Blu Fiber Co Cashmerino DK mini set in Hawthorne, 80% superwash merino, 20% cashmere.
- Size G (4.0mm) crochet hook – I love these Odyssey hooks from Furls Crochet!
- Yarn/Tapestry Needle for weaving in ends.
Stitch Abbreviations
- ch chain
- st(s) stitch(es)
- ss slip stitch
- sc single crochet
Pattern Notes
Set your hairpin lace loom so that the bars are 3.25” apart, measured from the outside of the bars. If your loom does not have settings that allow for 3.25” distance, just get them as close as you can, being aware that a larger distance means longer loops, and slightly increased yarn usage.
You can make this project with different yarn weights. If you use a finer yarn, you will need to increase your stitch count for each strip in multiples of 4 stitches. For heavier yarn weights, you can decrease the stitch count, or keep it the same and have a wider cowl. For heavier weights, you may also want to increase the width of the loom.
This project is also easily adaptable to a longer scarf by increasing the number of stitches for each strip of lace (again, keeping the stitch count a multiple of 4 sts)

Gauge
1.5 strips & 21 sts in 4”
Finished size (unstretched): approximately 14” tall x 9” wide (when formed into cylinder)
This project is very stretchy, and gauge is measured for the completed project, unstretched. If you are concerned about the size of your project, you can always make your hairpin lace strands purposely too long, but not tie off your strips. Then you can remove any unused stitches at the end of the project (just make sure you keep your stitch count a multiple of 4 stitches – each stitch includes a loop on each side of the hairpin lace strip).
Making Hairpin Lace Strips
If you’re new to hairpin lace, you can check out the instructions for how to make a basic strip of hairpin lace here, which will walk you step by step through how to make hairpin lace. There is a video tutorial included, and you can get a free PDF download of the instructions if you sign up for the mailing list (when you go to the post, scroll to the bottom to find the sign up link)! Just ignore the instructions for joining strips of lace, since this cowl uses a different joining technique.
This post shows how to use guide strands to keep your hairpin lace loops straight once you remove the strip from the loom. (This one also includes a video!)
Hairpin Lace Cowl Video Tutorial
This video does not show the whole project start to finish, but it does show you how to finish the sides of each strip, how to join the strips together, and how to do the picot edging on the top and bottom of the cowl.
How to Make The Hairpin Lace Cowl
To begin, make 5 strips of basic hairpin lace, one in each of your 5 colors. Each strip should be 3.25” wide and 96 stitches long (keeping in mind that each stitch includes one loop on each side of the lace strip). See links above if you need help making strips of lace.
There are three options for finishing each side of each hairpin lace strip, as follows:
For internal edges without joins
With same color yarn, begin with a slip knot on your hook. Insert your hook through the first two loops on one side of the strip, grab the third and fourth loop with your hook and pull them through the first two loops. Now sc in each of the first two loops (the two you pulled through – these used to be loops 3&4), ch4, then sc in the next two loops (the ones that used to be loops 1&2). Repeat this procedure across, creating an X for every four loops. Tie off.
For internal edges with joins
Work as for internal edges without joins, except that when working ch4, work as follows: ch2, remove hook, insert hook through corresponding ch4 space on adjacent hairpin lace strip, grab the yarn loop you previously dropped, and pull it through the ch4 space of the other strip (tighten your working yarn up a little bit if it became too loose, but no need to make it super tight). Now ch2 and continue on. You still are making a ch4, you are just joining to the other hairpin lace strip in the middle of the ch4, so two ch sts on each side of the join.
For external edges
Work as for internal edges without joins, except that instead of working a regular ch4, we will be adding a picot by working the following: ch5, ss in 4th ch from hook, ch2
Creating the Cowl
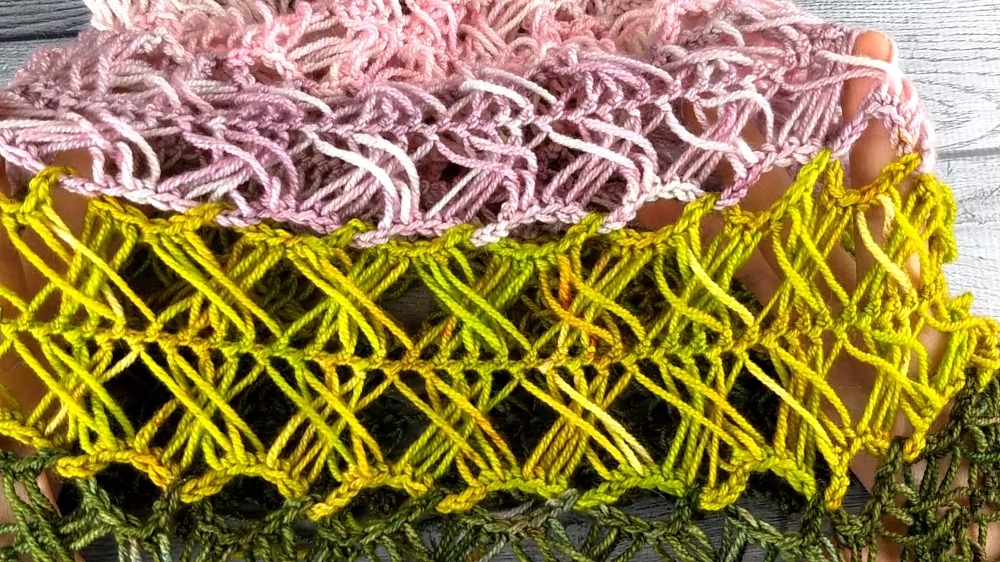
- Strip one – on one side, work internal edge without join. On other side, work external edge.
- Strip two – on one side, work internal edge without join. On other side, work internal edge with join, joining to the internal edge of strip one.
- Strip three – on one side, work internal edge without join. On other side, work internal edge with join, joining to the internal edge of strip two.
- Strip four – on one side, work internal edge without join. On other side, work internal edge with join, joining to the internal edge of strip three.
- Strip five – on one side, work external edge. On other side, work internal edge with join, joining to the internal edge of strip four.
- Use yarn tails to tie the cowl into a cylinder joining at the center and at each edge of each strip. I joined mine by simply tying square knots. Weave in ends, and you’re done!
If you liked this pattern, you may also like the Hairpin Lace Sleeveless Top or Allison Baby Blanket and Scarf Set
This pattern and all associated images are copyrighted. If you would like to use this pattern in a roundup blog post, you may use 1 image and link to this blog post. You may not copy the pattern instructions. Thank you for supporting Kickin Crochet!