This post may contain affiliate links. Please see my full disclosure and privacy policy for details.
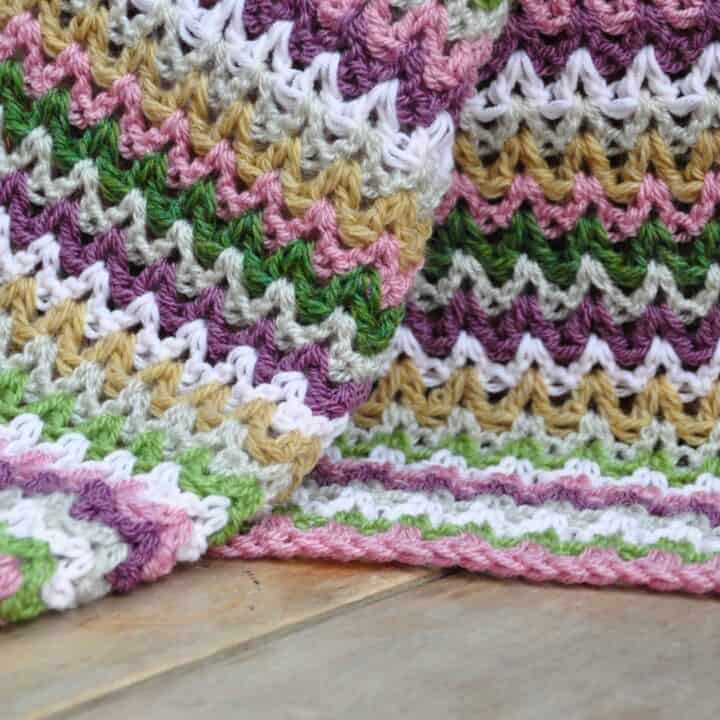
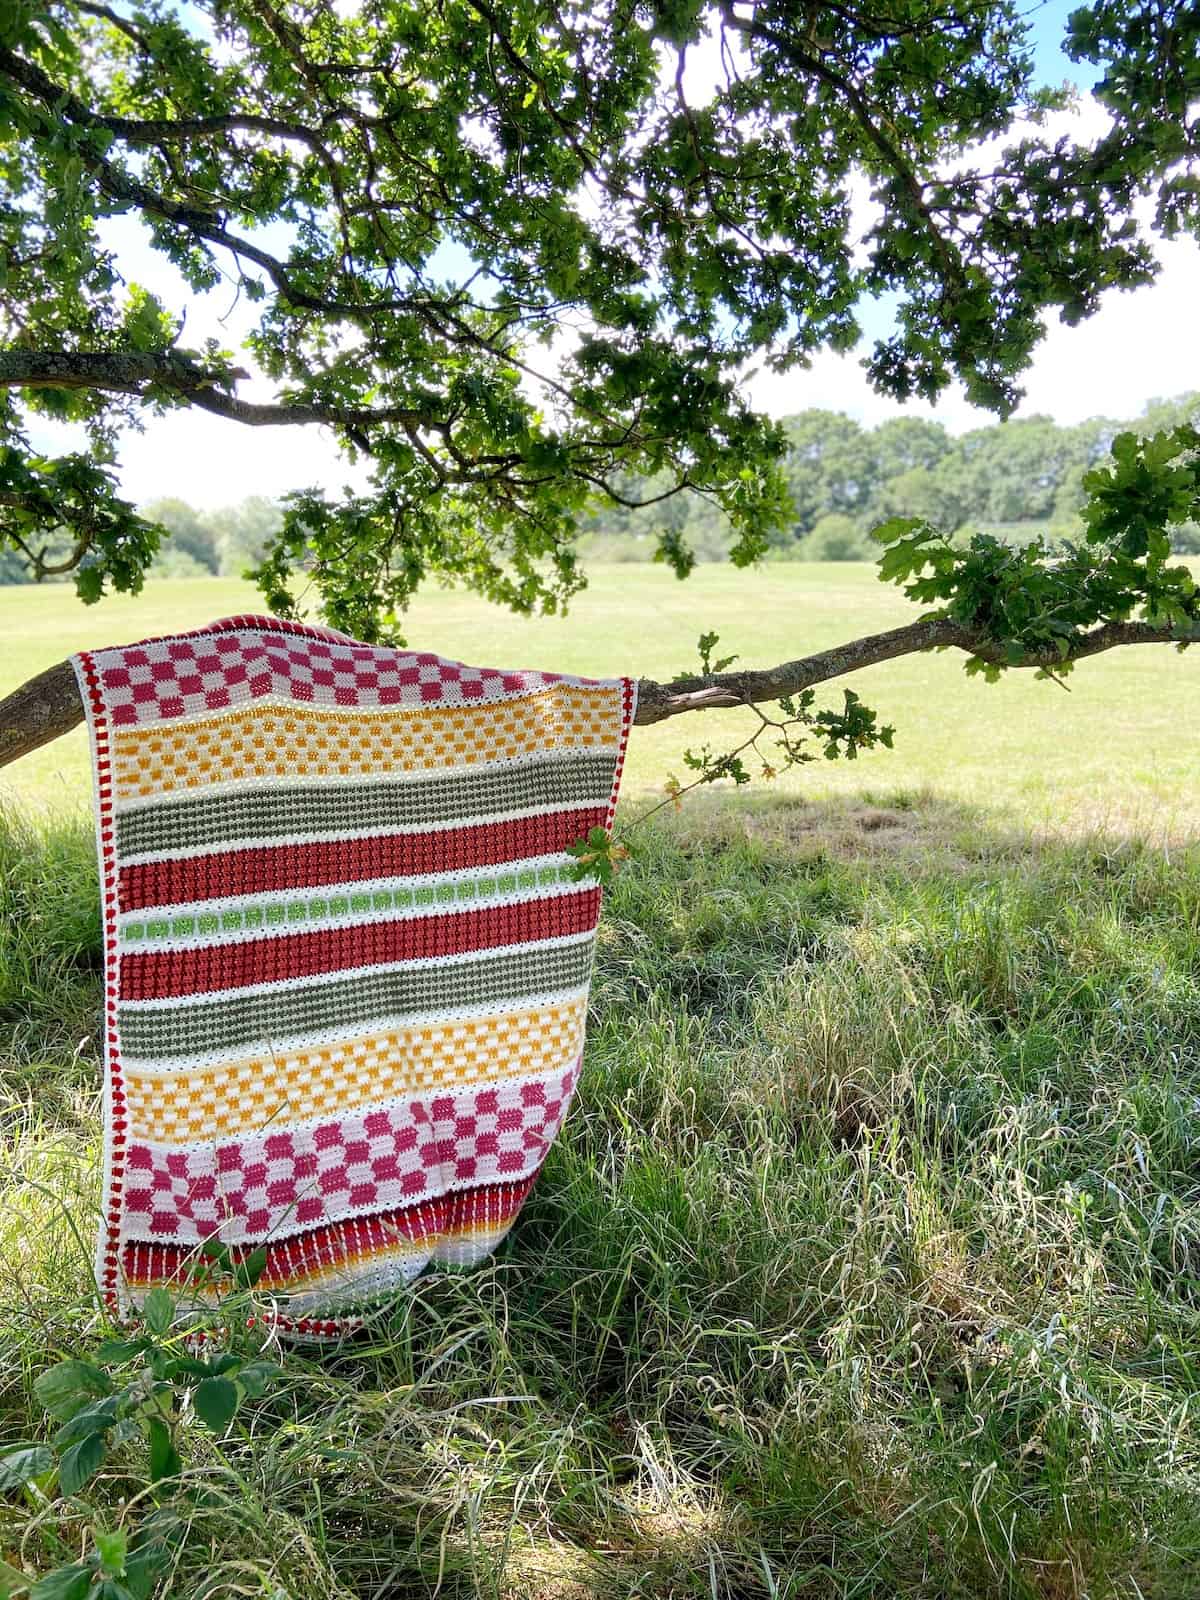
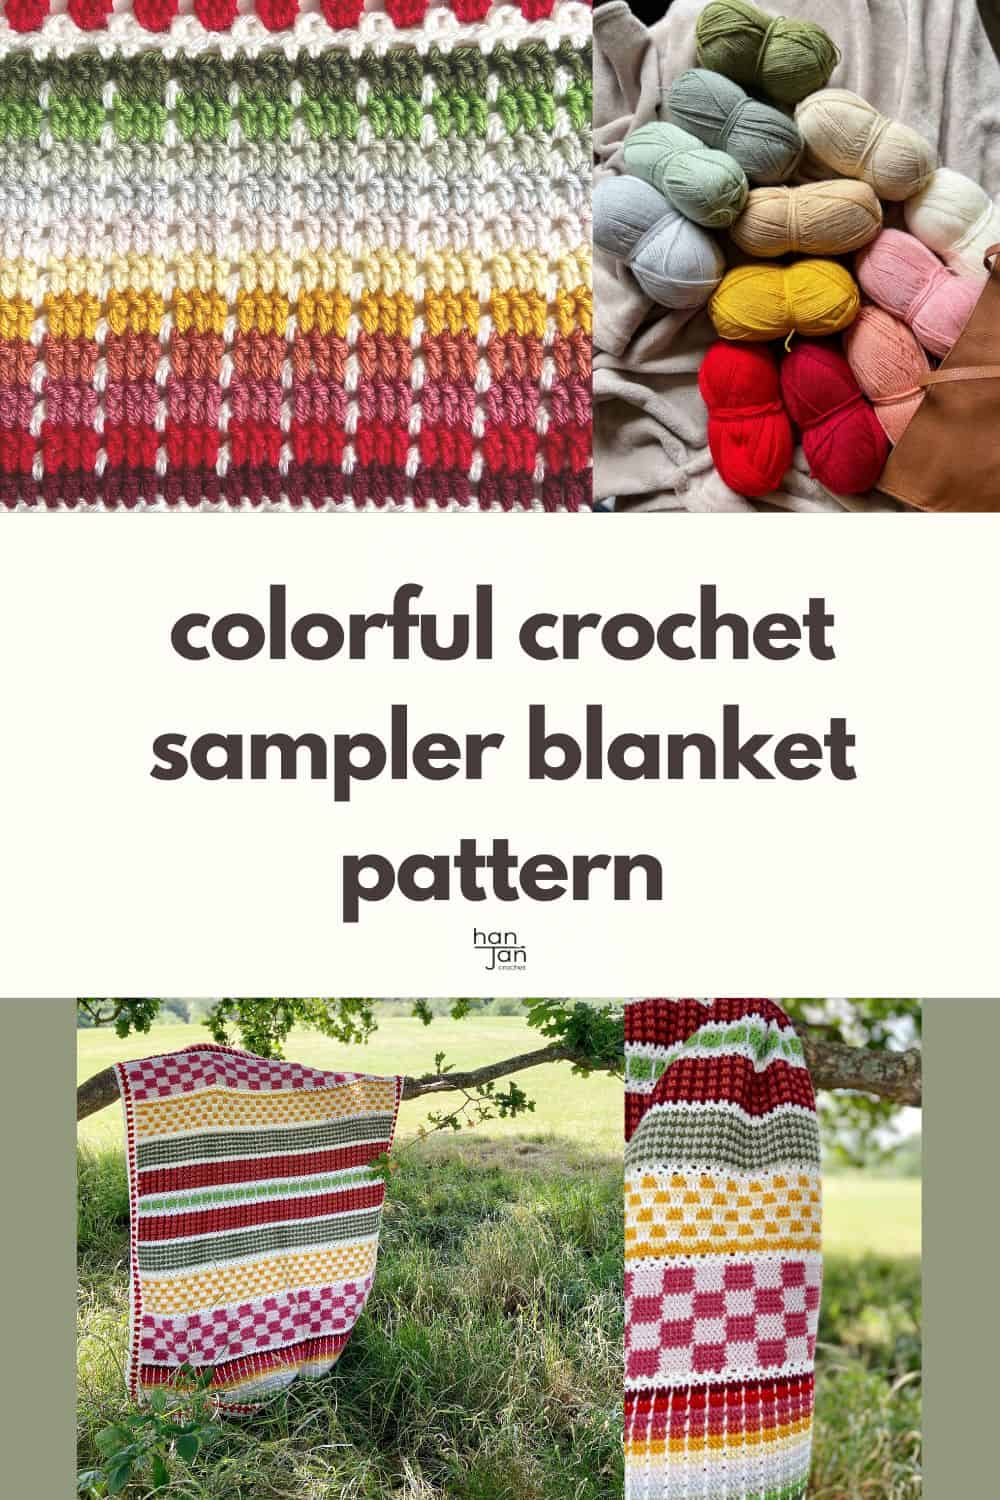
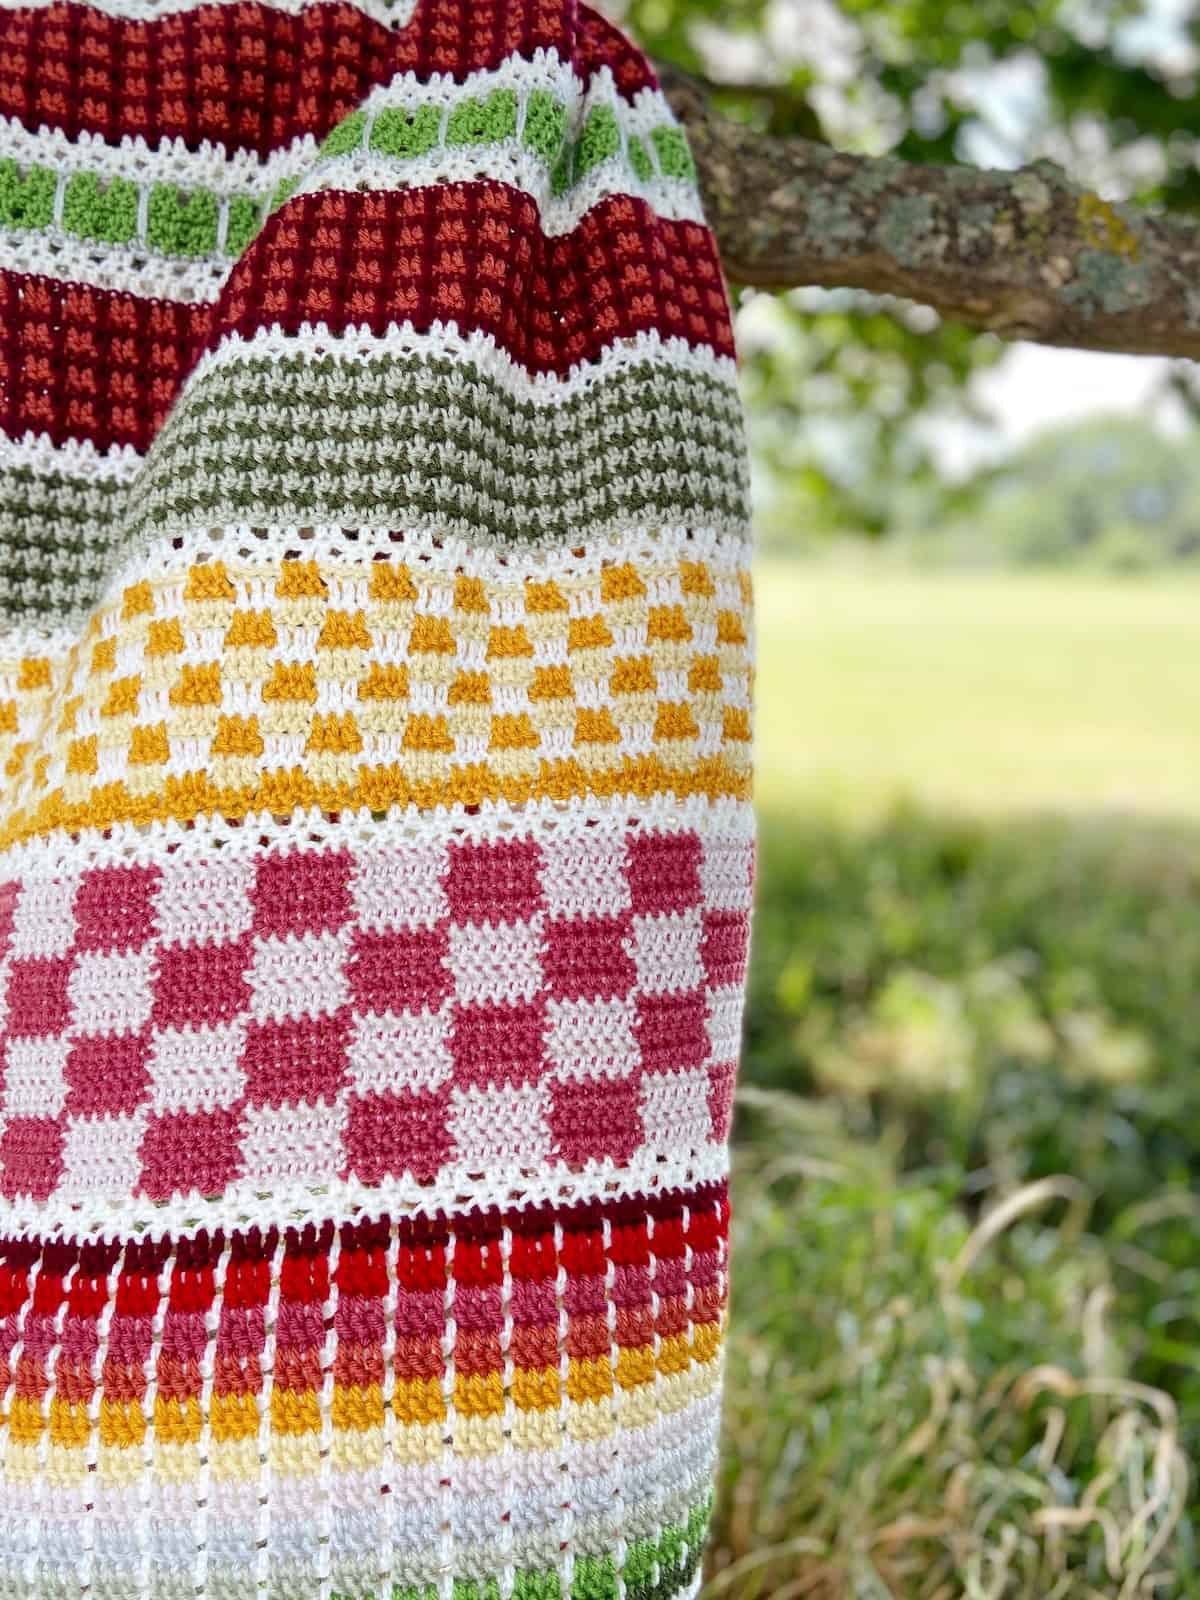
The Strawberries and Cream blanket is a stunning colorful sampler crochet blanket pattern that uses six different crochet colorwork stitches to create a striped afghan that looks fabulous and is great fun to make too!
Using just beginner crochet stitches, you can make this blanket using any colour combinations you like and it’s a perfect pattern for using up your yarn stash. Each different stitch has a video tutorial to accompany it along with one for the delicate strawberry stitch border too.
If you’ve ever wanted to conquer crochet colorwork but don’t know where to start then this colorful crochet blanket pattern is the one for you.
This post may contain affiliate links. Please see my full disclosure and privacy policy for details.
Scroll down for the Strawberries and Cream multi stitch crochet blanket free pattern in this post, or purchase the 29 page PDF Ebook or the full online crochet course with bonus videos, downloads and more to help you conquer all things crochet colorwork!
About this colorful sampler crochet blanket pattern
I have always been a huge fan of multi color crochet blanket patterns that use lots of different stitches. I get bored so easily with an entire blanket of exactly the same stitch (although they look beautiful) so I love mixing crochet stitches to create color and texture to keep me interested!
The great thing about using a mix of crochet stitches is that you can be really inventive with not only the texture but the style and balance of a project. You can create a stunning colorful crochet blanket by only using a few really simple stitches.
I know what you’re going to say though – ‘are colorwork crochet stitches hard Hannah? They look it!’
Yep. They do look tricky.
But I’m here to tell you that if you can work a US single crochet, half double crochet and double crochet then you can absolutely conquer these stitch patterns!
Whichever option of accessing the pattern you choose, there is a video tutorial to accompany each stitch. I’ll show you each of them as we go and we’ll get there together!
Why is a sampler crochet blanket good to make?
If you’ve not heard the term before a crochet sampler blanket is an easy crochet blanket pattern made up of lots of different crochet stitches and colors of yarn.
They are generally worked in rows like this one to create a striped crochet blanket pattern. They are also normally multi color designs but they don’t have to be!
I think they are a great crochet project for a few main reasons:
- You get to learn new crochet stitches you might not have tried before.
- You pick up new crochet techniques (like colorwork in this one).
- You can change the colors to suit your home or whoever you are making it for.
- You don’t need huge amount of each color so can use up some of your yarn stash for it!
What is the best crochet stitch for blanket patterns?
I often get asked which is my favourite crochet stitch for a blanket pattern and I can never decide!
What I do know is that when you create a sampler crochet blanket like this one you not only end up with a stunning blanket to enjoy but you also learn so many crochet colorwork stitches that you can use for all sorts of other projects. Winner all round!
The stitches that we will look at in this pattern (and that I think are the best crochet stitches for a blanket) are:
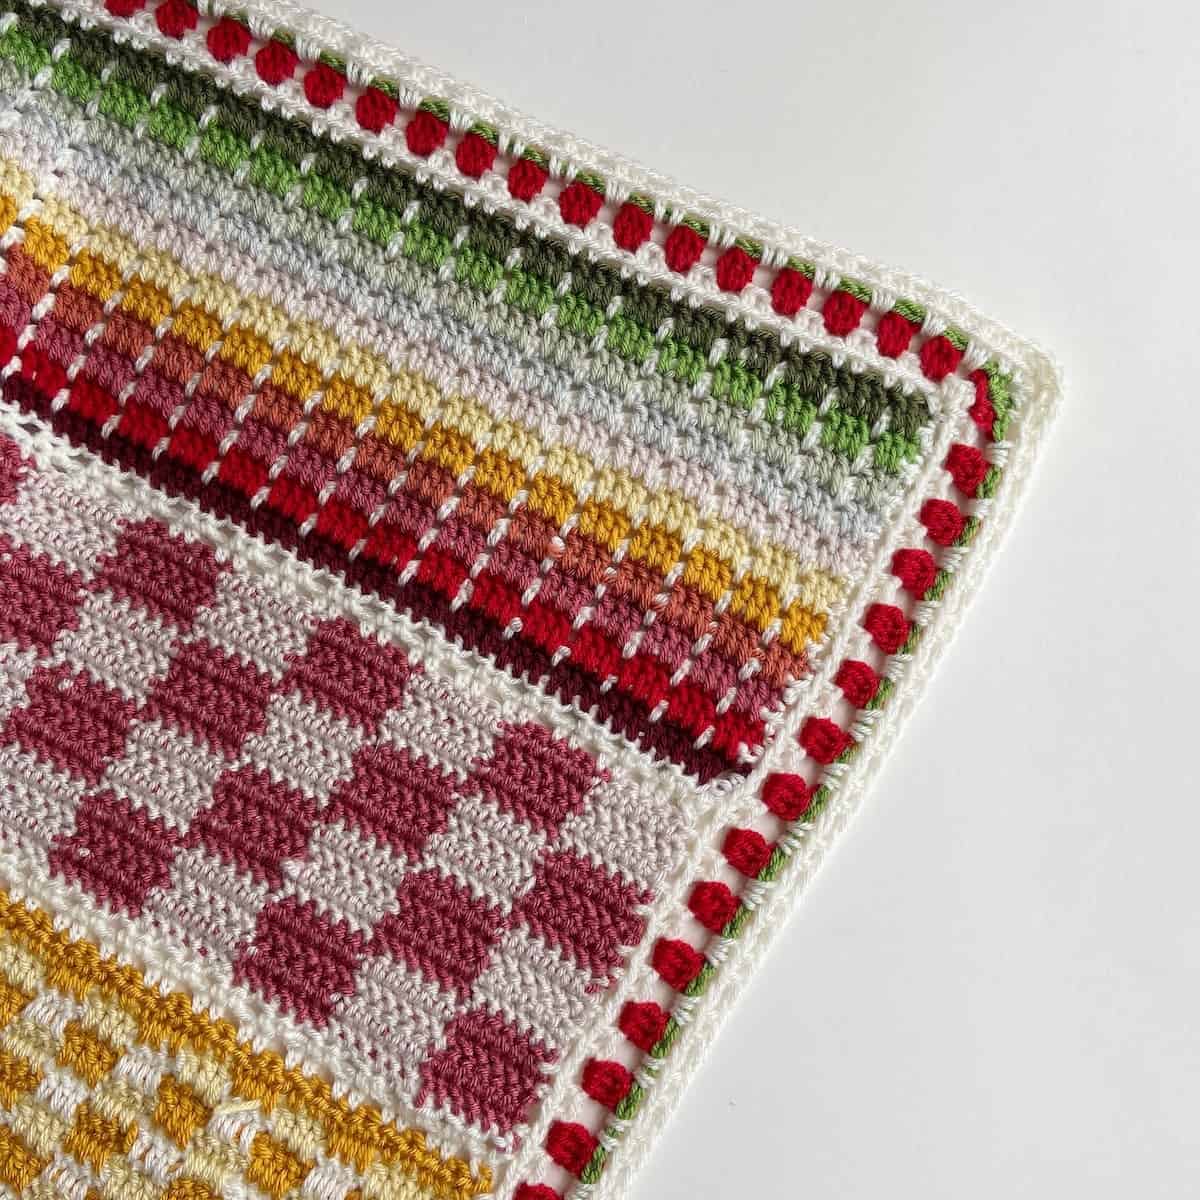
- Closed Granny Block Stitch – great for easy colorwork.
- Herringbone Gingham Stitch – really striking in just 2 colors.
- Crochet Plaid Stitch – using 3 colors and a moss stitch technique to drop the stitches two rows below.
- Lemon Peel Stitch (or griddle stitch) – not a classic colorwork crochet stitch but worked in stripes it looks stunning!
- Boxed Moss Stitch – a combination of row heights to create a fun ‘boxed’ looking crochet stitch.
- Spike Stitch – add some real drama with a stitch that slots right down into many rows below.
In this blanket we’ll also learn an ‘Intersection pattern’ which is just 2 rows that comes between the different stitches to punctuate and balance the blanket.
We then top it all off with a cute strawberry stitch border!
All in all, a feast of crochet colorwork stitches that you can use for so many more projects than just this one!
Join the crochet along!
I am delighted to say that during the month of July 2022 I will be hosting a crochet along for this sampler crochet blanket!
I’d be honoured if you’d like to join us 🙂
The main CAL will be hosted in both my HanJan Crochet Community Group and the LoveCrafts Community Group and each week we’ll share our progress – I can’t wait!
If you choose to view the pattern for free on this post throughout the CAL then you’ll find a new section released each week from 1st July. By the end of the month we will have created half of the blanket and then you can carry on making the rest at your own pace.
The best way to stay up to date is to sign up below and I’ll let you know when everything is updated for you!
What should I do if I struggle with the colorwork stitches?
I know that crochet colorwork techniques and stitches can seem really intimidating (especially if you are new to crochet) and so please don’t be afraid to ask any questions that you have in the community groups.
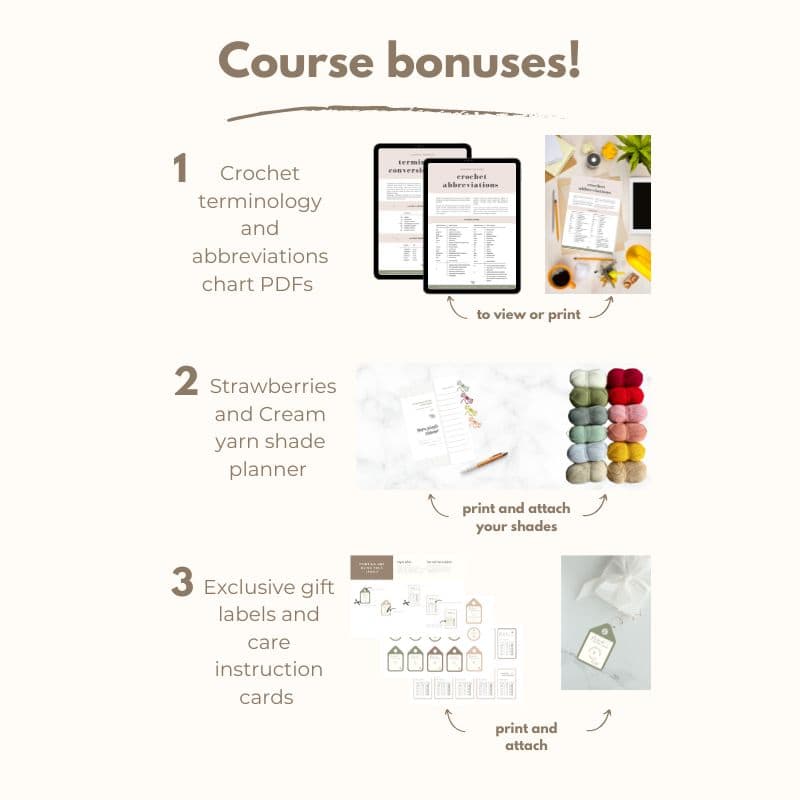
If you are really invested in conquering these crochet techniques then I’d love for you to take my entire course on the project. You’ll leave with much more than just a finished blanket – a huge collection of crochet skills to last a lifetime and lift all of your projects to the next level!
Here’s a peek of all the extras you get with the course:
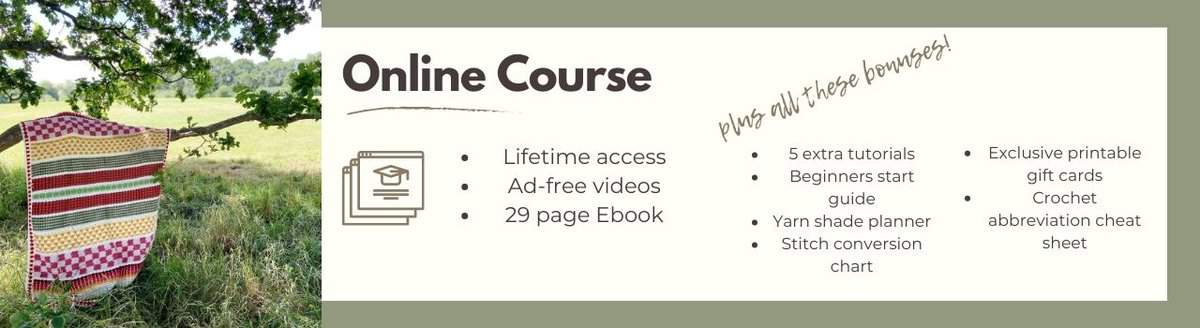
Crochet Colorwork Course
Get everything you need in just one place with no ads!
Yarn
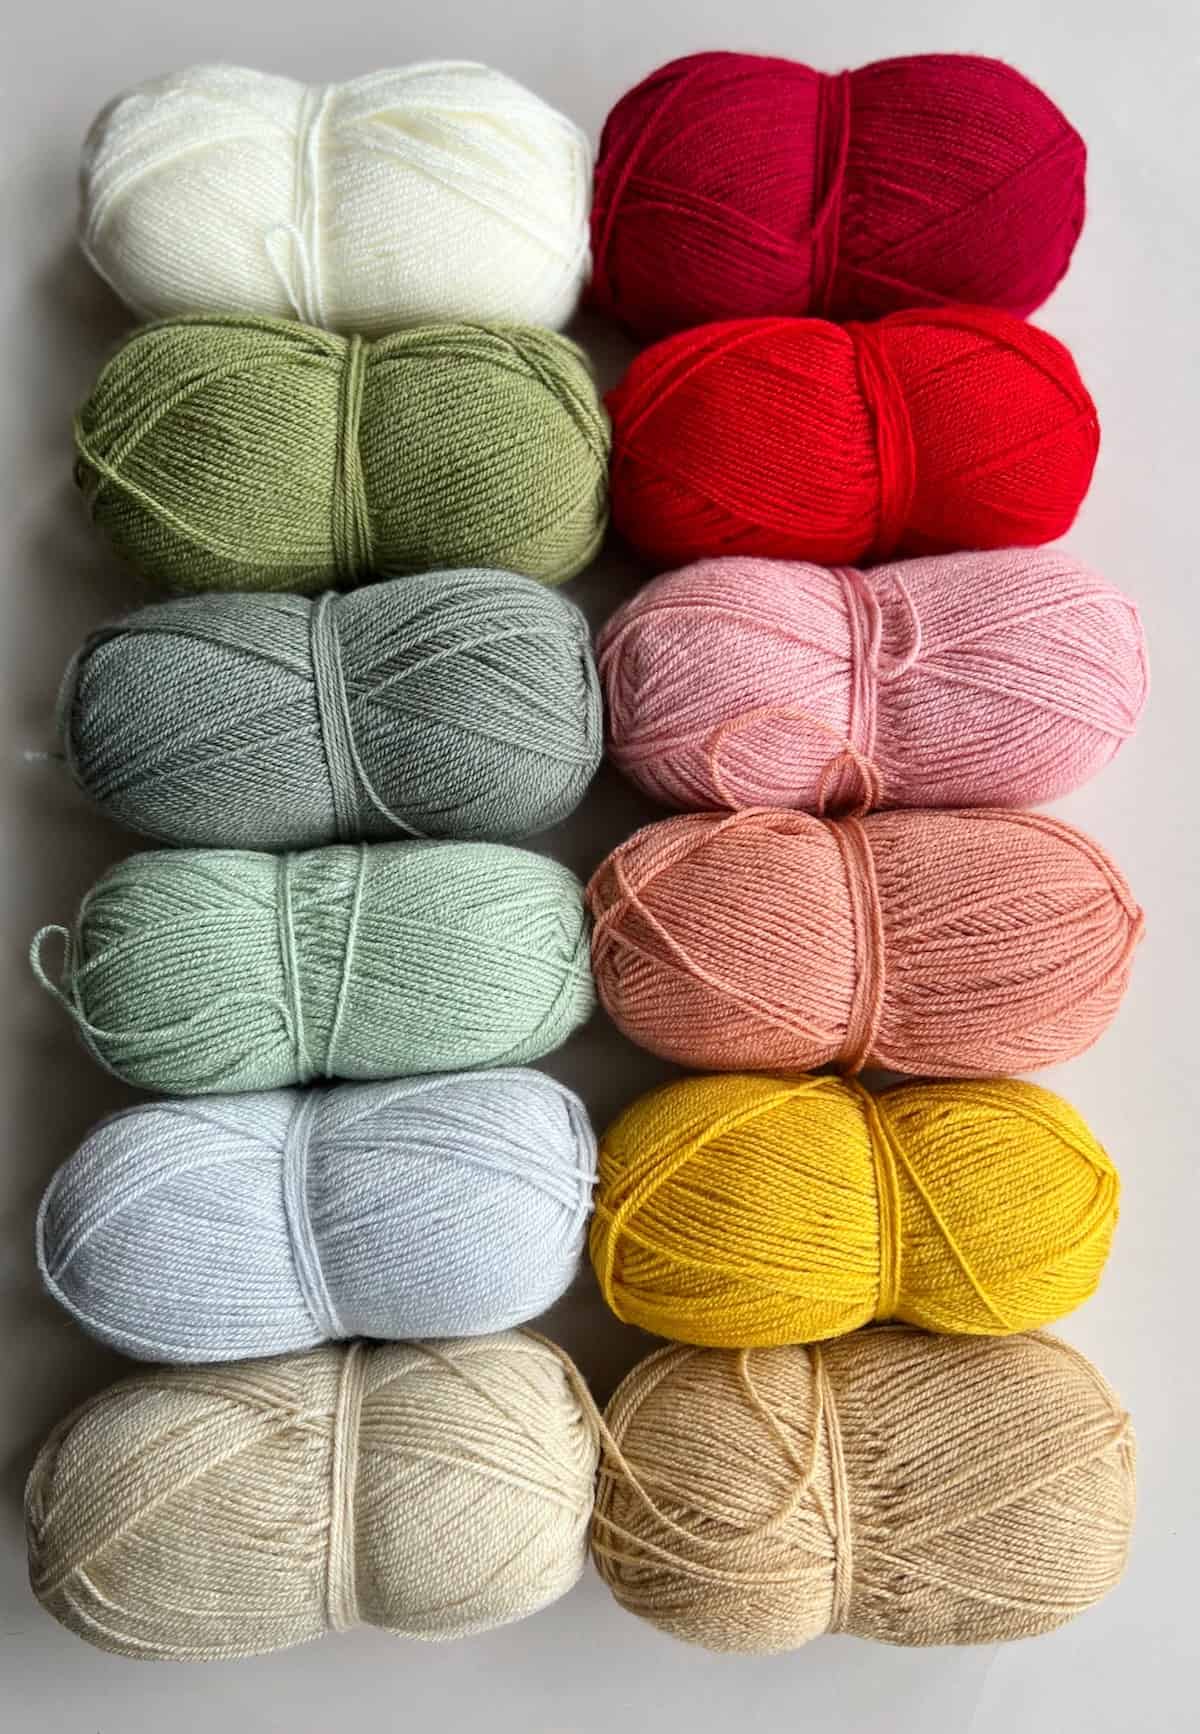
To make the colorful crochet blanket I originally used Deramores Studio DK but that isn’t available anymore unfortunately.
To recreate it for the course I used Paintbox Simply Double Knit 100% Acrylic, 276m, 302yds/100g which works perfectly and comes in such beautiful colors.
You’ll need approximately the following amounts:
3 balls of A (Champagne White) approx 740m/810yds
1 ball of B (Pear Green) approx 180m/195yds
1 ball of C (Pine Green) approx 145m/160yds
1 ball of D (Pistachio Green) approx 185m/200yds
1 ball of E (Misty Grey) approx 105m/115yds
1 ball of F (Vanilla Cream) approx 240m/265yds
1 ball of G (Light Caramel) approx 180m/195yds
1 ball of H (Mustard Yellow) approx 165m/180yds
1 ball of I (Vintage Pink) approx 160m/175yds
1 ball of J (Blush Pink) approx 240m/365yds
1 ball of K (Rose Red) approx 80m/85yds
1 ball of L (Red Wine) approx 240m/265yds
If you fancy raiding your stash or working with different colors (I hope you do as I’d love to see it!) then you’ll need a total of 12 shades and the approx yardage shown above of each.
I often get asked about ideas for alternative yarns. Here are some other Category 3 DK yarns that I think would work really well for this blanket:
- Stylecraft Special Double Knit 100% Acrylic, 295m, 323yds/100g
- Sirdar Stories DK 60% Cotton, 40% Acrylic, 140m, 153yds/50g
You could absolutely substitute for a Category 4 worsted weight yarn if you’d like to have just a slightly bigger blanket.
Tension and Sizing
The finished colorful crochet blanket measures 112cm by 140cm (44″ by 55″).
15sts and 13 rows of Section 1 pattern (closed granny block) = 10cm by 10cm (4″ by 4″).
Instructions for how to resize and customise the blanket are included in the PDF Ebook and Course.
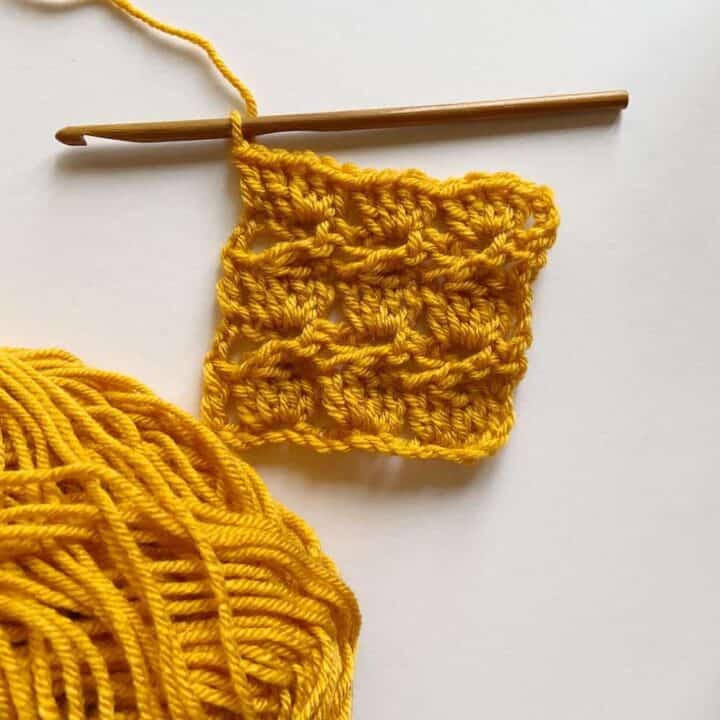
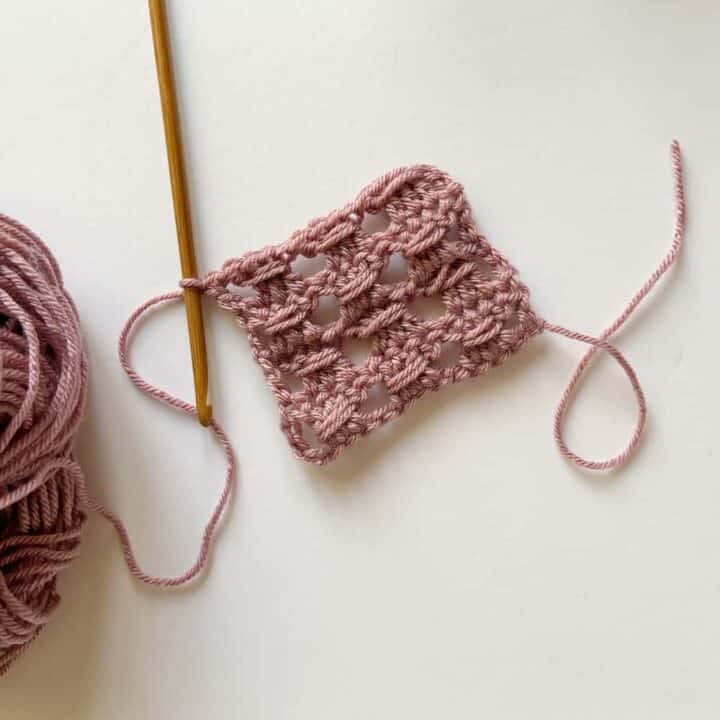
Swatch Instructions:
Foundation chain: ch26
Row 1: dc in 4th ch from hook (the skipped 3ch counts as 1dc), dc in each ch across [24]
Row 2: ch1, hdc, ch2, skip 2 sts, hdc in space before next st, *ch2, skip 3 sts, hdc in space before next st; rep from * to last 3 sts, ch2, skip 2 sts, hdc in last st (this is the 3ch at end).
Row 3: ch1, hdc in next st, dc in next 2 sts of two rows below (always working over the ch2 from previous row), skip hdc, *dc in next 3 sts of two rows below, skip htr; rep from * to last 3 sts, dc in next 2 sts of two rows below, hdc in last st.
Repeat Row 2 and 3 until the swatch measures around 15cm.
Materials
Along with your yarn, you will need the following:
- 4.5mm (US G+) crochet hook- my favourites are Furls Streamline Swirl crochet hooks or Clover Amour crochet hooks.
- Scissors
- Tapestry Needle
- Stitch markers
Prefer to get the ad-free PDF?
Get the ad-free, printable PDF Ebook in both UK and US crochet terms here:
Don’t forget to join HanJan Crochet to receive regular discount codes (and more free patterns!) and Pin this striped crochet blanket pattern to your crochet Pinterest board!
Glossary and Abbreviations
ch(s) – chain(s)
ss – slip stitch
st(s) – stitch(es)
RS – right side
rep – repeat
Crochet Stitches
| UK Crochet Terminology | US Crochet Terminology |
| dc – double crochet | sc – single crochet |
| htr- half treble crochet | hdc – half double crochet |
| dtr – double treble crochet | tr – treble crochet |
Special Stitches
Hhtr – herringbone half treble (UK) / Hhdc – herringbone half double crochet (US)
Yarn over, insert hook into next stitch, yarn over and pull up a loop (3 loops on hook). Pull first loop straight through the second loop (similar to a slip stitch to leave 2 loops on the hook). Yarn over, pull through two remaining loops on hook.
3tr-cl – 3 treble cluster stitch (UK) / 3dc-cl – 3 double crochet cluster stitch (UK)
Yarn over, insert hook into st, yarn over and pull through, yarn over and pull through 2 loops] 3 times into same st or space, yarn over, pull through all loops on hook.
Pattern Notes
A ch1 at the beginning of a row does not count as a stitch.
Turn your work at the end of each row.
Stitch counts are given in [ ] at the end of each row. If no stitch count is given, then the count is the same as the previous row.
Construction
The blanket is worked in one piece back and forth in rows, turning your work at the end of each row.
The border is then added around the edge of the blanket in rounds without turning your work.
Strawberries and Cream Blanket Crochet Pattern
US Crochet Terminology
SECTION 1: Closed Granny Block Stitch Crochet
Find a video tutorial of this crochet stitch here:
Rows 1-21:
Foundation chain: using Yarn B, ch146.
Row 1: dc in 4th ch from hook (the skipped 3ch counts as dc), dc in each ch across. [144 sts]
Change to Yarn A.
Row 2: ch1, hdc, ch2, skip 2 sts, hdc in space before next st, *ch2, skip 3 sts, hdc in space before next st; rep from * to last 3 sts, ch2, skip 2 sts, hdc in last st (this is the 3ch at end). Change to Yarn C.
Row 3: ch1, hdc in next st, dc in next 2 sts of two rows below (always working over the ch2 from previous row), skip hdc, *dc in next 3 sts of two rows below, skip hdc; rep from * to last 3 sts, dc in next 2 sts of two rows below, hdc in last st. Change to Yarn A.
Rows 2 and 3 create the pattern.
Rep the pattern in the following colour sequence:
Row 4: Yarn A, Row 5: Yarn D
Row 6: Yarn A, Row 7: Yarn E
Row 8: Yarn A, Row 9: Yarn F
Row 10: Yarn A, Row 11: Yarn G
Row 12: Yarn A, Row 13: Yarn H
Row 14: Yarn A, Row 15: Yarn I
Row 16: Yarn A, Row 17: Yarn J
Row 18: Yarn A, Row 19: Yarn K
Row 20: Yarn A, Row 21: Yarn L
INTERSECTION:
Rows 22-23:
Intersection pattern – the following 2 rows are repeated at the end of each section in Yarn A.
When pattern states to work Intersection Pattern you will work these two rows.
Row 22: using Yarn A, ch1, *hdc, ch1, skip 1 st, hdc; rep from * across, (noting that there is a hdc at beginning and end of each repeat).
Row 23: Repeat row 22.
SECTION 2: Herringbone hdc Gingham Crochet Stitch
Find a video tutorial of this crochet stitch here:
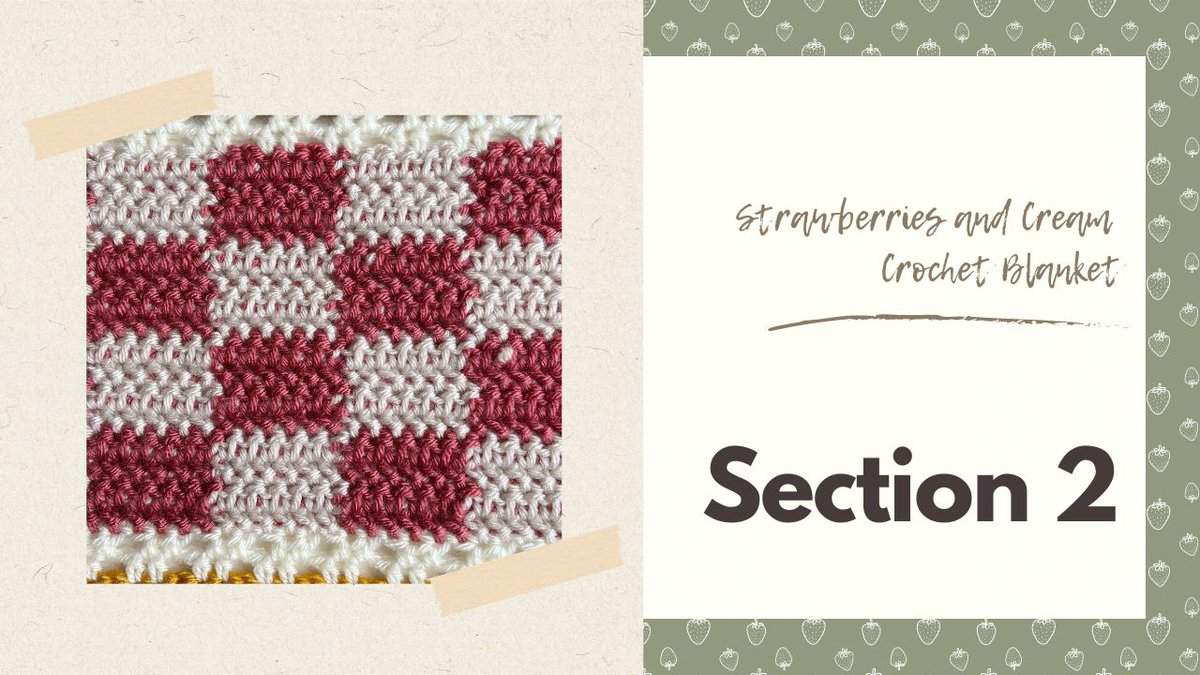
Rows 24-39:
Using Yarn J and Yarn F (carry the unused yarn along and trap yarn inside the stitches during this section).
Row 24: Starting with Yarn J ch1, 6Hhdc, in Yarn F 6Hhdc, *in Yarn J 6Hhdc, in Yarn F 6Hhdc; rep from * to end.
Row 25: Continue in Yarn F ch1, 6Hhdc, in Yarn J 6Hhdc, *in Yarn F 6Hhdc, in Yarn J 6Hhdc; rep from * to end.
Row 26: Rep row 24.
Row 27: Rep row 25.
Row 28: Rep row 25.
Row 29: Rep row 24.
Row 30: Rep row 25.
Row 31: Rep row 24.
Rows 32-35: Rep rows 24-27.
Rows 36-39: Rep rows 28-31.
Change to Yarn A.
Rows 40-41: Work Intersection Pattern (rows 22-23).
SECTION 3: Plaid Crochet Stitch
Find a video tutorial of this crochet stitch here:
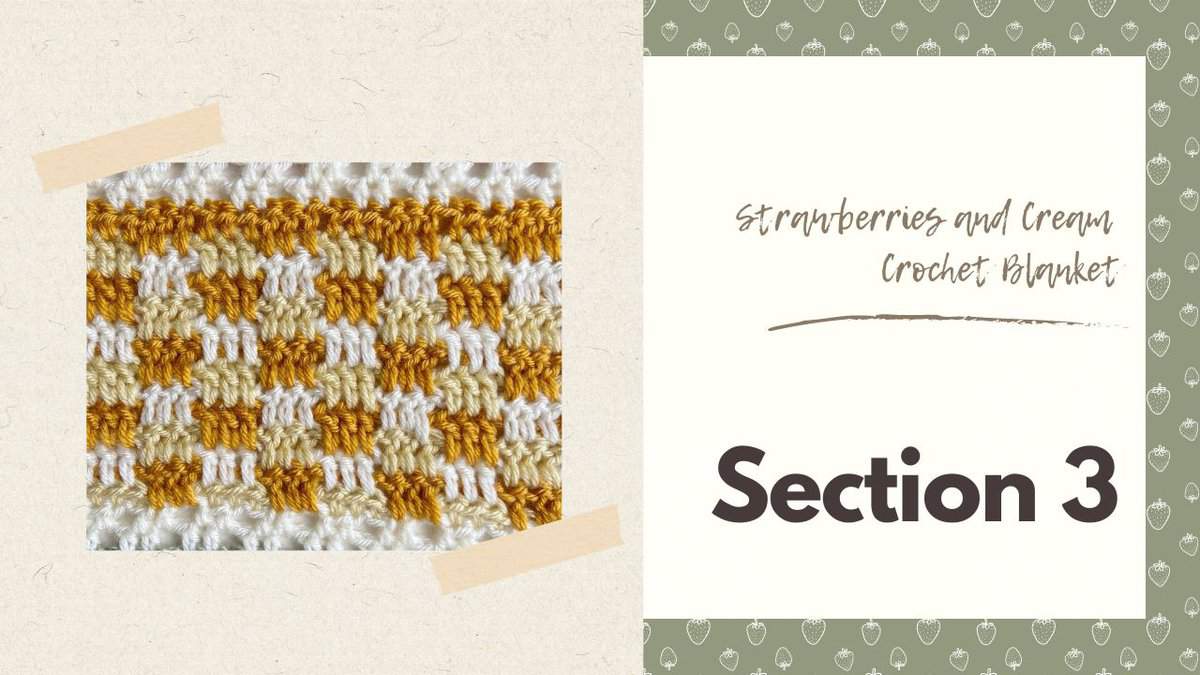
Row 42: using Yarn H, ch1, *hdc in next 3 sts, ch3, skip 3 sts; rep from * to last 6 sts, hdc in last 6 sts. Change to Yarn G.
Row 43: ch1, hdc in next 3 sts, *ch3, skip 3 sts, dc in next 3 sts two rows below (working over chains from previous row); rep from * to last 3 sts, hdc in last 3 sts.
Change to Yarn A.
Rows 44-54: Rep row 43 in the following colour sequence:
Row 44: Yarn A
Row 45: Yarn H
Row 46: Yarn G
Row 47: Yarn A
Row 48: Yarn H
Row 49: Yarn G
Row 50: Yarn A
Row 51: Yarn H
Row 52: Yarn G
Row 53: Yarn A
Row 54: Yarn H
Row 55: Using Yarn G, ch1, hdc in next 6 sts, *dc in next 3 sts two rows below, hdc in next 3 sts; rep from * to end.
Change to Yarn A.
Rows 56-57: Work Intersection Pattern (rows 22-23).
SECTION 4: Lemon Peel Stitch
Find a video tutorial of this crochet stitch here:
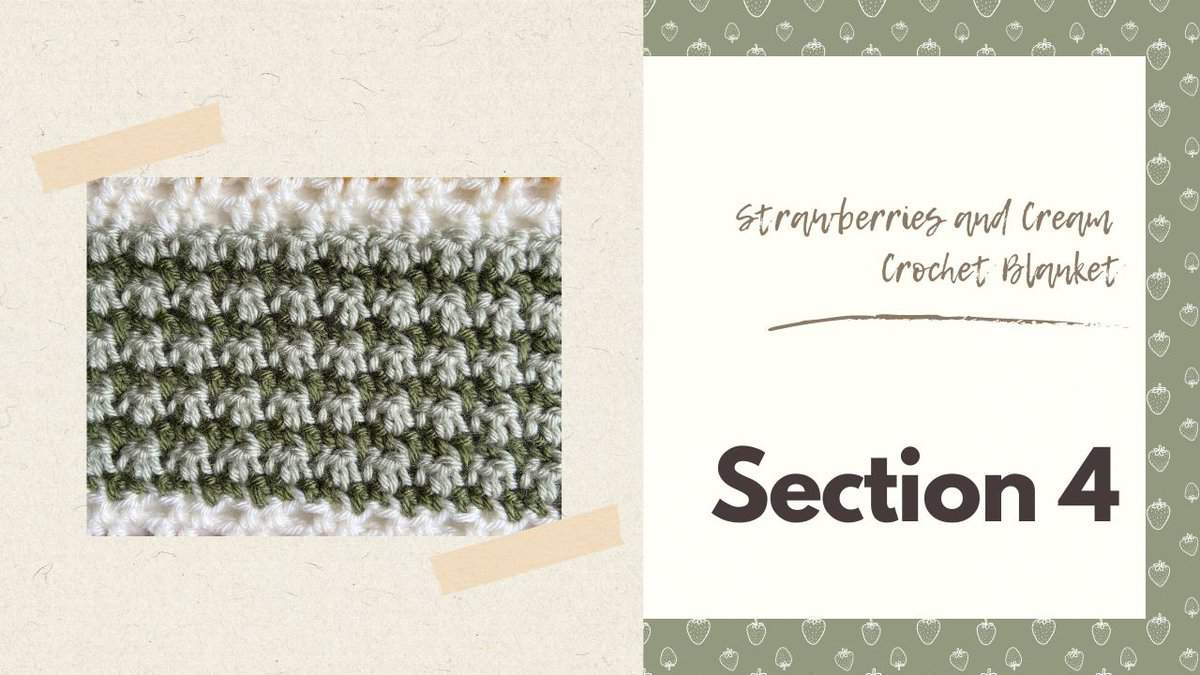
Row 58: Using Yarn D, ch1, *sc, dc; rep from * to end, change to Yarn B.
Rows 59-67: Rep row 58 in the following colour sequence:
Row 59: Yarn B
Row 60: Yarn D
Row 61: Yarn B
Row 62: Yarn D
Row 63: Yarn B
Row 64: Yarn D
Row 65: Yarn B
Row 66: Yarn D
Row 67: Yarn B
Change to Yarn A.
Rows 68-69: Work Intersection Pattern (rows 22-23).
SECTION 5: Boxed Moss Stitch
Find a video of this section here:

Row 70: using Yarn L, ch1, sc in each st to end.
Change to Yarn I.
Row 71: ch4 (counts as st and ch), skip 1 st, *dc in next 2 sts, ch1, skip 1 st; rep from * to last st, dc in last st, change to Yarn L.
Row 72: ch1, sc in next st, dc in skipped st two rows below (working over ch from previous row), *sc in next 2 sts, dc in skipped st two rows below; rep from * to last st, sc in last st.
Change to Yarn L.
Rows 71 and 72 create the pattern.
Rows 73-78: Repeat the pattern.
Change to Yarn A.
Rows 79-80: Work Intersection Pattern (rows 22-23).
SECTION 6: Crochet Spike Stitch
Find a video of this section here:
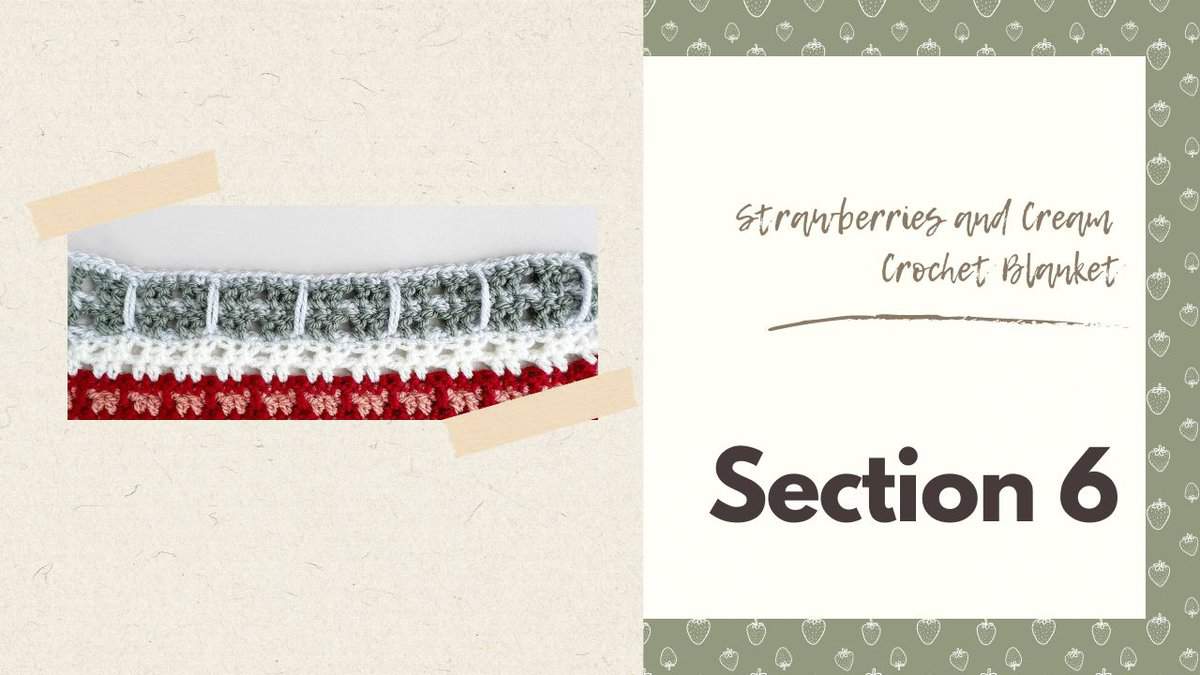
Row 81: using Yarn E, ch1, sc in each st to end.
Change to Yarn C.
Row 82: ch4 (counts as st and ch1), skip 1 st, *dc in next 2 sts, ch1, skip 1 st; rep from * to last st, dc in last st.
Row 83: ch1, sc in next st, ch1, skip 1 st, *sc in next 2 sts, ch1, skip 1 st; rep from * to last st, sc in last st.
Row 84: Rep row 82.
Change to Yarn E.
Row 85: ch1, sc in next st, dc in skipped st of row 81 (working over the chains of previous rows), *sc in next 5 sts, dc in skipped st of row 81 (working over the chains of previous rows); rep from * to last 4 sts, sc in last 4 sts.
Change to Yarn A.
Rows 86-87: Work Intersection Pattern (rows 22-23).
SECTION REPEATS
Rows 88-165:
SECTION 5 REPEAT:
Rows 88-96: Rep Section 5 in exactly the same colour sequence.
Change to Yarn A.
Rows 97-98: Work Intersection Pattern (rows 22-23).
REPEAT SECTION 4:
Rows 99-108: Rep Section 4, but this time, start with Yarn B.
Change to Yarn A.
Rows 109-110: Work Intersection Pattern (rows 22-23).
REPEAT SECTION 3:
Rows 111-124: Rep Section 3 in the colour sequence: Yarn G, Yarn H, Yarn A, Yarn G, Yarn H, Yarn A, Yarn G, Yarn H, Yarn A, Yarn G, Yarn H, Yarn A, Yarn G, Yarn H.
Change to Yarn A.
Rows 125-126: Work Intersection Pattern (rows 22-23).
REPEAT SECTION 2:
Rows 127-142: Rep Section 2 but switching the colours.
Change to Yarn A.
Rows 143-144: Work Intersection Pattern (rows 22-23).
REPEAT SECTION 1:
Row 145: using Yarn L, ch3, dc in each st to end, change to Yarn A.
Row 146: ch1, hdc in next st, ch2, skip 2 sts, hdc in space before next st, *ch2, skip 3 sts, hdc in space before next st; rep from * to last 3 sts, ch2, skip 2 sts, hdc in last st. Change to Yarn K.
Row 147: ch3, dc in next 2 sts of two rows below (always working over the ch2 from previous row), skip hdc, *dc in next 3 sts of two rows below, skip hdc; rep from * to last 3 sts, dc in next 2 sts of two rows below, hdc in last st.
Change to Yarn A.
Rows 146 and 147 create the pattern.
Rep the pattern in the following colour sequence:
Row 148: Yarn A
Row 149: Yarn J
Row 150: Yarn A
Row 151: Yarn I
Row 152: Yarn A
Row 153: Yarn H
Row 154: Yarn A
Row 155: Yarn G
Row 156: Yarn A
Row 157: Yarn F
Row 158: Yarn A
Row 159: Yarn E
Row 160: Yarn A
Row 161: Yarn D
Row 162: Yarn A
Row 163: Yarn C
Row 164: Yarn A
Row 165: Yarn B
Lightly block the blanket before adding border. You can weave in your ends at this point if you like or leave them for after the border.
Crochet Colorwork Course
Come and join me for the Strawberries and Cream course and really conquer colorwork in crochet!
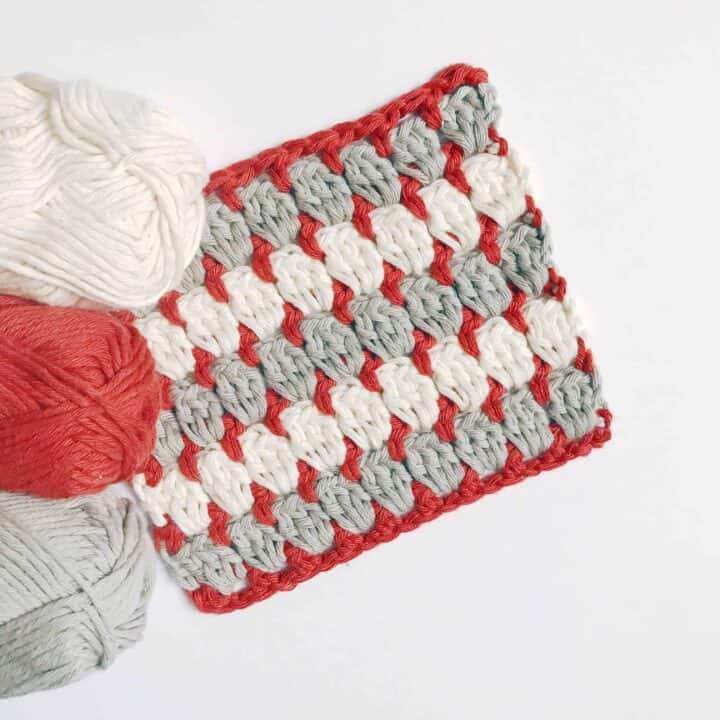
BORDER – Crochet Strawberry Stitch
The border is worked around the entire blanket in rounds with the RS facing you.
Watch a video tutorial here:
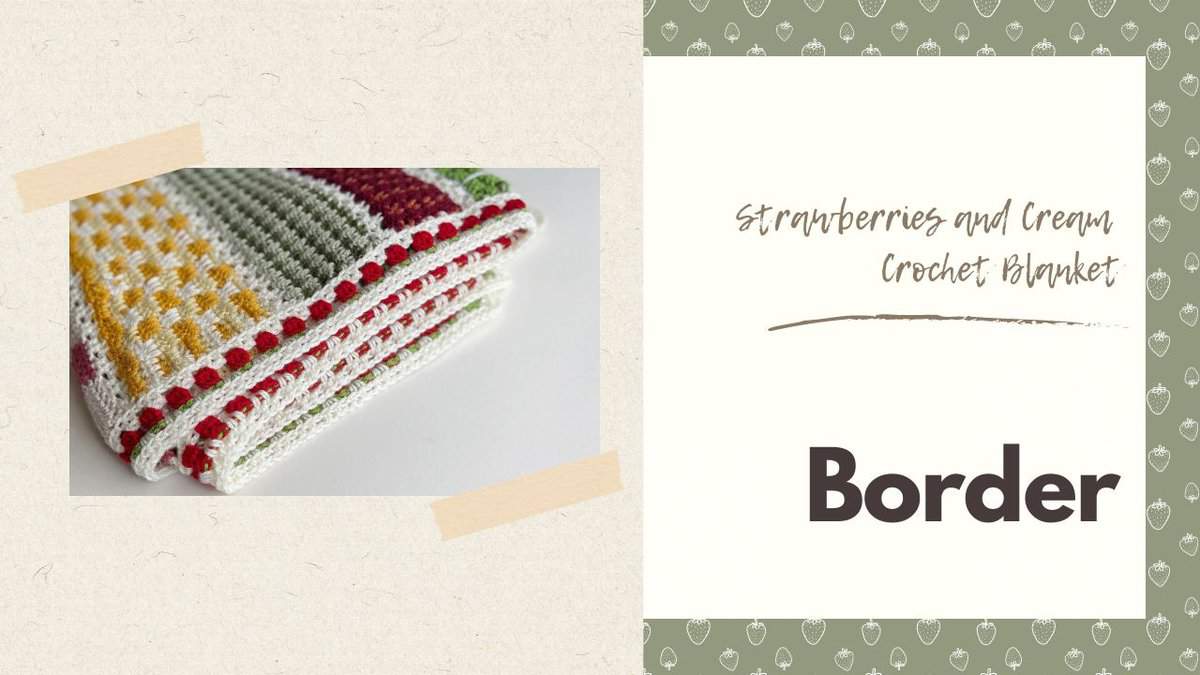
Round 1: join Yarn A to first st of last row. Working along the 144 sts, ch1 (not counted as a st), *hdc, ch1, skip 1 st, hdc*; rep from * to * to corner, ch1 (for first corner), rep from * to * 54 times along first long edge, ch1 (for next corner), rep from * to * along 144 sts of second short edge, ch1 (for next corner), rep from * to * 54 times along second long edge, ch1 (for final corner), ss to 1st st to join.
Round 2: ch1, starting in same st, *[hdc, ch1, skip 1 st, hdc;] to next corner, [hdc, ch1, hdc] in corner ch1-sp; rep around and after last corner, ss in 1st st to join.
Fasten off.
Round 3: join Yarn K to any corner ch1-sp, ch1, *[hdc, ch1, hdc] in corner ch1-sp, ch2, skip 2 sts, [3dc-Cl in next ch1-sp, ch2, skip 2 sts] to next corner; rep from * around, ss in 1st st to join.
Fasten off.
Round 4: Join Yarn C to any corner ch1-sp, ch1, *[hdc, ch1, hdc] in corner ch1-sp, ch2, skip 2 sts, [ss in 3dc-Cl, ch2, skip 2 sts] to next corner; rep from * around, ss in 1st st to join.
Fasten off.
Round 5: Join Yarn A to any corner ch1-sp, ch1, [hdc, ch1, hdc] in same corner ch1-sp, hdc in next st, *2hdc in ch2-sp of round 3 (working over previous rounds chains), ch1, skip next st; rep from * to st before corner, hdc, [hdc, ch1, hdc] in corner ch1-sp; rep from * around, omitting last corner, ss in 1st st to join.
Round 6: Ss into corner ch1-sp, ch1, [hdc, ch1, hdc] in same ch1-sp, *hdc in next 3 sts, [hdc, ch1, skip 1 st, hdc] to 3 sts before corner, hdc in 3 sts, [hdc, ch1, hdc] in corner ch1-sp; rep from * around, omitting last corner, ss in 1st st to join.
Weave in all ends to complete.
Join HanJan and Share Your Crochet!
It’s an honour to be able to create and share my free crochet patterns with you. I’d love to stay connected and send you regular discount codes and free patterns! Please sign up for my subscriber list to get a free gift right now!
I look forward to seeing your finished crochet projects, so please share them with me in the HanJan Crochet Facebook group or on Instagram and tag #hanjancrochet.
Or share your projects on Ravelry or LoveCrafts!
Get everything today!
Get the ad-free, printable PDF Ebook or course option and get making today.

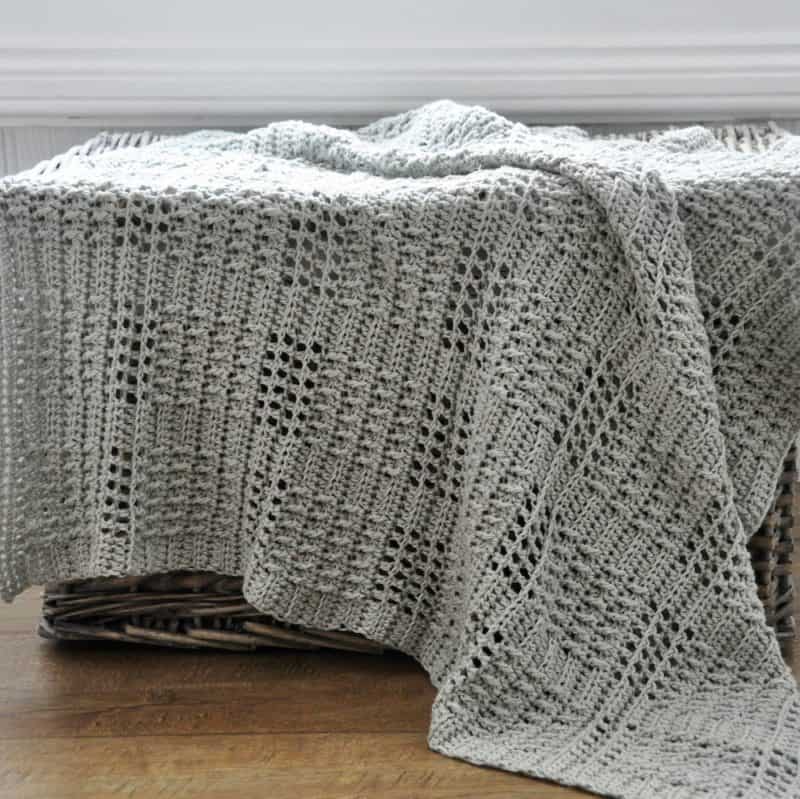
More Free Colourful Blanket Crochet Patterns
If you enjoy making colourful crochet blanket patterns here are a couple more patterns you might enjoy crocheting!
I also have a great set of easy beginner crochet blanket patterns that would work so well for busting that yarn stash too!