Learn to crochet the alpine stitch and make a gorgeous baby blanket with rich texture! With the use of post stitches you can achieve these beautiful ridges, and pretty easily, too, once you get a feel for the technique!
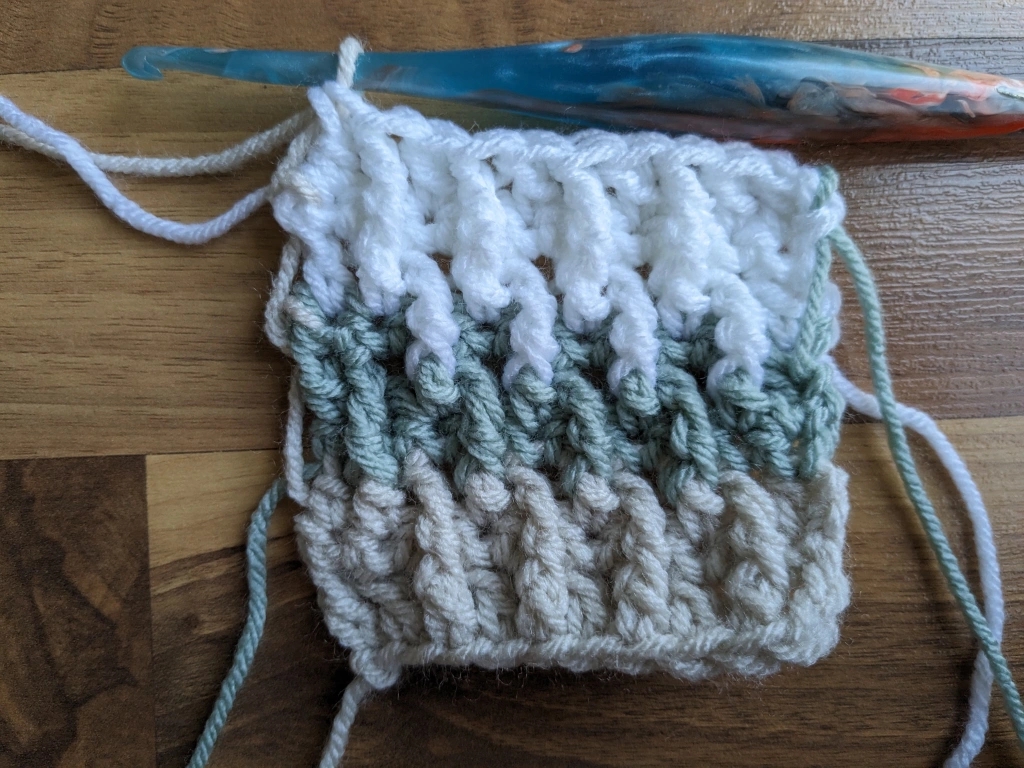
Believe it or not, the alpine stitch is a pretty mindless pattern once you get going. It’s a four row repeat but it feels like a two row repeat. Each set of two rows is very similar – just different enough to be a four row repeat officially.
There’s a clear right side and wrong side for alpine stitch, but I think the back of the blanket is pretty gorgeous in its own right!
I knew I wanted to work this blanket carrying the yarn up the sides. Tamara Kelly of Moogly taught a FaveCrafts Studio Live webinar on making a beautiful tricolor shawl, carrying the yarn up the sides so there were fewer ends to weave in. I love that webinar, and I LOVED carrying the yarn up the sides as I worked up this pattern. Having barely any ends to weave in is a game changer!
In order to carry your yarn up the sides, you need to complete an odd number rows per color. Since the alpine stitch is a four row repeat, I wasn’t sure how changing the color every three rows would pan out. Well I am thrilled with the results! I think the colors transition just beautifully, a bit more of an ombre or even woven look.
Materials
- Size 4 worsted weight yarn, approximately 1,700 yards. For this pattern I used:
- Color A: 2 Skeins I Love This Yarn! in Linen (about 500 yards)
- Color B: 2 Skeins I Love This Yarn! in Spa (about 500 yards)
- Color C: 2 Skeins I Love This Yarn! in White (about 700 yards, includes border)
- Size I/9 5.5mm crochet hook
- Stitch Markers
- Scissors
- Tapestry needle for weaving in ends
Abbreviations
- blo: back loop only
- ch(s): chain(s)
- dc(s): double crochet(s)
- hdc(s): half double crochet(s)
- fptrc(s): front post treble crochet(s)
- pm: place marker
- rep: repeat
- sc(s): single crochet(s)
- sl st: slip stitch
- sk: skip
- sp(s): space(s)
- st(s): stitch(es)
- yo: yarn over
Finished Size
Approximately 37″x46″
Gauge
12 alpine sts x 10 rows = 4″x4″
Notes
The alpine stitch can be achieved using either front post double crochet stitches OR front post treble crochet stitches. Haak Maar Raak suggests front post treble crochet if your work starts curling. I tend to crochet tightly, so I opted for the treble crochet option!
I did not use stitch markers as I worked the body of the blanket, but as you work the blanket border I do highly recommend using stitch markers in the corners.
I mentioned in the description that yarn is worked carrying the colors up the sides. Significantly fewer ends to weave in! You’ll complete your starting ch and the first 3 rows in your first color, then change colors every 3 rows for the body of the blanket.
I tacked down any floats at the end of every row I worked on to prevent super long, tight floats from forming. Once you’ve completed the first 10 rows or so and all three colors are begun, you should have in mind that at the end of EVERY row you will either be tacking down floats OR changing color.
I have a detailed photo tutorial of this stitch in a separate post, which you can view here: Tricolor Alpine Stitch Tutorial.
Winding Road Crochet’s Camel Stitch Blanket Border Tutorial is FANTASTIC – super clear instructions with step out photos and a video tutorial. I highly recommend if you have any confusion about working this border!
To adjust the width of the blanket, ch any even number of sts to start.
Tricolor Alpine Stitch Baby Blanket Pattern
With color A (linen/beige), Ch 98.
Row 1: First 2 chs count as a dc. Dc in the 3rd ch from the hook and in each st across. You should have 96 sts. Ch 1 and turn.
Row 2: Sc in each st across. Place final sc in the turning ch from the previous row. (This is the only row where you are working into a turning ch!) You should have 96 scs. Ch 1 and turn.
Row 3: Dc in the first st, *fptrc in the next st, dc in the next st* rep until there is one st left in the row. Dc in the last st, switching to color B (spa/teal) during the last yo. Ch 1 and turn.
Row 4: Sc in each st across. Ch 1 and turn.
Row 5: Dc in the first st, *dc in the second st (the top of the fptrc from row 3), fptrc in the next st (dc from row 3)* rep until there is one st left in the row. Dc in the last st, tacking down color A in the last yo. Tacking down your colors as you work helps prevent super long floats from becoming too tight. Ch 1 and turn.
Row 6: Sc in each st across. Switch to color C (white) during the last yarn over in the last sc of the row. Ch 1 and turn.
Rep Rows 3-6 until desired size. At the end of each row from here on out, you are either tacking down your color from a previous row OR changing colors. You will change colors every 3 rows. For my blanket I crocheted 124 rows total, ending on the third row of color B.
Cut yarn, fasten off, and weave in ends.
Camel Stitch Border
Border is worked entirely in color C (white).
Round 1: Pull up a loop of yarn in the upper righthand corner of the blanket (right side facing you). Ch 1, sc in the same sp. Sc in each st across. In each corner, sc, ch 1, pm, sc. As you work the sides, try to place about 3-4 sc stitches along the sides of each color stripe. The sides are the trickiest part! Also, be sure to enclose all those yarn floats as you work! Work 1 sc along each st along the bottom of the blanket. When you return to your starting corner, sc, ch 1, pm, sl st join.
Round 2: Ch 1, hdc back into the marked ch 1 corner. Working back into the starting corner in this way keeps your seam in the corner for a more polished look. Hdc in each st across. In the corners, hdc, ch 1, pm, hdc. Rep until you reach your starting corner. Hdc, ch 1, pm, sl st join to the first hdc in the row.
Rounds 3-5: Ch 1, hdc back into the ch 1 corner. Hdc in the blo of each st across. In the corners, hdc under both loops, ch 1, pm, hdc under both loops. Rep until you reach your starting corner. Hdc, ch 1, pm, sl st join to the first hdc in the row.
Here is the back of the blanket border if you’re curious!
Pin for later!

Leave a comment