With two length options to choose from, you can customize this long-sleeve crochet cardigan pattern to suit your personal style and preference. Choose a single colour or a vibrant palette of hues to make this cardigan uniquely yours.
Jera’s Jamboree receives payments for affiliate advertising. This is at no extra cost to you. As an Amazon Associate I earn from qualifying purchases. As a Cratejoy affiliate I earn if you click on a link and shop from my link. Please see my disclosure policy for more information.
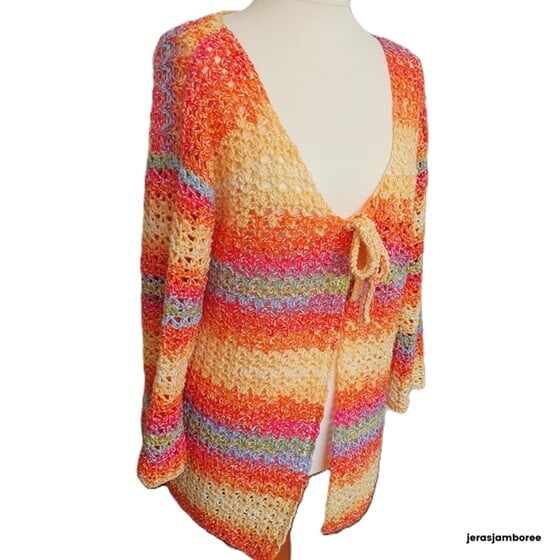
I enjoyed working the granny stitch in my seamless cardigan and wanted to work with it in another garment. This time however, I’ve created a totally different design and added in another stitch. This cardigan isn’t seamless, it has V-neck shaping and I’ve used a simple crocheted closure instead of a button band.
Instructions are written in UK and US crochet terms for sizes S to 3X and include two different lengths – 18 inch and 24.5 inch.
Keep scrolling for the free pattern or you can upgrade to a PDF in my Ravelry or Etsy stores.

Why you’ll Love Crocheting this Cardigan
How the long sleeve summer cardigan pattern is worked
My cardigan uses a blend of V-stitch and granny stitch which is worked in alternating rows throughout.
The granny stitch is used to begin the separate pieces giving a decorative edge to the hem and sleeve cuffs. No ribbing needed! I wanted a less structure feel to this cardi as in flowing and less restricted so this works perfectly, especially for the sleeve cuffs. Wrists are not enclosed and the open stitches give skin space to breath – perfect for the warmer months!
I have used stacked stitches to begin the rows (instead of a turning chain). This gives a really neat and tidy finish to the edges. No edging is needed.
A length of chains is worked in one row and folded over to slip stitch to give ‘tubing’ for the closure which is tied through the stitches at the start of the V-neck shaping.
My long-sleeved cardigan is worked in 5 separate simple shapes with minimal shaping and then seamed together.

The numbers below correspond to the numbers in the process images above.
- The back of the cardigan is crocheted first. There is no shaping for the back piece. It is worked flat and turned to work in rows.
- Right Front and Left front are worked next. I have decreased for the V-neck shaping by skipping stitches and leaving stitches unworked. These pieces are also worked flat and turned to work in rows.
- The sleeves are worked from the shoulder edge to the cuff, worked flat and turned to work in rows. Decreases are made by working two stitches together at the beginning and ending of a row.
- Assembly begins with the sewing of the shoulder seams. Working on the wrong side, the left and right front are lined up with the back and sewn into place.
- This is followed by setting the sleeves in place by lining up the shoulder edge of the sleeve with the shoulder edge, pinning into place and sewing along the shoulder. The sleeve is then folded in half and the seaming continues to the cuff. Finally, the seam is sewn from the underarm down the side of the garment to the hem. The image below shows how to lay out your cardigan for setting the sleeve in place and sewing the sleeve seam.

The crocheted tubing is worked last and threaded through the stitches at the start of the decreases on the right and left front.
Related Crochet Cardigan Patterns
- Featuring a stunning granny square motif on the back, this versatile crochet shrug pattern is an easy project.
- With a one-row repeat, this seamless cardigan is an easy project. You’ll enjoy the freedom of choosing the length to suit your personal style.
- Made-to-measure, you’ll crochet two hexagons using a combination of stitches (not granny stitch!) in the Ocean Hues cardigan.
- Two hexagons also look great as a pullover! Check out the Moon Shimmer sweater pattern.
- The Stella granny square cardigan is worked in one large granny square for the back and smaller squares for the front. This made-to-measure cardigan is an easy make. You’ll find different designs and constructions in this collection of free granny square cardigans.
- My hooded granny stitch cardigan is the perfect garment to wear during spring and summer
- Worked in 7 rectangles, the Selene long cardigan looks great worn with a dress or t-shirt and jeans. You’ll find different designs in this collection of free long cardigan patterns.
- Looking for a quick make? These chunky cardigan patterns could be just what you need.
- If you’re wondering what to do with those odds and ends in your yarn stash (and a blanket just isn’t grabbing your interest), have a browse of these of patchwork cardigan patterns.
- Planning your summer makes? This bright striped cardigan or lacy summer cardigan could be just what you’re looking for. Browse these free summer crochet cardigans for inspiration.
- Looking for simple but stylish? You’ll love this cocoon cardigan.
- Suitable for wearing all year, you’ll have this two-row repeat cardigan worked up in no time
Yarn Choices
I used Elements Panoramic DK in the colourway Prism from my yarn stash for this cardigan. The blend of 40% cotton and 60% acrylic gives a softness that was great to work with. It’s perfect for adding breathability to summer garments! I love the way the colour changes in the yarn work on this garment. Sadly, this yarn has since been discontinued.
You can substitute any DK yarn that meets gauge. My recommendation would be to substitute with a similar mix of fibres if you are wanting to achieve a similar drape and finish.
Elements Colours Cotton Blend is 55% cotton and 45% acrylic and you could change colour every few rows. Drops and King Cole have cotton/acrylic blends that would be suitable too. Have a browse through Wool Warehouse for some ideas, or you might have a suitable yarn in your stash.

Cardigan Pattern Notes
- Sizes are written for S to 3X and instructions are written thus S (M, L, XL, 2X, 3X)
- This pattern uses a stacked UK treble, US double to begin rows (see stitches section)
- Repeating instructions are noted * [ ] ie; *[sk 2 sts, 3tr in next ch] * rep to last 3 sts
- Two lengths are available – 18inches and 24.5inches
- Make sure you follow the instructions to match front and back for your length preference
- Weave in ends as you go
Skill Level
Easy
Supplies and Materials
- 4.5mm Crochet Hook
- DK (60% acrylic, 40% cotton) see Measurements table for amounts for the different sizes and the two different lengths
- Stitch markers/scrap yarn
- Scissors
- Yarn Needle
Stitches and Abbreviations
UK Treble Crochet (tr) / US Double Crochet (dc): Yarn over, insert your hook into stitch or space, yarn over, pull through (3 loops on hook), yarn over, pull through 2 loops (2 loops on hook), yarn over, pull through 2 remaining loops. 1 treble stitch completed.
UK Treble 2 Together (tr2tog) / US Double 2 Together (dc2tog) : Yarn over hook, draw up a loop in the next stitch, yarn over hook and pull through 2 loops on hook, yarn over hook, draw up a loop in the next stitch, yarn over hook and pull through all 3 loops on hook
Special Stitches
Stacked UK treble crochet (stacked treble) / US double crochet (stacked double)
Do not chain any stitches. Insert your hook into the very first stitch in the row. Yarn over, pull up a loop (two loops on hook), yarn over and pull through to complete what is a UK double/ US single crochet stitch. Insert hook in second loop of the two loops that are under your hook, yarn over, pull up a loop so that there are two loops on the hook. Yarn over and pull through to complete.
Image below shows the two loops under my hook.

V-Stitch (V-St):
UK [treble, ch1, treble] in same stitch/space
US [double, ch1, double] in same stitch/space
Granny Stitch
UK 3 treble in same stitch/space
US 3 double in same stitch/space
- Slip Stitch – sl st
- Chain – ch
- Skip – sk
- Rep – repeat
- Stitch/es – st/s
- Space – sp
- Decrease – decr
- Continue – cont
- Remaining – rem
- Opposite – opp
- Right Side – RS
- Wrong Side – WS

Gauge
16 stitches and 9 rows on a 4.5mm hook = 10cm X 10cm
Measurements
| Size in Pattern | To Fit Size (inches) | Finished Width (inches) | Amount of Yarn (yards) 18“ Length | Amount of Yarn (yards) 24.5” Length |
| S | 32 – 34 | 38 | 914 | 1120 |
| M | 36 – 38 | 42 | 1000 | 1227 |
| L | 40 – 42 | 46 | 1096 | 1346 |
| XL | 44 – 46 | 50 | 1168 | 1439 |
| 2X | 48 – 50 | 54 | 1245 | 1538 |
| 3X | 52 – 54 | 58 | 1345 | 1660 |
| Pattern instructions are written for two lengths: 18 inches OR 24.5 inches ‘To fit size’ follows the standard measurements as recommended in the Yarn Craft Council | ||||
Purchase the easy-to-read print-friendly PDF (ad free)
Included in the crochet cardigan pattern is:
- how the pattern is worked
- pattern notes
- clear written instructions
Long Sleeve Summer Cardigan Instructions UK Crochet Terms
Back
With a 4.5mm hook
Ch 79, (85, 94, 103, 109, 115, 127, 135)
Row 1: tr in 4th ch from hook, *[sk 2 sts, 3tr in next ch], * rep to last 3 sts, sk 2 sts, 2 tr in last st, turn
Row 2: stacked tr in first st, tr in same st, *[sk 2 sts, V-St in next st], * rep to last 3 sts, sk 2 sts, 2 tr in last st, turn
Row 3: stacked tr in first st, tr in same st, *[sk 2 sts, 3tr in ch1-sp], * rep to last 3 sts, sk 2 sts, 2tr in last st, turn
Row 2 and 3 form st pattern
46cm Length
Row 4 – 41 rep rows 2 and 3
61cm Length
Row 4 – 55 rep rows 2 and 3
Fasten off
Right Front
With a 4.5mm hook
Ch 40, (43, 49, 52, 55, 58)
46cm Length
Rep back from rows 1 – 26, (26, 24, 22, 22, 20)
61cm Length
Rep back from rows 1 – 38, (38, 36, 34, 34, 32)
Decreasing both lengths
Next row: *3tr in ch1-sp, *rep to last 3 sts, sk 2 sts, 2tr in last st, turn
Next row: stacked tr, tr in same st, *sk 2 sts, V-st in next st, * rep to last 4 sts, sk 2 sts, tr in next st, turn (leave last st unworked)
Rep above 2 decr rows for a total of 10 rows
Cont in pattern rep rows 2 and 3 of back until front matches back piece (46cm = 41 rows / 61cm = 55 rows)
Fasten off leaving a long tail for sewing shoulder seam
Left Front
With a 4.5mm hook
Rep right front instructions to decreasing
Next row: stacked tr, tr in same st, *3tr in ch1-sp, * rep to last ch-sp, sk last ch-sp, tr in last st, turn
Next row: sk 2 sts, *V-st in next st, sk 2 sts, * rep to last 3 sts, sk 2 sts, 2tr in last st, turn
Rep above 2 decr rows for a total of 10 rows
Cont in pattern rep rows 2 and 3 of back until front matches back piece (46cm = 41 rows / 61cm = 55 rows)
Fasten off leaving a long tail for sewing shoulder seam
Sleeves (make 2)
With a 4.5mm hook
Ch 61, (61, 70, 79, 79, 88)
Rep rows 1 – 16 from back piece
Row 17: * 3tr in ch1-sp, *rep to last 3 sts, turn (leave rem sts unworked)
Row 18: sk 1 st, V-st in next st, *sk 2 sts, V-st in next st, *rep to last 4 sts, tr in next st, ch1, sk 1 st, tr2tog, turn
Row 19: tr in ch1-sp, *sk 2 sts, 3tr in ch1-sp, * rep to last st, tr in last st, turn
Row 20: stacked tr, tr in same st, sk 1 st, tr in next st, *sk 2 sts, V-st in next st, *rep to last 4 sts, sk 2 sts, tr in next st, 2tr in last st, turn
Row 21: stacked tr, tr in same st, tr in next st, *sk 2 sts, 3tr in ch-sp, *rep to last 4 sts, sk 2 sts, tr in last 2 sts, turn
Row 22: stacked tr, tr in same st, *sk 2 sts, V-st in next st, *rep to last 4 sts, sk 3 sts, 2 tr in last, turn
Row 23: stacked tr, tr in same st, * sk 2 sts, 3tr in ch-sp, *rep to last 3 sts, sk 2 sts, 2tr in last st, turn
Row 24: stacked tr, tr in same st, *sk 2 sts, 3tr in ch-sp, *rep to last 3 sts, sk 2 sts, 2tr in last st, turn
Row 25: rep row 22
Row 26: rep row 23
Row 27: rep row 22
Row 28: rep row 23
Row 29: rep row 22
Row 30: rep row 23
Row 31: rep row 22
Row 32: rep row 23
Row 33: rep row 23
Sizes S, M fasten off
Row 34: rep row 22
Row 35: rep row 23
Sizes L, XL fasten off
Row 36: rep row 22
Row 37: rep row 23
Sizes 2X, 3X fasten off
Crocheting tubing to fasten cardigan
Ch 112
Tr in 3rd ch from hook, tr in ea ch to end, ch1, turn
Working into opp side of ch by folding row of sts in half, sl st through top of st and bottom of st.
Fasten off
Assembly
Shoulder Seams
With RS facing inwards, line up right front and left front with back and seam the shoulders.
Setting sleeves and seams
Working on the WS, lay the cardigan out (see image in how the pattern is worked) and mark the centre stitch of the top of the sleeve.
Line centre st of the sleeve with shoulder seam along the shoulder edge. Pin in place. Sew seam. Fold sleeve over (still working on WS) and sew sleeve seam from shoulder to cuff.
Side Seam
Sew side seam from underarm to hem.
Fasten off
Closure
Thread crocheted tubing through the beginning of the V-neck decrease on right and left fronts
Congratulations! Your cardigan is now ready to wear.

Long Sleeve Summer Cardigan Instructions US Crochet Terms
Back
With a 4.5mm hook
Ch 79, (85, 94, 103, 109, 115, 127, 135)
Row 1: dc in 4th ch from hook, *[sk 2 sts, 3dc in next ch], * rep to last 3 sts, sk 2 sts, 2 dc in last st, turn
Row 2: stacked dc in first st, dc in same st, *[sk 2 sts, V-St in next st], * rep to last 3 sts, sk 2 sts, 2 dc in last st, turn
Row 3: stacked dc in first st, dc in same st, *[sk 2 sts, 3dc in ch1-sp], * rep to last 3 sts, sk 2 sts, 2dc in last st, turn
Row 2 and 3 form st pattern
46cm Length
Row 4 – 41 rep rows 2 and 3
61cm Length
Row 4 – 55 rep rows 2 and 3
Fasten off
Right Front
With a 4.5mm hook
Ch 40, (43, 49, 52, 55, 58)
46cm Length
Rep back from rows 1 – 26, (26, 24, 22, 22, 20)
61cm Length
Rep back from rows 1 – 38, (38, 36, 34, 34, 32)
Decreasing both lengths
Next row: *3dc in ch1-sp, *rep to last 3 sts, sk 2 sts, 2dc in last st, turn
Next row: stacked dc, dc in same st, *sk 2 sts, V-st in next st, * rep to last 4 sts, sk 2 sts, dc in next st, turn (leave last st unworked)
Rep above 2 decr rows for a total of 10 rows
Cont in pattern rep rows 2 and 3 of back until front matches back piece (46cm = 41 rows / 61cm = 55 rows)
Fasten off leaving a long tail for sewing shoulder seam
Left Front
With a 4.5mm hook
Rep right front instructions to decreasing
Next row: stacked dc, dc in same st, *3dc in ch1-sp, * rep to last ch-sp, sk last ch-sp, dc in last st, turn
Next row: sk 2 sts, *V-st in next st, sk 2 sts, * rep to last 3 sts, sk 2 sts, 2dc in last st, turn
Rep above 2 decr rows for a total of 10 rows
Cont in pattern rep rows 2 and 3 of back until front matches back piece (46cm = 41 rows / 61cm = 55 rows)
Fasten off leaving a long tail for sewing shoulder seam
Sleeves (make 2)
With a 4.5mm hook
Ch 61, (61, 70, 79, 79, 88)
Rep rows 1 – 16 from back piece
Row 17: * 3dc in ch1-sp, *rep to last 3 sts, turn (leave rem sts unworked)
Row 18: sk 1 st, V-st in next st, *sk 2 sts, V-st in next st, *rep to last 4 sts, dc in next st, ch1, sk 1 st, dc2tog, turn
Row 19: dc in ch1-sp, *sk 2 sts, 3dc in ch1-sp, * rep to last st, dc in last st, turn
Row 20: stacked dc, dc in same st, sk 1 st, dc in next st, *sk 2 sts, V-st in next st, *rep to last 4 sts, sk 2 sts, dc in next st, 2dc in last st, turn
Row 21: stacked dc, dc in same st, dc in next st, *sk 2 sts, 3dc in ch-sp, *rep to last 4 sts, sk 2 sts, dc in last 2 sts, turn
Row 22: stacked dc, dc in same st, *sk 2 sts, V-st in next st, *rep to last 4 sts, sk 3 sts, 2dc in last, turn
Row 23: stacked dc, dc in same st, * sk 2 sts, 3dc in ch-sp, *rep to last 3 sts, sk 2 sts, 2dc in last st, turn
Row 24: stacked dc, dc in same st, *sk 2 sts, 3dc in ch-sp, *rep to last 3 sts, sk 2 sts, 2dc in last st, turn
Row 25: rep row 22
Row 26: rep row 23
Row 27: rep row 22
Row 28: rep row 23
Row 29: rep row 22
Row 30: rep row 23
Row 31: rep row 22
Row 32: rep row 23
Row 33: rep row 23
Sizes S, M fasten off
Row 34: rep row 22
Row 35: rep row 23
Sizes L, XL fasten off
Row 36: rep row 22
Row 37: rep row 23
Sizes 2X, 3X fasten off
Crocheting tubing to fasten cardigan
Ch 112
dc in 3rd ch from hook, dc in ea ch to end, ch1, turn
Working into opp side of ch by folding row of sts in half, sl st through top of st and bottom of st.
Fasten off
Assembly
Shoulder Seams
With RS facing inwards, line up right front and left front with back and seam the shoulders.
Setting sleeves and seams
Working on the WS, lay the cardigan out (see image in how the pattern is worked) and mark the centre stitch of the top of the sleeve.
Line centre st of the sleeve with shoulder seam along the shoulder edge. Pin in place. Sew seam. Fold sleeve over (still working on WS) and sew sleeve seam from shoulder to cuff.
Side Seam
Sew side seam from underarm to hem.
Fasten off
Closure
Thread crocheted tubing through the beginning of the V-neck decrease on right and left fronts
Congratulations! Your cardigan is now ready to wear.
Copyright Notice
The pattern and photographs of this design are the property of Sharon Goodwin at Jera’s Jamboree. This pattern and design are subject to copyright and are for personal, non-commercial use only. You may not share, resell, alter or redistribute this pattern in part or in whole. You may, however, sell any finished items you make. If you would like to include this pattern in a roundup, you may take one photo and link back to this pattern.
