- Ask or tell me anything
- Submit a post
- Website
- Shop
- Archive
-
amigurumi Totoro crochet pattern
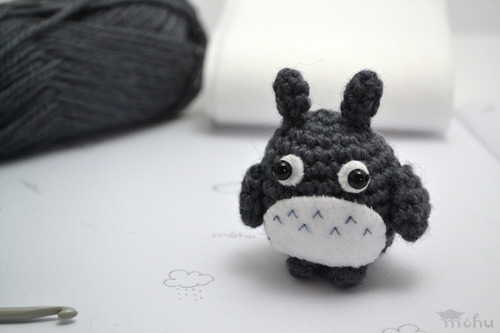
Totoro is so cute and loveable, so of course I had to make an amigurumi version in the same style as the other animals I’ve been making. Here is a free crochet pattern so you can make your own.
Materials and tools:
grey yarn (I think a lighter grey than mine would look better)
white felt
grey, black, and white thread
stuffing
6mm beads / buttons for eyes
crochet hook
tapestry needle for sewing yarn
smaller embroidery needle for sewing threadSize and gauge:
I used medium weight yarn and a 3.5 mm (E/9) crochet hook, to make an amigurumi totoro that is about 5 cm / 2" tall. You could use thicker or thinner yarn to make a different sized amigurumi, but remember that you will need to scale the template for the felt pieces as well.Pattern:
The amigurumi pattern is worked in the round, without joining the rows. American crochet terms are used. Start with a magic ring, or ch 2 and work in the first chain.Body:
1. Using grey yarn, 6sc in a circle.
2. 2sc in each sc around. (12 sc)
3. (2sc in next sc, sc in next sc) 6 times. (18 sc)
4. (sc in next sc, 2sc in next sc, sc in next sc) 6 times. (24 sc)
5-11. sc in each stitch around, for 7 rounds. (24 sc per round)
12. (sc in next sc, sc2tog, sc in next sc) 6 times. (18 sc)
13. (sc2tog, sc in next sc) 6 times. (12 sc)
14. (sc2tog) 6 times. (6 sc)Cut yarn, leaving a long tail for sewing, and finish off. Stuff the body so that it is nice and squishy, then sew the hole closed.
Arms (make 2):
1. 6 sc in a circle.
2. (2sc in next sc, sc in each of next 2 sts) 2 times. (8 sc)
3. sc in each sc around. (8 sc)
4. (sc2tog, sc in each of next 2 sts) 2 times. (6 sc)Finish off, leaving a long tail for sewing.
Feet (make 2):
1. 6 sc in a circle, and join with a slip stitch.Finish off, leaving a tail for sewing.
Tail:
1. 6 sc in a circle.
2. (2sc in next sc, sc in next sc) 3 times. (9 sc)
3-5. sc in each st around, for 3 rounds. (9 sc per round)
6. (sc2tog, sc in next st) 3 times. (6 sc)Finish off, leaving a long tail for sewing.
Ears (make 2)
1. 5 sc in a circle.
2. sc in each st around. (5 sc)
3. sc2tog, sc in each of next 3 sts. (4 sc)Finish off, leaving a long tail for sewing.
Felt details:
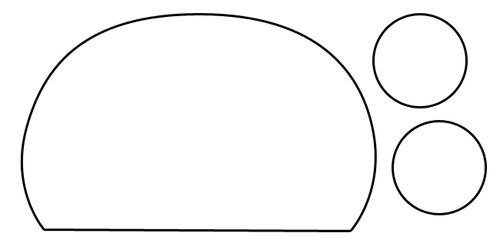
Right click on the above image and save it to your computer, then print it out so that you can use it to trace the pattern onto felt. If your amigurumi totoro’s body is about 5 cm / 2" tall, you won’t need to scale the pattern at all. Just make sure that your printer is printing at 100% scale, without cropping or resizing.
Cut the tummy and two eyes out of white felt.

Finishing:
Sew the arms onto either side of the body, between the 6th and 7th rows.
Attach the feet to the front of the body. Stuff the tail lightly and sew it to the back, so that your totoro can stand upright.
Sew the ears to the top of the head.
With white thread, sew the felt tummy onto the front of totoro, using the pictures as a guide. The bottom of the tummy should touch the top of the feet.
Sew the 2 felt eyes on, a little bit above the tummy.
Using black thread, sew black beads in the middle of the white felt eyes. If you want your amigurumi to look a bit more like the original totoro, you can use smaller beads for the eyes.
Embroider a little black nose in the middle of the face, level with the middle of the eyes.
Using grey thread, embroider some little upside-down v shapes onto the tummy.

If you have any questions, let me know in the comments below. You can even post pictures for us to see! Use #mohumohu to share your photos with me on Instagram (^-^)/
-
 mixecl liked this
 votlendisfugla-blog liked this
thespinningnymph liked this
ladybug-djm liked this
messy-heart-club liked this
queenofautumn01 liked this
verosweirdworld reblogged this from mohustore
kwack-sont liked this
 candymijangos liked this
 fan-is-an-understatement liked this
kaytrix liked this
alice-wonderful liked this
thatpurplevoice liked this
time-travelling-experiment liked this
thrones-n-calzones liked this
oursmiles reblogged this from mohustore and added:
Materials and tools: grey yarn (I think a lighter grey than mine would look better) white felt grey, black, and white...
 jenlovesitdontu2 liked this
 khah89 liked this
professorlego liked this
emmmygirl3000 liked this
saraes13-blog liked this
thisisablogforyou liked this
miki-s-trap reblogged this from mohustore
greppin liked this
angelwulf reblogged this from mohustore
grammaticalmustaches liked this
crochet-witch reblogged this from mohustore
macatrose reblogged this from mohustore
becca-esque reblogged this from mohustore
petrichome liked this
bleep14dhlm liked this
mthirtyone reblogged this from mohustore and added:
Posting this because I know a few people who would love it
s3ph0ral0v3 liked this
 yaystuff reblogged this from mohustore
 threadly-blog-blog reblogged this from mohustore and added:
adorable
anjushka liked this
creations-kawai liked this
pandasuitup liked this
mohustore posted this
- Show more notes
-

Making woolly creatures at mohumohu.com.
shop • blog
newsletter signup