

Hi!
I hope you all have a wonderful Friday! Been a while since my last post, but finally. I have a pattern for You! My pre summer gift to you. Hope you will enjoy it. The “Sass square” is finally done. I made it a while back, but had to write it down. And for the first time I have photo tutorial. Will write it down bot in English an Norwegian. 🙂
For this one I have used Drops Karisma. A eu hook 3,5 (us 4/E). The colors I have used for these squares is 40, 64, 65 and 66
Abbreviations/Forkortelser:
English Norsk
ss: slip stitch kjmsk :kjedemaske
ch: chain lm: luftmaske
sc:single crochet fm: fastmaske
hdc: Half double chrochet hlst: halvstav
Dc: Double Crochet St: Stav

Start by chaining 6
Begynn med 6 lm

Fasten in the first chain to make a ring.
Fest i den første lm for og danne en ring.
Sc 8 into the ring, fasten with a ss in the first sc. Cut yarn
8 fm om ringen, fest medd en kjmask i den første fm. Klipp tråden

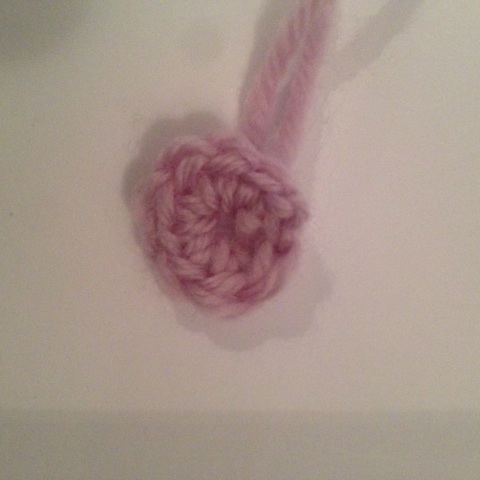
Now its time for the first bubble. Attatch a new colour in any sc and ch 3
Nå er det tid for den første boblen, Fest en ny farge i en av fm og lag 3 lm

Dc 4 more. You will now have 5 dc in your sc.
Hekle 4 staver til. Du skal nå ha 5 staver i den første fm.

Take out your hook of the 5 dc and insert it in the 3rd of you 3 ch
Ta ut heklekroken fra den 5. staven og ta den gjennom den 3. av lm

Put it trough the loop on the 5th dc.
Stikk den så igjennom løkken til den 5. staven.

Tighten the loop.
Stram løkken.

And pull the loop from the 5th dc through the 3rd ch.
Og dra løkken fra den 5. st gjennom den 3. lm

You have now made the first bubble.
Du har nå lagd den første boblen.

In next sc, dc 5 and repeat as hown above. Make 7 more bubbles. 8 bubbles in total.
I neste fm, lag 5 staver og gjenta som over . Du må lage 7 bobler til. ( 8 totalt) .

Make a ss between the bubbles (same color) and ch 2
Lag en kjmsk (samme farge) mellom boblene og lag 2 lm

Hdc, ch 1, 2 hdc ch1, between next bubble 2hdc, ch 1 2 hdc, ch1
Hlst, 1 lm, 2 hlst, mellom neste boble, 2 hlst, 1 lm, 2 hlst, 1lm

Will look like this. 🙂
Vil bli seende slik ut. 🙂

Continue the process between all the bubbles. You will have 16 ch 1 spaces.
Fortsett hele veien rundt. Du vil da ha 16 mellomrom (1lm).

With the starting color. Attach yarn in any ch space and ch 3.
Med fargen du begynnte med, fest garnet i en av lm mellomrommene og lag 3 lm

Dc 4 in same ch space
Hekle 4 staver til i samme mellomrom

Repeat the bubble. Hook through 3rd ch and trough the 5th loop, pull the loop trough 3rd ch.
Gjenta boblen. Heklenåla gjennom 3. lm og gjennom 5. løkken, dra løkken gjennom den 3. lm

In every ch space, make a bubble. 16 in total.
I hvert lm mellomrom, lag en boble. Totalt 16 bobler.

Make a ss between the bubbles, sc 1
Lag en kjmsk mellom boblene og lag en fm.

Between the next bubbles, dc 7
Mellom de neste boblene, lag 7 staver.

In total. x= sc
<- = 7dc
You will now have 8 sc and 8 petals (1 petal = 7 dc)
Totalt: x= fm
<- 7 st
Du vil nå ha 8 fm og 8 blader (1 blad = 7 st)

Change color and fasten yarn in any sc, ch 2, hdc 2 more in the same sc, ch 1,( *3 dc in next sc, ch 2, 3 dc in the same sc*), ch 1
Next sc, 3 hdc, ch 1, and in next sc (*repeat*). Continue until you have 4 corners. Just like a regular granny square. Fasten with a ss in the 2 ch.
Crochet one more round, in every corner (3dc, ch 2, 3dc) and every ch space (3 dc). Fasten with a ss in the first dc of this round.
Skift farge og fest garnet i en av fm, lag så 2 lm. Lag 2 hlst til i den samme fm, 1 lm og i neste fm (* 3 st, 2 lm, 3 st , * ), 1 lm. I den neste fm, 3 hlst, 1 lm og iden neste fm (*gjenta*), 1 lm. Fortsett i annenhver fm med 3 hlst og (**). Fest med en kjmsk i den 2. lm.
Hekle en runde til. I hvert hjørne, (3st, 2 lm, 3 st) 1lm og i hvert lm mellomrom 3 hlst etterfulgt av 1 lm. Fest med en kjmsk og klipp tråden.

Now for the petals under the first flover. I used the same colour that i used for the square. Insert the hook under one of your first bubbles. Attach yarn with a ss.
Nå til bladene under den første blomsten. Jeg brukte den samme fargen som til selve firkanten. Stikk heklekroken under en av boblene. fest garnet med en kjmsk.

*Chain 4 and fasten with a ss under the next bubble*. Continue ** all the way around. ( 8 ch spaces).
*4 lm, fest med en kjmsk under den neste boblen*. Gjenta ** hele veien rundt. ( 8 lm buer rundt).

In every ch space *sc, hdc, dc, ch1, dc, hdc, sc* Repeat until you have 8 petals. Cut and fasten the yarn.
I hver lm bue * fm, hlst, st, 1 lm; st, hlst, fm*. Repeter dette i hve lm bue. ( 8 blader). Klipp og fest tråden.

Voila! The Sass square
You will probarbly need to block the square, I just use needles and a coaster ( in cork). 🙂
Du må nok blokke ruten litt. Jeg bruker og legge den på et gryteunderlag i kork (korketavle funker fint!) og strammer den opp med nåler. 🙂

I wish you all have a wonderful evening and please let me know if you have any questions. 🙂
Ønsker dere alle en flott kveld og rop ut om dere har noen spørsmål! 🙂
