Pricing Handmade

stock-footage-woman-crochet-knittingPricing handmade items is hard. On the one hand, you spend a lot of time creating something and want to be fairly compensated for that time, but on the other hand, when it comes to time-consuming projects, if you charged enough to earn a fair wage for your hours of work, you’d be charging far more than most customers would be willing to pay. It’s a fine line, and it’s something I’m still struggling with as a shop owner.

There are lots of formulas out there to come up with a fair price for handmade goods that take into consideration the cost of materials and time spent working, like this one:

(Hourly wage x # of hours worked) + Cost of materials= wholesale price. Wholesale price x 2 is your retail price that you should be charging your customers.

So for example, if I spend 6 hours working on a crocheted toy (that’s about my average for the medium size toys I sell) and I want to earn $9 an hour (our minimum wage here in CA), that’s $54 plus material costs, which are luckily usually pretty low, around $3-4. So I’m looking at a total WHOLESALE cost of $58. Multiply that by 2 and your looking at a retail price of $116 for a 9 inch stuffed toy. Hmmm. Maybe there’s people out there that would have no problem paying that amount for a high quality handmade toy, but I know it would put my items out of reach for the vast majority of shoppers, which is not something I want.

On the other hand, if I price something too low, I’m not only essentially giving away my time, but I’m also hurting other handmade artists by undercutting their prices, which drives down prices across the board and negatively impacts the handmade marketplace as a whole. So it’s a balancing act, and I try very hard to look at it from both sides.

For me, I rarely have very much money in our budget to spend on gifts or something for myself, so when I plan to buy something I am very careful and weigh all of my options. I read product reviews, I compare prices, and I consider what makes one product superior to another. And for that reason, whenever I have the chance I buy handmade. Part of the reason is that I think it’s really important to support my fellow crafters because I know just how hard running a creative business can be. But mostly it’s because handmade items really are special, and for the most part are built to last. Knowing that something was made by someone’s hand especially for me makes me feel connected to that person and their products, even if I don’t know them and will never meet them personally. It gives things more meaning, and I find that I value those handmade items more. But then there are times when my budget forces me to the usual big box stores and their consumer-friendly prices, and that’s okay too. What’s frustrating is when people want the handmade quality at the big box price.

When you sell handmade items, it can be discouraging when people compare the price of your item to the price of something similar they can find at a large retailer. While I think most people do understand and value the time, effort and skill that goes into making something by hand, there will always be those who would rather pay a lower price for something mass produced by machines if it serves the same function. In the end though, while you may not be able to realistically charge what the formulas say you should and still get sales, it’s important to find a balance and not accept less than what you feel is a fair price for the work involved in creating your product. That number will be different for everyone, and it’s up to each person to find their own system that they’re comfortable with. The important thing is to give people the best possible product, hopefully at a price you can both live with.

And if you’re a handmade shopper, please keep in mind that you’re not just purchasing a product–you’re buying the time, effort and love that the artist put into creating something unique and special just for you! That’s not something you’ll find at Walmart.

Posted in What's New | Leave a comment

Winter Projects

I simply can’t believe Christmas is next week! This has been a whirlwind year and I feel like I’m still running to catch up! Luckily we settled pretty easily into our school routine and are now enjoying our winter break, along with some exceptionally cold California weather to inspire some new crocheted goodies! While I haven’t had a chance to get to all the projects on my to-do list for the year, I’ve been using my little bits of free time to work on some just-for-fun things, something I haven’t been doing enough of lately.

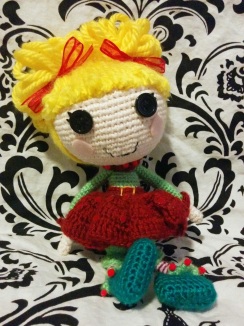
IMG_20151019_181502My kids had been asking me if we could do Elf on the Shelf this year, but to be totally honest, the Elf kinda creeps me out, so instead I decided to crochet our own. I found this adorable pattern for a Lalaloopsy elf from Epic Kawaii and I absolutely love how she turned out! This is my second doll pattern from Epic Kawaii and I was once again very impressed with the quality of the pattern and the amazing attention to detail.  The first one I tried was another Lalaloopsy, Winter Snowflake. (I’m so glad I at least have one girl to make all these cute dolls for!) The patterns cost a little more than I usually like to spend, but they really are worth the price!


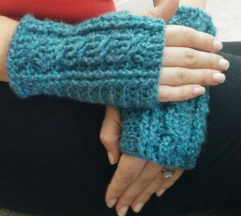
I know I really shouldn’t talk about cold weather, we Californians are IMG_20151013_144551pretty spoiled in that department, but it got to around 18 degrees last night where I live which is pretty cold in my book. As usual, this kind of weather gets me in the mood to make some new winter accessories, and I had been on the lookout for a new glove pattern for awhile when I came across this beauty: Cabled Wrist Warmers by Julee Fort. This is available as a free download on Ravelry and I LOVE them! They look complicated but the cables are actually really easy, just front and back post double crochet. I used Lion Brand Heartland in Glacier Bay. This has become one of my favorite worsted weight yarns, it’s so soft and the colors are gorgeous!
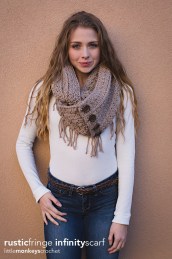
View More: http://kindredphoto.pass.us/rebeccalangfordAnd here’s a preview of my current project, the Rustic Fringe Infinity Scarf by Rebecca of Little Monkey Crochet. This is another great blog for beautiful free patterns, definitely worth checking out. For those of us that crochet Christmas gifts she even has a free download for “Honest Gift Tags” to show your loved ones how much hard work went into their gift. I will definitely be using these ^_^ !
Everyone stay warm and enjoy your holidays!


Posted in What's New | Leave a comment

An Unexpected Turn of Events

AkersFamily2014-28Well goodness. Life has a way of turning out unlike anything you would have expected. So there’s a few reasons I’ve been MIA for so long, and I’m sorry it’s taken me awhile to fill you all in! Around the beginning of the year I felt like I hit a wall, creatively and physically, and while the Holidays usually leave me feeling joyful and refreshed, this year they just left me feeling exhausted. I decided I needed to take some time to regroup, so I put my Etsy shop on vacation mode and took a step back from creating to figure out what I really want and am able to do. I know some of the exhaustion was due to some health issues I had been dealing with, but I think a lot of the problem really came down to feeling disconnected and overwhelmed by our crazy schedule.

I realized I had kind of been on autopilot–homework, check. Dinner, check. Bedtime, check. Clean the house while wrangling my now very mobile toddler….not so much, but the effort was made. The kids were bored, I was irritable, and between all of our obligations and getting everyone in bed early enough to be somewhat functional the next day, poor Papi wasn’t getting any quality time with anyone.

As the year wore on, I was feeling more and more frustrated by the amount of homework being piled onto the kids (when did they start giving homework in preschool?!?) and watching as their enthusiasm and love for learning was slowly being squashed out of them by the endless test prep, drills, and pressure to meet the “standards.” A was already dreading Kindergarten and B was bored out of her mind with the constant review of concepts she already knew. Something needed to change. We thought about switching them to private school, but it just wasn’t possible due to finances and the lack of good choices near us. That’s when we started talking about homeschooling.

IMG_20150825_134811This is something I had never even considered because, let’s face it, I’m not the most patient or organized person in the world, and I was afraid I would be a terrible teacher, get frustrated, and end up ruining my kids. But the more I looked into it and prayed about it, the more I was convinced this is what we needed to do. Not just for the kids, but as a way to bring the whole family closer. So we finished out the last few weeks of school while I learned everything I could about what we were getting ourselves into.

Now that the new school year has started and we’ve been at it for awhile, IMG_20150825_095506I’m so glad we decided to go for it! I’d be lying if I said it was easy, but it has been very much worth it! The freedom it has given us is amazing. The kids are flying through their lessons and they finally have time to just be kids–no homework to take over their fun time with Papi, no stress over getting up early or missing assignments.  And I’m getting the chance to re-educate myself and fill in the gaps my own traditional schooling left. Despite my fears, I see they’re actually learning and once again excited about it. I think my biggest problem has been relaxing a bit and realizing there is no one perfect curriculum and there’s no one right way to go about it. It’s a matter of finding what works for us.

IMG_20151003_124539So things are still a bit crazy around here, and the house still isn’t clean (and probably never will be now!) but we’re finding our joy again. And I’m finally picking up my hooks again. I promise I won’t turn this into a homeschool blog, if you’re interested in our adventures on that front I am starting a separate site for that. I just wanted to share with you the unexpected turn our lives have taken, and let you know that I’m finally feeling inspired to keep creating and sharing with you all. Thanks to everyone who has stuck around, and I’ll talk to you soon!

Posted in What's New | 2 Comments

Outlander Inspired Cowl–Version II

claire knitted cowlAfter making my first Outlander inspired cowl the other day I decided to make another version that’s worn without doubling up. This one works up a little quicker and doesn’t use so much yarn ^_^. It follows the same stitch pattern as the other one, but by keeping it all one piece it drapes a little differently and gives it a slightly different look.

I wanted to try a different yarn this time that would feel a little more “authentic” so I did this one in a bulky (5) wool roving yarn. It’s slightly less chunky than the previous version that uses super bulky (6) yarn and makes a somewhat more flexible fabric. I used the same P (11.5 mm) hook.

*Note: To start, I worked the first row of dc into the back bumps of the starting chain. If you haven’t done this before, if you turn your starting chain over you should see a row of small bumps going down the middle. Instead of working into the chain as you normally would, you make each double crochet into that little bump. The result is a nice uniform bottom row that looks more like all the others.

Here’s what you need:

2 skeins bulky (5) yarn (I used about 1 1/2 skeins, I’m guessing about 200 yds, of  wool roving yarn I happened to have in my stash. It’s very similar to Patons Classic Wool Roving or you could substitute any bulky weight yarn.)

Size P (11.5mm)  hook

Yarn needle for finishing

Gauge: 7 dc and 5 rows following pattern= 4 inches

Finished measurements: 14 inches long by 12 inches wide (when folded in half).

Note: Cowl is worked in turned rows to create a long rectangle, and then stitched together at the ends. Make sure your ridges are vertical when you seam the edges together.

Instructions:

Ch 27

Row 1 (RS): Dc in back bump of 4th ch from hook and in each ch across, turn. (Don’t do a turning ch.)

Row 2: Sl st in 1st dc, *dc in next dc, sl st in next dc. Repeat from * in each dc across, ending with a sl st in the top of turning chain. Turn.

Row 3: Ch 3 (counts as dc), dc in each st across. Turn.

Row 4: Sl st in 1st dc, *dc in next dc, sl st in next dc. Repeat from * in each dc across, ending with a sl st in last dc. Turn.

Repeat rows 3 and 4 until your rectangle measures 14 inches (for me it took 32 rows). Double check to make sure it will fit over your head. when the edges are seamed together– it should be a little snug but not uncomfortably tight. If necessary add or subtract rows to get the right fit for you. Now fold in half with wrong side facing, line up the ends and slip stitch through both sides to seam them together. Fasten off and weave in ends.

You’re done! So which style do you prefer, the shorter cowl or the long doubled up scarf? Let me know what you think!

Posted in Crochet Patterns, What's New | Tagged , , , , , | 8 Comments

Crochet Animal Applique Afghan–Links to Free Patterns!

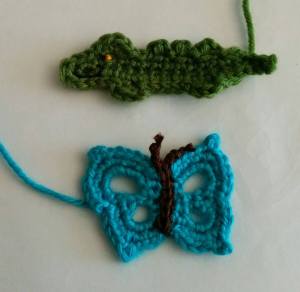
For awhile I’ve wanted to take on a big project, I just have had a hard time deciding what. I know I tend to start things and leave half of them unfinished, so I think that to have any hope of finishing a big project, it needs to be something I can break into bite sized pieces. So I was super excited when I saw a recent post by Sarah of Repeat Crafter Me about her latest project–26 days of crochet animal appliques! Each letter of the alphabet will be represented by a different animal applique and then put together in an afghan. Over the next month she’ll be adding the free applique patterns one by one to her blog. So I’ve decided to follow along and commit to making an applique each day until it’s done! Since the first two patterns have already gone up I went ahead and did both today, so here’s my alligator and butterfly ^_^

crochet animal appliques

I think this would be a really fun Crochet-Along project, so if anyone is interested in working on it with me, I’d love for you to share your progress! Maybe we can help keep each other on track;) Here’s the patterns for the first two appliques:

Alligator

Butterfly

And here you can see a preview of all the upcoming appliques!

Posted in What's New | Leave a comment

Double Drop Slouchy Hat–Free Pattern

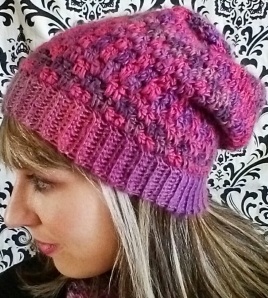
Red Heart Unforgettable in Winery Crochet PatternI finally got around to writing up my Double Drop Slouchy hat pattern that matches the cowl pattern I posted earlier! This slouchy hat uses a drop stitch pattern (where you work stitches into a previous row) to make a warm but still light and stretchy fabric that works perfectly with the self-­striping property of Red Heart Boutique Unforgettable yarn. If you’d like you can substitute any worsted weight yarn, and it would also look great in alternating solid colors for a bolder stripe effect! I’m working on uploading the pdf to Ravelry with more photos but for now here’s the basic pattern.

Materials:

One skein of worsted weight (category 4) yarn (I used Red Heart Unforgettable in Winery, 270 yds)

Size I hook

Yarn needle for finishing

Finished Measurements: Circumference–21 inches; Height–11 inches

Gauge: 20 st and 14 rows = 4 inches. Your double crochets should be about ½ in tall; 2 dc should measure about ½ inch across.

*Note: Red Heart Unforgettable yarn varies a little bit in thickness throughout the skein even though it is categorized as worsted weight. If you want to use a different worsted weight yarn for this pattern, just be sure to check your gauge. If you’re having trouble obtaining the proper gauge, try changing your hook size.

Instructions

Ribbing

Row 1: Ch 11, sc in 2nd ch from hook and each ch across (10 sc). Ch 1, turn.

Row 2: Sc in back loops only in each sc across. Ch 1, turn.

Repeat row 2 until band measures 21 inches long. It should be about 2 inches wide. Line up edges and slip stitch together to form a circle. Do not fasten off.

Hat

R1: Ch 1, sc 76 evenly around top edge of ribbing. Sl st in ch to join.

R2: Ch 3 (counts as dc), dc in next sc. *Ch 2, sk 2 sc, dc in next 2 sc. Repeat from * around, sl st to top of ch 3 to join.

R3: Ch 4 (counts as hdc, ch 2), *skip next 2 dc, dc in next 2 sc from round 1 (2 rows below, working over the ch 2 space), ch 2. Repeat from * around, sl st in 2nd ch of starting ch to join.

(In other words, after you ch 4, skip the first 2 dc in your current row. You’re now at the ch 2 space you made on the previous round. Directly below this space are 2 sc from the previous round. Working over the ch 2 space, dc into these 2 sc to make your first drop stitches.)

R4: Ch 2 (counts as hdc), *dc in next 2 dc from round 2  (2 rows below, working over ch 2 space), ch 2, skip next 2 dc. Repeat from * across, sl st in top of starting ch to join.

R5: Ch 4 (counts as hdc, ch 2), *sk next 2 dc, dc in next 2 dc from round 3 (2 rows below, working over ch 2 space), ch 2. Repeat from * around, sl st in 2nd ch of starting ch to join.

Repeat rows 4-5 until hat measures 11 inches from top to bottom of band.

Ch 1. Now you’re going to sc around the top, dropping stitches in the same established pattern (sc in each dc of current row and working over each ch 2 space to sc in each dc from 2 rows below). Do not fasten off.

Now you’re going to close up the top. Your hook should be at the top, back, center of the hat. Insert hook into the stitch directly across from the current stitch (top, front, center of the hat) and do a single crochet through both stitches. Pinch the opposite sides to the center point you just made and join with a sc in the same way. Continue pinching opposite sides together and sc them together until hole is completely closed. Fasten off and weave in end.

It can be a little awkward to sc through both sides, but it will ensure that your hat is closed up nice and secure ^_^

You’re done! Don’t forget to let me know how it turns out, and if you have any problems please let me know and I’ll be happy to help! The cowl pattern is also available for free here or you can download the free pdf on Ravelry here. For those of you getting an early start on your holiday gifts, the set would make a really cute Christmas present!

Terms of Use: Pattern is for personal use only, please do not sell, copy or redistribute either in print or online. You are free to sell finished items made from this pattern, I just ask that you please give credit to me (Ashley Soto/The Yarn Owl Boutique) as the designer and link back to the original pattern listing. Thank you!!


Posted in Crochet, Crochet Patterns, What's New | Tagged , , , | 11 Comments

The Claire Cowl–Free Crochet Pattern Inspired by Outlander

Claire Outlander CowlI’ve been obsessed with Diana Gabaldon’s Outlander book series since I discovered them in my first year of college (it feels like a lifetime ago!) and was unbelievably excited when I heard that Starz was developing a series based on the books! As silly as it sounds, this is something I’ve dreamed about for years, and since the tv series finally premiered a couple of months ago I’ve spent way too much time watching and re-watching every episode. While certain things are definitely different than they are in the books, as is always the case with an adaptation, I have to say I’ve fallen in love with the show and with the story all over again and am so glad the actors they found live up to what I always imagined in my head while reading!

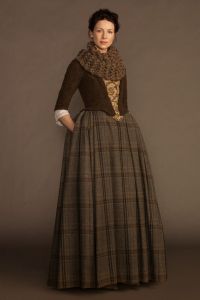
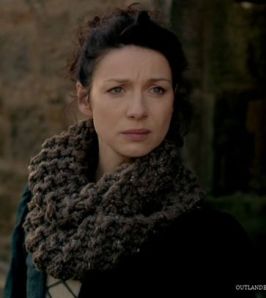
So why am I talking about this on a crochet blog? Well, it’s not just the story or the acting that has me hooked (although it’s wonderful), it’s also the incredible knits that Claire, the protagonist, gets to wear! The Crochet cowl inspired by Claire from Outlanderstory takes place mostly in the 18th century Scottish Highlands, where I can imagine it gets awfully cold and wet, and from what I’ve read the production team has gone to great lengths to accurately portray the local dress and customs of the times, so seeing all the lovely shawls, cowls, capes and gloves included in the costumes just made me appreciate in a new way that for centuries people have been making amazing things with yarn! I especially fell in love with this chunky cowl shown in the first picture, and apparently I’m not the only one! It didn’t take long for knitting patterns inspired by the show to start popping up everywhere, but I’ve had a harder time finding crochet patterns that replicate the look. Since I still haven’t made good on my New Year’s resolution to learn knitting (I’m not giving up, I still have 3 months!) I’ve been playing around with different patterns and came up with my own version of “The Claire Cowl.” Here’s the free pattern:)

 Outlander Inspired Chunky Cowl

3-4 skeins super bulky (6) yarn (I used 4 skeins of Lion Brand Hometown USA in Napa Valley Pinot, 324 yds total)

Size P 11.5mm  hook

Yarn needle for finishing

Note: Cowl is worked in turned rows and then stitched together at the ends.

Ch 21

Row 1 (RS): Dc in 4th ch from hook and in each ch across, turn.

Row 2: Sl st in 1st dc, *dc in next dc, sl st in next dc. Repeat from * in each dc across, ending with a sl st in the top of turning chain. Turn.

Row 3: Ch 3 (Counts as dc), dc in each st across. Turn.

Repeat rows 2 and 3 until you’ve nearly run out of yarn, making sure to leave enough to stitch ends together. You should have a very long rectangle. Now fold it in half with wrong side facing, line up the ends (don’t make a twist in the middle like you would with an infinity scarf) and slip stitch sides together to join ends. Fasten off and weave in ends.

That’s it! This cowl is super warm and cozy and works up pretty quickly, plus the pattern is easily adaptable if you’d like to make it shorter, wider, thinner, etc., just make sure your starting chain is an odd number of stitches and then make however many rows you’d like! Wear it long or doubled up Claire style, and don’t forget to let me know how it turns out ^_^

Outlander inspired crochet cowl


*Note: This is not an official Outlander pattern, just my own interpretation that was inspired by it. I’m not affiliated with the show or the books, I’m just a slightly obsessed fan with a crochet hook ^_^. As with all my patterns, feel free to share, I just ask that you give credit to me as the designer and link back to me. Thanks!!


Posted in Crochet, Crochet Patterns, What's New | Tagged , , , , , | 34 Comments

Fall is Here!!!

It’s officially fall!! Which to me marks the beginning of the non-stop fun that is the holiday season ^_^ Alright, so maybe it’s not all fun and games, but I just get so ridiculously happy the closer we get to Christmas, and inspiration for new projects is everywhere! Right now I’m thinking about our upcoming local vendor events, specifically the holiday craft fair coming up in November and trying to decide what all I need to have ready for it. I’ve had the chance to try out several new patterns that I’m super excited about, and have been testing a few more of my own designs that I’m excited to share with you soon!

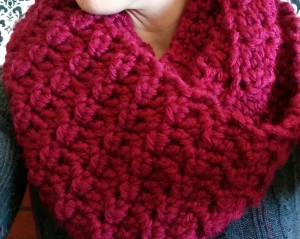
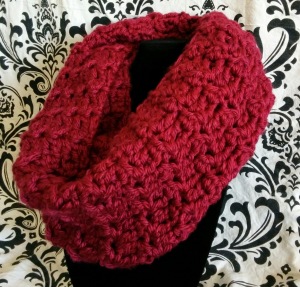
Every year I like to welcome the new season with a small splurge on some of the warm cozy yarns I’ve been holding off on all summer to try. So the husband took me on a yarn run the other day and waited patiently (for the first half hour at least) while I oohed and aahed over everything. Since I was on a budget (sigh) I couldn’t get nearly as much as I would have liked, but I love what I ended up with! I won’t go into too much detail now since I’m working on a yarn review post, but I’ll share a few with you now. While the goal was to try some new things, I couldn’t resist this Red Heart Boutique Unforgettable in Stained Glass, a colorway I hadn’t seen before.  I just finished using it to make this infinity scarf (free pattern here) and I am in love! All my favorite colors in one skein of yarn!


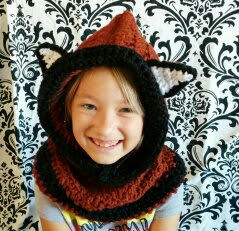
Crocheted fox cowl pattern by Heidi MayI was also really excited to find a new bulky weight yarn by Lion Brand called Woolspun (a Michaels exclusive). I had been looking for awhile for a good bulky weight yarn to use for a specific pattern and almost missed the display! It comes in some gorgeous solid colors and is really lovely to work with. I picked up some in a rusty color to use for this fox cowl pattern available for purchase from The Velvet Acorn. (Heidi, the designer, is in my opinion an absolute genius and I could spend tons of money in her Etsy pattern shop!)  It has a nice drape and feel to it, it doesn’t split like other bulky yarns I’ve tried, and has a squishiness (for lack of a better word) to it that is just really nice to work with!

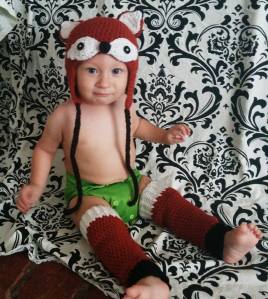
Speaking of foxes, I received a custom order request for a fox ear flap baby hat and legwarmer set, and this is what I came up with:

foxset

While I’d made legwarmers for adults before, I’d never had the chance to try them for babies and I just love how they turned out! I ended up making this set for my own little man, and was so glad he sat still long enough to get a decent picture! The hat is a variation on the pattern described in a previous post and the legwarmers are from a free pattern by Danyel Pink Designs found here.

Our other big project for the past week has been moving my daughter into her own room. This is bittersweet for me since it means the loss of my dedicated craft room, but I knew this day was coming and on the upside it’s definitely cut down on the squabbling with her brother now that they each have their own space! Another positive is it gave me an excuse to go through all of my crafting supplies and finally get organized! It’s actually not that big of a loss since I like to work in the living room where I can be with the family anyway, and I really didn’t need a whole room for my stuff and was (miraculously) able to fit almost everything into the hall closet. So everyone’s happy, and I can finally find everything! All in all a good week ^_^

Posted in Crochet, Crochet Patterns, Family Happenings, Holiday Crochet & Crafts, What's New | Tagged , , , , , | Leave a comment

The Yarn Owl is Now on Ravelry!

I joined Ravelry back in 2012 but until recently never really had a chance to do much with it other than look up patterns. This week I finally got around to getting my page set up and am working on getting my patterns posted (it’s a bit of a process to add patterns so it’s taking awhile). While there’s not much there right now, I’ll get more up as soon as possible, so be sure to check back!

If you’re not familiar with Raverly, if you knit or crochet it is an absolute goldmine! Basically it’s a database of patterns from tons of sources including online and print from thousands of designers. And since it’s also partnered with publishers, a lot of times you can find photos of most if not all projects in crochet books, which is perfect for me since I like to preview books before I buy them. It also lets you save all of your projects in one place so they’re easy to find and has tons of forums to answer your questions! Definitely check it out, and while you’re there be sure to visit my page! ^_^

Posted in Crochet Patterns, Shop News, What's New | Tagged , , , , , , | Leave a comment

Double Drop Cowl Free Crochet Pattern

Double crochet drop stitch sampleSummer is still in full swing here in the desert, but my mind is already turning towards fall and and all the cold weather things I love to make. I lucked out and found several skeins of one of my favorite yarns, Red Heart Boutique Unforgettable, on sale the other day and have been experimenting with new stitch patterns to put it to good use. One I really like uses drop stitches (where you work stitches into the previous row to get a kind of woven effect) and works perfectly with the self-striping property of the yarn. I used it to make a cowl first and liked it so much that I made a matching slouchy hat! I haven’t finished writing up the hat pattern yet, but here’s the FREE cowl pattern!

Double Drop Cowl

***Update*** This pattern is now available as a free PDF download on Ravelry!

Materials:

One skein of worsted weight yarn (I used Red Hearet Boutique Unforgettable in Winery)

Size J hook

Yarn needle for finishing

Finished measurements: Approx. 26 x 9 inches before stitching ends together

Gauge: 16 stitches across and 13 rows high = 4 inch square

Your double crochets should be about ¾ inch tall

Abbreviations:

ch–chain

hdc–half double crochet

dc–double crochet

RS–right side

Instructions:

Ch 38

Row 1 (RS): Dc in 4th chain from hook (skipped chains count as dc), dc in next ch, *ch 2, skip 2 ch, dc in next 2 ch. Repeat from * across, hdc in turning chain, turn.

Row 2: Ch 4 (counts as hdc plus ch 2), skip the first 2 dc in your current round. You’re now at the ch 2 space you made on the previous round. Directly below this space are 2 chains from the foundation chain. Working over the ch 2 space, dc into these 2 ch, ch 2. *Skip next 2 dc, dc in the next 2 foundation ch, ch 2. Repeat form * across, hdc in turning chain, turn.

Row 3: Ch 2 (counts as hdc), *dc in next 2 dc from two rows down, (working over ch 2 space), ch 2, skip next 2 dc. Repeat from * across, dc in next 2 dc, hdc in turning ch, turn.

Row 4: Ch 4 (counts as hdc, ch 2), *skip next 2 dc, dc in next 2 dc from 2 rows down (working over ch 2 space), ch 2. Repeat from * across, hdc in turning chain, turn.

Row 5- 83: Repeat rows 3 and 4. Fasten off leaving a long tail. With right side facing you, align the two edges and stitch them together using the needle and yarn tail.

That’s it! You could easily adapt this pattern to make it longer, shorter, or wider by adjusting your starting chain, using any multiple of 4 plus 2, and then adding or subtracting rows as needed. If you plan to make a larger cowl or scarf, I would recommend buying 2 skeins of yarn and making sure they’re the same dye lot (there can be quite a difference in color from one lot to another). If you have any questions or problems with the pattern please let me know and I’ll be happy to help! And please let me know how it turns out!


Posted in Crochet, Crochet Patterns, What's New | Tagged , , , , , | 1 Comment