Spooky Halloween Edition: Crochet Pumpkin Container (Not Actually Spooky)
Ha-Ha-Ha-Happy Halloween!
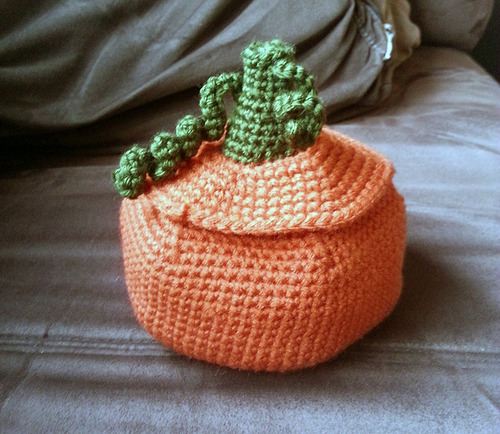
This is a pattern for a super cute crocheted pumpkin container that you, too, can make with only a basic knowledge of crochet! It is very easy, I promise. Completely painless.
Unless you poke yourself with the needle by accident or something—but please don’t do that.
Scroll down a little bit, past the cut, for the actual pattern.
Today’s adventure in crochet is a product of another gift exchange. I love doing gift exchanges because it provides me with crafting prompts that I would not normally think of for myself. For instance, this pumpkin container. Which I would not make for myself because I am a terrible person who does not like anything about pumpkins except for their seeds. Yes, I know I’m wrong. I’m sorry.
My person from the gift exchange only gave me three hints for something to give to her: She loves pumpkins, she would like something that could go in a classroom, and she likes chocolate. So, I bought her some fancy handmade chocolates from a local chocolatier, who it turns out, I had already met and is awesome. And I thought, I could make a pumpkin candy dish to put the chocolates into, and she could put it in her classroom! All bases covered. Genius.
I pretty much freestyled the thing and then retroactively figured out the pattern. It was so easy to make that it wasn’t hard to figure out.
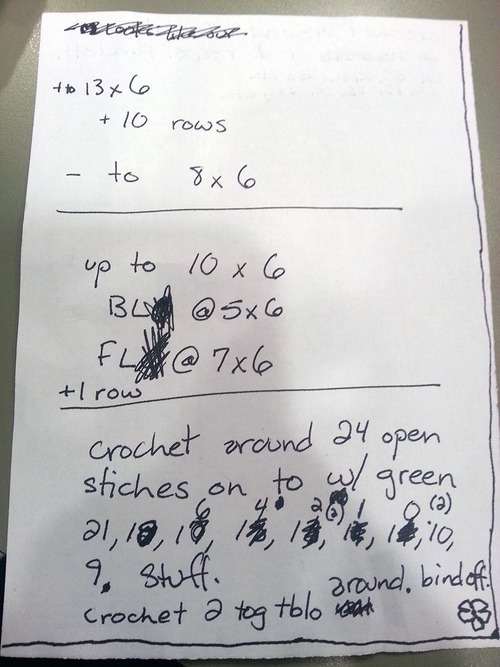
You can see my notes are super specific and easy to read.
Without further ado:
Crochet Pumpkin Container
Supplies:
Worsted weight yarn in dark orange
Worsted weight yarn in dark green
Size F crochet hook
Polyester Fiberfill or other stuffing material
Yarn needle for weaving in ends
Abbreviations
Ch: Chain stitch
SC: Single crochet
Sl: Slip stitch
SC2Tog: Single crochet two together
TBL: Through back loop only
TFL: Through front loop only
Instructions:
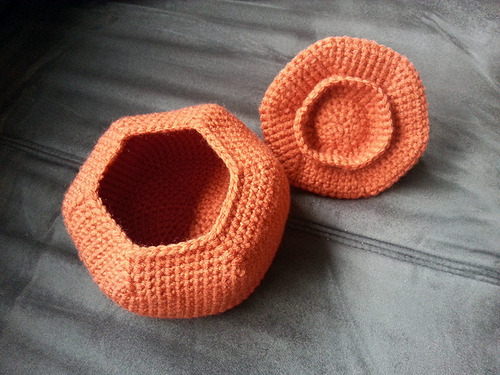
Body of the Container
Crocheted in the round.
Using dark orange, ch 2. SC 6 times into second ch from hook. Sl into top of first SC to form a circle. (6 stitches)
R1: SC twice in each stitch around. (12 stitches)
R2: *SC twice in first stitch, SC in next stitch* around. (18 stitches)
R3: *SC twice in first stitch, SC once each in next 2 stitches* around. (24 stitches)
R4: *SC twice in first stitch, SC once each in next 3 stitches* around. (30 stitches)
R5: *SC twice in first stitch, SC once each in next 4 stitches* around. (36 stitches)
R6: *SC twice in first stitch, SC once each in next 5 stitches* around. (42 stitches)
R7: *SC twice in first stitch, SC once each in next 6 stitches* around. (48 stitches)
R8: *SC twice in first stitch, SC once each in next 7 stitches* around. (54 stitches)
R9: *SC twice in first stitch, SC once each in next 8 stitches* around. (60 stitches)
R10: *SC twice in first stitch, SC once each in next 9 stitches* around. (66 stitches)
R11: *SC twice in first stitch, SC once each in next 10 stitches* around. (72 stitches)
R12: *SC twice in first stitch, SC once each in next 11 stitches* around. (78 stitches)
R13-22: SC around. (78 Stitches)
R23: *SC2tog, SC once each in the next 11 stitches* around. (72 stitches)
R24: *SC2tog, SC once each in the next 10 stitches* around. (66 stitches)
R25: *SC2tog, SC once each in the next 9 stitches* around. (60 stitches)
R26: *SC2tog, SC once each in the next 8 stitches* around. (54 stitches)
R27: *SC2tog, SC once each in the next 7 stitches* around. (48 stitches)
Sl into next stitch and pull through to bind off.
Lid of container
Crocheted in the Round
Using dark orange, ch 2. SC 6 times into second ch from hook. Sl into top of first SC to form a circle. (6 stitches)
R1: SC twice in each stitch around. (12 stitches)
R2: *SC twice in first stitch, SC in next stitch* around. (18 stitches)
R3: *SC twice in first stitch, SC once each in next 2 stitches* around. (24 stitches)
R4: *SC TBL twice in first stitch, SC TBL once each in next 3 stitches* around. (30 stitches)
R5: *SC twice in first stitch, SC once each in next 4 stitches* around. (36 stitches)
R6: *SC TFL twice in first stitch, SC TFL once each in next 5 stitches* around. (42 stitches)
R7: *SC twice in first stitch, SC once each in next 6 stitches* around. (48 stitches)
R8: *SC twice in first stitch, SC once each in next 7 stitches* around. (54 stitches)
R9: *SC twice in first stitch, SC once each in next 8 stitches* around. (60 stitches)
R10: SC around. (60 stitches)
Sl into next stitch and pull through to bind off.
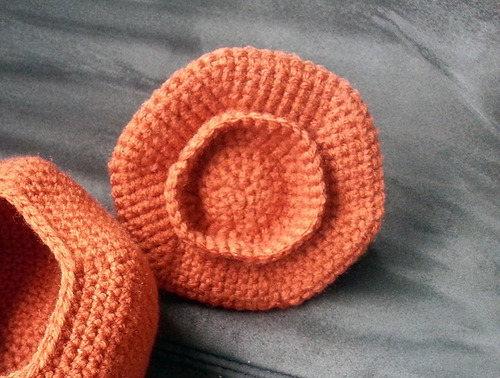
Under-Lid stabilizing ring
Crocheted in the round. Worked on the bottom (or inside) part of the lid. Helps to keep the lid from falling off or moving around too much.
Still using orange, sl into one of the exposed, unworked back loops from R6 of lid section.
R1: Ch 1 (this counts as first SC of round). SC once into each of the exposed, unworked back loops, around. Sl into top of first SC. (36 stitches)
R2-3: SC around. (36 stitches)
Sl into next stitch and pull through to bind off.
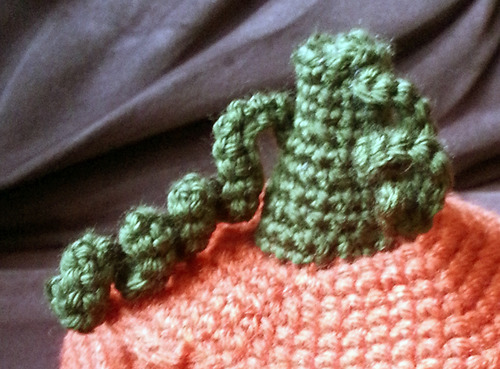
Stem:
Crocheted in the round. Worked on the top (or outside) part of the lid. In the pattern, I have a couple of stitches TBL for connecting the vine tendrils to, so I don’t have to sew them on. If you would prefer to just sew the vine tendrils on (because that’s probably easier), you can do those stitches as standard stitches
Using green, sl into one of the exposed, unworked front loops from R4 of lid section.
R1: Ch 1 (this counts as first SC of round). SC once into each of the exposed, unworked front loops, around. Sl into top of first SC. (24 stitches)
R2: *SC2tog, SC once each in next 6 stitches* around. (21 stitches)
R3: *SC2tog, SC once each in next 5 stitches* around. (18 stitches)
R4: *SC2tog, SC once each in next 7 stitches* twice. (16 stitches)
R5: SC2tog, SC TBL once each in next two stitches, SC once each in next 4 stitches, SC2tog, SC once each in next 6 stitches. (14 stitches)
R6: *SC2tog, SC once each in next 5 stitches* twice. (12 stitches)
R7: SC2tog, SC once each in the rest of the stitches around. (11 stitches)
R8: SC2tog, SC once each in next 5 stitches, SCTBL in next 2 stitches, SC once each in next 2 stitches. (10 stitches)
R9: SC2tog, SC once each in the rest of the stitches around (9 stitches).
Stuff.
Sl into next stitch. Ch1. SC2togTBL around. Bind off, leaving a tail. Sew the top of the stem shut with tail, and then weave in the ends.
Vine Tendrils:
Crocheted back and forth. These are the curly bits attached to the stem. If you decided to sew the tendrils using the yarn needle, you can skip the first and last slip stitch, and just sew them onto wherever you decide you would like them to go.
Tendril 1
Using green, sl into one of the exposed, unworked front loops from R8 of the stem. Ch 30. Sl into first chain from hook, SC in next chain, SC twice in following chain, *SC once each in next 2 chains, SC twice in following chain* until all chains are worked. Sl into the other exposed, unworked front loop from R8. Pull through to bind off.
Tendril 2
Using green, sl into one of the exposed, unworked front loops from R5 of the stem. Ch 15. Sl into first chain from hook, SC in next chain, SC twice in following chain, *SC once each in next 2 chains, SC twice in following chain* until all chains are worked. Sl into the other exposed, unworked front loop from R5. Pull through to bind off.
Weave in all ends.
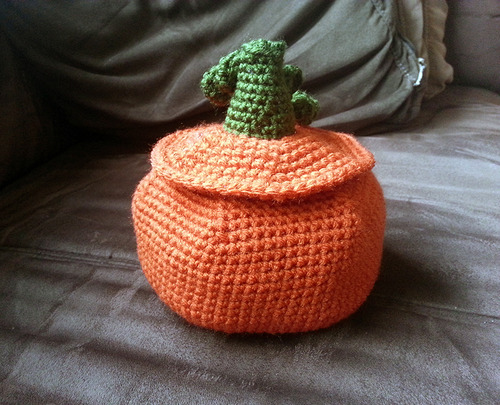
There you have it: your very own pumpkin container, a cute decoration and great for holding wrapped candies or chocolates!


