Thursday, June 9, 2016

Rawson Rose: A Granny Square

I was taught this pattern by Dorothy Rawson in 1992. She taught me how to crochet and, in doing so, changed my life!  I have no idea where she got the pattern. I am sure it is known by lots of different names and has many variations.  I am posting how I know to make it.  I love this pattern because it is simple and makes a sweet little granny square.

Any yarn and corosponding  hook will do.  I use American crochet terms


Rawson's Rose Granny Square. 

Ch. 6 and slip stitch to form a ring. 

First petal

Ch. 3, 3 dc into ring. Turn
Ch 3, one dc into same dc as ch. 1 dc into each dc of first row. You should now have one ch 3 and 3 dc in bottom row and one ch 3 and 4 dc in top row. 

First petal made. 

Second petal. 

Ch 3. Move this ch 3 BEHIND the first petal,  1 dc into ring. 
3 dc into ring.  Turn
Ch 3 Ch 3, one dc into same dc as ch. 1 dc into each dc of first row. 

Repeat directions for second petal  4 more times.  You will end with 8 petals. Slip stitch the last chain three to the first chain three made. 


 This is the back side after 2 petal have been made. 


The hook in the top picture  has the chain 3. Move the hook behind the petal and add one dc into the ring. 


The front after all 8 petals are made


After all 8 petals are made, fasten off.

Starting on the wrong side, tie on new color in any chain 3 space.


Ch 3, 3 dc into same ch3 space

ch 1.

3 dc, ch1, 3 dc into next chain three space.  This makes a corner.

3 dc into next chain 3 space.

3 dc, ch1, 3 dc  chain 1 into next chain three space.  This makes second corner.

3 dc into next chain 3 space.
3 dc, ch1, 3 dc  chain 1 into next chain three space.  This makes third  corner.

3 dc into next chain 3 space.

3 dc, ch1, 3 dc  chain 1 into next chain three space.  This makes fourth  corner.
Slip stitch into beginning chain three. Turn.


 You can fasten off here or  make a larger Granny  Square.  To keep going:

Chain three and add 3 dc into chain 1 space below. Follow pattern above, remembering to add 2 sets of 3 dc in corner spaces.

The back side after two granny rows.


And an extra one because I made these on a day when my pink roses were in bloom.

I used this pattern for the first  afghan I ever made- back in 1992!  I used  Red Heart acrylic, and although I shy away from acrylic these days, I have to admit the yarn has held up well.

Tuesday, October 28, 2014

Ribbon Casing Revisited

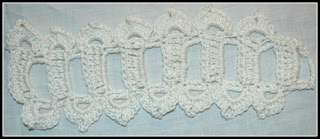
I can't get enough of this ribbon casing. I made some -just cuz- and it sat around for a long time. Then, on a whim I tied it to an old hanger and hung my daughter's folklorico dress on it. Cheery. Fancy. Who can resist? 


The pattern can be found here: http://www.antiquepatternlibrary.org/pub/PDF/6-JA023Corticelli2.pdf

Wedding Bells


I made these a while ago. Usually, I bring them out in winter, string a green ribbon through them, and put them up for the holidays.  This year they came out early.  I got married a few weeks ago and decided to use these as a backdrop.  So, they became wedding bells.


Yarn: New Zealand wool. ( I don't know any more than that. It was a gift-years ago).

Free Pattern: http://crochet.about.com/library/weekly/aa022302.htm

It is not the best picture ever, but it does capture how lovely this design is. Captivating, I'd say. And, they are really fun to make.  I can make oodles of these.


Monday, October 27, 2014

A Tisket A Tasket: My Little Yellow Aspen Basket


Yarn: Cascade Peruvian Highland Wool.  Eco-wool. Natural. 

Dye notesHand dyed soft yellow with yellow aspen leaves.  (Alum mordant) 

The dying process changed the yarn a bit.  I think this is because I left it in the dye pot for a LONG time-overnight. Also, I suspect I didn't get all of the mordant washed out.  I had one skein of this yarn.  I dyed about 1/2 of it with marigolds and the other half with aspen leaves.I did not do the whole skein in the same mordant.  The marigold yarn felt the same before and after the dying process. The aspen batch was not as fluffy. 


Directions for basket:

My basket is basically a riff on Anna and Heidi Pickles' granny basket, found for free on Revelry. I love their pattern and have made several Granny Baskets.  For my Aspen Basket, I wanted something floppy and a little less granny.  Mine will not stand up on its own. 

This is a simple basket, but I may not be the best person to be writing out patterns. Send me a message if you need help. 


Crochet a basic granny.  Stop when it is as big as you want the base of your basket to be. Do NOT fasten off.  ( Unless you are changing color.) 

Next round (Round A): continue as before, but instead of three DC,  put a 2dc cluster  in each chain space  and chain one in between.  Do this all the way around. Do not add extras clusters in corners. There are no more corners: you are now working in the round. Fasten with a slip stitch to beginning of round.

Next round (Round B): single crochet in each stitch around.  (One single crochet in the chain space and one in the top of each cluster) Fasten with a slip stitch to beginning of round.

Repeat these two rounds A,B,A,B, etc. until your basket is as tall as you want it. 

End with round B.  Add handles (Or not) .

To do handles: Find center of  round. Determine beginning and end of handles on each side.  Mark with stitch markers. Single crochet  from stitch marker to stitch marker. Chain to length you want your handles, fasten chain at next stitch marker, single crochet to next marker. 

Single crochet around, putting one single crochet in each single crochet and in each chain.  You can do this once or more- depending on what you like. 


El Diablo


There is something about El Diablo, and Mexican folklore in general, that Does It For Me.

With all things El Diablo, I appreciate the naming, the poking fun at, our darker sides. So, when I saw this pattern, I knew I had to make it. Immediately.  It is the perfect accessory for spicy dinners.

Fiber notes: red wool base. Black wool for face embroidery. Red gingham backing. Cotton batting for "filling"

To make it into a usable potholder, I backed it with two layers of cotton batting and gingham.

Link to free pattern: http://freevintagecrochet.com/free-potholder-patterns/spool164/up-pops-the-devil-potholder

I did my own thing with the embroidery. I had a bit of a struggle with the tongue-or what I guess is supposed to be the tongue. Mine basically looks like the pattern picture, but people never think it is a tongue. So, now I say it is a toothpick - the kind old men suck  (chew? what do they do with those things?) on after a very good meal.


Wednesday, January 9, 2013

Turtle & Granny

About two years ago, I found a little turtle footstool at an antique store.  Shortly after bringing her home, her cover ripped, and as I was too busy taking care of a new baby, I just put her away.  Now that life has eased up a bit, I've been  pulling out stashed projects and actually completing them. 

 For turtle, I used this pattern for a round Granny. Here is my result: 


 I am happy to have turtle back in the house. Having a crocheted shell cozies her up some.  Her previous cover was blue vinyl. Now, my daughter likes to sit on her soft back and read books.

Friday, December 14, 2012

More Crochet Lace! Ribbon Casing No. 321 C

I finished another 10 inch strand of lace for a Christmas stocking. 

Here is the finished lace with ribbon:


Crochet lace, ribbon casing, trim, free pattern
This is another easy and fast project.  You make this first:

Crochet lace, free pattern, trim, ribbon casing
And then weave in ribbon. 

 Here is the link to the free pattern for Ribbon Casing.

Quite pretty, yes?

I have to crochet one more strand of lace and then I have to make the stockings. I have time, right?