Heart Eyes Emoji Pillow

Heart Eyes Emoji Pillow

Heart_Eyes_Emoji

Actually I wanted to publish this pattern before Valentine’s Day. But I’ve been sick several times during the past weeks. But I think a little love is never wrong … So here’s the pattern for you!

You’ll need:
I used Red Heart Super Saver and a 4.5mm hook for the yellow head.
Heart Eyes and mouth are made of random worsted weight yarn and a 4.00mm hook.

Head (in yellow, make 2)

ch 4, join to form ring
(start each round with ch 3 which counts as dc)
R 1: 16 dc
R 2 – 10: 16 increases in each round, at the end you should have 160 dc
R 11 and 12: sc around (160 dc)

Before you crochet both head parts together, make the mouth and eyes and sew them onto one of the yellow circles.

Mouth (in brown)

ch 31
Row 1: sc in 2nd ch from hook, inc, 4 sc, inc, 16 sc, inc, 4 sc, inc, sc (34)
Row 2 – 5: ch1, turn, dec at the beg and at the end of row (sc2tog)
Row 6 – 8: ch 1, turn, sk 1st st, sc across
FO, turn
Row 9: join yarn in 3rd st, sc across, leave last 2 st unworked
Row 10: ch 1, turn, sk 1 st, 3 sl st, 10 sc, 3 sl st
Do not fasten off, *ch 1, sc* along side, FO and repeat on other side

Heart Eyes (in red, make 2)

I used this Red Heart Pattern for the eyes, but I didn’t do the last round with the reverse sc.

http://www.redheart.com/free-patterns/valentine-heart-coaster

As stuffing I took a standard square pillow (40 cm) because I couldn’t find a round one. It loses shape very easily, but it’s OK if you box it from time to time. ;o)

Crochet both yellow parts together. Make sure the right sides are outside. Of course you can also sew it together if you like that better.

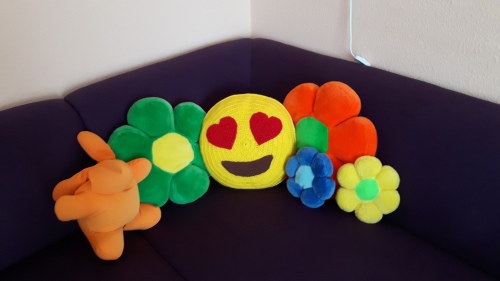
Now you’re done with your emoji pillow!! I hope you love it! Now you can take silly pictures holding it in front of your face (or someone else’s!) or you can cuddle with “someone” who is totally in love with you. ;o)

20160212_125311

Hot Air Balloon

Hot Air Balloon

Hot Air Balloon

Hot Air Balloon by lydienne

A great use for leftovers of yarn. You need less than 10 grams/0.35 oz of each color when you use four colors. My hot air balloon is 13 cm/5.25 inches high.

Note: For the balloon start each round with ch2 (counts as dc) and end each round with a slip stitch in the new color.
The basket is worked in continuous rounds.

Balloon

ch 4, join with sl st to form ring
R 1: 14 dc
R 2: 2 dc in ea st (28 dc)
R 3: *2 dc in 1, dc* repeat (42 dc)
R 4 and 5: 42 dc
R 6: *dc2tog, dc* repeat (28 dc)
R 7: 28 dc
R 8: dc2tog around (14 dc)
R 9: *dc2tog, 5 dc* repeat (12 dc)
R 10: 12 dc
R 11: sc2tog in BLO (6 sc)
Stuff and close remaining hole.

Basket

ch 2
R 1: 6 sc
R 2: 2 sc in ea st (12 sc)
R 3: 12 sc in BLO
R 4 and 5: 12 sc
R 6: 12 sl st
Weave both ends in.

Now I connected the balloon and the basket at three points. I just made knots and hid the ends.

Have fun crocheting and don’t forget to add your project on ravelry! I’d be very happy to see it! 🙂

Tiny Duck Applique

Tiny Duck Applique

P1080726

Tiny Duck Applique by lydienne

What you’ll need:

P1080733

ch 2

Round 1: 6 sc in 2nd ch from hook

Round 2: 2 sc in ea st around

ch 3

fdc in last st of Round 2

2 fdc

go back 1 fdc and make another fdc in that st

ch 3, sc in 1st ch, sl st on last fdc

FO, weave ends in.

In CC
sc in 3rd last st of Round 2, FO, leaving a bit of a tail to embroider the eye, hide this end, too.

P1080737

Bunny Applique

Bunny Applique

Easter is coming! I actually made this many weeks ago and decided it was way too early to post it. Now here it is … make one just in time. I will probably use my bunny applique to make a greeting card.P1080706

Bunny Applique by lydienne

Note: The applique is crocheted in one piece (except for the scut). I just stated the body parts to make it more clear what you’re working on.

Head
ch 4, join with sl st to form ring
ch 3, 8 dc, 3 trc, 4 dc, sl st to ch 3,
Ears
*ch 6,  sl st in 2nd ch from hook, hdc, 2 dc in 1 ch, hdc, sc, sl st in next st of head* repeat for 2nd ear
2 sl st,
Body
ch 3, dc in same st, 2 dc, 2 dc in same st
Paw
ch 5, dc in 3rd ch from hook, 2 sc
Body II
6 sc (last one onto ch-3)
turn, ch 3, dc in same st, 5 dc
turn, ch 3, dc in same st, 4 dc, dc2tog
turn, ch 2 (counts as hdc), 5 hdc
Paw II
ch 5, dc in 3rd ch from hook, 2 sc, sl st on top of dc2tog

For the scut I took a thicker yarn and just made 4 chs and joined with a slip stich. I sewd it to the bootie.

Please don’t copy or redistribute this pattern (in any language), always link to my blog. If you want to translate it, please ask me for permission. Thanks and have fun crocheting!


Kaninchen-Applikation von lydienne

Anmerkung: Diese Applikation wird in einem Stück gehäkelt. Die Untergliederung in die Körperteile dient nur der Übersichtlichkeit.

Kopf
4 Lm und mit Km zu Ring schließen
3 Lm, 8 Stäb, 3 DStäb, 4 Stäb in Ring, KM auf oberste der 3 Lm

Ohren
*6 Lm, Km in 2. M v. Nadel aus, hStäb, 2 Stäb in 1 M, hStäb, fM, Km in die nä M v. Kopf* für 2. Ohr wiederholen, 2 Km am Kopf

Körper
3 Lm, Stäb in selbe M, 2 Stäb, 2 Stäb in dieselbe M

Pfote
5 Lm, Stäb in 3 M v. Nadel aus, 2 fM

Körper II
6 fM (die letzte auf die 3 Anfangs-Lm
wenden, 3 Lm, Stäb in dieselbe M, 5 Stäb
wenden, 3 Lm, Stäb in dieselbe M, 4 Stäb, 2 Stäb zushäkeln (=abnehmen)
wenden, 2 Lm (zählt als hStäb), 5 hStäb

Pfote II
wie 1. Pfote, mit Km in die 2 zusgehäkelten Stäb

Für die Blume habe ich dickeres Garn verwendet und einfach 4 Lm mit einer Km zusammengeschlossen. Dann habe ich sie angenäht.

Eine Weiterverbreitung -auch in Auszügen oder eine Übersetzung- bedarf meiner schriftlichen Zustimmung. Viel Spaß beim Nacharbeiten und frohe Ostern!

Derby Hat for Beer Bottle

Derby Hat for Beer Bottle

M hubby needed some additional gift for a friend who was going to get a voucher for home brouwing for his birthday. So I bought a bottle of beer and embelished it. I made notes while crocheting. So here you go:

P1080685

Derby Hat for Beer Bottle by lydienne

You need: DK weight yarn + E hook (3.5 mm)

Ch 2

Round 1: 6 sc in 2nd ch from hook

R 2: 2 sc in ea st around -12

R 3: *2 sc in 1, 1 sc* repeat 6 times -18

R 4: sc around -18

R 5: *2 sc in 1, 8 sc* repeat -20

R 6 – 8: sc around -20

R 9: *2 sc in 1, 1 sc* repeat 10 times -30

R 10: *2 sc in 1, 4 sc* repeat 6 times -36

FO, weave ends in.

Have fun crocheting! Please don’t copy or redistribute this pattern without my permission. You may sell finished items made from this pattern.

Toadstools in Spring

Toadstools in Spring

toadstool

I’ve seen those mushrooms in springtime colors in decoration stores. I bought two wooden ones in nice pastel colors at Xenos.

P1080679

I thought they might need some crocheted friends. Couldn’t find a pattern I liked 100 % on ravelry, so I made up my own.

Toadstool in Spring by lydienne

Note: I recommend using the “invisible increase” instead of sc2tog. It looks much better (see picture).

In MC

Ch 2

R1: 6 sc in 2nd ch from hook – 6

R2: 2 sc in each st -12

R3: sc around -12

R4: *2 sc in one st, sc* 6x -18

R5: *2 sc in one, 2 sc* 6x -24

R6: *2 sc in one, 3 sc* 6x -30

R7: *2 sc in one, 4 sc* 6x -36

R8: *sc2tog, 4 sc (in BLO)* 6x -30

In white

R9: *sc2tog, 3 sc (in BLO)* 6x -24

R10: *sc2tog, 2 sc* 6x -18

R11: *sc2tog, sc* 6x -12

Start stuffing.

R12: *sc2tog, sc* 6x -8

R13: sc around in FLO -8

R14-17: sc around -8

R18: *2 sc in one, 3 sc* 2x -10

R19: *2 sc in one, 4 sc* 2x -12

R20: *sc2tog* 6x -6

FO leaving a long tail, close remaining hole and embroider dots, weave end in.

Please don’t copy and redistribute this pattern in any way. Always link to my blog. Thanks!

P1080677 P1080678

Happy Valentine’s Day!

Happy Valentine’s Day!

P1080653

Have a nice day with your loved one(s)!

I did some crochet for Valentine’s Day and some other DYI stuff. Have a look …

This candle jar has a cute heart string made out of thread no. 15. You can find the pattern here. It’s asy and very fast done. The edge is no crochet, it’s ribbon I bought at Zeeman.

P1080644

Then I made this flower wreath. I found it complicated to pick colors I liked. Originally I wanted to use a lot more colors, yellow, orange and blue … But I’m quite satisfied with the way it came out. The heart wreath was only 99 c at Zeeman. I bought 4 new ones yesterday because I think it’s such a nice present and of course I want one for our own door. Here is my pattern for the little flowers.

P1080648

Now these sachets contain chocolate lollies that melt in hot milk. I found the idea on a German Blog: zuckerimsalz

P1080657

Greetings from sunny Dresden! ❤

Granny Socks from Simply Häkeln 01/2015

Granny Socks from Simply Häkeln 01/2015

Bought my copy of the magazine about one week ago. I had already looked on the Internet which patterns it included and this was my number 1 favorite. So I started crocheting on February, 2 while working on other projects as well (the usual chaotic organisation I have when it comes to crocheting …). I finished it two days ago, but I still had to weave in the ends …and there were thousands of it!

simply-hakeln-heft-06-2014-3

So here they are! I’m very pleased with the way they turned out.

I hope Granny loves them as much as I do. She will get them for her birthday on February, 20.

P1080625

Heart to Heart

Heart to Heart

P1080620

Heart to Heart (as applique or garland) by lydienne

[Für Deutsch bitte runterscrollen.]

Make 2. Finish first one with sl st, connect second one (and each of the following) before sl st.

Ch 2,

2 fsc, 1 fsc in 2nd from hook,
4 fsc, 2 fsc in 2nd from hook,
2 fsc, 1 fsc in 2nd from hook,
8 fsc, 2 fsc in 2nd from hook,
7 fsc, 1 fsc in 2nd from hook,
2 fsc, 2 fsc in 2nd from hook,
3 fsc, 1 fsc in 2nd from hook,
1 fsc, FO

P1080623

For personal use only. Copying or redistributing this pattern in any way is prohibited. Please link to my blog. Have fun crocheting!

*******************************************

Herz an Herz (als Aufnäher, Girlande, für Glückwunschkarten …) von lydienne

Für ein Pärchen zweimal häkeln. Erstes Herz mit KM schließen, zweites einfädeln und anschließend mit KM beenden.

2 Lfm anschlagen,
2 Basis-FM, 1 Basis-FM in die 2. v d Nd,
4 Basis-FM, 2 Basis-FM in die 2. v d Nd,
2 Basis-FM, 1 Basis-FM in die 2. v d Nd,
8 Basis-FM, 2 Basis-FM in die 2. v d Nd,
7 Basis-FM, 1 Basis-FM in die 2. v d Nd,
2 Basis-FM, 2 Basis-FM in die 2. v d Nd,
3 Basis-FM, 1 Basis-FM in die 2. v d Nd,
1 Basis-FM, abmaschen

Basisketten ohne Luftmaschen werden zum Beispiel im “Häkel-Guide im Taschenformat” vom bpa-Verlag erklärt. Hier gibt es ein Video dazu: Drops – Anschlag mit festen Maschen ohne Luftmaschen

Viel Spaß! Würde mich freuen, wenn ihr eure Werke bei Ravelry oder Facebook zeigt. Herz an Herz auf Ravelry

Das Kopieren oder Verbreiten dieser Anleitung ohne meine Genehmigung ist untersagt. Bitte immer auf meinen Blog verlinken. Danke!

Tampon Monsters

Tampon Monsters

P1080605

Tampon Monsters by lydienne

This pattern includes instructions for both sport and worsted weight yarn. The instructions for the thinner yarn are in brackets. The monsters are about the same size and can “eat” 4 tampons (normal size).

What you’ll need:
– MC: sport weight yarn and 3.00 mm hook (take a 3.5 mm hook if you crochet very tightly) or worsted weight yarn and 4.00 mm hook
– CC: yarn weight is not crucial and you only need very few yardage of it
– perhaps some sewing thread
– 2 buttons
– scissors, yarn needle, maybe smaller needle for buttons
– 4 tampons to check size after round 3

Note: You can sell monsters made from this pattern, but you are not allowed to sell the pattern or copy and redistribute it in any way. Please link to my blog instead. Happy crocheting!

Ch 7 (10)

Round 1: sc in 2nd ch from hook, sc in following 4 (8) chs, 3 sc in last, continue working on the other side of ch, sc in following 4 (8), 2 sc in last -14 (22) sc

Round 2: 2 sc in 1st, 4 (8) sc, 2 sc in 1 st, sc, 2 sc in 1 st, 4 (8) sc, 2 sc in 1 st, sc -18 (26) sc

Round 3 – 4 (5): sc around -18 (26) sc

Round 5 (6): sc, ch 8 (12), sk 8 (12) sts, sc, sc in remaining sts

Round 6 (7): sc around working into each ch -18 (26) sc

Round 7 (8) – 11 (18): sc around

Round 12: 5 dc, go back and insert hook into 1st dc made, pull loop through (like in popcorn stitch), now work 4 sl sts through next sts and the sts behind them (last sts of round before), 5 dc, go back and insert hook into 1st dc made, pull loop through, sl st to finish

(Round 19): 6 trc, go back and insert hook into 1st trc made, pull loop trough (like in popcorn stitch), now work 7 sl sts through next sts and the sts behind them (last sts of round before), 6 trc, go back and insert hook into 1st trc made, pull loop through, sl st to finish

FO, weave in ends. Sc around mouth opening. Sew buttons on.

Done!

P1080607 P1080609 P1080611

I’d love to see your monsters! Please share them on ravelry or my FB page. 🙂