
 Hello friends 🙂
Can you believe it’s nearly Christmas !? Nope. Me either! My head is still firmly stuck way back in June somewhere and I’m not at all ready to start thinking about Turduckens or Christmas cheer.
Despite my un-christmasy mood, I’ve put together a quick and easy pattern for you to deck your halls (or tree).
So without further ado here ’tis…
Crochet Ribbon Christmas Tree
Edit: You can now get an ad free, print friendly version here on: Ravelry | Etsy |Love Crochet
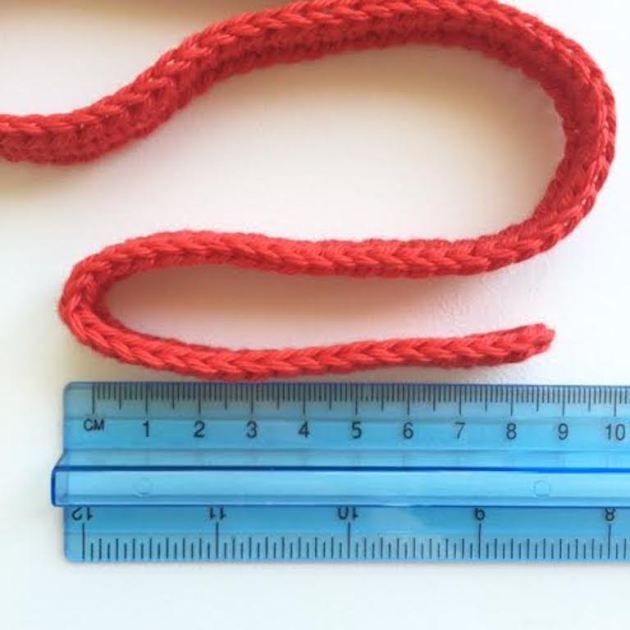
Finished size: 13 cm
What you’ll need:
- 3 mm hook
- Small amounts 8 ply/DK cotton yarn. I’ve used various brands from my stash but a stiffer cotton works better than a soft cotton for these.
- Aprox 13g for the tree
- Aprox 3 g each in 6 different colours for the baubles
- Yarn needle
Tip: You can use any weight yarn for these but they will turn out a different size. Use a hook smaller than you normally would for your yarn so that your work is nice and firm.
US Terms Used (UK/Aus terms in brackets)
Abbreviations:
ch – chain
sc (dc) – single crochet (double crochet)
hdc (htr) – half double crochet (half treble)
ss – slip stitch
Pattern
Tree – Make 1
Foundation row: Ch 182
Row 1: Hdc (htr) into 3rd ch from hook, hdc (htr) up to last ch, 5 hdc (htr) into last ch
Row 2: Turn work upside down and work into bottom loop of ch, hdc (htr) up to last st, 4 hdc (htr) into last st. Join with a ss into top of beginning ch-2. Fasten off and weave ends in.
Baubles – make 6
Worked in spiral rounds
Start: Leaving a long tail (about an arms length) to be used for stuffing later, make a magic circle
Round 1: working into ring, ch 1 (not counted as a st), 6 sc (dc)
Round 2: 2 sc (dc) into each st (12 sc/dc)
Round 3: 12 sc (dc)
Round 4: * skip one st, sc (dc) into next st. Repeat from * 5 more times, stopping half way to insert stuffing (roll long yarn tail into a rough ball shape and squish into half closed ball. Use the blunt end of your hook to help push it all in before you finish closing). Join with a ss.
Fasten off and bury yarn end back up through centre of ball. Clip closely.
Assembly:
Step 1: Lay your tree piece out on a flat surface and fold end back aprox 8.5 cm
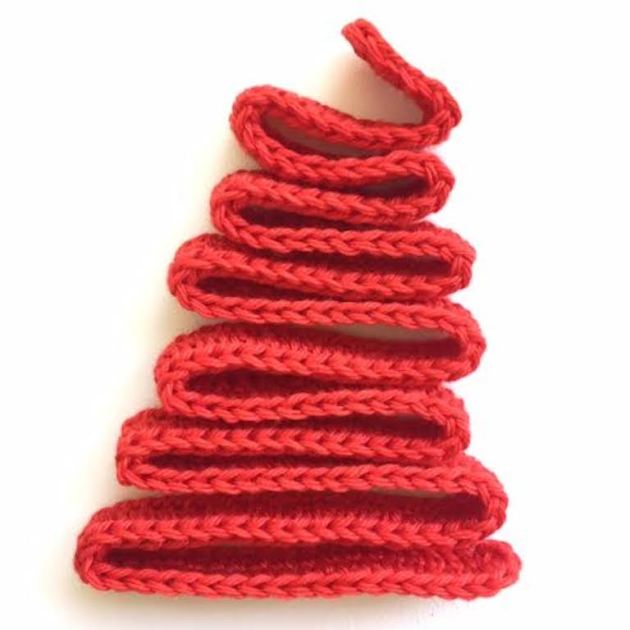
Step 2: Keep folding up, making each fold slightly shorter than the last until it looks something like this

Step 3: Place your first bauble at the base of your tree and continue up, placing baubles between 2 layers of each fold (see pic). You’ll probably have to fiddle a bit to get your folds looking right (and will need to fiddle even more when you start sewing in a minute)
When you’re happy with your tree shape, thread your needle with a length of yarn aprox 40 cm, using the colour of your choice (this will also become the hanging loop)

Step 4: Starting with the bottom bauble, secure your thread with a couple of small stitches in the centre top of the bauble (you won’t see this as this side will rest up against the bottom of the tree)

Step 5: Take your needle up through the first layers, pick up your next bauble and run needle up through the centre and then through the next set of layers.
Continue joining together this way until all baubles are attached.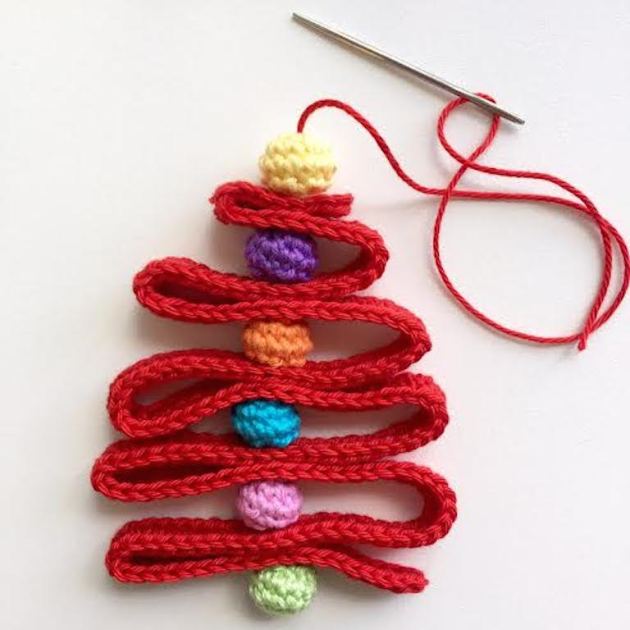
Step 6: Give the tail end a little tug to tighten (don’t pull too hard or you’ll squish your baubles out of shape).

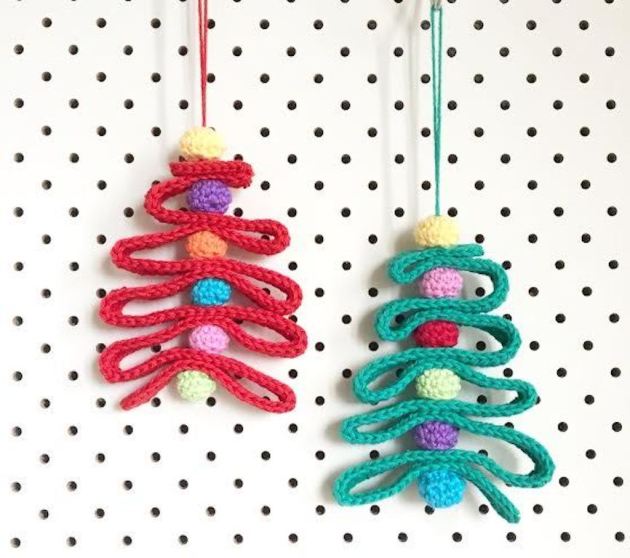
Step 7: Make a hanging loop with the remaining yarn by going back down through the centre of the top bauble and make a few small stitches into the bottom of the bauble and the top layer of the tree to secure.
Give your tree a little ‘foof’ and hang for everyone to admire.
Until next time
Michelle x

Lovely trees and really easy to make. Thanks for the clear instructions!
http://soldenochedecocrochet.blogspot.com.ar/
lamente no hallar traduccion en castellano.
I think i can do this, gonna try. Very pretty.
Antes se podían,traducir los trabajos,ahora no pq,?.Es una pena pq son trabajos muy interesantes,y no todos sabemos hablar otros idiomas que no sea español. Si pueden corrijan el error.Gracias.
Wow, what a fantastic idea. So simple yet so effective 😊
Absolutely love this. A handy idea to put on the front of a Christmas card!
Love the look of this and the instructions seem so clear. Might have to have a go at this. Thanks for the pattern.
Adorable! A whole string of them would make an awesome bunting!
Those trees are so cute! Wonderful little presents for teachers etc. Thanks so much for the pattern, it’s brilliant!
This is simply great! I’ll made it ^__^
Great and easy!
So darned cute. Thanks for the pattern.
Ok I am beginning crocheted please tell me what a bauble is fo u make them or buy
Hi Debra
The baubles are the round balls in the tree. The instructions are in the pattern but if you prefer you can just use beads instead.
This tree is beautiful in it’s simplicity, thankyou for the pattern.
My pleasure. Enjoy 😀
I love-love-love your x-mas trees, Michelle – how generous of you to share the pattern/tutorial with us: thank you! Marianne xx
My absolute pleasure Marianne. Thanks for popping by. I hope you enjoy making one for yourself x
These are so cute and your clear directions make it sound so easy. I love the clever stuffing. Simple is always good! Thank you for sharing.
Thank you for this pattern and for putting it in US and UK terminology.
Thank you for the sooo cute decorations. Bright and sunny colours will go well here in Australia.
just wondering is 182 cast on right, i did my first one had to use 9 instead of 6 baubles it’s 15cms long
Hi there, yes 182 ch is correct. My finished ribbon ended up aprox 80 cm so you may have looser tension than I do to end up with a bigger tree.
ah yes could be that alright, i tried it again with fewer stitches and it looked like the picture. It’s sparkle red wool i got in Dealz. Thanks for getting back so quickly. I’m still learning with wool tensions. 🙂 Thanks again. Appreciated
I love these! Modern and cute too. I have made 3 red ones so far using red heart super saver yarn and will make 3 more green ones to make a line of them at my window. Thankyou for a great design and easy pattern to follow 🙂
I love it- almost-instant gratification. Ideal project for our little crochet group where we share and de-stress! Thank you.
love the tree!!! I’m using a variegated thinker yarn…a tad fuzzy and thicker is spots…using a 3.25 hook…nearly 2 sizes smaller than the yarn requires….turning out well!
when putting the tree “together” I took another small hook and poked it through the base of the tree to hold it together 🙂 then i placed the balls next to it and drew the needle through 🙂 works like a charm!
That’s an excellent idea Alana! Wish I had’ve thought of it as I found this part annoyingly fiddly!
Love the idea and would like to print this but can’t find a print button. I am going to save this page and make a couple later.
Hi Gwen, unfortunately I don’t have the option to print free patterns from the site as yet but I do hope you’ll come back soon to make some trees for yourself.
Pingback: The Studio Link Love #7 - Studio10 Creative
Pingback: Crochet Ribbon Christmas Tree Pattern | adornosmalulu
how can I print out the directions for making these?
I’m sorry Marie-Therese but I don’t have a print option available yet
Gwen & Marie-Therese, you could copy and paste the pattern to a word document, and then print it.
Yes, this is an option for everyone. As long as it’s only for personal use, then this is the best way to print a copy for yourself.
Pingback: Crochet Ribbon Christmas Tree Pattern
Pingback: Natale, idee per la casa | Blog Tricot
I made this, slight smaller to suit, and the result is great! One suggestion that worked for me – I left a long tail to begin, and used the beginning end as the top, then used the tail instead of a separate thread.
Pingback: Favourite Christmas Crochet Patters - Hello Deborah
Pingback: Patrón gratis amigurumi de arbol de navidad original - agumirumis, amigurumis y más
muy ingenioso que buena creatividad. gracias por compartirla.DIos te bendiga
Pingback: Knit and Stitch Blog » Blog Archive Crafty Christmas Trees » Knit and Stitch Blog
Pingback: Cheer up, create ….. something. | the willow witch
Hi 🙂
These trees are so cute! Thank you so much for sharing!
I am having trouble stuffing the baubles with the tail, its really hard to get in there and mine are ending up kind of oval shaped 😦 yours looks perfect do you have any tips or ideas to help?
Thanks xo
Grace
Hi Grace it is a bit fiddly, I didn’t do anything special except to use the end of my hook to get the yarn stuffed in and give them a squish with my fingers to make them more rounded. Maybe cut some of your tail off and try with less yarn might help. Cheers Michelle 🙂
Pingback: 18 Crochet Ornaments to make this Christmas | My Poppet Makes
Reblogged this on adornosmalulu.
Pingback: Last minute christmas gifts
Pingback: Inspírate con…Navidad | Con estas mis manitas
Pingback: Last minute christmas gifts - haakmaarraak.nl
Pingback: [Free Pattern] This Super Cute Ribbon Christmas Tree Is A Quick And Easy Pattern - Knit And Crochet Daily
Hi, I love this pattern! What brand of yarn did you use? Thanks, Ellen K.
Hi Ellen I just used scraps of dk/8ply cotton yarn (various brands) but any yarn will do.
Pingback: Crochet Ribbon Christmas Tree Pattern – hookingwithstyle
Pingback: Free Crochet Pattern: Ribbon Christmas Tree – Make It Crochet
I’m excited about making one of these I think they are so cute
I’m going to have these hanging in my shop window come December… they’re great!
I’m busy with one now, but NCIS is on! I’ll let you know how I get on.
Wow!!
This is amazing!! So unusual, I’ve never seem anything like this before. So modern for something that has been crocheted…. Forget making Sunday lunch, I’m starting on this immediately!!!
…pizza anyone???
Pingback: Crochet Christmas teacher gifts – Eps and Amy
To je nádhera. Moc se mi to líbí a určitě brzy vyzkouším.
Love it!
These are adorable. If you don’t want to make the baubles, you could use those fuzzy Pom-poms and just be careful when assembling to not pull too tightly.
Pingback: Ribbon Christmas Tree – Free Pattern – Craft-Addicts
So cute! My 12 year old daughter and I are making some for our tree. Thank you for sharing the pattern. 🙂
My pleasure 😀 That’s so great to hear that you are enjoying mum & daughter time making them together
Pingback: Crochet Ornament Round Up - Sugar Bee Crafts
this pattern could it also work with a loom knitter? I think I’ll try it both ways
I think I’ll try this both ways crochet and loom knitting
I’ll try this, i think I can also try by loom knitting, love it
love it
Pingback: Crochet Ornament Round Up - My Viking Vinyl
sorry I meant spool knitting, and sorry that I posted 4 times
I love the pattern. Dont you have the knitting pattern as well
Thank you 🙂 I only have a crochet pattern for these
Pingback: Patrón gratis amigurumi de arbol de navidad original – amigurumis y más
Reblogged this on judithwill56 and commented:
Time to try and get a bit Christmassy………..small ornaments is a start. Sharing on from Poppy and Bliss with thanks
Pingback: Christmas Decorations – Free Crochet Pattern Round Up – Goddess Crochet
Just wondering – when you say foundation row:CH182, do you mean you have to do the foundation chain, a normal chain then start the next step, OR do you mean do your chains, do sc to make the chain stiff and not turn then start the next step.
Seems lately I’ve been seeing foundation chain on patterns and everyone wants you to do something different with it. I really want to give this a go, but want to clarify which way you mean first. Thanks!
Hi Kathy
Sorry for the confusion. My bad wording! I meant start with a normal chain then start the next step. I hope that helps.
Michelle
Not a problem at all!!
Thank you for the clarification. 🙂 Its greatly appreciated. (It did however, force me to learn how to do the foundation chain and it actually looks pretty great! (though, I only got about 10 stitches along haha)
Thanks for sharing this pattern. I saved this pattern for doing it later on.
My pleasure 😀 I hope you’ll enjoy making it
Wow! What a discovery! I love everything I’ve seen here at your place… I’ve “landed” following the link to your feathers: such a wonderful idea and pattern: thank you so much for sharing it for free! I’ve become your devoted follower! ^_^
I have made quite a few of these, all different sizes, some of the smaller ones with beads. They are so pretty!! Thank you for the instructions. They were up so quickly.
They have been here for a few years but every autumn en winter these cute trees pop up again, so I have to make a few as they are so cute and kidsproof. Thanks for the instructions.
Pingback: A Retro Christmas - Free Crochet Pattern Round-Up - funkifybers.com
Cute little decorations. I am going to give them a try. I am a fairly new crocheter and am not sure what the dc in () means after the sc? ” 2 sc (dc) into each st (12 sc/dc)”
Hi Theresa the (dc) is the UK/Aus terminology for sc where it is called double crochet (dc) You will just pay attention to the terminology you are used to
Pingback: Cool and Easy Crochet Christmas Ornaments To Decorate Your Tree ~ DIY WITH LOVE
Pingback: Slinger kerstbomen | Luova tyttö
I dub thee as the ULTIMATE CHRISTMAS ORNAMENT… LOL! Thanks so much for sharing! I love seeing this pattern pop up every year in time for Christmas. ! It’s such a versatile pattern and so quick and easy to whip up a few for Ornaments and gift appliqués instead of curly ribbons! Thanks again Michelle.
Sincerely,
Michelle
Have you done these with beads? I plan on using beads and am trying to think of ways to attach them.
Hi Theresa, I haven’t tried with beads myself but I know others have. You could use the same instructions I’ve given here just substituting your beads for the crochet beads Ive used here.
Love the pattern and have gotten lots of rave reviews on it. I used purchased pom-poms and bells.
Thank you so much! Every year I try to put something special as package toppers and these will be perfect. They look simple, versatile and quick. I’m going to try using bells as someone mentioned, I don’t have luck getting needles and yarn through beads. I love the ad free version so I got it on Ravelry. I’ll also be following you from now on!! 🧶 🎄
Thank you so much for your support Amy 🙂 I’m sure your gift recipients will love that extra special touch
Fairly new to crocheting and have a question. In the Tree pattern, Row 2, what does it mean to turn work “upside down”? I don’t really understand this step. Can you help?
Hi Sue, you will be turning your work upside down and working into the bottom of the chains that you just stitched into in the first row. I hope this helps?
Going to give it a try. I’ll let you know. Thanks!
Love the pattern, just a little confused when you write sc(dc). Is it supposed to be a single crochet or double crochet
Hi there the pattern is written in US terms ie you work in single crochet. The dc in brackets is the UK terms equivalent which is double crochet
I just made this I used green on side and red on the other.. I love it ! Thanks for sharing this.
I’m several years late to the party here, but just wanted to say that I stumbled on to this little gem and made my first one of these today … and I absolutely love it! I used the yarn I had handy which was Schweppes Stonewashed. I used 4mm hook for the “tree” and 3.5mm for the baubles. My finished item is 6” tall and 4” at the widest. I think it will be perfect for a garland/bunting type decoration! I will probably make smaller ones to go on packages for Christmas this next year. Thank you so much for the wonderful pattern!
Your trees would’ve looked gorgeous in the stonewashed
Your tree would look fab in the Stonewashed yarn ! I’m so pleased you enjoyed making it. Thanks so much for stopping by 😊